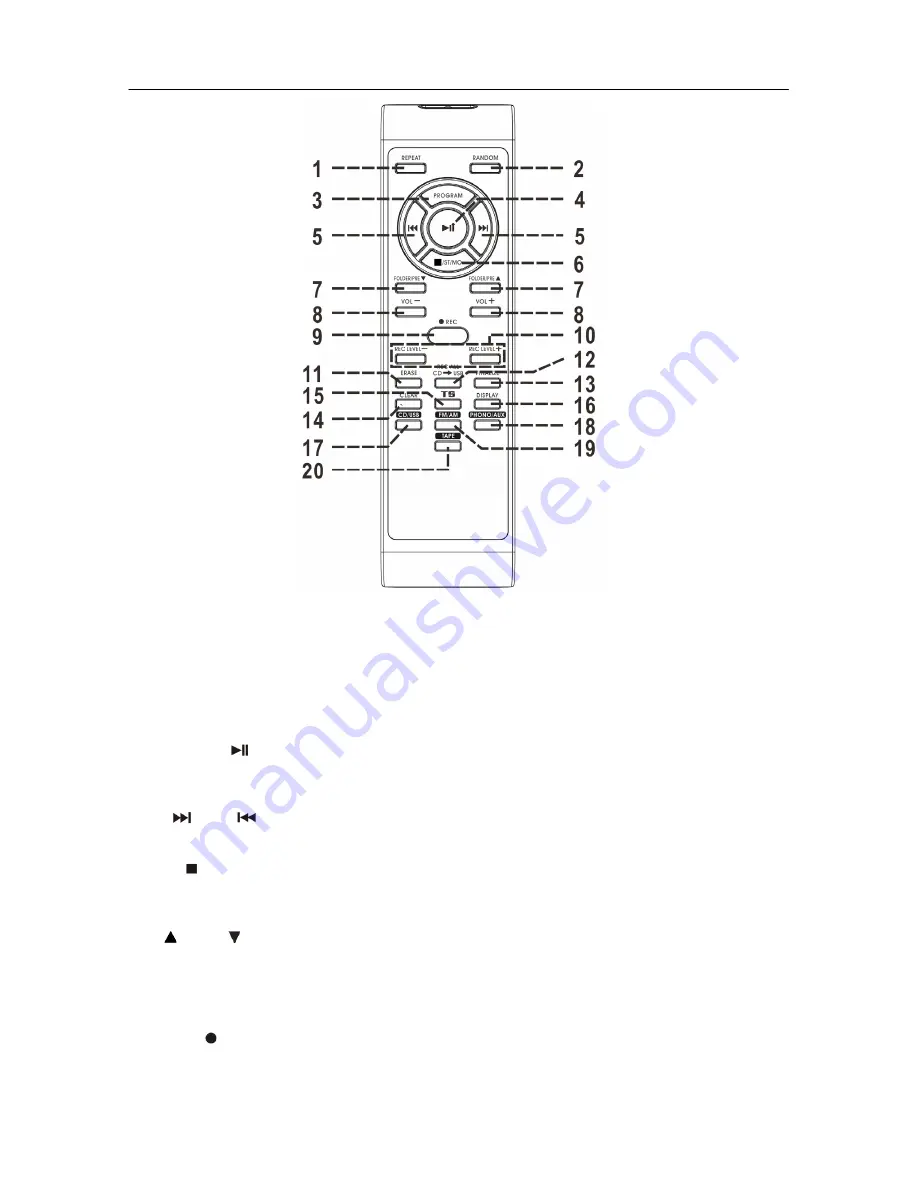
background image


E8

REMOTE CONTROL


Button description                           


1. Repeat                                  In CD/USB mode: Press to activate CD Repeat 1/all 


2. Random 

In CD/USB mode: Press to activate shuffle play function 


3. Program 

In CD/USB mode: Press to activate programming function 


4. Play/pause 


In CD/USB mode: Press to Start/Pause CD/USB playback 

In Recording/Encoding mode: Press to confirm function. 


5. Skip/Tuning   

  Up 

/Down

                  In CD/USB mode: Press to select next/previous Track 

                          In Radio mode: Press to tune frequency up/down 


6. Stop 

/

FM Mono/St 

In CD/USB mode: press to stop playback 

In FM Radio mode: Press to Select FM Stereo/Mono Mode 


7. Folder/Preset   

  Up  /Down  

In Radio mode: Press to recall radio preset channel 

                                                                                upward/downward 

In USB mode: Press to select Music Folder up/down 


8. /-   


Press to adjust the volume level Up (+) and Down (-) 


9. Record   

Press to active Record/Encode function 


10. Rec Level+/- 

Press to increase/decrease recording level in recording mode. 


Summary of Contents for JTA-990

Page 1: ...ALL IN ONE STEREO MUSIC SYSTEM WITH MP3 ENCODING MODEL JTA 990 USER MANUAL PLEASE READ THIS USER MANUAL COMPLETELY BEFORE OPERATING THIS UNIT AND RETAIN THIS BOOKLET FOR FUTURE REFERENCE ...

Page 2: ...grounding type plug A polarized plug has two blades with one wider than the other A grounding type plug has two blades and a third grounding prong The wide blade or the third prong is provided for your safety If the provided plug does not fit into your outlet consult an electrician for replacement of the obsolete outlet 10 Protect the power cord from being walked on or pinched particularly at plug...

Page 3: ...er d If the product does not operate normally by following the operating instructions Adjust only those controls that are covered by the operating instructions as an improper adjustment of other controls may result in damage and will often require extensive work by a qualified technician to restore the product to its normal operation e If the product has been dropped or damaged in any way and f Wh...

Page 4: ...rforming any of the procedures in a way other than those specified herein may result in hazardous radiation exposure This unit should not be adjusted or repaired by anyone except qualified service personnel ON PLACEMENT Do not use the unit in places which are extremely hot cold dusty or humid Place the unit on a flat and even surface Do not restrict the air flow of the unit by placing it in a plac...

Page 5: ...evision reception which can be determined by turning the equipment off and on the user is encouraged to try to correct the interference by one or more of the following measures Reorient or relocate the receiving antenna Increase the separation between the equipment and receiver Connect the equipment into an outlet on a circuit different from that to which the receiver is connected Consult the deal...

Page 6: ... a safe level Start your volume control at a low setting Slowly increase the sound until you can hear it comfortably and clearly and without distortion Once you have established a comfortable sound level Set the dial and leave it there Taking a minute to do this now will help to prevent hearing damage or loss in the future After all we want you listening for a lifetime We Want You Listening For a ...

Page 7: ...NNECTING THE AC POWER CORD After connecting the speakers unwind the AC power cord fully and connect it to any convenient household 120V 60Hz AC outlet NOTE The product is designed to operate on normal 120V 60Hz AC only Connecting this system to any other power supply could result in damage to the unit which is not covered by your warranty You will noted that this system is equipped with a polarize...

Page 8: ...use button 23 Rotary Volume Control Knob 24 Aux Phono Mode Button 25 CD USB Mode Button 26 Tuner AM FM Mode Button 27 CD Door open close Button 28 Enhance Bass effect On Off button 29 Cassette Door Cover 30 Tape Forward Eject Button 31 CD Tray 32 CD Tray eject hole 33 45 Rpm Record Adaptor 34 33 45 78 RPM Speed Selector 35 Auto Stop Switch 36 Tone Arm Rest with Clip 37 Pitch Adjust Knob 38 RCA Lin...

Page 9: ...5 Skip Tuning Up Down In CD USB mode Press to select next previous Track In Radio mode Press to tune frequency up down 6 Stop FM Mono St In CD USB mode press to stop playback In FM Radio mode Press to Select FM Stereo Mono Mode 7 Folder Preset Up Down In Radio mode Press to recall radio preset channel upward downward In USB mode Press to select Music Folder up down 8 Volume Press to adjust the vol...

Page 10: ...ON The battery compartment is located on the back of the remote control 1 Remove the battery compartment door by pressing in on the tab and lifting it off 2 Insert two 2 AAA size batteries included into the battery compartment following the polarity markings inside the battery compartment 3 Replace the battery compartment door Battery Precautions Replacement of batteries must be done by an adult D...

Page 11: ...ition of unit until the internal antenna picks up the strongest signal FM For best FM reception the FM lead wire antenna located on the back of the set should be fully unwrapped and extended NOTE Automatic tuning depends on the signal strength of the broadcasting station so weak stations may be skipped You can manually tune to find the weak stations if a station gets skipped With strong signals th...

Page 12: ...record to play to the end but it will not stop automatically You must manually raise the tone arm and place it back in the rest to stop the turntable from spinning and turn it off PITCH ADJUST The PITCH ADJUST allows you to fine tune the playing speed of the record once the correct speed 33 45 78 RPM is chosen Turn the Pitch Adjust Control to slightly increase or decrease the speed of the turntabl...

Page 13: ...he LCD display Skip mode skip up skip down 1 During CD Stop mode if Skip up or down button is pressed It will go to next or previous track and remain in Stop mode Press Play Pause button to start music playback 2 During play or pause mode if Skip up or down button is pressed It will go to next or previous track and start playing the track NOTES Always press the STOP button to stop CD playback and ...

Page 14: ...he remote control This function allows you to re program the memory half way through if necessary 1 Tap the STOP button once to stop programmed track playback PROGRAM icon still showing in LCD display 2 Press the CLEAR button on remote control once to start deleting the last programmed track 3 Press the CLEAR button once by once the programmed tracks will be deleted one by one from the memory NOTE...

Page 15: ...ic type or brand of disc A RECORDING MODES Whichever media you choose to record from please complete the following procedures before recording onto a CD R RW 1 Press the CD Door open close button on main unit to open the CD tray 2 Place a blank CD R or CD RW Disc into the CD tray 3 Press the button to close the tray 4 The system will perform a search and the LCD display will show bUSY 5 Wait until...

Page 16: ...ant to add more tracks in the disc finalize the recorded CD R RW disc by follow the instructions in FINALIZING A CD R RW DISC section II RECORDING FROM CASSETTE 1 Press the TAPE button to select Tape mode 2 Place the Cassette Tape you wish to record into the Cassette Slot Do not fully insert the tape 3 Press the REC button on remote control or main unit the LCD display will show Cd and icon 4 Pres...

Page 17: ... TRACK Note If you Record One track make sure AUTO TRACK icon will not show on the display press the REC 1 ALL button to turn it off if AUTO TRACK showing in display iii Press the REC button to start recording icon appears and CD icon is flashing 4 After completion of recording press the STOP button to stop the playback of the USB thumb drive IV RECORDING FROM AN AUDIO CD VIA USB BUFFERING A MINIM...

Page 18: ...amming procedure and make sure the CD is in stop mode during the procedure Note Do not press the Play Pause button to play the programmed tracks if you want to record programmed tracks to a CD R or CD RW 3 Press the REC button directly for the system to start the Recording mode 4 Repeat procedures 5 7 as above IV a to complete the recording then Finalize the recorded disc if necessary Notes Record...

Page 19: ...re playing at other audio CD player This process is knows as finalizing and a table of contents TOC will be written to the CD at the same time 1 Press the CD USB button to select the CD mode CD will appear on the LCD display 2 Press the CD Door open close button to open the CD tray 3 Place your Audio CD that you wish to finalize print side up inside the CD tray 4 Press the button to close the CD t...

Page 20: ... message will appear on the LCD display 6 Once the un finalizing process has finished the LCD display will show total track numbers total playing time and NO TOC indicator Ii ERASE ONE TRACK 1 Press the CD USB button to select the CD mode 2 Press the CD Door open close button on main unit to open the CD tray 3 Place the un finalized CD RW disc from which you would like to delete tracks into the CD...

Page 21: ...onnection 1 Make sure the unit is off or in USB mode 2 Plug in the USB thumb drive with the face up and make sure it s fully inserted 3 Press the POWER button switch to turn on the unit again press the CD USB button twice to select USB mode The system will start reading MP3 songs stored on the thumb drive automatically after connecting and LCD display will show the total number of MP3 files being ...

Page 22: ...D playing 9 When encode all tracks the encoding will stop automatically until Record All Tracks completed you can also press the Stop button to stop the encoding anytime ENCODE FROM RECORD OR AUX IN 1 Insert your USB thumb drive into the USB port on the main unit Ensure there is sufficient space available on the USB thumb drive for encoding 2 Press the PHONO AUX button to select Phono mode to enco...

Page 23: ... store the encoded tracks within this folder The default MP3 encoding format is set to 128 kbps bit rate and 128 kbps and 44 1kHz sampling rate This setting cannot be changed No song titles will be recorded during the encoding mode To interrupt a recording simply press the STOP button on the remote control or main unit at any time during Recording mode MANUAL TRACK SEPARATION You can divide the mu...

Page 24: ...cted Note If the track number to be deleted is different than your selection it is a track that was recorded by the JTA 990 If there is any concern about what files are being deleted we recommend you insert the USB thumb drive into your computer and manually delete them that way 4 Press the button on your Remote Control to confirm the deletion and the display will show bUSY 5 The LCD display will ...

Page 25: ... of the deck after listening LINE OUT CONNECTION You can connect this unit to an external Hi Fi AMPLIFIER system by connecting the LINE OUT socket to the auxiliary input socket of your Hi Fi AMPLIFIER system with RCA cables not included Note The Volume control on the main unit will not adjust the volume when using the LINE OUT 3 5MM STEREO HEADPHONE JACK The stereo headphone jack is located on the...

Page 26: ...n to switch to standby mode when you finish listening Don t forget to switch off the power on your external device as well RESETTING If the system does not respond or has erratic operation you may have experienced an electrostatic discharge ESD or a power surge that triggered the internal computer to shut down automatically If this occurs disconnect main unit power by unplug the AC POWER cord and ...

Page 27: ...ake sure your records especially older ones are sufficiently cleaned prior to playing them Thoroughly clean dust off the stylus and record regularly Use a soft brush to clean the stylus Brush from the base to the tip as shown below For records with only light amounts of dust we recommend brushing them off with a carbon fiber brush or velvet pad before playing them Use a good quality record cleaner...

Page 28: ...e CD burning process the CD tray may not eject when the eject button is pressed If this occurs you will need to manually eject the CD tray to retrieve the CD following the steps below 1 Press the POWER button to switch to standby mode Do not manually open the tray when there is power to the drive 2 Locate the manual eject hole on the front of the CD tray as shown below 3 Carefully insert a stiff w...

Page 29: ...o STEREO Sound is distorted Volume level is set to high Decrease the volume Sound source is distorted Try a different audio source such as a music CD The tape does not move The cassette tape is not inserted properly The tape has reached the end Insert the cassette tape correctly Flip the cassette No sound from tape The tape heads are dirty Clean the tape heads Tape sound is distorted or faint The ...

Page 30: ...mb drives Power Consumption Main Unit 42Watts At Spectra environmental and social responsibility is a core value of our business We are dedicated to continuous implementation of responsible initiatives with an aim to conserve and maintain the environment through responsible recycling Please visit us at http www spectraintl com green htm for more information on Spectra s green initiatives or to fin...

Page 31: ...ure to provide reasonable care and necessary maintenance as outlined in the user manual 3 Warranty of all SPECTRA products applies to residential use only and is void when products are used in a nonresidential environment or installed outside the United States This warranty gives you specific legal rights and you may also have other rights which vary from state to state TO OBTAIN SERVICE please re...

Reviews: