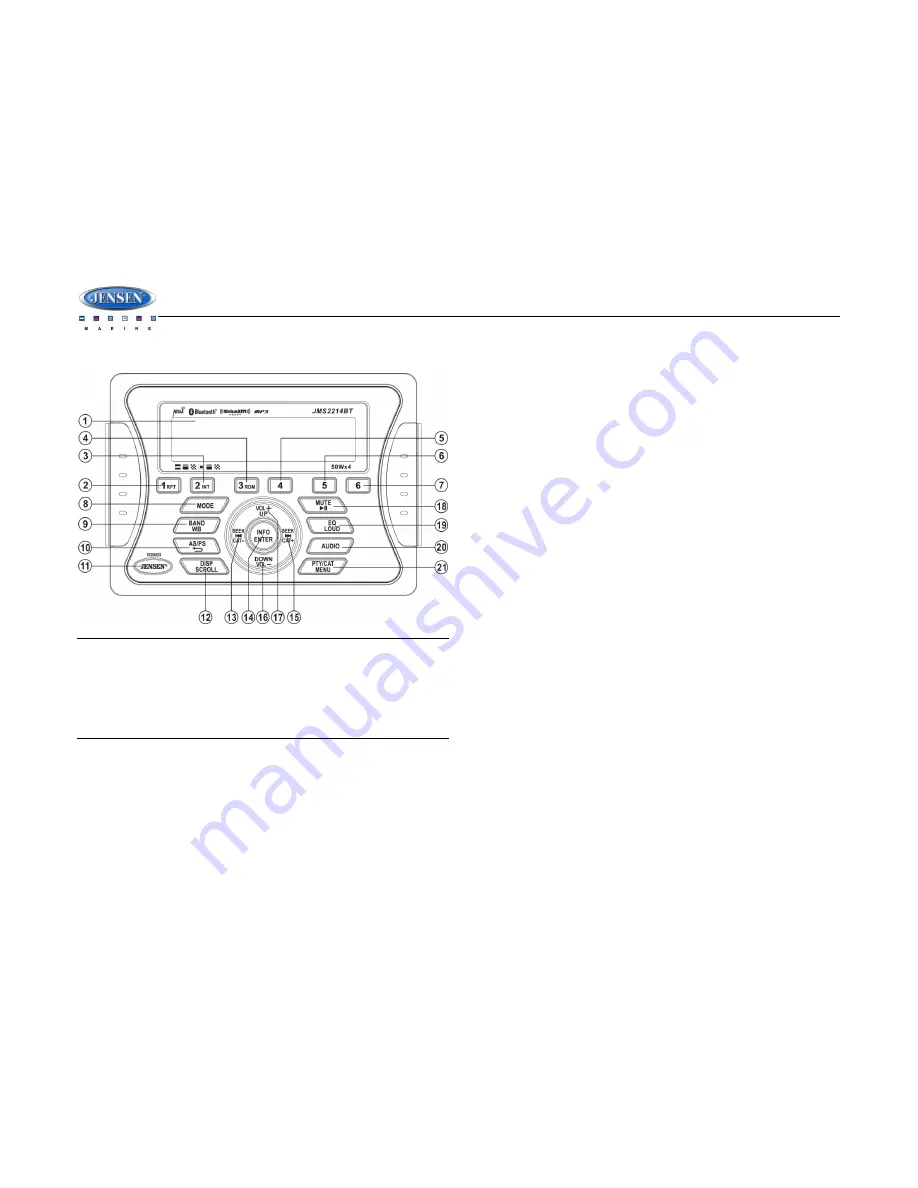
background image


JMS2214BT 


10 


SIRIUSXM RADIO OPERATION 


NOTE: SIRIUSXM is available in the US for subscribers with addresses in the continental 
US and is available in Canada for subscribers with a Canadian address. Required 
subscription plus compatible SIRIUSXM tuner and antenna are required and sold 
separately. To subscribe to SIRIUSXM on the internet, visit siriusxm.com, or call 
888-539-7474. Have your SIRIUSXM ID ready (SIRIUSXM ID is located on the back of the 
SiriusXM tuner or by tuning to Channel 0). SIRIUSXM programming is subject to change. 
Visit siriusxm.com for the most complete and up-to-date channel lineup and product 
information. “SIRIUSXM” and the SIRIUSXM dog logo and related marks are trademarks 
of SiriusXM Inc. All rights reserved. 


Switching to SIRIUSXM Satellite Radio 

(Requires optional SIRIUSXM tuner) 

Press the 

MODE

 button (8) as many times as necessary to change the mode to SIRIUSXM 

radio mode. 

Accessing your SIRIUSXM Radio ID 

To display your SIRIUSXM radio ID, use the 

SEEK |<<

 button (13) 

to tune to channel “000”. 

The screen will display “SIRIUSXM ID” with the SID displayed in the middle of the LCD screen. 
The SIRIUSXM radio ID is 12 characters long. 

Selecting a Band 

In SIRIUSXM mode, press the 

BAND/WB

 button (9) to access the SIRIUSXM user-preset 

channel groups in the following order: SXM1, SXM2, SXM3. 

Category Tuning 

1. 

Press the 

PTY/CAT/MENU

 button (21) to access Category mode. 

2. 

While in category mode, press

 SEEK >>|

 / 

CAT+ 

OR

 SEEK |<< / CAT-

 buttons (15, 13) to 

choose a category. 

3. 

Press the 

VOL +/-

 buttons (17, 16) to choose desired channels in that category. (The 

current channel number within the chosen category will always be the default first channel 
tuned.) 

4. 

Press the 

INFO/ENTER

 button (14) to play the highlighted channel and return to channel 

tuning mode. 

Channel Up/Down Tuning 

Press the 

SEEK |<< / >>|

 buttons (13, 15) to search for a channel. 

Press and hold

 the 

SEEK

 buttons to fast search. 

Direct Tuning Mode 

1. 

Press and hold

 the 

INFO/ENTER

 button (14) to enter direct tuning mode. 

2. 

Press 

VOL +/-

 buttons (17, 16) to change the first of three digits for the desired channel in 

the direct entry screen. 

3. 

Press the 

INFO/ENTER 

button to confirm the entered digit and move to the second digit 

field. 

4. 

Press 

VOL +/-

 buttons to select the second digit. 

5. 

Press 

the INFO/ENTER

 button to confirm the entered digit and move to the third digit field. 

6. 

Press 

VOL +/-

 buttons to select the third digit. 

7. 

Press the 

INFO/ENTER

 button to confirm the three digit channel and tune to the selected 

channel. 

Storing Preset Channels 

The preset buttons (1-6) can be used to store 6 channels, allowing convenient access to your 
favorite channels. 

Programming Channels 

1. 

Select the channel you want to store in memory. 

2. 

Press and hold

 a 1-6 preset button until the corresponding preset button number appears. 

3. 

Repeat steps 1 and 2 to program additional channels. 

Preset Recall 

Press one of the six preset buttons to directly select a preset channel stored in the current band. 

Preset Scan 

Press 

AS/PS

 button (10) to scan stations stored in all three user-preset channel groups (SXM1, 

SXM2 and SXM3). The unit will pause for 10 seconds at each preset station. Press 

AS/PS 

again 

Summary of Contents for JMS2214BT

Page 1: ...JMS2214BT MARINE AUDIO SYSTEM Installation and Operation Manual iPhone iPod iPod classic iPod nano iPod shuffle and iPod touch are trademarks of Apple Inc registered in the U S and other countries ...

Page 2: ...pecifications 17 Made for iPod and Made for iPhone mean that an electronic accessory has been designed to connect specifically to iPod or iPhone respectively and has been certified by the developer to meet Apple performance standards Apple is not responsible for the operation of this device or its compliance with safety and regulatory standards Please note that the use of this accessory with iPod ...

Page 3: ...N LOCATIONS THAT MIGHT HINDER VEHICLE OPERATION Doing so may obstruct vision or hamper movement which can result in a serious accident INSTALL THE WIRING SO THAT IT IS NOT CRIMPED OR PINCHED BY SCREWS OR SHARP METAL EDGES Route the cables away from moving parts or sharp pointed edges This will prevent crimping and damage to the wiring If the wiring must pass through a metal hole be sure to use a r...

Page 4: ...nterfere with driving and cannot injure passengers if there is a sudden or emergency stop Avoid installing the unit where it will be subject to high temperatures from direct sunlight hot air or from a heater or where it would be subject to excessive dust dirt or vibration Wired Commander Mounting 1 Choose a mounting area for the wired commander that is clean and flat allowing the rear gasket to fu...

Page 5: ... can cause damage to the wires 4 Follow the wiring diagram carefully and make certain all connections are secure and insulated with crimp connectors or electrical tape to ensure proper operation 5 After completing the wiring connections reconnect the negative terminal of the battery and turn the unit on to confirm operation vessel accessory switch must be on If the unit does not operate disconnect...

Page 6: ...JMS2214BT 4 WIRING TUNER AMP MODULE WIRED COMMANDER ...

Page 7: ...eted function buttons do not operate error symbol on the display Use a ball point pen or thin metal object to press the RESET button located on the tuner box You can recover factory default settings using the RESET function located on the system menu With YES flashing press the MODE button 8 to activate Audio Menu Press the AUDIO button 20 on the control panel to access the audio menu You can navi...

Page 8: ...audio beep once per minute The warning and sound will continue until the unit is turned off or the voltage is restored to more than 10 8 Volts Battery Auto Off Off On Reset To Defaults ENTER Press the INFO ENTER button 14 to return the JMS2214BT to factory default set up values Update Firmware ENTER Press the ENTER button 12 to apply recent software updates Equalizer Press the EQ LOUD button 19 to...

Page 9: ... Preset Scan Select a band Press AS PS FAV button 10 to scan stations stored in the current band The unit will pause for 5 seconds at each preset station Press AS PS FAV again to stop scanning when the desired station is reached RBDS Operation This unit is equipped to display RBDS Radio Broadcast Data Service information when broadcast by the radio station NOTE Radio stations broadcasting RBDS may...

Page 10: ...wing table Table 1 WB Frequencies Frequency MHz Preset 162 400 2 162 425 4 162 450 5 162 475 3 162 500 6 162 525 162 550 1 The above table also shows which preset button will access the frequency Note that one frequency cannot be accessed using a preset button The frequency can only be reached using the tuning controls Use the SEEK or buttons 15 13 or the preset buttons to tune to each of the seve...

Page 11: ...disc play to play all tracks in the current folder in random shuffled order Press 3 RDM again to stop random play Folder Navigation MP3 Only Press the PTY CAT MENU button 21 to view a list of all songs in the current folder Press the PTY CAT MENU button again to navigate up through the file structure Press the VOL UP 17 and DOWN VOL 16 buttons to navigate the list Press the INFO ENTER button 14 to...

Page 12: ...a category 3 Press the VOL buttons 17 16 to choose desired channels in that category The current channel number within the chosen category will always be the default first channel tuned 4 Press the INFO ENTER button 14 to play the highlighted channel and return to channel tuning mode Channel Up Down Tuning Press the SEEK buttons 13 15 to search for a channel Press and hold the SEEK buttons to fast...

Page 13: ... the INFO ENTER button to move to the next digit f Repeat above steps to enter all 4 digits g Repeat above steps to confirm the new code 3 After setting a new four digit code you can lock channels by entering the Locked Channels menu 4 Upon entering the code you can navigate the list using the VOL buttons to highlight the channels 5 Press the INFO ENTER button 16 to Lock indicated by a icon or Unl...

Page 14: ... the unit as long as the vehicle ignition is turned on Controlling Playback Pausing Playback During playback press the MUTE button 18 to pause the iPod player Pause will appear on the LCD Press MUTE button again to resume playback Repeat Play During playback press the 1 RPT button 2 to repeat the current song Repeat will appear on the LCD Press 1 RPT again to stop repeat playback Random Play Durin...

Page 15: ...gory mode press the VOL buttons 17 16 to choose file search by Playlist Artist Album Genre Song Audiobook or Podcast Press the INFO ENTER button 14 to select the search mode Use the VOL buttons 17 16 buttons to search the available files on the iPod Press the INFO ENTER button to play the selected song or file ...

Page 16: ...tton to select the device Press the VOL or VOL button to choose Lock Unlock Disconnect or Delete for this device LOCK UNLOCK The JMS2214BT can store up to 5 devices for BT connection The devices are stored in FIFO First In First Out order To prevent a device from being bumped from the list when more than 5 devices are used you must lock the device To Lock Unlock a device press the ENTER button to ...

Page 17: ...o icon illuminates on the LCD Selecting Tracks During playback press the SEEK TUNE TRK button 13 15 to play the previous or next track Pausing Playback During playback press the MUTE button 7 to pause the BT AUDIO player BT AUDIO will appear on the LCD Press MUTE button again to resume playback If you change to another mode the mobile phone audio will pause Press the MODE button 8 to return to BT ...

Page 18: ...tem Most vessels employ this wire and resistor but it may be necessary to check them for correct operation Another method of suppression is the use of additional noise suppressors These can be obtained from most CB A radio or electronic supply shops Interference Radio reception in a moving environment is very different from reception in a stationary environment home It is very important to underst...

Page 19: ...equency Range USA 530 1710 kHz Frequency Range Europe 522 1620 kHz Sensitivity S N 20dB 36 dB General Operating Voltage DC 12 Volts Grounding System Negative Ground Speaker Impedance 4 8 Ω ohms per channel Tone Controls Bass at 100 Hz 10 dB Treble at 10 kHz 10 dB Power Output 50W x 4 Current Drain 15 Ampere max Commander Dimensions 5 15 W x 1 2 D x 3 7 H Tuner Amp Dimensions 8 35 W x 6 55 D x 2 4 ...

Page 20: ...ASA Electronics Corporation www asaelectronics com www jensenmarinedirect com 2014 ASA Electronics Corporation ...

Reviews: