background image

INSTALLATION

Clock setting battery back-up
The battery back-up compartment is located at rear of the unit.
(1) Remove the battery compartment door.
(2) Follow the polarity diagram shown inside the compartment and install 2 x AAA batteries (not 
      included).
(3) Replace the battery compartment door.

WARNING:

- Be sure that the batteries are installed correctly. Wrong polarity may damage the unit.
- Do not mix old and new batteries.
- Do not mix alkaline, standard (carbon-zinc) or rechargeable (nickel-cadmium) batteries.
- Only batteries of the same or equivalent type as recommend are to be used.
- If the unit is not to be used for an extended period of time, remove the battery.
- Do not dispose of batteries in fire, batteries may explode or leak.

AC-DC Adaptor Connection
The unit is powered by an external AC-DC Power Adaptor with an output of 8V DC / 2000mA 
(included).
(1) Plug the adaptor into an outlet rated at 240V AC / 50Hz.
(2) Insert the adaptor's DC output plug into the DC-IN jack on the back of the unit.

NOTE:

 This unit is not magnetically shielded and may cause color distortion on the screen of some TVs or 

video monitors. To avoid this, you may need to move the unit further away from the TV or monitor if 
unnatural color shifts or image distortion occurs. 

PROTECT YOUR FURNITURE!!
This system is equipped with non-skid rubber 'feet' to prevent the product from moving when you operate
the controls. These 'feet' are made from non-migrating rubber material specially formulated to avoid leaving
any marks or stains on your furniture. However certain types of oil based furniture polishes, wood
preservatives, or cleaning sprays may cause the rubber 'feet' to soften, and leave marks or a rubber residue
on the furniture.
To prevent any damage to your furniture we strongly recommend that you purchase small self-adhesive felt
pads, available at hardware stores and home improvement centers everywhere, and apply these pads to
the bottom of the rubber 'feet' before you place the product on fine wooden furniture.

Battery Low indication
If the battery low indicat

or         blinks on LCD display, replace the back-up battery with fresh one.

5

6

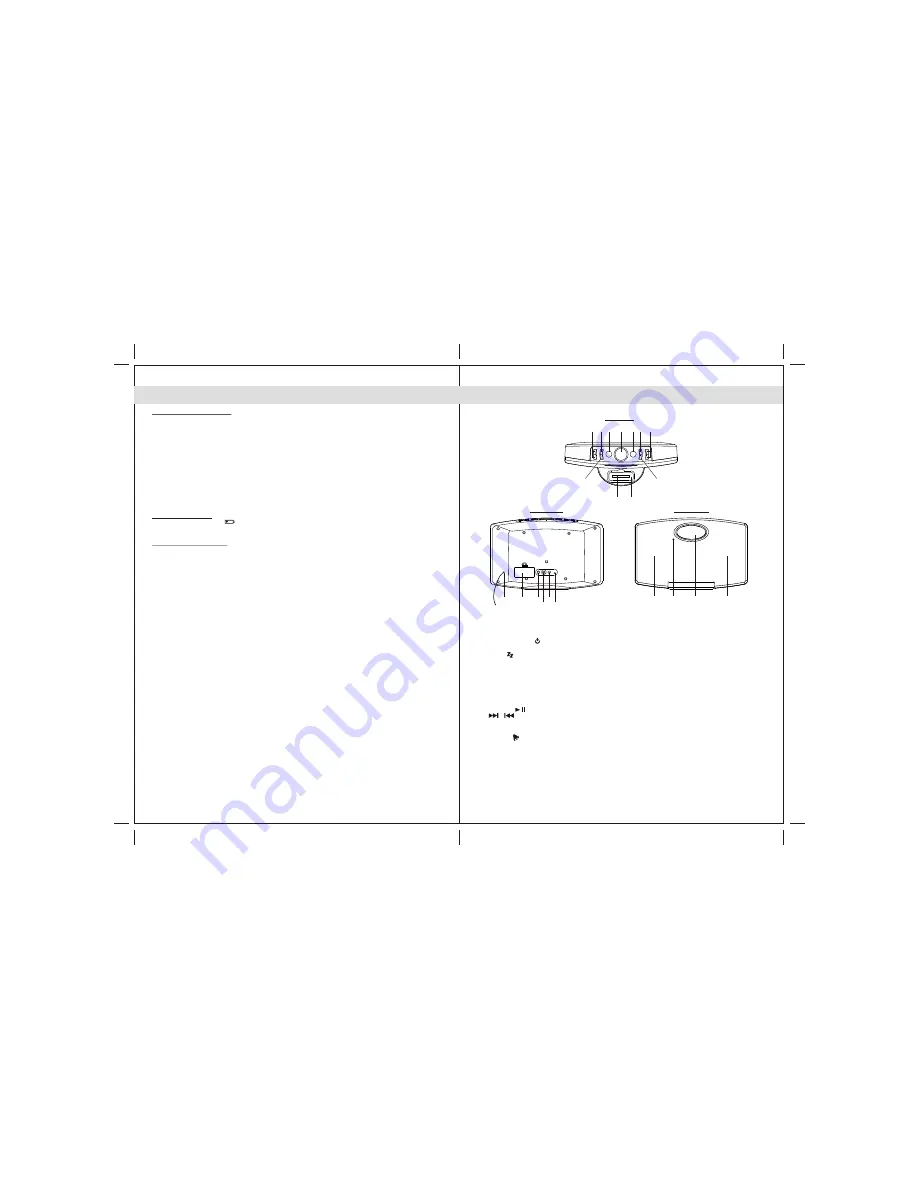
LOCATION OF CONTROLS

Main Unit

Top view

Front view

Rear view

1. 

 docking station

2. 

 docking connector

3. POWER  On/Off      

button ----- Turns the unit on or standby.

4. Function

 button ----- Select FM RADIO, iPod/iPhone, AUX modes.

5. SLEEP

      button ----- Select the time duration of the sleep timer.

6. CH+/- 

button ----- Select preset radio station. 

7. VOLUME 

wheel/ 

MODE 

button

     MODE 

button -----


In standby mode, press to adjust clock and alarm setting.

                                     In FM radio mode, press to select FM stereo or mono reception.

     VOLUME 

wheel -- Rotate to adjust the volume level up or down;


Rotate to adust hour/minute of clock/alarm.

8. SNOOZE/DIMMER

 button ----- Activate the snooze function; turn LCD backlight Bright/DIM/OFF.

9. PRESET /         

button----- Save radio preset station; iPod/iPhone play-pause.

10.         /         

button -----  In iPod/iPhone mode, skip tracks Forward / Backward or perform 

                                             high-speed search.
                                             In Radio mode, turn the radio frequency up/down.

11. ALARM 

     button -----   Turn the alarm on and off.

12. LCD display
13. Pair of Speakers
14. Remote Infrared Sensor
15. Battery Compartment


16. AUX IN 

jack : Auxiliary audio signal input

.

17. RCA VIDEO Jack

 ------ Composite video signal output.

18. DC-in

 jack : For the connection of external DC power supply.

19. RESET

 button ----- For resetting the unit.

20. FM Antenna wire

iPod/iPhone
iPod/iPhone

10

9

8

7

4

5

6

11

3

2

1

13

13

12

14

17

18

19

16

15

20

Summary of Contents for JiMS-211i

Page 1: ...ded 1 x CR2032 Lithium Battery included FM 87 5 108 MHz 0 05 MHz tuning step Printed in China SERVICE Please refer to the instructions on the enclosed warranty card for returning your unit for service When returning the unit please remove batteries to prevent damage to the unit in transit and or from possible leakage We are not responsible for batteries returned with the product or for the cost of...

Page 2: ...h loud and clear without annoying blaring or distortion and most importantly without affecting your sensitive hearing Sound can be deceiving Over time your hearing comfort level adapts to higher volumes of sound So what sounds normal can actually be loud and harmful to your hearing Guard against this by setting your equipment at a safe level BEFORE your hearing adapts To establish a safe level Sta...

Page 3: ...rom the apparatus 11 Only use attachments accessories specified by the manufacturer 12 Unplug this apparatus during lightning storms or when unused for long periods of time 13 Refer all servicing to qualified service personnel Servicing is required when the apparatus has been damaged in any way such as power supply cord or plug is damaged liquid has been spilled or objects have fallen into the app...

Page 4: ...eaning sprays may cause the rubber feet to soften and leave marks or a rubber residue on the furniture To prevent any damage to your furniture we strongly recommend that you purchase small self adhesive felt pads available at hardware stores and home improvement centers everywhere and apply these pads to the bottom of the rubber feet before you place the product on fine wooden furniture Battery Lo...

Page 5: ...op on the first strong station signal it finds Notes Manual tune to select weaker stations that might be by skipped during automatic tuning If the automatic tuning does not stop on the exact frequency of the station for example it stops on 100 9 MHz instead of 100 8 MHz use the manual tuning method to fine tune to the exact frequency of the desired station You may press the MODE button to select F...

Page 6: ...button to pause or resume the iPod iPhone playback Press the iPod iPhone Skip Search Forward or Backward button to skip to the next or previous song Press and hold the iPod iPhone Skip Search Forward or Backward button for fast forwarding or fast rewinding during playback iPod iPhone control function keys using remote control To repeat playback song file press iPod REP button To random playback so...

Page 7: ... it expires press the POWER button once This manual snooze operation can be repeated three times Each time the alarm turns on it plays for 60 minutes without pressing the snooze button To stop the alarm immediately after the alarm sounds you may also press the ALARM button It resets itself for the following day Note For the alarm source iPod iPhone is selected and the corresponding device has not ...

Page 8: ...lay at high volume Using no wrong iPod iPhone Adaptor Make sure the dock insert is the proper fit for your iPod iPhone Wait for 3 minutes iPod will enter sleep mode automatically It may be caused during function switching iPod iPhone unintentionally wake up in PAUSEmode 14 Do not subject the unit to excessive force shock dust or extreme temperature Do not tamper the internal components of the unit...

Reviews: