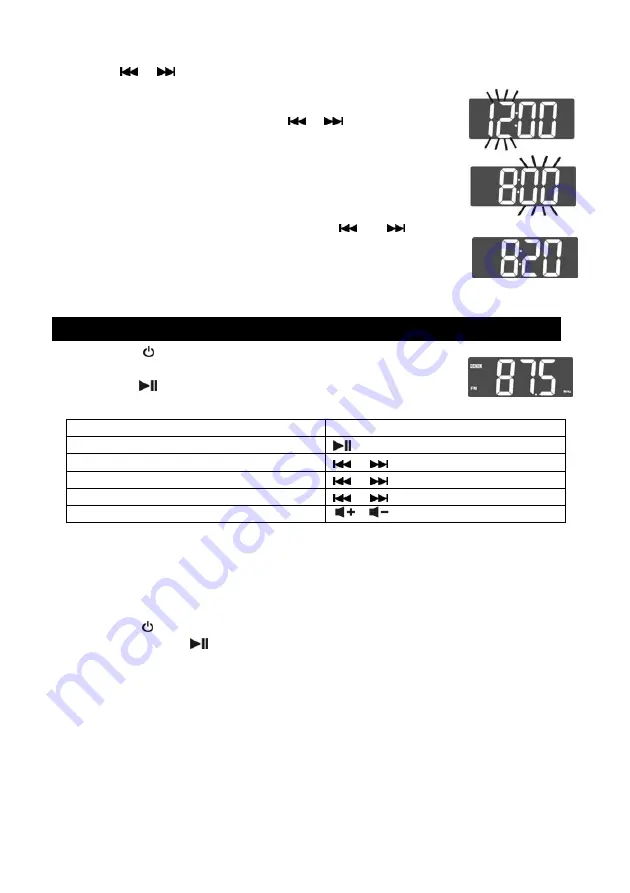
background image


6

Press the 

MEMO./SET

 button once. “12H” will appear and flash in the display. 

2. Press


or


 b

utton once to select 24 Hour format (24 H) if desired.  

3. Press 

the 

MEMO./SET

 button again to save the hour format 

setting. The Hour digit will blink.  

4.  While the Hour digit blinks, press 

 or 

 button repeatedly 

to set the current hour.  

Note: For 12 Hour format, make sure the Hour is correctly set so 

that AM or PM is correctly displayed.  

5. Press 

the 

MEMO./SET

 button again to save the hour setting. 

The minute digit will blink. 

6.  While the Minute Digit blinks, press 

 or 

 button 

repeatedly to set the current minutes.  

7. Press 

the 

MEMO./SET

 button again to complete the setting. 


TUNER OPERATION 

1. Press 

the  POWER/

STANDBY

 button once. The System 

will enter the FM mode. 

2. Press 

the   /

 BAND

 button once to switch to AM if desired. 


TO: PRESS: 

Switch between AM/FM band 

 / BAND Button 

Scan radio station manually 

 or 

 repeatedly  

Scan radio station automatically 

 or 

 and hold for 2 seconds 

Stop auto-tuning 

 or 

 once 

Control the volume 

 / 

 Buttons 


TO PRESET CHANNELS 

This unit is equipped with 20 preset memories each for AM and FM. Once they are 
preset, they can be instantly accessed by briefly pressing the 

ALM.1/ MEM-

 or 

ALM.2/MEM+

 Buttons.  

1. 

Press the   POWER/

STANDBY

 button to turn the System on. 

2. 

Press the 

BAND /


 button to switch between AM or FM band. 

3. 

Tune to a desired station.      

4. 

Press the 

MEMO./SET

 Button once. The Preset Channel number will appear 

and the Program Indicator “M” will also appear and flash in the Display.  

5. 

While the Program Indicator “M” is blinking, repeatedly press the 

ALM.2/MEM+


or 

ALM.1/ MEM-

 Button to select the desired preset channel.  

6. 

While the Program Indicator “M” is blinking, briefly press the 

MEMO./SET


button again to complete.  

7. 

Tune to another station and repeat steps 4 to 6 to store stations in other preset 
locations. 

TO RECEIVE PRESET STATIONS 


Summary of Contents for JiMS-182

Page 1: ...Docking Digital Clock Radio Music System For iPod OWNER S MANUAL JiMS 182 iPod not included Please read this Instruction Manual carefully before using the unit and retain it for future reference...

Page 2: ...contact the distributor via the telephone number at the back of this instruction manual FCC NOTICE This equipment has been tested and found to comply with the limits for a Class B digital device pursu...

Page 3: ...polishes wood preservatives or cleaning sprays may cause the rubber feet to soften and leave marks or a rubber residue on the furniture To prevent any damage to your furniture we strongly recommend th...

Page 4: ...ctly Wrong polarity may damage the unit and void the warranty ii For indoor use we recommend you remove all batteries and use the included AC adaptor BATTERY CARE I Do not mix old and new batteries II...

Page 5: ...ery compartment Replacing the Lithium Battery 1 Remove the battery tray located on the back of the unit 2 Replace the exhausted CR2025 3V lithium battery with a new one with the side facing upward 3 S...

Page 6: ...etween AM FM band BAND Button Scan radio station manually or repeatedly Scan radio station automatically or and hold for 2 seconds Stop auto tuning or once Control the volume Buttons TO PRESET CHANNEL...

Page 7: ...rom the radio as possible AUX OPERATION You can play other music sources iPod shuffle 1 st and 2 nd generation MP3 CD or other digital audio player through the speakers of JiMS 182 by connecting the A...

Page 8: ...Pod onto the connector in the docking bay Note Please be careful when seating your iPod onto the dock to avoid damaging the 30 pin connector in the iPod or the docking system 4 The iPod will start pla...

Page 9: ...sound when the alarm time is reached 2 Wake to Radio Repeatedly press ALM 1 MEM or ALM 2 MEM Button to enter the RADIO mode or will appear in the display Follow the procedure in TUNER OPERATION to se...

Page 10: ...using battery power the LCD backlit is always set to the dimmest level in order to conserve battery power Press any button the LCD backlight will automatically set to high and resume to the dimmest l...

Page 11: ...to turn on the Light The light will dim and go off when the preset sleep time expires Note In AUX Mode if the playing time of the external device is shorter than your selected sleep time the music wil...

Page 12: ...tton to select iPod mode iPod will not play iPod is not inserted properly Re insert iPod again Alarm Alarm is not activated Check that Alarm indicator or or or appears in the Display No Alarm Incorrec...

Page 13: ...t Apple performance standards Apple is not responsible for the operation of this devise or its compliance with safety and regulatory standards 90 DAY LIMITED WARRANTY AND SERVICE VALID IN THE U S A ON...

Page 14: ...send it prepaid by insured parcel post or UPS to SPECTRA at the address shown below IF THE UNIT IS RETURNED WITHIN THE WARRANTY PERIOD shown above please include a proof of purchase dated cash regist...

Reviews: