background image


E-6 

POWER SOURCE 


AC POWER CONNECTION


This product operates on 120V ~60Hz AC power supply. Plug the AC power cord (#16) 

into a household outlet AC source. 


INSTALLING THE BACK-UP BATTERY


This  unit  is  equipped  with  a  battery  back-up  system,  it  requires  3V

 2  x  AA  (UM-3) 

batteries  (not  included)  to  maintain  the  time  settings  and  radio  presets  during  an  AC 

power outage. 

1.  Remove the battery door (#15).  

2.  Install  two  pieces  AA  size  batteries  into  the  battery  compartment  following  the 

polarity diagram inside. Use only the specified size and type of batteries.  

3.  Replace the battery door (#15). 


Note: 

The unit will operate without a battery installed but your time & alarm setting will 

be lost and will have to be reset in the event of power interruption or failure. 


IMPORTANT:


Be  sure  that  the  batteries  are  installed  correctly. Wrong  polarity  may  damage  the  unit 

and void the warranty. For best performance and longer operating time, we recommend 

the use of good quality alkaline battery. 


BATTERY WARNING 

1. 

Be sure that the batteries are installed correctly. Wrong polarity may damage the unit 

2.   Use only the size and type of batteries specified. 

3. 

If the unit is not to be used for an extended period of time, remove the batteries. 

Old or leaking batteries can cause damage to the unit and may void the warranty. 

4. 

Do not try to recharge batteries not intended to be recharged; they can overheat 

and rupture. (Follow battery manufacturer’s directions) 

5. 

Do not dispose of batteries in fire, batteries may leak or explode 


POWER ON/STANDBY


1.  In standby mode, press and hold the  /MODE BUTTON (#7) to turn on the unit. 
2.  Press and hold the  /MODE BUTTON (#7) again to return the unit to standby mode. 


CLOCK OPERATION 


TIME SETTING 

1.   At Standby mode, press Time/M+ button (#1), 12 or 24 Hr will flash on the display. 

2.   Press MIN/DOWN/DIM (#2) or HOUR/UP BUTTON (#3) repeatedly to select 12 or 

24-hour display mode. 

3.   Press TIME/M+ button (#1) to confirm, the time will flash on the display. 

4.   Press  the  HOUR/UP  BUTTON  (#3)  repeatedly  to  set  the  hour,  press  the 

MIN/DOWN/DIMBUTTON (#2) repeatedly to set the minute. 

Notes:   

  If the PM Indicator (#14) is not showing in 12-hour mode, the time displayed 

is AM.


It  will  auto  confirm  after  it  flashes  4  times.  Once  the  time  stop  flashing,  you  can 

repeat step 1 to step 4 to reset the time. 

Summary of Contents for JEP-150

Page 1: ...AM FM Weather Band Clock Radio with Weather Alert MODEL JEP 150 USER MANUAL PLEASE READ THIS USER MANUAL COMPLETELY BEFORE OPERATING THIS UNIT AND RETAIN THIS BOOKLET FOR FUTURE REFERENCE...

Page 2: ...blades with one wider than the other A grounding type plug has two blades and a third grounding prong The wide blade or the third prong is provided for your safety If the provided plug does not fit in...

Page 3: ...e power supply cord or plug is damaged b If liquid has been spilled or objects have fallen into the product c If the product has been exposed to rain or water d If the product does not operate normall...

Page 4: ...t the interference by one or more of the following measures Reorient or relocate the receiving antenna Increase the separation between the equipment and receiver Connect the equipment into an outlet o...

Page 5: ...establish a safe level Start your volume control at a low setting Slowly increase the sound until you can hear it comfortably and clearly and without distortion Once you have established a comfortable...

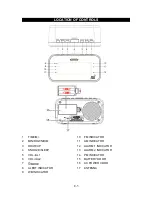
Page 6: ...10 FM INDICATOR 2 MIN DOWN DIM 11 AM INDICATOR 3 HOUR UP 12 ALARM 1 INDICATOR 4 SNOOZE SLEEP 13 ALARM 2 INDICATOR 5 VOL AL1 14 PM INDICATOR 6 VOL AL2 15 BATTERY DOOR 7 MODE 16 AC POWER CORD 8 ALERT IN...

Page 7: ...rrectly Wrong polarity may damage the unit 2 Use only the size and type of batteries specified 3 If the unit is not to be used for an extended period of time remove the batteries Old or leaking batter...

Page 8: ...ess the SNOOZE SLEEP BUTTON 4 to suspend the alarm and activate the snooze function alarm will stop will sound again 9 minutes later If you press SNOOZE SLEEP BUTTON 4 again the alarm will stop moment...

Page 9: ...30 AM and 30FM stations To recall one of the preset stations 1 Press and hold the OFF MODE BUTTON 7 to turn on the JEP 150 2 Tap the MODE BUTTON 7 to select AM FM band 3 Press the TIME M BUTTON 1 the...

Page 10: ...ashing until you press SNOOZE SLEEP BUTTON 4 or MODE BUTTON 7 to turn it off Notes In case there is a power interruption the JEP 150 will continue to receive weather alerts if you have a battery insta...

Page 11: ...the cabinet becomes dusty wipe it with a soft dry dust cloth Do not use any wax or polish sprays on the cabinet If the front panel becomes dirty or smudged with fingerprints it may be cleaned with a...

Page 12: ...ble recycling Please visit us at http www spectraintl com green htm for more information on Spectra s green initiatives or to find a recycler in your area 90 DAY LIMITED WARRANTY AND SERVICE VALID IN...

Page 13: ...lly and send it freight prepaid to SPECTRA at the address shown below IF THE UNIT IS RETURNED WITHIN THE WARRANTY PERIOD shown above please include a proof of purchase dated cash register receipt so t...

Reviews: