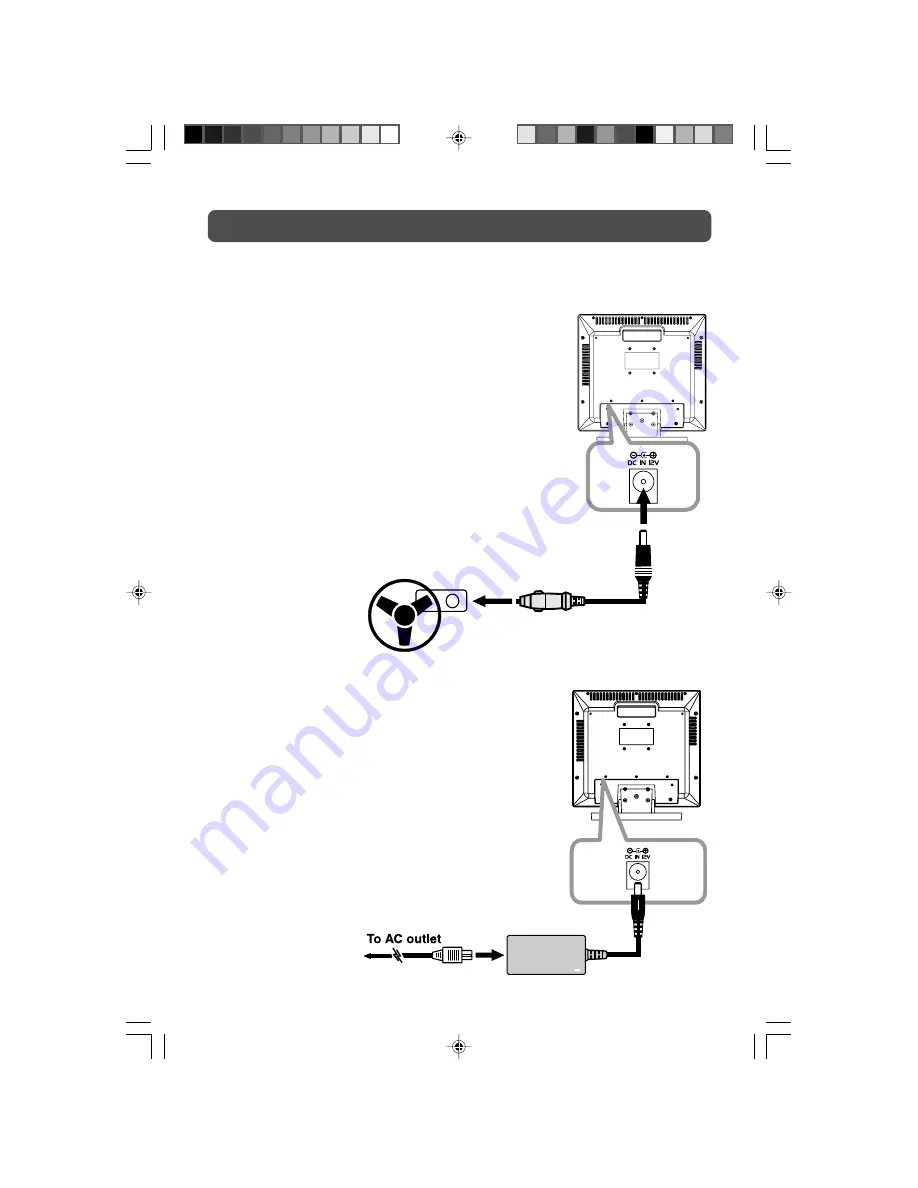
Jensen JE1508 Owner'S Manual Download Page 13

13

POWER SUPPLY

USING THE CAR POWER ADAPTER

The included car power adapter allows the unit to be used with vehicles that have a 12V,
negative ground electrical system.

Cautions:

• Use the provided car power adapter only. Use with other car

power adapters could damage the unit.

• The car power adapter included with this unit is for its use

only. Do not use it with other equipment.

• In the interest of traffic safety, do not operate this unit or

view videos while driving a vehicle.

• Make sure the unit is securely fastened to prevent it from

falling or flying through the air in the event of an accident.

• When the inside of the cigarette lighter socket is dirty with

ashes or dust, the plug section may become hot due to poor
contact. Be sure to clean the cigarette lighter socket before
use.

• After use, disconnect the car power adapter from both the

unit and cigarette lighter socket.

USING THE AC  POWER ADAPTER

The supplied AC adapter operates on AC 120V.
• Press the 

STANDBY/ON

 button on the unit or remote control

to turn on the unit.

Note:

• The AC adaptor included with this unit is for its use only. Do

not use it with other equipment.

• Be sure the AC power cord is disconnected and all functions are

off before making connections.

• Make sure that all the components are connected correctly.

To prevent electrical shock, match wide blade of plug to wide
slot of wall outlet, then fully insert.

• When you are not going to use the  unit for a long period of time,

disconnect the power cord.

PLV1615CS1- E2-23 JENSEN-DC.pmd

06/08/2007, 17:57

13

Summary of Contents for JE1508

Page 1: ...OWNER S MANUAL 15 LCD TV ...

Page 2: ... harmful interference to radio or television reception which can be determined by turning the equipment does cause harmful interference to radio or television reception which can be determined by turning the equipment off and on the user is encouraged to try to correct the interference by one or more of the following measures Reorient or relocate the receiving antenna Increase the separation betwe...

Page 3: ...n electrician for replacement of the obsolete outlet 10 Protect the power cord from being walked on or pinched particularly at the plug convenience receptacles and the point where they exit from the apparatus 11 Only use attachments accessories specified by the manufacturer 12 Use only with the cart stand tripod bracket or table specified by the manufacturer or sold with the apparatus When a cart ...

Page 4: ...12 Connecting a PC 12 Connecting an Audio Amplifier 13 Connecting the Power Cord 13 INSTALLATION 14 Removing the Base Stand 14 Mounting on the Wall 14 USING HEADPHONES 15 UNIT OPERATION 15 Turning the Unit on for the First Time 15 TV SETUP 16 21 Video Menu 16 VGA Settings in PC Mode 17 Audio Menu 17 TV Menu 18 Setup Menu 18 20 Time Setup Setting 19 Caption Setting 20 Restore Setting 20 Parental Me...

Page 5: ...avoid damage caused by battery leakage corrosion Do not mix old and new batteries Do not mix ALKALINE standard CARBON ZINC or rechargeable NICKEL CADMIUM batteries WARNING Do not dispose of batteries in a fire or they may leak and or explode REMOTE CONTROL ACCESSORIES PLEASE LOCATE THE INCLUDED ACCESSORIES Remote control with battery x 1 AC adapter x 1 Car power adapter x 1 Audio Video cable x 1 M...

Page 6: ... the sound Press again to cancel mute 12 FUNCTION Button Press to switch between TV AV IN YUV IN PC IN 13 SOUND Button Press to select from preset sound settings Personal Standard Voice Music Theater to match the type of show you are watching 14 ENTER Button Press to confirm selections on a menu screen 15 MENU Button Press to display the on screen menu 16 AV Button Press to select AV IN mode 17 MT...

Page 7: ...e Light On The unit is in STANDBY Light Off The unit is turned ON 4 Removable Base Stand 5 DC IN 12V 6 AV OUT Video Output Jack 7 AV OUT Audio Output Jacks Left Right 8 AV IN Video Input Jack 9 AV IN Audio Input Jacks Left Right 10 PC IN MONITOR VGA Jack 11 PC IN Audio Jack 12 YUV IN Component Video Input Jacks Y PB PR 13 YUV IN Audio Input Jacks Left Right 14 AV IN S Video Input Jack 15 Headphone...

Page 8: ...able box Satellite Cable or TV antenna cable to TV ANTENNA CABLETerminal cable not included CONNECTING AN AUDIO AMPLIFIER This connection allows you to use an audio amplifier and external speakers Connect the right red and left white audio OUTPUT from this unit to the right red and left white audio INPUT on your amplifier Refer to your amplifier s user manual for more information Note To control t...

Page 9: ... included Make sure you connect both audio and video from the same camcorder to the same input AV IN Note Please refer to the user manual for the camcorder for more information Connect to a VCR Connect the right red and left white audio output from the VCR to the right red and left white input on this unit Audio cable not included Connect the S VIDEO output from the VCR to the S VIDEO input on thi...

Page 10: ...formation CONNECTIONS Connect to a VCR Connect the right red and left white audio output from the VCR to the right red and left white input on this unit Connect the video yellow output from the VCR to the video input on this unit Make sure you connect both audio and video from the same VCR to the same input AV IN Note Please refer to the user manual for the VCR for more information AUDIO VIDEO CAB...

Page 11: ... CONNECTIONS Connect to a VCR PVR Connect the right red and left white audio input from the VCR PVR to the right red and left white output on this unit Connect the video yellow input from the VCR PVR to the video output on this unit Make sure you connect both audio and video from the same VCR PVR to the same output AV OUT Note Please refer to the user manual for the VCR PVR for more information No...

Page 12: ...onnect the right red and left white audio output from the source to the right red and left white input on this unit Audio cable not included Make sure you connect both audio and video from the same source to YUV IN Note When connecting a DVD player to the television the picture resolution is solely dependent upon the resolution supported by the DVD player attached DVD Player resolutions vary from ...

Page 13: ...ashes or dust the plug section may become hot due to poor contact Be sure to clean the cigarette lighter socket before use After use disconnect the car power adapter from both the unit and cigarette lighter socket USINGTHE AC POWER ADAPTER The supplied AC adapter operates on AC 120V Press the STANDBY ON button on the unit or remote control to turn on the unit Note The AC adaptor included with this...

Page 14: ...l times when removing the base stand Be sure that no hard or sharp or anything that could scratch or damage the LCD display come in contact with it Do NOT place pressure on the front of the unit at any time because the screen could crack 1 Disconnect any cables or cords connected to the unit 2 Lay the unit down on a flat surface so the backside is facing up making sure to place a soft cushioned ma...

Page 15: ...he button to select your OSD language and press the button to the next step 3 Use the button to select your TV tuner source Antenna or Cable and press the button to the next step 4 Make sure RF aerial has been connected properly to TV ANTENNA input jack on the rear of the system press the ENTER or button The system will automatically start to scan and preset all available TV channels 5 After scani...

Page 16: ...s of the picture Brighten or darken the whole picture Contrast Adjust to sharpen the picture quality The black portions of the picture become richer in darkness and the white become brighter Saturation Adjust the color saturation of the picture Tint Adjust the tint of the picture Toward purple Toward green Sharpness Adjust the sharpness level to improve detail in the picture Color Temperature Adju...

Page 17: ...f there is flicker of screen letters color misalignment or blurring Clock Adjusts the display clock to change width of the image AV YUV PC MODE TV MODE AUDIO MENU 1 Press the MENU button 2 Use the or button to select Audio then press the ENTER or button to go into the Audio settings 3 Use the or button to select the options Balance Bass Treble or Audio Mode Adjust them using the or button The scre...

Page 18: ... Cable cable satellite broadcasts mode are available Auto Scan Add CH Search for more usable stations and add them in memory The stations stored before are still kept Add Channel Search for more usable stations and add them in memory Channel Skip Skip weak channels and the channels you don t like MTS Select Stereo SAP Secondary Audio Program Mono Audio Language Select from English Spanish French A...

Page 19: ...e Press the or button to locate the position and press the number buttons to input power on time Power Off Time Press the or button to locate the position and press the number buttons to input power off time Time Setup Setting TV MODE AV YUV MODE OSD Language Select from English Español Français PC MODE Video Audio Setup Parental Setup EXIT Exit Select English OSD Language Time Setup Caption Resto...

Page 20: ...tion Select the digital closed caption or turn it off Digital Caption Style Select As Broadcaster to use the default digital caption style of the broadcaster Select Custom to activate the caption style items and set you prefered detailed settings Note This function only works on ATSC programs broadcast with captions Video Audio TV Setup Parental Analog Closed Caption Digital Closed Caption Digital...

Page 21: ...atings TV Y Recommended for all children TV Y7 Recommended for all children age 7 and above TV G General Audience TV PG Parental Guidance Suggested TV 14 Parental Strongly Cautioned TV MA Mature Audience Only G GENERAL AUDIENCES Suitable for all ages PG PARENTAL GUIDANCE SUGGESTED Some material may not be suitable for children PG 13 PARENTS STRONGLY CAUTIONED Some material may be inappropriate for...

Page 22: ...erly Increase the volume Make sure the antenna or audio video source device is working properly Make sure all cables are connected firmly Check for local interference Make sure there are no unshielded electrical devices nearby that are causing interference Turn the TV off for 30 minutes then try it again Bad Picture snow multiple images distortion blurry No sound Black and white picture No picture...

Page 23: ...23 Unit INCH 3 15 5 8 14 3 8 6 5 8 7 1 2 10 1 2 11 8 PLV1615CS1 E2 23 JENSEN DC pmd 06 08 2007 17 57 23 ...

Page 24: ...Printed in China 811 161S91W330 www asaelectronics com IB_back page_JEN pmd 08 08 2007 11 06 2 ...

Reviews: