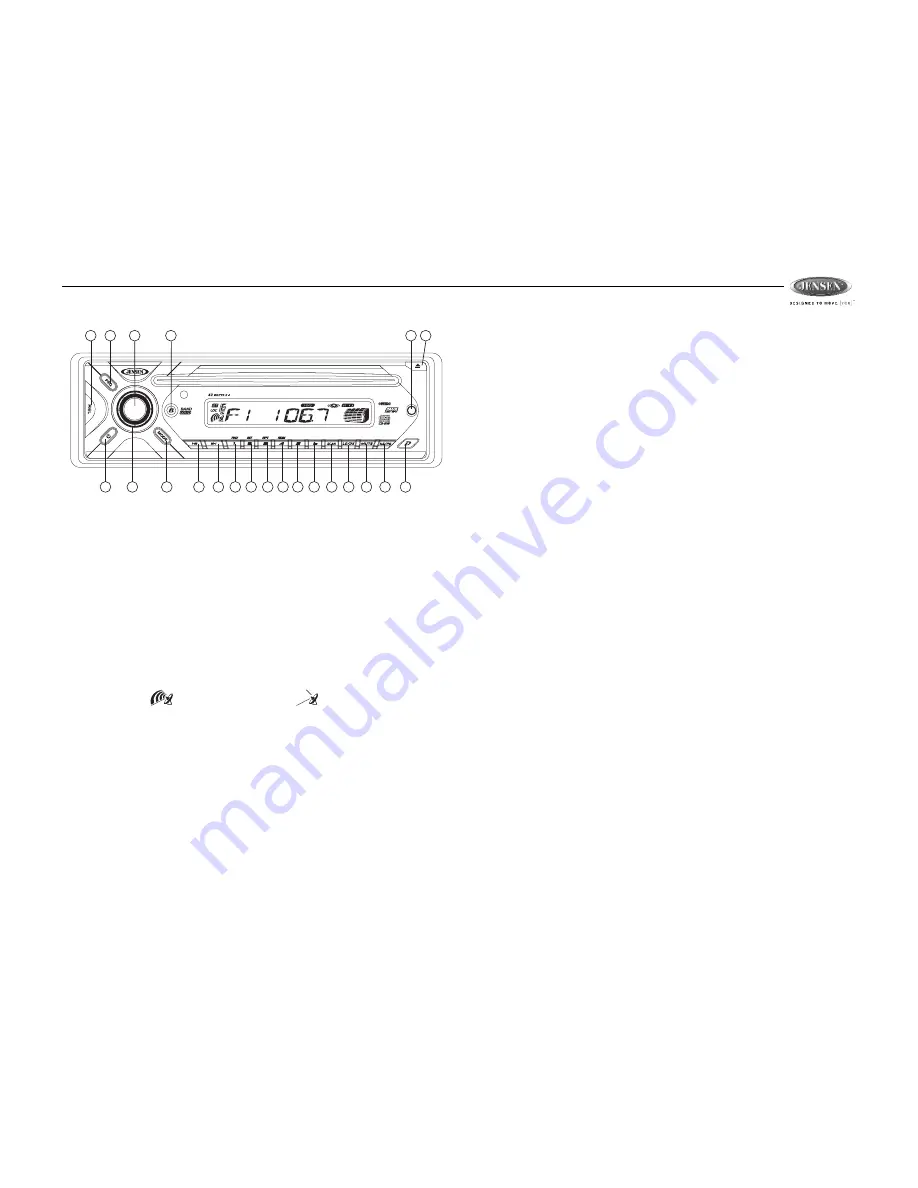
background image

JCD3006

7

TUNER OPERATION

Select a Band

Press the 

button


(19) on the control panel (or the 

BND

 button on the remote control) to 

change between three FM bands and one AM band. Each band stores up to six preset 
stations. 

Tuning

Auto Seek Tuning

Press the up 

>>|

 (21) or down 

|<<

 button (20) on the control panel (or the 

U

 or 

D

 buttons on the 

remote control) for less than three seconds to move to the next station automatically.

Manual Tuning

Press the up 

>>|

 (21) or down 

|<<

 button (20) for more than three seconds to enter manual 

tuning mode. Press the up 

>>|

 (21) or down 

|<<

 button to change the radio frequency number 

up or down one step. The radio signal strength meter indicates the strength of the current radio 
station broadcast. 

Scan

Press the 

SCN

 button (10) to automatically search for stations. Each available station will flash 

on the display for a few seconds before the next is searched. To select a “flashing” station, 
press the 

SCN

 button again.

Local/Distant (LO/DX)

During radio operation, received signals are usually in stereo mode as indicated by the “ST” 
icon; however, when the signals are weak or intermittent, you can activate the Local (LOC) 
mode by pressing the

 LO/DX

 button (9) (“LOCAL” appears on the display) on the control panel 

(or the 

LOC

 button on the remote control). This mode favors access to local stations whose 

signals are much stronger; thereby improving radio reception. Press the 

LOC

 button again to 

terminate Local receive mode. 

Preset Stations

Six numbered preset buttons store and recall stations for each band.

Store a Station

Select a band (if needed), then select a station. Hold a preset button (12-17) for three seconds. 
The preset number will appear in the display.

Recall a Station

Select a band (if needed). Press a preset button (12-17) to select the corresponding stored 
station.

Automatically Store / Preset Scan (AS/PS, AMS)

Automatically Store

Select a band (if needed). Press 

AS/PS

 (11) on the control panel (or the 

AMS

 button on the 

remote control) for more than three seconds to automatically select six strong stations and 
store them in the current band. The new stations replace any stations already stored in that 
band.

Preset Scan

Select a band (if needed). Press 

AS/PS 

(11) to scan stations stored in the current band. The 

unit will pause for ten seconds at each preset station. Press 

AS/PS 

again to stop scanning 

when the desired station is reached.

Loudness Control (B, BND)

Press the 

B

 button (19) on the control panel (or the 

BND

 button on the remote control) to turn 

the “Loudness” function on/off. When Loudness is activated, the display will show “X-Bas” for a 
few seconds. 

Preset Equalizer (PEQ)

Press the 

PEQ

 button (7) to select from the following preset equalizer functions: FLAT > 

CLASSIC > POP M > ROCK > DSP OFF. When “DSP OFF” is selected, the EQ function is 
controlled by the Bass/Treble settings.

Stereo

The unit will automatically pick up an FM stereo signal, when available. When in stereo mode, 
the “ST” icon appears in the display. When no stereo signal is available, the unit will 
automatically revert to mono operation, and no icon will be displayed. To manually switch 
between mono and stereo mode, press the 

MO

 button (23) on the remote control.

JCD3006

1

2

3

5

6

7

8

9

10

11

20

21

12

13

14 15 16

17

18

19

4

22

Best

Reception

Worst

Reception

Summary of Contents for JCD3006

Page 1: ...JCD3006 JCD3006 Installation and Operation Manual MOBILE CD PLAYER RECEIVER ...

Page 2: ...OR ELECTRIC SHOCK AND ANNOYING INTERFERENCE USE ONLY THE RECOMMENDED ACCESSORIES THIS DEVICE IS INTENDED FOR CONTINUOUS OPERATION DISC NOTES Compatible Disc Types NOTE CD R and CD RW discs will not play unless the recording session is closed and the CD is finalized Disc Maintenance A dirty or defective disc may cause sound dropouts while playing Before playing wipe the disc using a clean cloth wor...

Page 3: ...rough the mounting sleeve 6 Follow the wiring diagram carefully and make certain all connections are secure and insulated with crimp connectors or electrical tape to ensure proper operation 7 After completing the wiring connections attach the front panel and turn the unit on to confirm operation vehicle ignition switch must be on If the unit does not operate recheck all wiring until the problem is...

Page 4: ...Panel DCP Removing the Detachable Control Panel DCP 1 Turn the power off 2 Press the REL button 3 Remove the DCP Attaching the DCP 1 Attach the panel at the right side first with point B on the main unit touching point A on the DCP as shown in the diagram 2 Press the left side of the DCP onto the main unit until a click is heard CAUTION DO NOT insert the DCP from the left side Doing so may damage ...

Page 5: ...IOLET VIOLET BLACK GREEN GREEN BLACK RED BLACK RED WHITE WHITE BLACK BLUE YELLOW BLACK WHITE RIGHT FRONT SPEAKER LEFT REAR SPEAKER N A LEFT FRONT SPEAKER CHASSIS GROUND LEFT REAR PRE AMPLIFIER LINE OUT LEFT FRONT SPEAKER POWER ANTENNA BATTERY RIGHT FRONT SPEAKER RIGHT REAR SPEAKER RIGHT REAR SPEAKER LEFT REAR SPEAKER IGNITION ACC REAR PRE AMPLIFIER LINE OUT COMMON RIGHT REAR PRE AMPLIFIER LINE OUT...

Page 6: ...he RESET button for five seconds to reset the main unit The unit will return to the factory default settings The reset button should be activated for the following reasons initial installation of the unit when all wiring is completed function buttons do not operate error symbol on the display NOTE If after pressing the RESET button the unit still does not function normally use a cotton swab soaked...

Page 7: ...e a Station Select a band if needed then select a station Hold a preset button 12 17 for three seconds The preset number will appear in the display Recall a Station Select a band if needed Press a preset button 12 17 to select the corresponding stored station Automatically Store Preset Scan AS PS AMS Automatically Store Select a band if needed Press AS PS 11 on the control panel or the AMS button ...

Page 8: ...t reverse through the disc CD play starts when the button is released Play Pause Disc Playback 1 PAU Press the 1 PAU button 12 to suspend disc play Press the 1 PAU button again to resume disc Play Intro Scan 2 INT Press the 2 INT button 13 on the control panel or the 2 SCN button on the remote control to play the first 10 seconds of each track sequentially Press 2 INT again to stop Intro Scan and ...

Page 9: ...ely dirty or disc is defective Clean the disc or try to play a new one Temperature inside the vehicle is too high Wait until the ambient tempera ture returns to normal Condensation Leave the player off for an hour or so then try again No sound Volume is too low Adjust volume to audible level Wiring is not properly con nected Check wiring connections The operation keys do not work Control panel not...

Page 10: ...JCD3006 10 ASA Electronics Corporation www asaelectronics com 2006 ASA Electronics Corporation v 071206 ...

Reviews: