background image

12

HD5112

Satellite Radio Operation

Listeners can subscribe to XM® Radio on the Web by visiting 
www.xmradio.com, or by calling (800) 967-2346. Customers should 
have their Radio ID ready (see “Displaying the Identification (ID) 
Code”). Customers can receive a limited number of free-to-air 
channels without activation. 

Listeners can subscribe to Sirius® Radio on the Web by visiting 
www.sirius.com, or by calling (888) 539-SIRIUS. Customers should 
have their Sirius ID ready (Sirius ID is located on the Satellite Radio 
Tuner, sold separately). Customers can listen to music samples by 
tuning to channel 184.
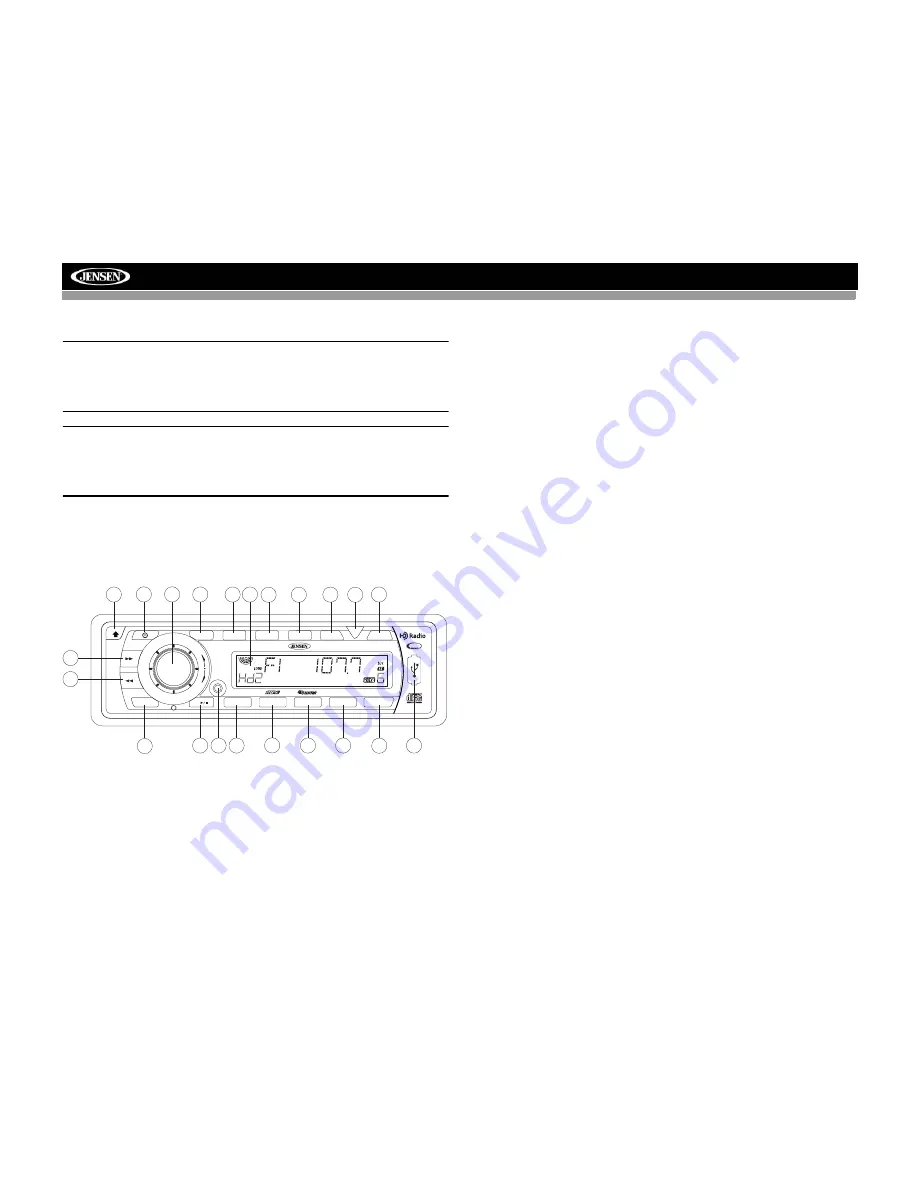
Accessing Satellite


Radio Mode

To switch to satellite radio mode, press the 

SRC 

button


(2) until “XM 

RADIO” or “SIRIUS” appears on the display. This will not be displayed 
unless the unit is connected an optional Sirius or XM receiver.

Displaying the Identification (ID) Code

Before you listen to satellite radio, you must subscribe to the service using 
your radio’s identification number. To display the radio ID, press the 

TUNE/

CH <<

 button (11) to access channel 000. The screen displays the radio ID 

where the channel name is usually displayed.

Selecting a Station

Press the 

TUNE/CH >>

 or 

TUNE/CH <<

 button (10 and 11) to change to 

another station. 

Press and hold

 the 

TUNE/CH >>

 or 

TUNE/CH <<

 button for 

more than one second to fast forward or fast reverse through the stations.

Preset Stations

Press the 

BAND

 button (3) to change between three user preset channel 

groups. Each channel group stores up to six preset stations. You can store 
and recall a total of 18 preset stations.

Store a Station

1.

Select a channel group, then select a station.

2.

Hold a preset button (13 – 18) for three seconds. The preset number 
appears in the display.

Recall a Station

1.

Select a channel group.

2.

Press a preset button (13 – 18) to select the corresponding stored 
station.

Tuner Modes

Press the 

DISP

 button (7) to change the tuner mode to the following options 

in the order listed.

Channel Name

Genre (News, Sports, Hits, Kids, etc.)

Artist name

Song Name

If the selected channel name, artist, or title exceeds eleven characters, the 
display information will scroll twice upon selection. 

Direct Tuning Mode

To enter a station directly, perform the following steps.

1.

Press the 

SELECT

 button


(5) to enter direct tuning mode. 

2.

Turn the rotary encoder to display “XM CH_ _ _” or “SR CH_ _ _”.

3.

Turn the rotary encoder again to select the first digit of the desired 
channel (0, 1, or 2).

4.

Press the 

BAND/ENTER

 button (3) to enter the first number and move 

to the second position.

5.

Turn the rotary encoder again to select the second digit of the desired 
channel (0 - 9).

1

2

4

7

10

11

3

5

6

8

9

20

2

SCN

1

3

RPT

4

SHF

5

6

BAND

AUX - IN

CAT / DIR

>

>

A ~ Z

PRESS

0 ~ 9

ENTER

SAT

READY

MONO

DISP

EQ

SRC

MUTE

PS

HD5112

SELECT

FILE / FOLDER

iPod

TUNE / CH

12

19

21

13

14

16

15

17

18

22

Summary of Contents for HD5112

Page 1: ...atts Peak 40W x 4 HD5112 Installation and Operation Manual SAT READY 2 SCN 1 3 RPT 4 SHF 5 6 MONO DISP EQ BAND SRC MUTE AUX IN PS HD5112 CAT DIR SELECT FILE FOLDER A Z PRESS 0 9 iPod ENTER TUNE CH SAT READY ...

Page 2: ......

Page 3: ...ion 2 Wiring 3 Installation 4 Front Panel Release 7 Operation 8 Tuner Operation 10 Satellite Radio Operation 12 CD Player Operation 14 MP3 WMA Operation 16 iPod Operation 20 Remote Control 22 Care and Maintenance 23 Troubleshooting 24 Specifications 25 ...

Page 4: ...ii HD5112 ...

Page 5: ...eady Supports MP3 WMA files via CD R RW SD card or USB 24 Station Presets 18 FM 6 AM Electronic Detachable Faceplate Rear Pre amp Line Output 2MB ESP Last Position Memory Random Repeat Intro LCD Dimmer Preset EQ Rock Pop Classic Loudness Electronic Bass Treble Balance Fader jLink iPod Cable and 3 5mm Media Adapter Cables Included Infrared remote control HD Radio Technology Manufactured Under Licen...

Page 6: ...dio The transport screws are clearly marked NOTE If the HD5112 is to be installed in a car equipped with an on board drive or navigation computer do not disconnect the battery cable If the cable is disconnected the computer memory may be lost Under these conditions use extra caution during installation to avoid causing a short circuit WARNING Only connect the unit to a 12 volt power supply with pr...

Page 7: ...chassis Memory Battery YELLOW Connect to battery or 12 volt power source that is always live The radio will not work if this wire is not connected Amplifier Wiring GRAY Connect line out for optional external amplifiers The RED connector is for the right and the WHITE connector is for the left Antenna Connector LF AVG RF AVD LR ARG RR ARD TERK XMDJEN100 cables sold separately TERK XMD1000 Direct Tu...

Page 8: ... series of bend tabs along the top bottom and sides of the mounting sleeve With the sleeve fully inserted into the dashboard opening bend as many of the tabs outward as necessary to firmly secure the sleeve to the dashboard 5 Place the radio in front of the dashboard opening so the wiring can be brought through the mounting sleeve 6 Follow the wiring diagram carefully and make certain all connecti...

Page 9: ...the front of the new radio chassis Remove and discard the frame 3 Remove the factory mounting brackets and hardware from the existing radio and attach them to the new radio using the same screws Do not exceed M5 x 9 MM maximum screw size Longer screws may damage components inside the chassis 4 Wire the new radio to the vehicle as outlined in the Universal Installation instructions 5 Slide radio ch...

Page 10: ... The satellite radio receiver is the central data receiving equipment required to process the satellite signals from the external antenna It is typically installed in the dash under the seat or in the trunk or rear of the vehicle Do not mount receiver near a heater vent or where it can be exposed to extreme temperatures In addition when running the wire for the external antenna do not kink or pinc...

Page 11: ...ttach the front panel make sure the electrical terminals on the back of the panel are free of dust and dirt as debris could cause intermittent operation or other malfunctions Position the right side of the panel in place until correctly engaged then lightly press the left side of the panel until the mechanism locks it into place Precautions when Handling the Front Panel Do not drop the front panel...

Page 12: ...e To decrease the volume rotate the rotary encoder counter clockwise When volume is adjusted the volume level will be shown on the display panel as a number ranging from VOL 00 lowest to VOL 100 highest Press the rotary encoder repeatedly to step through the following audio VOLUME BASS TREBLE BALANCE and FADER The unit automatically exits audio control mode after five seconds of inactivity BASS To...

Page 13: ...ns Equalizer Press the EQ button 20 to choose one of the following pre defined bass and treble curves FLAT CLASSICS POP M ROCK M DSP OFF Loudness Press and hold the BAND button 3 toggle loudness on off When listening to music at low volumes this feature will boost the bass and treble ranges to compensate for the characteristics of human hearing Auxiliary Input To access an auxiliary device 1 Conne...

Page 14: ...e then press the TUNE CH or TUNE CH buttons to move the radio frequency number up or down one step Auto Seek Tuning Press the TUNE CH 10 or TUNE CH 11 button to automatically seek the next station Mono Stereo Press the MONO button 19 to select mono or stereo reception for analog radio stations You can sometimes improve reception of weak stations by selecting mono operation When in stereo mode the ...

Page 15: ...red station is reached Broadcast Information During HD Radio broadcasting available broadcast information will automatically appear on the LCD Press the DISP button 7 multiple times to view broadcast information in the following order Band Frequency CH NAME TITLE ARTIST CATEGORY Clock only available when pressing DISP button The information will scroll across the screen if longer than 8 characters...

Page 16: ...ond to fast forward or fast reverse through the stations Preset Stations Press the BAND button 3 to change between three user preset channel groups Each channel group stores up to six preset stations You can store and recall a total of 18 preset stations Store a Station 1 Select a channel group then select a station 2 Hold a preset button 13 18 for three seconds The preset number appears in the di...

Page 17: ...8 Press the BAND ENTER button to enter the third number and access the channel Category Mode To select stations in a specific category perform the following steps 1 Press the SELECT button 5 twice to select CATEGORY mode 2 Press the CAT DIR and buttons 17 18 labeled 5 and 6 to select the desired category 3 Press the BAND ENTER button 3 to confirm 4 Once a category is selected use the TUNE CH or TU...

Page 18: ...an one second to advance to the next track on the CD The selected track number will appear on the display Press and hold the TUNE CH 10 or TUNE CH 11 button for more than one second to fast forward or fast reverse through the disc CD play starts when the button is released Intro Scan SCN During disc play press 2 SCN 14 to play the first 10 seconds of each track on the disc When the desired track i...

Page 19: ...but will erase the time and preset memory If the suggested measures do not solve the problem contact an authorized warranty station near you or contact customer service at 1 800 323 4815 for further assistance Electronic Shock Protection ESP This unit is equipped with electronic shock protection as follows 40 seconds for CDDA CDA 120 seconds for MP3 recorded at 44 1kHz 128kbps 200 seconds for WMA ...

Page 20: ...media reproducible on this unit has the following limitations Maximum number of nested folders 8 Maximum number of files per disc 999 Maximum number of folders per disc 255 Maximum number of files per media device 2000 MP3 WMA written in formats other than those listed above will not play successfully and their file names or folder names will not be displayed properly MP3 WMA Encoder and CD Writer...

Page 21: ... number Installing a USB Device Gently lift the rubber USB slot cover 22 from the top and pull it down Insert your USB thumb drive into the USB slot on the front of the radio The unit will automatically search for MP3 and WMA files on the device and begin playback You can access USB PLAY mode from any other mode by pressing the SRC button 2 USb is displayed in the bottom left corner of the LCD NOT...

Page 22: ...k number to play Pressing the appropriate key repeatedly will scroll through the corresponding number and characters You can also use the rotary encoder 4 to enter search characters Press the rotary encoder to confirm each entry If you enter a three digit track number the unit will search the track immediately If you enter one or two digits press the BAND ENTER button 3 to begin the search or wait...

Page 23: ...CD will display the current directory name followed by the file currently playing 2 Turn the rotary encoder 4 to browse all available folders or files in the current directory 3 Press the rotary encoder button to select a folder or file If a folder is selected two apostrophes appear on the LCD indicating that the selection is a folder Repeat steps 2 and 3 to select a file for playback If a file is...

Page 24: ...ation when available appears on the LCD screen automatically during playback Press the DISP button 7 to manually display iPod playback information in the following order Track Elapsed Time Song TITLE ARTIST CATEGORY Album Name Clock Play Pause Press the 1 button 13 to suspend or resume play PAU flashes on the display when paused Track Selection Select a Track Press the TUNE CH 10 or TUNE CH 11 for...

Page 25: ... Category Search Mode 1 During iPod playback mode press the SELECT button 5 to enter iPod Category Search Mode 2 Turn the rotary encoder 4 to access categories in the following order Playlist Artist Album Genre Song Composer 3 After selecting the desired category press the BAND ENTER button 3 within 5 seconds to confirm 4 Turn the rotary encoder 4 to browse songs or folders in the current category...

Page 26: ...el Down 8 Change Band Confirm Entry Confirm Entry Confirm Entry Confirm Entry Change Band Confirm Entry 9 Display Set Clock Broadcast Infor mation Display Set Clock Display Set Clock ID3 Information Display Set Clock ID3 Information Display Set Clock Broadcast Infor mation 10 Preset Station 1 Play Pause Play Pause Play Pause Preset Station 1 11 Preset Station 2 Intro Scan Intro Scan Intro Scan Pre...

Page 27: ...f recording burning some CD R RWs may be incompatible with this unit After recording burning the session must be closed Please refer to your software s recommended procedures for closing a disc session Review your recording software to familiarize yourself with the correct recording burning procedures We recommend using the latest versions of ROXIOTM or NEROTM burning software In addition this uni...

Page 28: ...ground or to each other Check splices insulate all bare wires Blows fuses Power wire shorting to ground Make sure wire is not pinched Speaker wires shorting to ground Make sure wire is not pinched Incorrect fuse fuse too small Install fuse of correct rating CD skips too much Receiver mount is not solid or backstrap is not secure Check mounting and backstrap tighten if needed Installation angle mor...

Page 29: ... Range 87 5MHz 107 9MHz Mono Sensitivity 30dB 11dBf Quieting Sensitivity 50dB 15dBf Signal to Noise Ratio 1 kHz 58dB Stereo Separation 1 kHz 30dB Frequency Response 30Hz 12kHz 3dB AM Tuner Tuning Range 530 kHz 1710 kHz Sensitivity 20dB 15uV Signal to Noise Ratio 1 kHz 50dB Frequency Response 50Hz 2kHz 3dB Auxiliary Input Input Sensitivity 400mV RMS for 1 watt RMS into 4 ohms Frequency Response 20H...

Page 30: ...26 HD5112 ...

Page 31: ...ntenance section of your Installation and Operation Manual for additional information regarding the proper use of your product Limitations THE EXTENT OF THE COMPANY S LIABILITY UNDER THIS WARRANTY IS LIMITED TO THE REPAIR OR REPLACEMENT PROVIDED ABOVE AND IN NO EVENT SHALL THE COMPANY S LIABILITY EXCEED THE PURCHASE PRICE PAID BY PURCHASER FOR THE PRODUCT This Warranty is in lieu of all other expr...

Page 32: ...Audiovox Electronics Corporation Hauppauge NY 11788 Technical Assistance 1 800 323 4815 www jensen com 2007 Audiovox Ver 101207 Printed in China ...

Reviews: