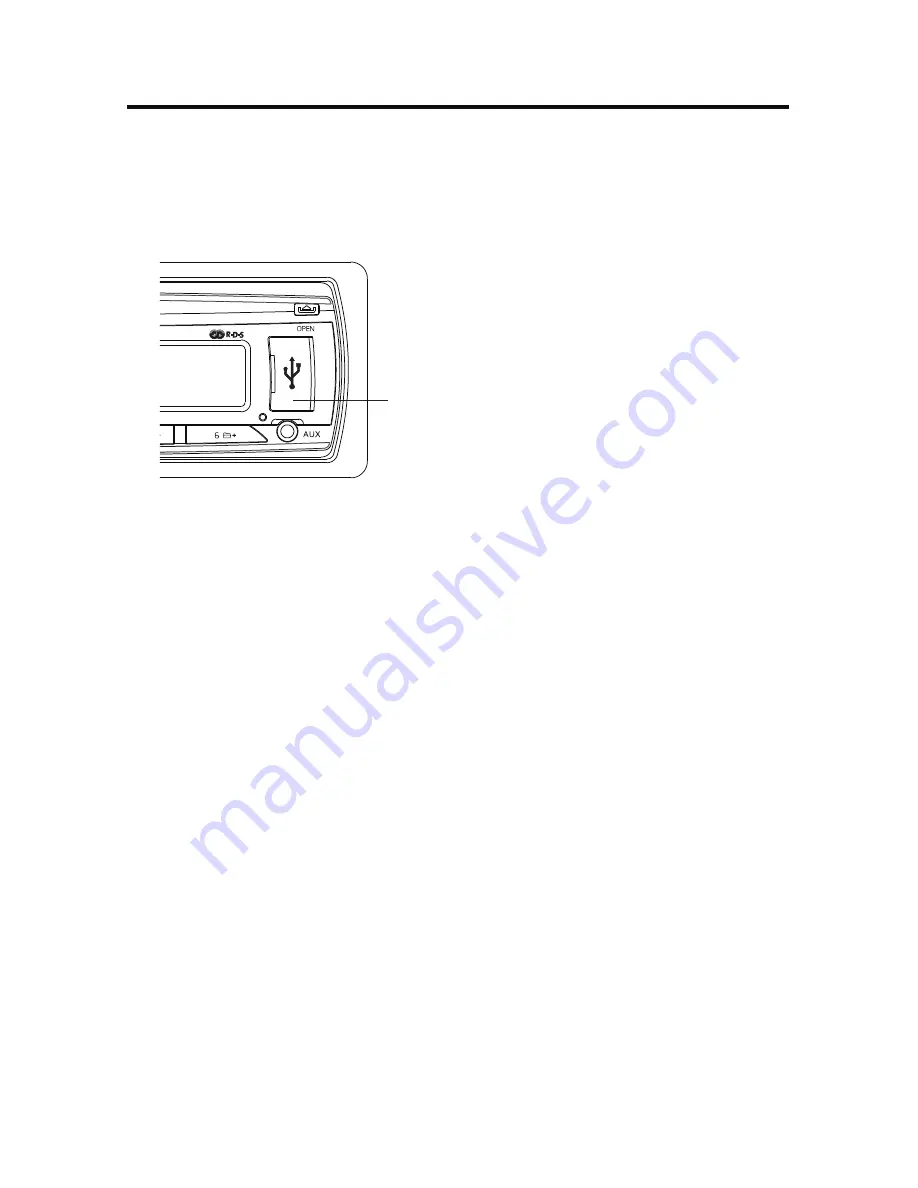
background image

27

DMR2116i

USBOPERATION

The unit contains a USB port. The USB port is located on the faceplate beneath the 

protective cover. You can connect an USB memory device using this port.
1.   Locate the USB Input Cover on the faceplate. 


USB Input Cover

2.  Lift the USB Input Cover to reveal the USB port.
3.   Insert the USB device into the USB port. The unit will read the audio files on 

the USB device automatically. “USB” appears on the display panel and MP3/

WMA file playback begins.

4.   If the unit is in another mode of operation press the 

SRC

 button on the 

faceplate.

Note:  When in USB play mode, be sure not to remove the USB device from the USB 

port.

Note:  The unit can only support a standard USB memory device. When connecting 

an MP3 player that uses normal batteries (non rechargeable batteries), the 

batteries should be removed from the MP3 player first and then connected to 

the USB port. Otherwise, damage to the batteries may result.

Note:  This unit supports a USB device with up to 8GB storage size. If there is any 

compatibility problems, we recommend you to format your USB device in 

FAT32 mode before using it. If the problem persists, consult your dealer for 

assistance.

Summary of Contents for DMR2116i

Page 1: ...DMR2116i Owner s Manual 160watts peak 40W x 4 ...

Page 2: ...e replacement must be the same amperage as shown on the fuse holder Never replace a fuse with another fuse of a different value Do not use a fuse with a higher amperage rating than the fuse originally supplied with your unit otherwise damage to the unit or a fire will result Made for iPod and Made for iPhone means that an electronic accessory has been designed to connect specifically to iPod or iP...

Page 3: ...aceplate 13 Installing the Faceplate 14 WIRING CONNECTIONS 15 CONTROLS AND INDICATORS 17 BASIC OPERATION 20 Turning the Unit On of Off 20 Selecting an Audio Source 20 Volume 20 Mute Control 20 System Settings 20 Setting the Clock 22 RADIO OPERATION 23 Choosing a Radio Band 23 Selecting a Frequency Band 23 Radio Tune Seek Function 23 Mono Stereo Reception Control 23 Local Distance Control 23 Saving...

Page 4: ... OPERATION 33 SPECIFICATIONS 35 TROUBLESHOOTING 36 CARE AND MAINTENANCE 37 COMMON REPLACEMENT PARTS 38 NOTES 39 FEATURES AM FM Receiver RDS EON Operation Automatic Memory Storing Fully Detachable Faceplate Preset Equalization USB and SD Card Interface iPod iPhone via USB Auxiliary Input Function ...

Page 5: ...r and the ground becomes detached there is a risk of damage to the products or fire Be sure to connect the color coded leads according to the wiring diagram Incorrect connections may cause the unit to malfunction or damage the vehicle s electrical system Wires for this product and those for other products may be different colors even if they have the same function When connecting this product to a...

Page 6: ...ing the insulation of the power supply lead of the unit and tapping into the lead The current capacity of the lead will be exceeded causing overheating Since an unique audio I C circuit is employed never wire the unit so the speaker leads are directly grounded or the left and right speaker leads are common When this product s source is switched ON a control signal is outputted through the blue lea...

Page 7: ...as a ball point pen to set the unit to its initial status INSTALLATION TOOLS Two removal wrenches are supplied for taking out the old unit and place with this brand name car radio The following tools and supplies may also be needed for the installation but are not supplied Installation Tools Phillips Screwdrivers Wire Stripper Wire Cutter Hammer Pencil Electrical Tape Electric Drill Installation S...

Page 8: ...ring diagram of the existing head unit before disconnecting any wires If you are not positive of the polarity of the existing wires from the speakers to the head unit install new wires 1 While the old unit is playing disconnect the wires from one speaker 2 Take a length of masking tape and fold it around the wire so it forms a flag 3 On the masking tape mark the polarity of the speaker wires as we...

Page 9: ...onnect the wiring Make sure it is connected up properly and the unit and the system work properly To ensure proper installation use only parts included with the unit The use of unauthorized parts can cause malfunctions Consult with your nearest dealer if installation requires the drilling of holes or other modifications to the vehicle Install the unit where it does not get in the driver s way and ...

Page 10: ...assis For details refer to the following illustrated installation methods DIN Front Mount Method A Installation Opening This unit can be installed in any dashboard having an opening as shown below Installing the Unit Be sure you test all connections first and then follow these steps to install the unit 1 After removing the old radio and mounting sleeve insert the supplied mounting sleeve into open...

Page 11: ... firmly in place 3 Attach the wires from the unit to existing wires See the wiring connections diagram Insert the radio into the dashboard Then apply the trim frame to the outside of radio 4 Support the radio using the supplied rear mounting bolt and steel bar See the parts list ...

Page 12: ...facturer for specific instructions NOTE Outer trim frame hook and mounting sleeve are not used for this installation 1 Remove the hooks on both sides 2 Align the screw holes of the mounting bracket supplied with the car and the screw holes of the main unit Tighten the two screws on each side of the unit Then fasten the brackets to the car 3 Attach the wires of the unit to the existing speaker wire...

Page 13: ...NG THE DETACHABLE FACEPLATE Removing the Faceplate 1 Press the release button on the faceplate and pull off the faceplate Faceplate Release Button 2 Keep the faceplate in the protective case Faceplate Protective Case ...

Page 14: ...or control buttons when detaching or re installing the faceplate 3 Do not touch the contacts on the faceplate or on the main unit body It may result in poor electrical contact 4 If any dirt or foreign substances adhere to the contacts they can be removed with a clean and dry cloth 5 Do not expose the faceplate to high temperatures or direct sunlight 6 Keep away any volatile agents e g benzene thin...

Page 15: ...e ends of the unused speaker outputs to prevent a short circuit Never ground the negative speaker terminals to chassis ground ISO Connector Fuse 10 A RCA OUT Left White Right Red Antenna Socket A B Connector A 1 Rear right speaker Purple 2 Rear right speaker Purple Black 3 Front right speaker Grey 4 Front right speaker Grey Black 5 Front left speaker White 6 Front left speaker White Black 7 Rear l...

Page 16: ...switch ON Off operations Yellow Memory Backup Wire Connect the Yellow Memory Backup wire to an electrical terminal always supplied with power regardless of ignition switch position White Panel Light Wire Connect the White Panel Light wire to the lighting circuit of vehicle This will illuminate the buttons on the display for night time operation This wire can also be connected to the Blue Remote wi...

Page 17: ...is button again to unmute the audio 2 SRC Mode Select TA Traffic Announcement Button Press this button to select radio auxiliary device USB SD or iPod iPhone play USB or SD mode can only be selected when an USB flash memory or SD card is inserted into the USB port or SD port respectively iPod iPhone mode can only be selected when an iPod iPhone is inserted into the USB port In radio mode press and...

Page 18: ...tton to release the faceplate from the chassis 6 USB Input Cover Front panel cover which when open allows the connection of a USB device device for playback of music files 7 Aux Input Jack Accepts a 3 5 mm jack which can accept signals from various audio video devices 8 6 Folder Up Button Press this button once to advance one folder 9 5 Folder Down Button Press this button once to go back one fold...

Page 19: ...each stored preset In iPod iPhone mode press this button to enter the category menu 15 Next Track Fast Forward Button Press the button once to advance to the next track Press and hold the button to fast forward 16 Band PTY Program Type Button Press this button to select or change the radio band FM1 FM2 FM3 AM1 or AM2 In FM radio mode press and hold this button to show the program type In iPod iPho...

Page 20: ...her the volume level Mute Control Press the MUTE button briefly to mute the sound instantly MUTE appears on the display panel Press it again to restore the sound Adjusting the volume knob also cancels the mute function System Settings When using the mobile audio system for the first time it is recommended that you customize the system settings to suit your preferences Sound Adjustment Mode The sou...

Page 21: ... panel This indicates that the loudness function is OFF 2 Rotate the volume knob to select ON or OFF Preset Equalizer Function The Preset Equalizer function applies a preset sound level to the unit s audio output signal in accordance to the type of music being played To select an equalizer preset 1 Press the volume knob repeatedly until EQ appears in the display panel 2 Rotate the volume knob to c...

Page 22: ...for the setting to take effect Setting the Clock The time clock can be set anytime when the power is on 1 Press and hold the volume knob The time appears on the display panel 2 Press and hold the volume knob until the hour blinks on the display panel Rotate the volume knob to set the hours 3 Press the volume knob for the minutes to blink Rotate the volume knob to set the minutes 4 Press and hold t...

Page 23: ... button for 2 seconds MANUAL appears on the display panel Press the or button once to manually adjust the radio frequency Tuning Press the or button once The radio will seek the next strong and clear frequency station Repeat to seek more stations with a strong signal in your listening area Mono Stereo Reception Control The reception of distant stations may be improved by selecting MONO operation M...

Page 24: ...tically scan and enter up to eighteen FM strong stations into the preset memory locations for the FM1 FM2 and FM3 bands or twelve strong AM stations into the preset memory locations for the AM1 and AM2 bands Each band stores up to six preset stations While listening to the FM radio press and hold the AS button on the faceplate The receiver will automatically scan and save stations of the 3 FM band...

Page 25: ... the program is received When a traffic announcement is received the unit will temporarily switch to the tuner mode regardless of the current mode and begin broadcasting the announcement After the traffic announcement is over it will return to the previous mode and volume level To interrupt a traffic announcement briefly press the TA button it will not switch off the TA mode Traffic Announcement S...

Page 26: ...ow Button Program Type Category 1 Program Type Category 2 1 Oldies Country News Info Sport 2 Soft Nostalgia Rock Classic Rock Talk 3 Jazz Classic Adult Soft Rock Top 40 4 Rhythm Soft Rock Foreign 5 Religious Music Religious Talk Personality 6 Public College Weather When a program type is selected the radio starts to search corresponding PTY information SEEK PTY appears on the display panel The rad...

Page 27: ... unit is in another mode of operation press the SRC button on the faceplate Note When in USB play mode be sure not to remove the USB device from the USB port Note The unit can only support a standard USB memory device When connecting an MP3 player that uses normal batteries non rechargeable batteries the batteries should be removed from the MP3 player first and then connected to the USB port Other...

Page 28: ...entially then it will play the files in the folders sequentially Pausing or Resuming Playback Press the 1 Play Pause button to pause playback PAUSE appears on the display panel Press the 1 Play Pause button again to resume playback Fast Forward or Fast Reverse Press and hold the button to fast forward Press and hold the button to fast reverse Selecting a Track To select the next or previous track ...

Page 29: ...gain to cancel the function Playing Tracks in a Random Order Press the 4 RDM Random button to play all the tracks in random order RDM and the track number appears on the display panel Press the 4 RDM button again to cancel the function Selecting a Folder Folder Down Press the 5 button once to go back one folder Folder Up Press the 6 button once to advance one folder ...

Page 30: ...rd slot Memory Card Slot 4 Install the faceplate The unit will search the MP3 WMA files in the card and start to play MP3 WMA files automatically CARD appears on the display panel 5 If the unit is in another mode of operation press the SRC button on the faceplate to select SD play mode Note This unit supports a SD MMC card with up to 8GB storage size If there is any compatibility problems we recom...

Page 31: ...olders on the SD card in this manner If the SD card has loose files and folders containing files it will play the loose files sequentially then it will play the files in the folders sequentially Pausing or Resuming Playback Press the 1 Play Pause button to pause playback PAUSE appears on the display panel Press the 1 Play Pause button again to resume playback Fast Forward or Fast Reverse Press and...

Page 32: ... to repeat the current track RPT and the track number appears on the display panel Press the 3 RPT button again to cancel the function Playing Tracks in a Random Order Press the 4 RDM Random button to play all the tracks in random order RDM and the track number appears on the display panel Press the 4 RDM button again to cancel the function Selecting a Folder Folder Down Press the 5 button once to...

Page 33: ...Selecting a Track 1 Select a category as described above When pressing the volume button to confirm the selected category the display will show the current catalog stored in the iPod or iPhone 2 Rotate the volume knob to change the track title to the next track or the previous track 3 Press the volume knob to play the selected track Pausing Playing When playing a track press the 1 button to pause ...

Page 34: ...ory When playing a track for more than 1 second press the button to play the current track from the start of that track When playing a track for less than 1 second press the button to play the previous track When playing a track press and hold the button or button for several seconds to play in fast reverse or fast forward Release the button to resume normal playback ...

Page 35: ...o 16dBf Stereo separation 1kHz 35dB Frequency response 30Hz 17kHz 3dB AM Tuner Tuning range AM 530 kHz 1710kHz Tuning range Europe 522kHz 1620kHz Sensitivity 20dB signal to noise 30uV Frequency response 50Hz 2kHz 3dB Auxiliary Input Input sensitivity 400mV RMS for 1 watt RMS into 4 ohms Frequency response 20Hz to 20kHz 3dB Input impedance 10 k ohms General Power supply 11 16 VDC negative ground Po...

Page 36: ...ied value No sound The volume is at minimum The wiring is not properly connected Adjust the volume to a desired level Check the wiring connection The operation keys do not work The built in microcomputer is not operating properly due to noise Press the RESET button The faceplate is not properly installed The radio does not work The antenna cable is not connected Insert the antenna cable firmly The...

Page 37: ...his occur the screen will not operate properly until the moisture has evaporated Replacing the Fuse Make sure the amperage matches the specified value when replacing the fuse s If the fuse is bad check the power connection and replace the fuse with a new one If the same problem occurs this might indicate a malfunction within the unit Warning When replacing a fuse the replacement must be the same a...

Page 38: ...38 Detachable Faceplate 30213890 Owner s Manual Kit 30613860 Wire Harness 30313840 Trim Ring 30413840 Main Sleeve 30113840 Hardware Bag 30513840 COMMON REPLACEMENT PARTS ...

Page 39: ...39 DMR2116i NOTES ...

Page 40: ...Audiovox Electronics Corporation Hauppauge NY 11788 Technical Assistance 1 800 323 4815 www mobile jensen com 2013 Audiovox Printed in China 128 9240 ...

Page 41: ...DMR2116i Owner s Manual 160watts peak 40W x 4 Manual del propietario vatios de potencia máxima 40W x 4 ...

Page 42: ...ible utilice otro con el mismo amperaje que se indica en el portafusibles Nunca reemplace un fusible por otro de diferente valor No utilice un fusible con una clasificación de amperaje mayor que el fusible original provisto en la unidad si lo hace la unidad se podrá dañar o incendiar Diseñado para iPod y Diseñado para iPhone significa que el accesorio electrónico fue diseñado para conectarlo espec...

Page 43: ...el frontal 14 CABLEADO 15 CONTROLES E INDICADORES 17 OPERACIÓN BÁSICA 20 Encendido y apagado de la unidad 20 Selección de una entrada de audio 20 Volumen 20 Control de silencio 20 Configuración del sistema 20 Configuración del reloj 22 OPERACIÓN DE LA RADIO 23 Selección de una banda de radio 23 Selección de una banda de frecuencia 23 Funciones de sintonización y búsqueda de la radio 23 Mando para ...

Page 44: ...D iPHONE 33 ESPECIFICACIONES 35 RESOLUCIÓN DE PROBLEMAS 36 CUIDADO Y MANTENIMIENTO 37 PIEZAS DE REPUESTO COMUNES 38 NOTAS 39 CARACTERÍSTICAS Radio AM FM Operación RDS EON Almacenamiento automático en memoria Panel frontal totalmente desmontable Ecualización preconfigurada Interfaz de USB y tarjeta SD iPod iPhone vía USB Función de entrada auxiliar ...

Page 45: ...tencia Si conecta los productos juntos y la puesta a tierra se separa existe riesgo de daños a los productos o incendio Asegúrese de conectar los cables de colores según el diagrama de cableado Las conexiones incorrectas pueden causar anomalías en la unidad o dañar el sistema eléctrico del vehículo Los cables de este producto y los de otros productos pueden tener diferentes colores aun cuando su f...

Page 46: ...e de alimentación de la unidad para acoplar otro cable y así alimentar otro equipo Excederá la capacidad de corriente del cable y éste se recalentará Como se utiliza un circuito integrado de audio exclusivo nunca cablee la unidad de modo de poner a tierra los cables del altavoz directamente o para compartir los cables izquierdo y derecho del altavoz Cuando la fuente de este producto se lleva a la ...

Page 47: ... RESET restablecer con un objeto punzante como un bolígrafo para configurar la unidad en su estado inicial HERRAMIENTAS PARA LA INSTALACIÓN Con esta radio de marca para automóviles se entregan dos llaves para extraer la unidad antigua y colocar la nueva Tal vez necesite las siguientes herramientas y materiales para la instalación pero no se incluyen Herramientas para la instalación Destornilladore...

Page 48: ...xistente antes de desconectar cables Si no está seguro de la polaridad de los cables existentes entre el altavoz y la unidad principal instale cables nuevos 1 Desconecte los cables de uno de los altavoces mientras la unidad antigua esté reproduciendo 2 Tome un trozo de cinta de carpintero y pliéguela alrededor del cable para formar una bandera 3 Marque en la cinta de carpintero la polaridad de los...

Page 49: ...onectada y que tanto ésta como el sistema funcionen adecuadamente Utilice únicamente las piezas que se incluyen con la unidad para garantizar una instalación correcta El uso de piezas no autorizadas puede provocar fallos de funcionamiento Consulte con su distribuidor más cercano en el caso de que la instalación requiera la realización de orificios u otras modificaciones del vehículo Instale la uni...

Page 50: ...asis de la unidad Para obtener más información consulte los métodos de instalación ilustrados a continuación Montaje frontal según la norma DIN Método A Abertura para instalación Esta unidad puede instalarse en cualquier tablero que tenga una abertura como la que se muestra a continuación Instalación de la unidad Asegúrese de probar todas las conexiones y luego siga estos pasos para instalar la un...

Page 51: ...ables existentes Consulte el diagrama de conexiones de los cables Introduzca la radio en el tablero Luego coloque el marco de guarnición en la parte exterior de la radio 4 Sostenga la radio con el tornillo de montaje posterior y la barra de acero provistas Vea la lista de piezas Para sostener la unidad Pared cortafuego ...

Page 52: ...sta instalación no se utiliza el marco de guarnición exterior el gancho y la funda de montaje 1 Quite los ganchos de ambos lados 2 Alinee los orificios para los tornillos del soporte de montaje suministrado con el vehículo con los orificios para los tornillos de la unidad principal Apriete los dos tornillos a cada lado de la unidad Luego fije los soportes al automóvil 3 Conecte los cables de la un...

Page 53: ...panel frontal 1 Presione el botón extraer en el panel frontal y retire el panel frontal Faceplate Release Button 2 Guarde el panel frontal en el estuche de protección Faceplate Protective Case Estuche de protección Panel frontal Botón de extracción Panel frontal ...

Page 54: ...a pantalla ni sobre los botones de control al extraer o al volver a instalar el panel frontal 3 No toque los contactos del panel frontal ni el cuerpo principal de la unidad Se puede causar un contacto eléctrico defectuoso 4 Si hay suciedad o sustancias extrañas adheridas a los contactos límpielos con un paño limpio y seco 5 No exponga el panel frontal a altas temperaturas ni a la luz solar directa...

Page 55: ...e 2 Rear right speaker Purple Black 3 Front right speaker Grey 4 Front right speaker Grey Black 5 Front left speaker White 6 Front left speaker White Black 7 Rear left speaker Green 8 Rear left speaker Green Black Connector B 1 No connection 2 No connection 3 No connection 4 Battery 12 V Yellow 5 Antenna power Blue 6 Panel light White 7 ACC Red 8 Ground Black Conector ISO Fusible de 10 A RCA DE SA...

Page 56: ... encendido Cable amarillo de copia de seguridad de la memoria Conecte el cable amarillo de copia de seguridad de la memoria a un terminal eléctrico que siempre reciba alimentación independientemente de la posición del interruptor de encendido Cable blanco de iluminación del panel Conecte el cable blanco de iluminación del panel al circuito de iluminación del vehículo Esto iluminará los botones de ...

Page 57: ... escuchar el audio de nuevo 2 Botón SRC modo selección TA anuncios sobre el tránsito Presione este botón para seleccionar la radio el equipo auxiliar o reproducción por USB SD o iPod iPhone Solo puede seleccionarse el modo USB o SD cuando se introduce una memoria flash USB o una tarjeta SD en el conector USB o SD respectivamente Solo puede seleccionarse el modo iPod iPhone cuando se introduce un i...

Page 58: ...ar el panel frontal del chasis 6 Cubierta de entrada de USB Cubierta del panel frontal que se abre para conectar un dispositivo USB para reproducir archivos de música 7 Conector de entrada auxiliar Compatible con conectores de 3 5 mm que acepten señales de diversos dispositivos de audio y video 8 Botón 6 carpeta hacia arriba Presione este botón una vez para avanzar a la siguiente carpeta 9 Botón 5...

Page 59: ...tomáticamente una presentación preliminar de 5 segundos de duración de cada preselección almacenada En la modalidad iPod iPhone presione este botón para ingresar en el menú del iPod iPhone 15 Botón pista siguiente avance rápido Presione el botón una vez para avanzar a la pista siguiente Mantenga presionado el botón para avanzar con rapidez 16 Botón Band PTY tipo de programa Presione este botón par...

Page 60: ...en en el panel frontal para regular la intensidad del volumen Cuanto mayor sea el número tanta más intensidad tendrá el volumen Control de silencio Presione brevemente el botón MUTE silencio para silenciar el sonido de inmediato Se muestra MUTE en la pantalla Vuélvalo a presionar para reanudar el sonido También se cancela la función de silencio al ajustar la perilla de volumen Configuración del si...

Page 61: ...curva de respuesta de frecuencia del audio para que el sonido se escuche más natural cuando el volumen es menor 1 Presione varias veces la perilla de volumen hasta que se muestre LOUD OFF sonoridad desactivada en la pantalla Esto indica que la función de sonoridad está desactivada 2 Gire la perilla de volumen para activar o desactivar esta función Función de ecualización preconfigurada La función ...

Page 62: ...EA AM en la pantalla 2 Gire la perilla de volumen para seleccionar la región del sintonizador AM Américas o EUR Europa 3 Deje la unidad en espera para que la configuración surta efecto Configuración del reloj El reloj puede configurarse en cualquier momento mientras la unidad esté encendida 1 Mantenga presionada la perilla de volumen Se muestra la hora en la pantalla 2 Mantenga presionada la peril...

Page 63: ...resionado el botón o durante 2 segundos En la pantalla se mostrará el mensaje MANUAL Presione el botón o una vez para ajustar manualmente la frecuencia de radio Sintonización Presione una vez el botón o La radio buscará la emisora siguiente con frecuencia potente y clara Repita la búsqueda de más emisoras con señal potente en su zona de audición Mando para recepción monofónica y estéreo La recepci...

Page 64: ...rá hasta dieciocho emisoras de radio de FM con señal potente en las posiciones prestablecidas de la memoria para las bandas FM1 FM2 y FM3 o doce emisoras de radio de AM con señal potente en las posiciones prestablecidas de la memoria para las bandas AM1 y AM2 Cada banda almacena hasta seis emisoras preseleccionadas Mientras escucha una emisora de radio FM mantenga presionado el botón AS en el pane...

Page 65: ...sobre el tránsito la unidad pasará temporalmente a la modalidad de radio independientemente de la modalidad actual y comenzará a transmitir el anuncio Al finalizar el anuncio la transmisión regresará a la modalidad y a la intensidad de volumen anteriores Para interrumpir un anuncio sobre el tránsito presione brevemente el botón TA esto no desactivará el modo TA Configuración de los Anuncios sobre ...

Page 66: ...ía 1 Tipo de programa categoría 2 1 De ayer música country Noticias Información Deportes 2 Música suave melancólica Rock Rock clásico Charlas 3 Jazz Clásica Adultos Rock suave Mejores 40 4 Rítmica Rock suave Extranjera 5 Música religiosa Charlas religiosas Personalidad 6 Público Universitario Clima Cuando se selecciona un tipo de programa la radio comienza a buscar la información PTY correspondien...

Page 67: ... otra modalidad presione el botón SRC en el panel frontal Nota Cuando está activada la modalidad de reproducción USB no quite el dispositivo USB del conector USB Nota La unidad sólo es compatible con un dispositivo de memoria USB estándar Si conecta un reproductor de archivos MP3 alimentado con baterías corrientes baterías no recargables en primer lugar debe quitar las baterías del reproductor de ...

Page 68: ...hivos en las carpetas Pausa o reinicio de la reproducción Presione el botón 1 reproducción pausa para detener la reproducción Siempre se muestra PAUSE pausa en la pantalla Vuelva a presionar el botón 1 reproducción pausa para reanudar la reproducción Avance rápido o retroceso rápido Mantenga presionado el botón para avanzar con rapidez Mantenga presionado el botón para retroceder con rapidez Selec...

Page 69: ...eproducción aleatoria de pistas Presione el botón 4 RDM Al azar para reproducir todas las pistas en orden aleatorio Se muestra RDM y el número de pista en la pantalla Presione otra vez el botón 4 RDM para cancelar la función Selección de una carpeta Carpeta hacia abajo Presione el botón 5 una vez para retroceder a la carpeta anterior Carpeta hacia arriba Presione el botón 6 una vez para avanzar un...

Page 70: ...mory Card Slot 4 Coloque el panel frontal La unidad buscará los archivos MP3 WMA en la tarjeta y automáticamente comenzará a reproducir los archivos MP3 WMA Se muestra CARD tarjeta en la pantalla 5 Si la unidad está funcionando en otra modalidad presione el botón SRC en el panel frontal para seleccionar el modo de reproducción SD Nota Esta unidad es compatible con tarjetas SD MMC de hasta 8 GB de ...

Page 71: ...Si la tarjeta SD tiene archivos sueltos y carpetas que contienen archivos reproducirá secuencialmente los archivos sueltos y luego reproducirá de la misma manera los archivos en las carpetas Pausa o reinicio de la reproducción Presione el botón 1 reproducción pausa para detener la reproducción Se muestra PAUSE pausa en la pantalla Vuelva a presionar el botón 1 reproducción pausa para reanudar la r...

Page 72: ...ista actual Se muestra RPT y el número de pista en la pantalla Presione otra vez el botón 3 RPT para cancelar la función Reproducción aleatoria de pistas Presione el botón 4 RDM Al azar para reproducir todas las pistas en orden aleatorio Se muestra RDM y el número de pista en la pantalla Presione otra vez el botón 4 RDM para cancelar la función Selección de una carpeta Carpeta hacia abajo Presione...

Page 73: ...be anteriormente Al presionar el botón de volumen para confirmar la categoría seleccionada la pantalla mostrará el catálogo actual almacenado en el iPod o iPhone 2 Gire la perilla de volumen para cambiar el título de la pista a la pista siguiente o anterior 3 Presione la perilla de volumen para reproducir la pista seleccionada Pausa de la reproducción Al reproducir una pista pulse el botón 1 para ...

Page 74: ...cir una pista durante más de 1 segundo presione el botón para reproducir la pista actual desde el comienzo de la pista Al reproducir una pista durante menos de 1 segundo presione el botón para reproducir la pista anterior Al reproducir una pista mantenga presionado el botón o el botón durante varios segundos para reproducir la pista avanzando o retrocediendo rápidamente Suelte el botón para reanud...

Page 75: ...éreo 1kHz 35dB Frecuencia de respuesta 30Hz 17kHz 3dB Sintonizador de AM Rango de sintonización AM 530 kHz 1 710kHz Rango de sintonización Europa 522kHz 1620kHz Sensibilidad a 20 dB de relación señal ruido 30uV Frecuencia de respuesta 50Hz 2kHz 3dB Entrada auxiliar Sensibilidad de entrada 400mV RMS para 1 vatio RMS a 4 ohmios Frecuencia de respuesta 20Hz a 20kHz 3dB Impedancia de entrada 10 k ohmi...

Page 76: ...ado No hay sonido El volumen está al nivel mínimo Los cables no están correctamente conectados Ajuste el volumen al nivel deseado Compruebe la conexión de los cables Los botones de operación no funcionan La microcomputadora integrada no funciona correctamente debido al ruido Pulse el botón RESET Reinicio El panel frontal no está colocado correctamente La radio no funciona El cable de la antena no ...

Page 77: ...caso la pantalla no funcionará correctamente hasta que la humedad se evapore Reemplazo del fusible Cuando cambie los fusibles asegúrese de que el amperaje coincida con el valor especificado Si el fusible está quemado revise la conexión de alimentación y reemplácelo con un fusible nuevo Si el problema se repite la unidad podría tener una anomalía Advertencia Al reemplazar un fusible utilice otro co...

Page 78: ...ntal desmontable 30213890 Kit del Manual del propietario 30613860 Mazo de cables 30313840 Perfil embellecedor exterior 30413840 Abrazadera principal 30113840 Bolsa de tornillería 30513840 PIEZAS DE REPUESTO COMUNES ...

Page 79: ...39 DMR2116i NOTAS ...

Page 80: ...Audiovox Electronics Corporation Hauppauge NY 11788 Technical Assistance 1 800 323 4815 www mobile jensen com 2013 Audiovox Imprimido en China 128 9240 ...

Reviews: