background image

7

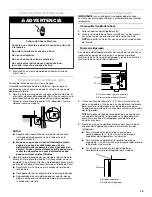
6. Turn shutoff valve ON.
7. Check for leaks. Tighten any nuts or connections (including 

connections at the valve) that leak.

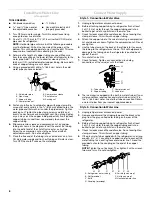
Style 3 - Connection to Shut-off Valve

1. Unplug refrigerator or disconnect power.
2. Remove and discard the shipping tape and the black nylon 

plug from the gray, coiled water tubing on the rear of the 
refrigerator.

3. Before attaching copper tubing to refrigerator, flush at least 

2 qt (1.9 L) of water through the copper tubing and into a 
bucket to get rid of any particles in the water line. 

4. Check for leaks around the saddle valve. Do not overtighten 

clamp or sleeve. This will crush copper tubing.

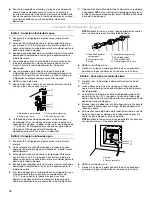
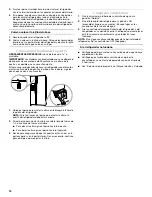
5. Push the bulb end of the tubing into the water valve as far as it 

will go. Thread the provided nut onto the water valve as 
shown.
NOTE: Tighten the nut by hand. Then tighten it with a wrench 
two more turns. Do not overtighten. 

6. Turn shutoff valve ON.
7. Check for leaks. Tighten any nuts or connections (including 

connections at the valve) that leak.

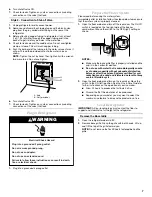
Plug in Refrigerator

1. Plug into a grounded 3 prong outlet. 

Prepare the Water System

Please read before using the water system.
Immediately after installation, follow the steps below to make sure 
that the water system is properly cleaned.

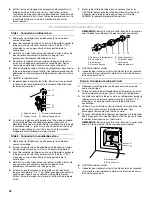
1. Open the freezer door and turn off the ice maker. The On/Off 

switch is located on the top right side of the freezer 
compartment. Move the switch to the OFF (right) setting as 
shown.

NOTES:

Make sure the base grille filter is properly installed and the 
cap is in the horizontal position. 

Do not use with water that is microbiologically unsafe 
or of unknown quality without adequate disinfection 
before or after the system. Systems certified for cyst 
reduction may be used on disinfected waters that may 
contain filterable cysts.

2. Open the freezer door and turn on the ice maker. Move the 

switch to the ON (left) position. See the Use & Care Guide for 
further instructions on the operation of your ice maker.

Allow 24 hours to produce the first batch of ice. 

Discard the first three batches of ice produced. 

Depending on your model, you may want to select the 
maximum ice feature to increase the production of ice.

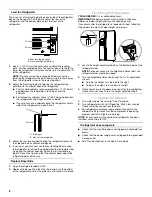
Level Refrigerator

IMPORTANT: All four leveling legs must contact the floor to 
support and stabilize the full weight of the refrigerator.

Remove the Base Grille

1. Open the refrigerator doors to 90°.
2. Remove base grille. Grasp the grille with both hands. Lift up 

and tilt the top of the grille toward you. 
NOTE: Do not remove the Tech Sheets fastened behind the 
grille.

A. Bulb
B. Nut (provided)

A
B

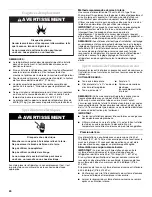
Electrical Shock Hazard

Plug into a grounded 3 prong outlet.

Do not remove ground prong.

Do not use an adapter.

Do not use an extension cord.

Failure to follow these instructions can result in death, 
fire, or electrical shock.

WARNING

Summary of Contents for JCB2585WES

Page 1: ...________________________________________ Phone number__________________________________________________ Model number __________________________________________________ Purchase date __________________________________________________ Tableof Contents Índice Tabledes matières ASSISTANCE OR SERVICE 1 REFRIGERATOR SAFETY 2 INSTALLATION REQUIREMENTS 2 Tools and Parts 2 Product Dimensions 2 Location Req...

Page 2: ...pending on water line connections you may also need a 6 35 mm nut and 6 35 mm ferrule ProductDimensions Top View You can be killed or seriously injured if you don t immediately You can be killed or seriously injured if you don t follow All safety messages will tell you what the potential hazard is tell you how to reduce the chance of injury and tell you what can happen if the instructions are not ...

Page 3: ...e back of the refrigerator is 78 198 1 cm long When leveling legs are fully extended to 1 25 mm below the refrigerator add 19 mm to the height dimensions Front View Model Size A B C 23 654 L 68 174 6 cm 68 175 0 cm 68 174 0 cm 25 694 L 71 182 2 cm 71 182 5 cm 71 181 6 cm 21 54 1 cm 66 167 7 cm 3 9 2 cm C A B Model Size Height A 23 654 L 25 694 L 64 164 8 cm 67 172 1 cm 35 90 6 cm A 3 9 2 cm ...

Page 4: ... should permit doors to open fully See the Door Swing Dimensions section Do not install the refrigerator near an oven radiator or other heat source nor in a location where the temperature will fall below 55 F 13 C Floor must support refrigerator weight more than 600 lbs 272 kg door panels and contents ElectricalRequirements Before you move your refrigerator into its final location it is important ...

Page 5: ...ystem is less than 40 to 60 psi 276 to 414 kPa Check to see whether the sediment filter in the reverse osmosis system is blocked Replace the filter if necessary Allow the storage tank on the reverse osmosis system to refill after heavy usage If your refrigerator has a water filter it may further reduce the water pressure when used in conjunction with a reverse osmosis system Remove the water filte...

Page 6: ...particles in the water line 3 Check for leaks around the saddle valve Do not overtighten clamp or sleeve This will crush copper tubing 4 Attach the copper tube to the valve inlet using a compression nut and sleeve as shown Tighten the compression nut Do not overtighten 5 Use the tube clamp on the back of the refrigerator to secure the tubing to the refrigerator as shown This will help prevent dama...

Page 7: ... switch is located on the top right side of the freezer compartment Move the switch to the OFF right setting as shown NOTES Make sure the base grille filter is properly installed and the cap is in the horizontal position Do not use with water that is microbiologically unsafe or of unknown quality without adequate disinfection before or after the system Systems certified for cyst reduction may be u...

Page 8: ...Open the refrigerator doors to 90 2 Replace the base grille Place the lower clips into the bottom of the refrigerator and roll the grille up until it snaps into place Door HeightAdjustment TOOLS NEEDED or adjustable wrench IMPORTANT Models are preset with a quarter s thickness difference in door height and may not need adjusting If necessary after the refrigerator is loaded with food follow the st...

Page 9: ...______________________________________________ SEGURIDAD DEL REFRIGERADOR REQUISITOS DE INSTALACIÓN Piezasyherramientas IMPORTANTE Observe todos los códigos y reglamentos aplicables Instalador Deje las instrucciones de instalación con el propietario Propietario Guarde las instrucciones de instalación para referencia futura y para que puedan ser usadas por el inspector eléctrico local Mantenga un t...

Page 10: ...icadas consideran las patas niveladoras extendidas como mínimo 6 35 mm por debajo del refrigerador El cable de suministro de energía es de 66 167 7 cm de largo La línea de agua ajustada a la parte posterior del refrigerador es de 78 198 1 cm de largo Si las patas niveladoras están totalmente extendidas 1 25 mm por debajo del refrigerador agregue 19 mm a las medidas de altura Taladro manual o eléct...

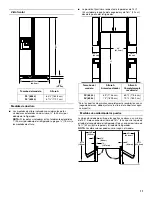
Page 11: ...ustarse la altura de la abertura según se muestra Medidas de oscilación de las puertas La ubicación debe permitir que las puertas se abran a un mínimo de 150 Deje un espacio mínimo de 13 34 cm entre la pared y el lado del congelador del refrigerador Deje un espacio mínimo de 16 42 cm entre la pared y el lado del refrigerador NOTA Las dimensiones pueden variar según el modelo Tamaño del modelo Altu...

Page 12: ...sición deseada Requisitos delsuministro de agua Reúna las herramientas y piezas necesarias antes de comenzar la instalación Lea y siga las instrucciones provistas con cualquiera de las herramientas enlistadas aquí HERRAMIENTAS NECESARIAS NOTA El distribuidor de su refrigerador tiene un juego disponible con una válvula de cierre tipo montura de 6 35 mm una unión y tubería de cobre Antes de comprar ...

Page 13: ... izquierda del refrigerador hasta la tubería de agua Agregue 7 pies 2 1 m para poder mover el refrigerador para limpiarlo Use tubería de cobre de 6 35 mm de diámetro externo Asegúrese que ambos extremos de la tubería de cobre están cortados a escuadra 4 Usando un taladro conectado a tierra haga un orificio de 6 35 mm en la tubería de agua fría que Ud eligió 5 Sujete la válvula de cierre al tubo de...

Page 14: ... gris de agua enrollada en la parte trasera del refrigerador 3 Antes de fijar la tubería de cobre al refrigerador deje correr por lo menos 2 qt 1 9 L de agua a través de la tubería de cobre y dentro de una cubeta para eliminar cualquier partícula dentro de la tubería de agua 4 Busque fugas alrededor de la válvula tipo montura No apriete demasiado la abrazadera o la manga Se puede quebrar la tuberí...

Page 15: ...lla de la base 1 Abra las puertas del refrigerador a 90 2 Quite la rejilla de la base Tome la rejilla con las dos manos Levante e incline la parte superior de la rejilla hacia Ud NOTA No quite las Hojas Técnicas que están sujetas detrás de la rejilla Nivele el refrigerador A cada lado del refrigerador detrás de la rejilla de la base hay un juego de dos pernos de nivelación Los pernos superiores aj...

Page 16: ...ltura en la bisagra inferior de la puerta del refrigerador NOTA Para fácil acceso al perno para ajustar la altura la puerta del refrigerador debe estar cerrada 2 Gire el perno para ajustar la altura usando la llave de tuerca de o una llave de tuerca ajustable Para elevar la altura gire el perno hacia la derecha Para bajar la altura gire el perno hacia la izquierda 3 Revise para asegurase de que la...

Page 17: ...achat____________________________________________________ SÉCURITÉ DU RÉFRIGÉRATEUR EXIGENCES D INSTALLATION Outillageetpièces IMPORTANT Respecter toutes les prescriptions des codes et règlements en vigueur Installateur Remettre les instructions d installation au propriétaire Propriétaire Conserver les instructions d installation pour consultation ultérieure et pour utilisation par l inspecteur lo...

Page 18: ...s avec les pieds de nivellement déployés à la hauteur minimum de 6 35 mm sous le réfrigérateur Le cordon d alimentation mesure 66 167 7 cm de long La canalisation d eau fixée à l arrière du réfrigérateur mesure 78 198 1 cm de long Lorsque les pieds de nivellement sont complètement déployés à 1 25 mm sous le réfrigérateur ajouter 19 mm aux dimensions de hauteur Perceuse manuelle ou électrique conve...

Page 19: ... illustré Dimensions pour le pivotement des portes L emplacement d installation doit permettre l ouverture des portes à un angle minimal de 150 Prévoir un dégagement minimal de 13 34 cm entre le mur latéral et le côté du compartiment de congélation Prévoir un dégagement minimal de 16 42 cm entre le mur latéral et le côté du compartiment de réfrigération REMARQUE Les dimensions peuvent varier en fo...

Page 20: ...mentationen eau Rassembler les outils et pièces nécessaires avant de commencer l installation Lire et suivre les instructions fournies avec les outils indiqués ici OUTILLAGE REQUIS REMARQUE Votre marchand de réfrigérateurs présente une trousse disponible avec un robinet d arrêt à étrier de 6 35 mm un raccord et un tube en cuivre Avant l achat s assurer que le robinet d arrêt à étrier est conforme ...

Page 21: ...iser un tube en cuivre de 6 35 mm de diamètre extérieur Veiller à ce que le tube soit coupé d équerre aux deux extrémités 4 À l aide d une perceuse électrique reliée à la terre percer un trou de 6 35 mm dans la canalisation d eau froide choisie 5 Fixer le robinet d arrêt sur le tuyau d alimentation en eau à l aide d une bride de tuyau Vérifier que le raccord du robinet est bien engagé dans le trou...

Page 22: ...et le bouchon en nylon noir du serpentin gris pour l eau à l arrière du réfrigérateur 3 Avant de raccorder le tube en cuivre au réfrigérateur purger le tube en cuivre en laissant couler au moins 2 pintes 1 9 L d eau dans un seau pour éliminer toute particule de la canalisation 4 Vérifier s il y a des fuites autour du robinet d arrêt à étrier Ne pas serrer excessivement la bride ou la bague Ceci pr...

Page 23: ...r la grille des deux mains Soulever la grille et incliner le dessus vers soi REMARQUE Ne pas enlever les fiches techniques fixées derrière la grille Niveler le réfrigérateur Il y a un jeu de deux boulons de nivellement de chaque côté du réfrigérateur derrière la grille de la base Les boulons supérieurs ajustent l arrière du réfrigérateur et les boulons inférieurs ajustent l avant du réfrigérateur ...

Page 24: ...e du réfrigérateur doit être fermée 2 Tourner le boulon d ajustement de la hauteur à l aide de la clé de ou de la clé à molette Pour augmenter la hauteur tourner le boulon vers la droite Pour diminuer la hauteur tourner le boulon vers la gauche 3 Vérifier les portes pour s assurer qu elles sont égales en haut et en bas Si nécessaire continuer à tourner le boulon d ajustement de la hauteur Achever ...

Reviews: