background image

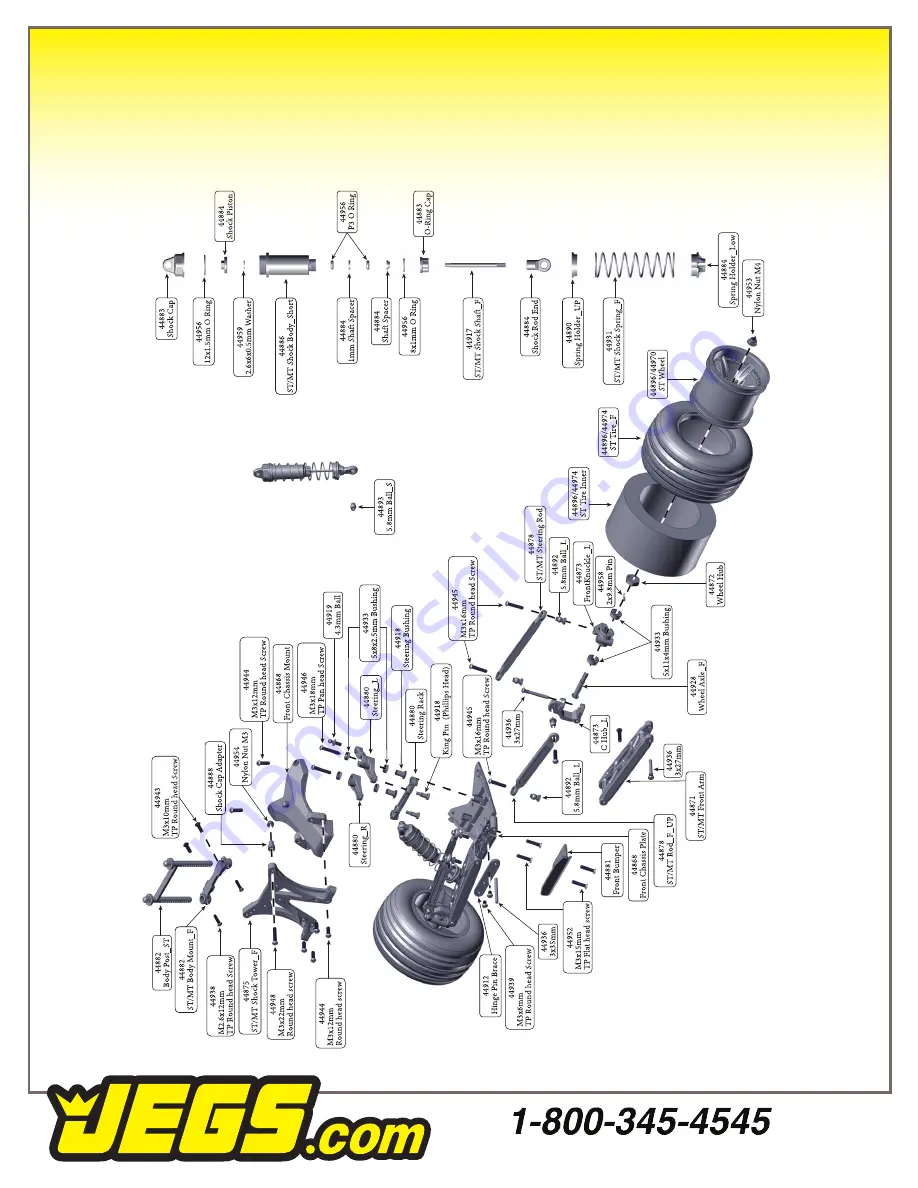
Front End Exploded View

8

Summary of Contents for Holeshot 555-44200

Page 1: ...Stadium Truck Assembly Guide 555 44200 Holeshot Assembly Instruction Parts List ...

Page 2: ...ists of many moving parts like gears shafts and tires Avoid touching these areas when the battery is connected Many parts of the Holeshot will become hot after running Allow the parts to sufficiently cool before conducting any maintenance Beginning a Run 1 Place the Holeshot with the wheels off the ground 2 Confirm that the speed controller switch is OFF and connect the motor and battery 3 Switch ...

Page 3: ...ht side of the transmitter If you hear short beep or beeping please replace your transmitter batteries immediately before operating your vehicle Step 5 Turn on the Truck You can start the Holeshot by activating the on off switch Turn the transmitter on before starting the truck Step 6 Testing Operation Before driving the Holeshot ensure that everything is operating correctly Make sure wheels turn ...

Page 4: ...amper Steering Rod Velcro Strap Main Chassis Battery Compartment Rear Body Mount Dog Bone Motor Transmission Slipper Clutch Rear Arm Rear Shock Tower ESC Electronic Speed Control Receiver Box Steering Servo Front Chassis Mount Front Body Mount Front Arm Front Up Rod ...

Page 5: ...TH Rev Trigger LED Battery Compartment Antenna Wire Bind Button B Battery 3 Channel Auxiliary 2 Channel Throttle 1 Channel Steering Motor ESC Electronic Speed Control Channel 2 Battery Receiver Steering Servo Channel 1 Motor ESC Electronic Speed Control Channel 2 Battery Receiver Steering Servo Channel 1 ...

Page 6: ...r are bound together the receiver s LED light will turn solid 6 This may take up to 30 seconds otherwise repeat step 1 to 5 Fail Safe Adjustment 1 Press and hold the receiver binding button until the LED light flashes 2 Adjust the throttle trigger and steering wheel to adjust the position 3 Press the binding button to program Once the positions have been programmed the LED light will flash and sta...

Page 7: ...Basic Operation 6 For more transmitter details please refer to the JEGS 30 user manual Left Right Switch Off Switch On Forward Brake Push trigger twice for reverse ...

Page 8: ...pper Clutch Adjustment First place the 2 0mm Allen wrench tool included into the center drive cup horizontally through the drive cup where the dog bone pin sits and hold by hand to lock the transmission Second tighten the slipper adjustment nut in a clock wise rotation by using 7mm hex driver or the 4 way tool included until it stops then loosen it counter clockwise by 1 turn Once the initial adju...

Page 9: ...Front End Exploded View 8 ...

Page 10: ...9 Main Chassis Rear End Exploded View ...

Page 11: ...Differential Exploded View Gearbox Exploded View 10 ...

Page 12: ...ial and workmanship only Problems that arise from normal wear abuse neglect or any damage that arises as a result of improper use incorrect batteries overheating are not covered by this warranty The warranty also does not cover any problems resulting from crashes JEGS is not liable for any loss or damages resulting from the use or misuse of this product or any of the accessories or chemicals relat...

Reviews: