

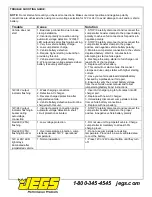

TROUBLE SHOOTING GUIDE:
NOTE:
Do not start vehicle until you check all connections. Make sure correct positive and negative polarity
connections are achieved when using manual voltage selection for 12V or 24V to avoid damage to unit and/or vehicle
battery.
Trouble
Cause
Solution
Vehicle does not
start
1. Bad clamp connection due to loose
clamp installation.
2. Incorrect polarity connection during
automatic voltage detection. 12V/24V
LED output indicators flashing & buzzing.
3. Very low vehicle battery charge.
4. Low Jump starter charge.
5. Vehicle battery defective.
6. Require higher starting current than
provide by this unit.
7. Vehicle electrical system faulty.
8. Wrong manual voltage selected when
battery is severely discharged.
1. STOP! Carefully disconnect and reconnect the
Jump starter booster clamps to the proper battery
polarity to achieve full connections for positive &
negative polarity.
2. STOP! Carefully disconnect and reconnect the
Jump starter booster clamps to the proper
positive and negative vehicle battery polarity.
3. Maintain Jump starter connection to the vehicle
depleted battery. Wait 3-4 minutes before
attempting to start vehicle again.
4. Recharge the Jump starter to full charge or at
least 50% of charge status.
5. Replace with new battery.
6. This unit will not start vehicle. Disconnect
clamps and use Jump starter with higher starting
current.
7. Have your vehicle alternator/starter/battery
checked by a professional for repair.
8. Ensure to verify the correct battery voltage
from the vehicle's owner manual and follow
jumpstarting/battery boost instructions.
12V/24V output
indicator flashing
1. Weak charging connectors.
2. Defective AC charger.
3. Reverse charged protection after
jumpstarted vehicle.
4. Vehicle battery defective & will not be
charged with this unit.
1. Insert AC charger plug to full contact into DC
charger port.
2. Replace with new AC charger.
3. Immediately disconnect Jump starter clamps
from vehicle battery connections.
4. Replace with new battery.
12V/24V output
indicator flashing &
buzzer during
autovoltage
connection
1. Incorrect polarity connection during
automatic voltage detection & short
circuit protection activated.
1. STOP! Carefully disconnect and reconnect the
Jump starter booster clamps to the proper
positive & negative vehicle battery polarity.
Red LED (25%)
flashing
1. Low voltage protection.
1. DO not use unit to jumpstart vehicle. Charge
Jump starter immediately to at least 50%
charging level.
Red LED (25%)
flashing & buzzer
1. Over temperature protection. Jump
starter exceeded 140° F operational
temperature.
1. Do not use Jump starter at existing
temperature. Place unit in a well ventilated area
to cool the battery.
12V or 24V LED
light stays
illuminated after
jumpstarted vehicle
1. Normal operation.
1. Press 12V or 24V output button until they turn
off.
1-800-345-4545 jegs.com


