JCB, SO53 3LEwww.JCBDIY.comCustomer Helpline 0333 0143092
Safety and operating manual
Power Planer
JCB-PP1050
Page 1: ...JCB SO53 3LE www JCBDIY com Customer Helpline 0333 0143092 Safety and operating manual Power Planer JCB PP1050...
Page 2: ......
Page 3: ...nd matching outlets will reduce risk of electric shock b Avoid body contact with grounded surfaces such as pipes radiators ranges and refrigerators There is an increased risk of electric shock if your...
Page 4: ...gloves away from moving parts Loose clothes jewellery or long hair can be caught in moving parts g If devices are provided for the connection of dust extraction and collection facilities ensure these...
Page 5: ...ied repair person using only identical replacement parts This will ensure that the safety of the power tool is maintained PLANER SAFETY WARNINGS 1 Wait for the cutter to stop before setting the tool d...
Page 6: ...y user must read instruction manual Warning Wear ear protection Wear eye protection Wear dust mask Double insulation Waste electrical products should not be disposed of with household waste Please rec...
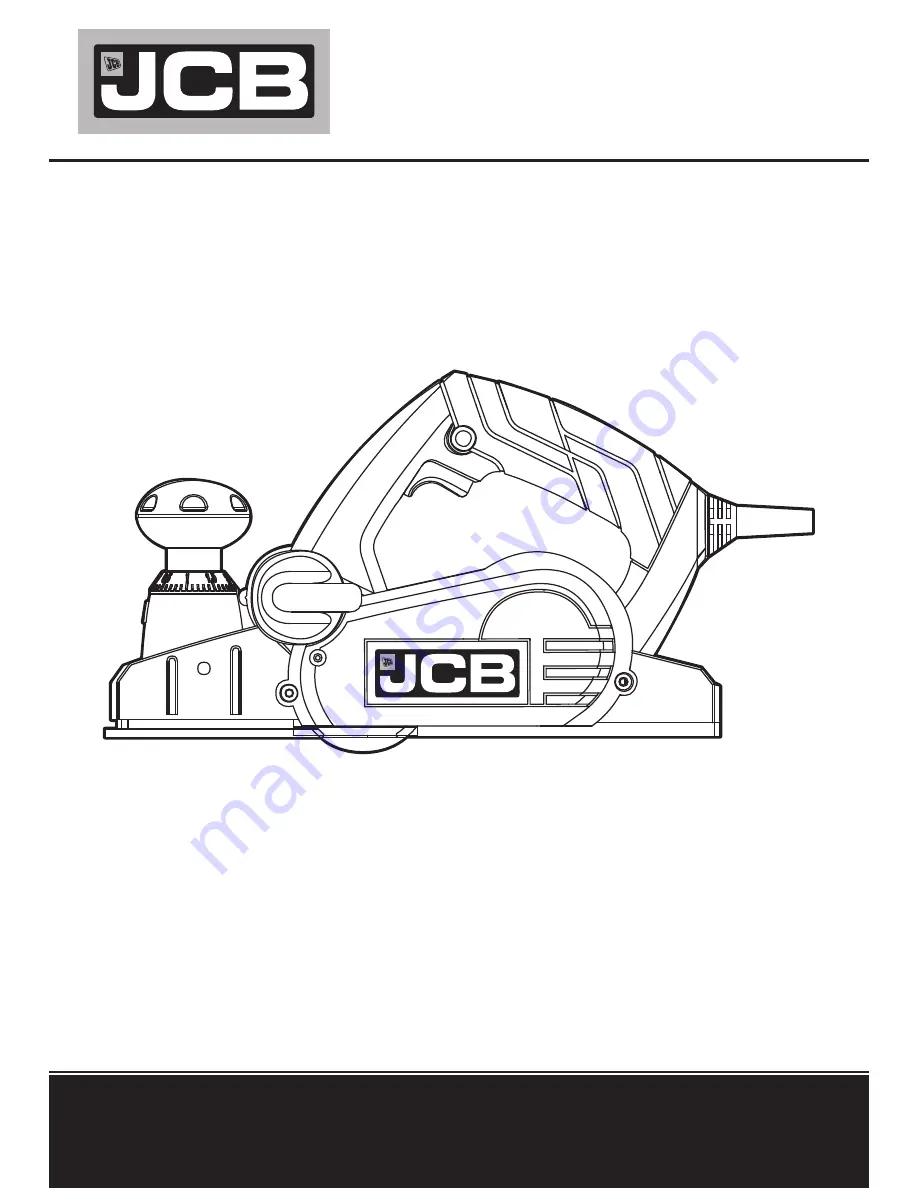
Page 7: ...BOLT 7 REBATE PARALLEL GUIDE 8 LOCKING SCREW 9 BASE PLATE 10 V GROOVES 11 REBATE DEPTH GAUGE 12 CUTTING DEPTH ADJUSTMENT 13 BLADE See D1 14 BLADE CLAMP See D1 15 SPANNER See D1 16 LARGE PULLEY See E...
Page 8: ...protection when sound pressure is over 80dB A WARNING The vibration emission value during actual use of the power tool can differ from the declared value depending on the ways in which the tool is use...
Page 9: ...dance with these instructions and keep well lubricated where appropriate If the tool is to be used regularly then invest in anti vibration accessories Avoid using tools in temperatures of 10o C or les...
Page 10: ...event accidental starting Depress the lock off button 1 then on off switch 2 and release lock off button 1 The machine is working now To switch off just release the on off switch See A 2 CUTTING DEPTH...
Page 11: ...AND EMPTYING THE DUST BAG SEE FIG C2 After using your planer for an extended period of time or when planing wet green timber chips may build up in the dust exhaust outlet and require clearing Chip bui...
Page 12: ...e 3 bolts approximately 1 2 rotation counter clockwise See D1 Holding the blade clamp 14 in position using a piece of wood slides the blade 13 out of the blade clamp to remove the blade from the blade...
Page 13: ...cing or maintenance 2 The cutting blades will be turning and may cause injury Loosen screw and remove belt cover 5 remove worn drive belt from large pulley 16 and pinion 17 and clean them See F lace t...
Page 14: ...maintain all of the base plate flat on the work surface to prevent the cutting blade jumping Move the plane evenly over the work surface It is best to use small depths of cut and repeat the planing pr...
Page 15: ...ate depth using the scale and the mark on the planer housing next to the scale See H Loosen fasten bolt 6 and adjust the required rebating width max 82 mm See I Tighten locking screw 8 Adjust the desi...
Page 16: ...place Keep the motor ventilation slots clean Keep all working controls free of dust Occasionally you may see sparks through the ventilation slots This is normal and will not damage your power tool If...
Page 17: ...ate of purchase If your JCB power tool becomes defective within this warranty period we guarantee to Replace or repair all defective parts free of charge or Repair products free of charge or Replace t...
Page 18: ...ing cutter Complies with the following Directives EC Machinery Directive 2006 42 EC EC Electromagnetic Compatibility Directive 2004 108 EC RoHS Directive 2011 65 EU Standards conform to EN 60745 1 EN...
Page 19: ......
Page 20: ......