background image

993/85700

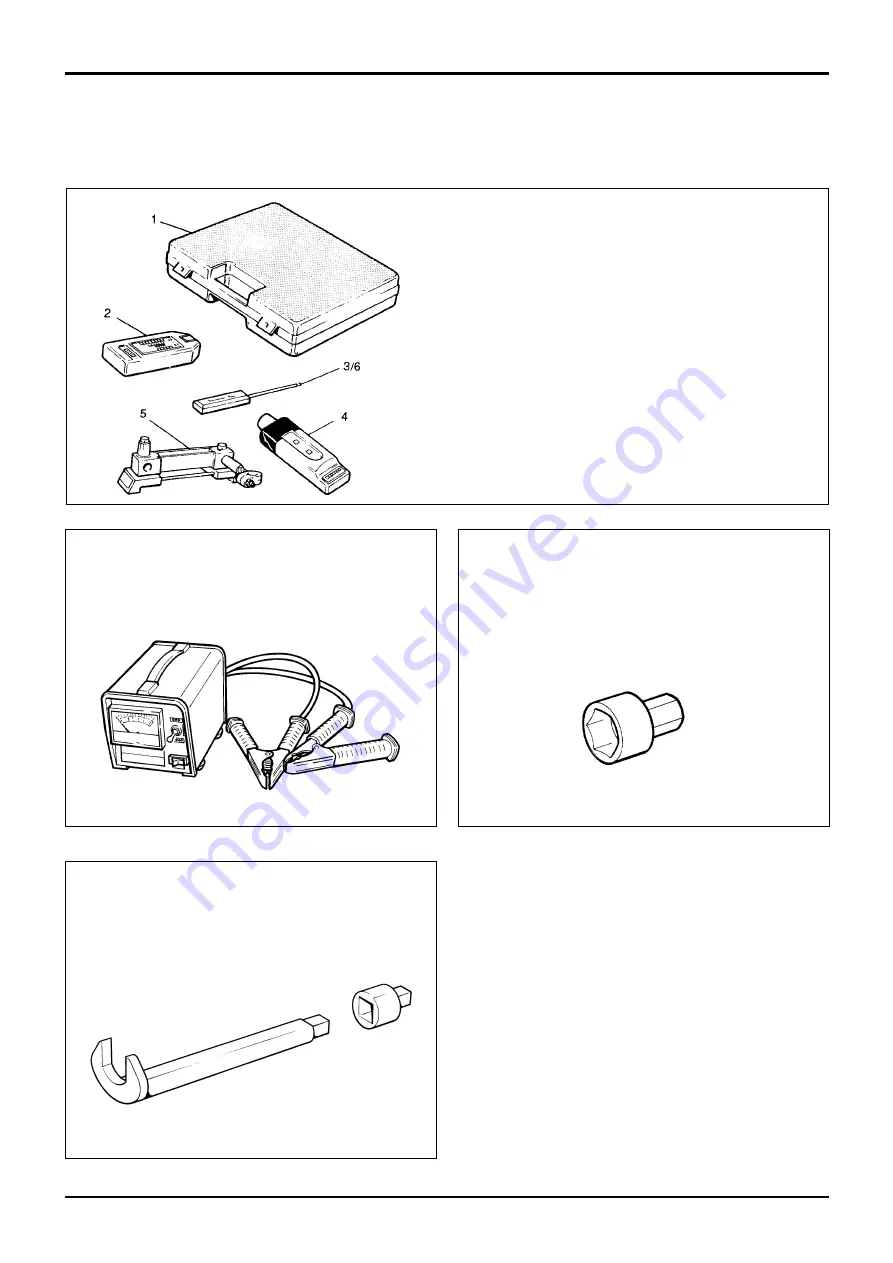
Battery Tester

AVO Test Kit

1

892/00283

Tool Kit Case

2

892/00298

Fluke Meter 85

3

892/00286

Surface Temperature Probe

4

892/00284

Venture Microtach Digital 
Tachometer

5

892/00282

100 amp Shunt - open type

6

892/00285

Hydraulic Temperature Probe

825/00410

15 mm Crowfoot Wrench

825/99833

Adapter

1 - 1

Section C

Electrics

9803/3280

Section C

1 - 1

Issue 1

Service Tools

S216200

892/00882

Socket for Alternator Pulley Nut

S216770

S239510

S188231

www.WorkshopManuals.co.uk

Purchased from www.WorkshopManuals.co.uk

Summary of Contents for 214e

Page 1: ...al 3CX 4CX 214e 214 215 217 VARIANTS Backhoe Loader From M c No 930000 Onwards From M c No 903000 Onwards USA PUBLISHED BY THE TECHNICAL PUBLICATIONS DEPARTMENT OF JCB SERVICE WORLD PARTS CENTRE WATER...

Page 2: ...The remaining sections are alphabetically coded and deal with Dismantling Overhaul etc of specific components for example A Attachments B Body Framework etc The page numbering in each alphabetically c...

Page 3: ...l circuit pressure and M R V operating pressure Pressure Pressure that is above neutral circuit pressure but lower than that denoted by red Servo Oil pressure used in controlling a device servo Neutra...

Page 4: ...tification Number VIN 1 1 Typical Engine Identification Number 1 1 Serial Plates 1 2 Torque Settings 2 1 Service Tools Numerical List 3 1 Service Tools Body Framework 4 1 Electrics 4 4 Hydraulics 4 6...

Page 5: ...numbers can help identify exactly the type of equipment you have 1 1 Typical Vehicle Identification Number VIN SLP 3CX T S V E 930000 A B C D E F G A World Manufacturer Identification B Machine Model...

Page 6: ...chine D Rear Axle 4WS machine E Synchro Shuttle Transmission F Powershift Transmission G Engine Section 1 General Information 9803 3280 Section 1 1 2 Issue 1 E F G A S257580 A401030 S260120 B C S25910...

Page 7: ...430 11 2 38 1 21 4 3390 345 0 2500 Metric Grade 8 8 Bolts Bolt Size Hexagon A F Torque Settings mm mm Nm kgf m lbf ft M5 5 8 7 0 7 5 M6 6 10 12 1 2 9 M8 8 13 28 3 0 21 M10 10 17 56 5 7 42 M12 12 19 98...

Page 8: ...60096 Adapter 4 8 823 10420 Shim Kit Powershift gearbox layshaft clutch 4 17 825 00410 Crowfoot Wrench 4 4 825 99833 Adapter for 825 00410 4 4 826 01099 Rivet Nut 4 1 826 01101 Rivet Nut 4 1 826 0110...

Page 9: ...ft setting ring 4 13 892 01080 Ring Socket Spanner Layshaft setting ring 4 13 892 01077 Synchro Shuttle Gearbox Selector Shaft Lock Screw 4 13 892 01078 Synchro Shuttle Gearbox Mainshaft Adjuster 4 13...

Page 10: ...F 4 3 993 68105 Adaptor M20 x M20 4 3 993 68106 Adaptor M20 x M24 4 3 993 68107 Bar M20 x M20 X 800MM 4 3 993 68108 Adaptor M20 x 7 8 UNF 4 3 993 68109 Adaptor M20 x M12 4 3 993 68110 Adaptor M20 x 5...

Page 11: ...099 M6 x 16mm Rivet Nut 826 01101 M6 x 19mm Rivet Nut 826 01103 M8 x 18mm Rivet Nut 826 01102 M8 x 21mm Rivet Nut 826 01104 M10 x 23mm Rivet Nut 826 01105 M10 x 26mm Rivet Nut Installation Tool Availa...

Page 12: ...able upon request contact JCB Technical Service JCB part number 992 12400 2 Cartridge x 240V 992 12600 6 Cartridge x 240V Wire Starter used to access braided cutting wire below through original polyur...

Page 13: ...x M20 X 800MM 3 993 68103 Adaptor M20 x 5 8 UNF 8 993 68108 Adaptor M20 x 7 8 UNF 4 993 68104 Adaptor M20 x 1 UNF 9 993 68109 Adaptor M20 x M12 5 993 68105 Adaptor M20 x M20 10 993 68110 Adaptor M20...

Page 14: ...Case 2 892 00298 Fluke Meter 85 3 892 00286 Surface Temperature Probe 4 892 00284 Venture Microtach Digital Tachometer 5 892 00282 100 amp Shunt open type 6 892 00285 Hydraulic Temperature Probe S1882...

Page 15: ...etainer 5C 7214 0003 4 Way Socket Retainer 5D 7214 0001 4 Way Socket Connector 6A 7216 0002 6 Way Pin Housing 6B 7216 0004 6 Way Pin Retainer 6C 7216 0003 6 Way Socket Retainer 6D 7216 0001 6 Way Sock...

Page 16: ...2 00264 3 4 in M BSP x 3 4 in F BSP x Test Point 892 00265 1 in M BSP x 1 in F BSP x Test Point 4 6 Section 1 General Information 9803 3280 Section 1 4 6 Issue 1 S188131 S188121 S200141 Service Tools...

Page 17: ...ls cont d Section E Hydraulics 892 00881 Valve Spool Seal Fitting Tool Components for Valve Block A R V Testing For 4CX Variable Flow machines use 25 201103 892 00309 A R V Pressure Test Kit 1 892 003...

Page 18: ...8 in BSP 816 00190 1 2 in BSP 816 00197 5 8 in BSP 816 00196 3 4 in BSP 816 00193 1 in BSP S193880 892 00047 3 8 in BSP A x 1 4 in BSP B 892 00048 1 2 in BSP A x 1 4 in BSP B 892 00049 5 8 in BSP A x...

Page 19: ...Diameter 892 01022 For 60 mm Rod Diameter slew ram 892 01023 For 65 mm Rod Diameter 892 01024 For 70 mm Rod Diameter 892 01025 For 75 mm Rod Diameter 892 01026 For 80 mm Rod Diameter 892 00167 For 90...

Page 20: ...st Adapter B 892 00301 Flow Test Adapter C 892 00302 Flow Test Adapter S266880 892 00922 12 2 Torque Converter Alignment Tool S267260 S188160 A B C Torque Measuring Tool for Wheel Hub Seals Manufactur...

Page 21: ...n 1 General Information 9803 3280 Section 1 4 11 Issue 1 Service Tools cont d Section F Transmission 892 00817 17 mm A F x 3 4in square drive 892 00818 22 mm A F x 3 4in square drive 892 00819 15 mm A...

Page 22: ...F Transmission 892 00182 Bearing Pad Driver S216310 992 04000 Torque Multiplier use in conjunction with a torque wrench to give a 5 1 multiplication when tightening pinion nuts S197030 Test Point 1 89...

Page 23: ...ers A396590 A396600 892 01078 Synchro Shuttle Gearbox Mainshaft Adjuster A396510 892 01079 Mainshaft setting ring 892 01080 Layshaft setting ring A313250 7 1 3 6 5 2 4 Powershift Gearbox Flow Test Ada...

Page 24: ...nit 892 00269 Sensor Head 0 100 l min 0 22 UK gal min 892 00293 Connector Pipe 892 00270 Load Valve 1406 0021 Bonded Washer 1604 0006 Adapter 3 4 in M x 3 4 in M BSP 1612 0006 Adapter 3 4 in F x 3 4 i...

Page 25: ...eral Information 9803 3280 Section 1 4 15 Issue 1 Service Tools cont d Section F Transmission 1 6 8 9 7 6 5 A396950 3 4 A396580 A396930 A396960 A396940 www WorkshopManuals co uk Purchased from www Wor...

Page 26: ...pacer Kit Sychro Shuttle Gearbox SD70 SD80 Axles Comprises of Spacer thickness mm 921 52628 12 600 829 30405 12 625 921 52629 12 650 829 30406 12 675 921 52630 12 700 829 30407 12 725 921 52601 12 750...

Page 27: ...n F Service Tools Section 1 General Information 9803 3280 Section 1 4 17 Issue 3 Service Tools cont d Section F Transmission 823 10420 Thrust Washer Kit Powershift gearbox Layshaft clutch Comprises of...

Page 28: ...k Adaptor DLA enables data exchange between the machine ECU Electronic Control Unit and a laptop PC loaded with the applicable ShiftMaster diagnostics software 2 Interconnecting cable DLA to laptop PC...

Page 29: ...ool for Cylinder Bores to assist bedding in of new piston rings S192390 For details of other engine service tools refer to Engine Service Manual Publication No 9806 0100 or 9806 2140 for low emission...

Page 30: ...ng fluid for use on threads larger than 50mm dia 4101 0451 50ml Activator A cleaning primer which speeds the curing rate 4104 0251 1ltr of anaerobic products 4104 0253 Bottle 200ml Cleaner Degreaser F...

Page 31: ...2 Care Safety 9803 3280 Section 2 i Issue 1 Contents Page No Safety Notices 1 1 General Safety 2 1 Operating Safety 3 1 Maintenance Safety 4 1 www WorkshopManuals co uk Purchased from www WorkshopManu...

Page 32: ...ken it is highly probable that the operator or others could be killed or seriously injured INT 1 2 1 WARNING Denotes a hazard exists If proper precautions are not taken the operator or others could be...

Page 33: ...ime you are working with or on the machine take care and stay alert Always be careful Always be alert for hazards INT 1 3 5 WARNING Clothing You can be injured if you do not wear the proper clothing L...

Page 34: ...to feel drowsy stop the machine at once Get out of the cab into fresh air INT 2 1 10 WARNING ROPS FOPS Structure The machine is fitted with a Roll Over Protection Structure ROPS and a Falling Objects...

Page 35: ...l will rise to the top and form flammable vapours INT 3 1 6 WARNING Battery A battery with frozen electrolyte can explode if it is used or charged Do not use a machine with a frozen battery To help pr...

Page 36: ...rings This will protect against eye injury from components accidently flying out GEN 6 2 CAUTION Rams The efficiency of the rams will be affected if they are not kept free of solidified dirt Clean dir...

Page 37: ...ipper lubricant contains 1 53 lead The repeated swallowing of very small quantities can cause chronic lead poisoning Do not smoke or touch food while handling this lubricant Dispose of waste rags etc...

Page 38: ...s 9 1 Backhoe Quickhitch 9 2 Front Axle 2 Wheel Drive Machines 9 3 Front Axle 4 Wheel Drive Machines 9 3 Front Axle All Wheel Steer Machines 9 4 Rear Axle All Wheel Steer Machines 9 4 Extending Dipper...

Page 39: ...nging the Oil and Filter 16 1 Powershift Gearbox Checking the Oil Level 17 1 Changing the Oil Filter 17 2 Hydraulic System Checking the Fluid Level 18 1 Hydraulic Tank Cap 18 1 Changing the Filter Ele...

Page 40: ...ads 25 1 Wear Pad Adjustment 25 1 Air Conditioning Adjusting the Compressor Drive Belt 26 1 Hose Burst Protection Valve if fitted Checking Hose Burst Protection Valve 27 1 Lowering a Load 27 1 Service...

Page 41: ...d for the handling or use of new oil beside the normal care and hygiene practices Used Oil Used engine crankcase lubricants contain harmful contaminants Here are precautions to protect your health whe...

Page 42: ...Change Oil Filter Change Rams Chrome Condition Check Section 3 Routine Maintenance 9803 3280 Section 3 3 1 Issue 1 Service Schedules A badly maintained machine is a danger to the operator and the peo...

Page 43: ...een Washer Fluid Level Check Boom Lock Engagement Check Condition of Paintwork Check Stabiliser Legs Sideshift Check Adjust Machine Generally Check and Clean Power Sideshift Wear Pads Grease Power Sid...

Page 44: ...LL systems for example hydraulic engine coolant fuel and oil transmission brakes axles etc If a leak is evident find the source and repair as required Make sure that the system is topped up with the r...

Page 45: ...nd trapping your fingers the loader arms should be carefully lowered onto the safety strut as shown Start the engine and slowly lower the loader arms onto the safety strut stop the movement immediatel...

Page 46: ...broken or cracked window glass Replace damaged items Check all bucket teeth for damage and security Check all lamp lenses for damage Inspect the tyres for damage and penetration by sharp objects Check...

Page 47: ...etc must not be allowed to accumulate within the engine compartment or in the propshaft guards when fitted Please inspect these areas frequently and clean at the beginning of each work shift or more...

Page 48: ...e loader arms the shovel can fall and you could be crushed See Loader Arm Safety Strut in MAINTENANCE section 2 3 1 4 1 WARNING Do not remove the engine side panel while the engine is running 2 3 1 5...

Page 49: ...belt every three years 2 3 1 7 1 Inspect the seat belt for signs of fraying and stretching Check that the stitching is not loose or damaged Check that the buckle assembly is undamaged and works correc...

Page 50: ...ed Chock all four wheels before getting under the machine 2 3 2 1 Greasing should be done with a grease gun Normally two strokes of the gun should be sufficient Stop greasing when fresh grease appears...

Page 51: ...e Points Note Figure shows a typical boom and dipper arrangement Section 3 Routine Maintenance 9803 3280 Section 3 9 2 Issue 1 Greasing 2 1 3 4 6 A340900 8 7 9 5 0 www WorkshopManuals co uk Purchased...

Page 52: ...ease Points 6 7 8 9 1 2 3 4 5 1 2 3 4 4 2 3 1 S260200 S260210 5 Note Grease point 5 is a remote grease point mounted on the side of the mainframe chassis near the left front wheel Note Grease point 5...

Page 53: ...eer Machines 5 Grease Points Rear Axle All Wheel Steer Machines 4 Grease Points Note Grease point 5 is a remote grease point mounted on the side of the front nose near the left front wheel 1 2 4 3 1 2...

Page 54: ...the drying period Take the same precautions as for oil to keep Waxoyl off your skin Do not breathe the fumes Apply in a well ventilated area 5 3 1 9 Extend the dipper Coat the runners with Waxoyl as s...

Page 55: ...s 3 grease points on each stabiliser Total 6 Grease Points Loader Quickhitch 2 grease points each end Total 4 Grease Points S089961 S259390 1 2 3 4 5 6 3 2 1 6 In 1 Clamshovel 3 grease points each end...

Page 56: ...greasing Kingpost 9 Grease Points Note Figure shows a centremount kingpost greasing is same for sideshift kingpost Note It is recommended that grease points 2 and 3 are lubricated using a hand grease...

Page 57: ...hich is inflammable Keep flames away when applying Waxoyl Waxoyl can take a few weeks to dry completely Keep flames away during the drying period Do not weld near the affected area during the drying p...

Page 58: ...and pressures for your machine Use an air hose fitted with a self locking air chuck and remote shut off valve 3 Add the Air Make sure that the air hose is correctly connected to the tyre valve Clear...

Page 59: ...mission to neutral Raise and block the loader arms Lower the backhoe to the ground and stop the engine 2 Remove the reservoir cap A and check the level The MAX and MIN marks are marked on the side of...

Page 60: ...to tap or knock the element If the inner element is to be changed lift up pulls E and remove inner element F On turbocharged engines remove pulsation ring L 5 Clean inside the canister H pulsation ri...

Page 61: ...de when you remove the plug 13 3 1 15 a Place a container of suitable size beneath the drain plug b Remove drain plug C and its O ring Let the oil drain out then clean and refit the drain plug with a...

Page 62: ...onnet see Engine Panels Opening and Closing the Bonnet 3 Carefully loosen cap A Let any pressure escape Remove the cap CAUTION Keep your face away from the drain hole when removing the drain plug 2 3...

Page 63: ...he first 20 hours of operation Cleaning the Cab Heater Filter 1 Park the machine on firm level ground engage the parking brake and set the transmission to neutral Lower the attachments to the ground a...

Page 64: ...haracteristics Fuel Standards Consult your fuel supplier JCB distributor about the suitability of any fuel you are unsure of Low Temperature Fuels Special winter fuels may be available for engine oper...

Page 65: ...ngage the parking brake and set the transmission to neutral Raise and block the loader arms Lower the backhoe to the ground and stop the engine 2 Drain off any water in the element A by turning tap B...

Page 66: ...transmission to neutral Lower the loader arms and backhoe to the ground and stop the engine 2 Set the starter key to the IGN position WARNING Hot oil and engine components can burn you Make sure the e...

Page 67: ...level ground Engage the parking brake Lower the attachments to the ground Stop the engine Remove the starter key Disconnect the battery CAUTION When the strainer is removed oil will gush out Keep to...

Page 68: ...gearbox to maximum mark on dipstick filler A Use only the recommended oil 4 Start and run the engine slowly for a period not exceeding five minutes This allows the oil to fill filter pump torque conv...

Page 69: ...ect the battery remove the engine side panels 3 Place a container of suitable size beneath the transmission to catch the oil 4 Remove bolts B Pull off cover plate A and gasket C allow the oil to drain...

Page 70: ...hine is operated Contact your JCB distributor immediately 2 3 4 3 3 If the oil level is low remove filler cap B and replenish with recommended hydraulic oil as required Hydraulic Tank Cap The hydrauli...

Page 71: ...d handle E and pull the element assembly from the hydraulic tank 3 Remove the element from its canister a Hold canister F b Hold handle E and rotate the element G 90 anti clockwise c Pull on handle E...

Page 72: ...p 3 Place a container beneath the hydraulic tank to catch the oil remove drain plug and drain the hydraulic tank Make sure the container is large enough to hold the tank contents see Service Capacitie...

Page 73: ...he Differential Oil WARNING Make the machine safe before getting beneath it Lower the attachments to the ground engage the parking brake remove the starter key disconnect the battery 2 3 2 2 1 Park th...

Page 74: ...ubricating properties of the oil will reduce as a result of brake wear Consult your JCB distributor for advice if necessary Change the oil in each hub separately 1 Set the machine level with the tyres...

Page 75: ...that the OIL LEVEL mark on one hub is at the bottom as shown in fig 1 Engage the parking brake Set the transmission to neutral Lower the attachments to the ground Stop the engine and remove the starte...

Page 76: ...fires or spillage should be put in a closed acid proof receptacle and must be disposed of in accordance with local environmental waste regulations INT 3 1 12 WARNING Batteries give off explosive gases...

Page 77: ...quantities of water or milk Then drink milk of magnesia beaten egg or vegetable oil Get medical help GETS ONTO YOUR SKIN Flush with water remove affected clothing Cover burns with a sterile dressing t...

Page 78: ...battery isolator key must be fitted and switched on 1 To isolate the battery turn the battery isolator key A in an anti clockwise direction B and remove Keep the key in a safe place and available for...

Page 79: ...ansmission to neutral Raise and block the loader arms Lower the backhoe to the ground and stop the engine 2 Unscrew bolts A Lift off the radiator grille 3 Brush off all debris from the cooler tubes an...

Page 80: ...should be inspected and replaced as required Wear Pad Adjustment Note It is very important that the wear pads are adjusted at the correct service intervals as the inner leg could contact the outer leg...

Page 81: ...the engine cannot be started Disconnect the battery before doing this job 2 3 3 5 1 Park the machine on firm level ground engage the parking brake and set the transmission to neutral Raise and block t...

Page 82: ...afely lowered Make sure that the area is clear of other people before lowering the load If you do not follow these precautions you or others could be killed or seriously injured 2 3 5 3 Boom and Dippe...

Page 83: ...Below 40 C 104 F Powershift 4 speed 15 5 3 4 JCB Extreme Performance SAE10W Below 40 C 104 F Front Axle 4WD JCB HD90 Gear Oil without LSD API GL 5 Housing 2WS 13 2 86 JCB Special Gear Oil Plus with LS...

Page 84: ...losed Watch level indicator on hydraulic tank Note JCB HP Grease is the recommended specification grease if using JCB Special MPL EP then the greasing must be carried out more frequently WARNING Waxoy...

Page 85: ...i Section A Attachments 9803 3280 Section A i Issue 1 Contents Page No www WorkshopManuals co uk Purchased from www WorkshopManuals co uk...

Page 86: ...ser Matrix Cleaning 20 8 Filters Changing and Cleaning 20 9 Compressor Drive Belt Adjusting 20 10 Glazing Removing Broken Glass and Old Sealant 21 1 Preparing and Installing New Glass 21 4 Cab ROPS FO...

Page 87: ...and Replacement 36 1 Kingpost Removal and Replacement 37 1 Boom Dipper Removal and Replacement 38 1 Hydraulic Tank Removal and Replacement 39 1 Power Sideshift Ram Removal and Replacement 40 1 Cab Pan...

Page 88: ...t number 4104 1310 454g 1 lb tub 12V Mobile Oven 1 cartridge capacity required to pre heat adhesive prior to use It is fitted with a male plug 703 23201 which fits into a female socket 715 04300 JCB p...

Page 89: ...to cut out broken glass JCB part number 892 00846 Cut Out Knife used to remove broken glass JCB part number 992 12800 L Blades 25 mm 1 in cut replacement blades for cut out knife above JCB part numbe...

Page 90: ...eral tool used for smoothing sealants also used to re install glass in rubber glazing because metal tools will chip the glass edge JCB part number 892 00847 S186470 Rubber Spacer Blocks used to provid...

Page 91: ...the kit have a screwed thread at each end One of the threads will always be M20 size this is to accommodate the end stops items B and C The other end of the adaptor will have varying thread sizes to...

Page 92: ...the threaded mandrel until it touches the head of the rivet nut shown at B 4 Insert the rivet nut assembled to the tool into the hole drilled in step 1 5 Hold handle C and at the same time draw the ma...

Page 93: ...ermostatic Switch Settings Cut out 0 6 C 33 0 F Cut in 4 2 C 39 5 F Refrigerant R 134a 1 4 Kg Maximum charge Oil PAG Oil Quantities Condenser 1 5 fluid oz 42 6 ml Evaporator 3 0 fluid oz 85 2 ml Recei...

Page 94: ...3 1 Section B Body Framework 9803 3280 Section B 3 1 Issue 1 Basic Operation A401370 A B X Y E H G D J F C www WorkshopManuals co uk Purchased from www WorkshopManuals co uk...

Page 95: ...ve foreign particles from the system The high temperature high pressure refrigerant is forced by compressor action into the expansion valve D which meters the amount of refrigerant entering the evapor...

Page 96: ...r armature turns starting the refrigeration cycle Current is fed to the field coil through three series switches whose contacts are controlled by the following a The manual A C ON OFF switch F in the...

Page 97: ...en there is no refrigerant in the system otherwise the compressor will be damaged 4 3 4 4 1 It is critical that the correct refrigerant R 134a is used and that charging is done only by qualified perso...

Page 98: ...or closed Renew expansion valve emitted from unit c Blower operates on fan Blower resistor failed Renew resistor speed 3 only Blower motor failed Renew complete blower unit Blower does not operate Fu...

Page 99: ...ure switch assembly pressure switch assembly bypassed NO Renew the compressor clutch and retest Refer to Service Procedures Pressure Switch Testing 7 Does the clutch engage with thermostat switch YES...

Page 100: ...ressure Temperature Gas C High Pressure Liquid LOW SIDE 2 0 bar 2 0 kgf cm2 29 lbf in2 HIGH SIDE 14 8 bar 15 1 kgf cm2 215 lbf in2 Normally Functioning A C System Gauge Readings Low Side Gauge Normal...

Page 101: ...flow obstructed by dirt receiver drier clogged Correction 1 Evacuate A C system 2 Replace receiver drier 3 Charge system with R 134a 4 Operate system and check performance LOW SIDE Blue HIGH SIDE Red...

Page 102: ...High Other symptoms Sight Glass No bubbles visible even at lower engine RPM Diagnosis Refrigerant overcharge condenser cooling fins clogged with dirt or cooling fans malfunctioning Correction 1 Clean...

Page 103: ...f frost or moisture on low side pipes Diagnosis Excessive refrigerant in low side pipes possibly from expansion valve being opened too wide Correction 1 Leak test system 2 Evacuate A C system 3 Repair...

Page 104: ...on 1 Evacuate A C system 2 Replace receiver drier 3 Remove moisture by repeatedly evacuating system 4 Charge system with R 134a 5 Operate system and check performance LOW SIDE Blue HIGH SIDE Red High...

Page 105: ...circuit diagram in Section C Electrics Component Key 1 Main Machine Harness Connector 2 Air Conditioning ON Off Switch 2A Panel Illumination Bulb 2B Switch Illumination Bulb 3 Blower Switch 4 Binary...

Page 106: ...the expansion valve run the air conditioning for a few minutes then switch off the engine and test for leakage using an electronic leak detector To test for leakage in the low pressure side of the sy...

Page 107: ...ct the Javac unit to an empty receiver bottle Weigh the bottle before and after filling to assess system capacity 6 Switch on Javac unit and open the low pressure manifold valve 7 The Javac unit will...

Page 108: ...em as described in Refrigerant Recovery 2 Close all valves and connect the manifold as shown Connect the blue hose to the system low pressure port and the red hose to the high pressure port 3 Connect...

Page 109: ...re in inches of mercury Hg and vacuum in microns 0 001mm Hg ATM BAT Normal atmospheric pressure reading Battery condition 15 510mbar 381mm 15 in Hg Partial vacuum Vacuum system is operating 29 980mbar...

Page 110: ...s and connect the manifold as shown with the blue hose connected to the oil injector and the red hose to the system high pressure port 3 Connect the yellow hose to the vacuum pump 4 Connect the other...

Page 111: ...eading see Notes for twin valve cylinders 3 Slowly open the high pressure valve and allow the vacuum to draw in refrigerant to the specified weight for the system Refer to Technical Data 4 Close all v...

Page 112: ...Level If the refrigerant charge level is OK use the following electrical test procedures 1 Switch the engine off so that the air conditioning system cannot operate 2 Disconnect the binary pressure sw...

Page 113: ...Park the machine on firm level ground Raise and block the loader arms Lower the backhoe to the ground and stop the engine 2 Remove the starter key 3 Remove the front grille 4 Remove both side panels...

Page 114: ...e starter key 2 Remove Screws D air intake cover E and filter F Clean filter element using compressed air Refit filter into the cover and refit Section B Body Framework 9803 3280 Section B 20 9 Issue...

Page 115: ...both Side Panels 5 Loosen pivot fastening bolt A Loosen adjustment link fastening bolts B and C 6 Position the compressor so that there is approximately 10 mm 3 8 in slack at point X midway along the...

Page 116: ...the remainder from JCB Service see Service Tools The work must only be carried out in a dry frost free environment A protective canopy may be required or the machine frame must be moved to a sheltere...

Page 117: ...ife blade oscillating ii Insert the knife blade into the sealant ii Slowly move the knife along the sealant with the blade positioned as close to the glass as possible Do not allow the knife blade to...

Page 118: ...s remove the cut off sealant and all remaining particles of shattered glass 5 If necessary trim off the remaining old sealant to leave approximately 1 to 2 mm on the upright face of the cab frame aper...

Page 119: ...cating on a 600 x 700 mm x 15 to 19 mm thick plywood board P sourced locally to fit the glass stand N It is recommended that an access hole is cut in the board to accommodate the glass lifter making i...

Page 120: ...ss and make sure that the adhesive forms a continuous pyramid shape Note 3 Once the pre heated adhesive has been applied to the glass install the glass in the aperture as soon as possible After approx...

Page 121: ...xcess sealant should be left to cure see Note 4 and then cut off with a sharp knife Note 4 On completion of the glass replacement procedures the sealant curing time is 30 minutes This means that the m...

Page 122: ...s that are not approved by the manufacturer may be dangerous and will invalidate the ROPS FOPS certification INT 2 1 9 3 Failure to take these precautions could result in death or injury to the operat...

Page 123: ...itting the engine panels are described in the routine maintenance section refer to Section 3 Routine Maintenance Engine Panels Section B Body Framework 9803 3280 Section B 23 1 Issue 1 Service Procedu...

Page 124: ...g the wear pads are described in the maintenance section refer to Section 3 Stabiliser Legs Wear Pad Adjustment 24 1 Section B Body Framework 9803 3280 Section B 24 1 Issue 1 Service Procedures www Wo...

Page 125: ...t be replaced as a set and fitted by a qualified service engineer Inspecting the Top Wear Pads 1 Park the machine on level ground Engage the parking brake and put the transmission in neutral 2 Positio...

Page 126: ...lt H and discard one washer J b Refit and tighten bolt H c Repeat the procedure for the remaining 3 adjusting bolts H on the same side of the dipper d Visually re check the gap is no greater than 1 5...

Page 127: ...brake and set the transmission to neutral Lower the loader arms to the ground 2 Select the carriage clamps to lock 3 Measure all four clamps clearance all measurements should be taken on the centre li...

Page 128: ...move bolt D through the slot in the rail E 7 Hydraulic clamp F and washer G should remain in position 8 Remove plate J and wear pad H Assembly 9 Fit wear pad H plate J and bolt D 10 Fit new lock tab B...

Page 129: ...ust 1 Park the machine on firm level ground engage the parking brake and set the transmission to neutral Lower the loader arms to the ground 2 Position the carriage centrally and rest the bucket on th...

Page 130: ...0 Section B 30 1 Issue 1 Air Conditioning Component Key R A C Controls S Expansion Valve T Re circ Air Inlet V Water Valve W HVAC Unit X Bulkhead Plate A401280 S R V X W T www WorkshopManuals co uk Pu...

Page 131: ...VAC unit will require the assistance of a refrigeration engineer or suitably trained person since the refrigerant needs to be drained from the system 1 Disconnect the battery 2 Loosen and remove the s...

Page 132: ...Air Conditioning Component Key R HVAC Unit Top Cover S Heat Exchanger Heater and Evaporator T Expansion Valve V Freeze Protection Thermostat W Blower Unit X HVAC Unit Housing A401270 S R T V W X www...

Page 133: ...e thermostat 5 Remove the screws securing the thermostat to the HVAC unit housing Replacement is the reverse of the removal procedure Evaporator Matrix Removal and Replacement Note Before removing the...

Page 134: ...pansion Valve T Re circ Air Inlet V Water Valve W HVAC Unit X Bulkhead Plate Section B Body Framework 9803 3280 Section B 30 5 Issue 1 Air Conditioning A401280 S R V X W T www WorkshopManuals co uk Pu...

Page 135: ...to the HVAC unit by removing the right hand side console refer to HVAC Air Conditioning Unit Removal and Replacement Step 2 3 Disconnect the electrical connections and unscrew the pressure switch Rep...

Page 136: ...35 1 Section B Body Framework 9803 3280 Section B 35 1 Issue 1 Loader Arms A X B E G D F Y Z S265931 H K L T R S U www WorkshopManuals co uk Purchased from www WorkshopManuals co uk...

Page 137: ...tted hoses shown at B Plug and cap the hoses immediately 10 Disconnect the electrical connections not shown to the loader shovel reset switch if fitted 11 Remove pivot pin retaining bolts D E F and G...

Page 138: ...36 1 Section B Body Framework 9803 3280 Section B 36 1 Issue 1 Stabiliser Legs S216810 S261790 A B E F G D C www WorkshopManuals co uk Purchased from www WorkshopManuals co uk...

Page 139: ...is fitted remove nut C and retaining bolt D Drive out the foot retaining pin E CAUTION The ram is heavy It is recommended that the ram is removed with the assistance of a sling and suitable lifting a...

Page 140: ...36 3 Section B Body Framework 9803 3280 Section B 36 3 Issue 1 Stabiliser Legs S271850 A B C www WorkshopManuals co uk Purchased from www WorkshopManuals co uk...

Page 141: ...c Remove the wear pads and attach suitable lifting gear through the wear pad locating holes d Use suitable lifting equipment lift the inner leg clear Replacement Replacement is a reversal of the remov...

Page 142: ...00 Removal and Replacement 1 3 2 4 5 6 7 8 9 10 13 13 15 15 14 14 16 16 m 14 om Pivot Bearing 15ft 6in 17ft Backhoe 80 65 72 71 Item 14 Boom Pivot Bearing 14ft Backhoe Item 15 Kingpost Pivot Bearing 8...

Page 143: ...are NOMINAL figures only and must not be used to manufacture the liner bearings Replacement Replacement is generally a reversal of the removal procedures however note the following To assist with the...

Page 144: ...38 1 Section B Body Framework 9803 3280 Section B 38 1 Issue 1 Boom and Dipper A B D C F G L H J E www WorkshopManuals co uk Purchased from www WorkshopManuals co uk...

Page 145: ...placement 7 Wrap a sling around the boom as shown at D Make sure the weight of the boom is held by the sling before removing pivot pins etc 8 Place a suitable support underneath the boom ram C 9 Remov...

Page 146: ...38 3 Section B Body Framework 9803 3280 Section B 38 3 Issue 1 Boom and Dipper B A C D E F G H J K L S266170 www WorkshopManuals co uk Purchased from www WorkshopManuals co uk...

Page 147: ...rt underneath the dipper ram as shown at C 7 Wrap a sling around the dipper as shown at D Make sure the weight of the dipper is held by the sling before removing pivot pins etc 8 Remove nut E bolt F a...

Page 148: ...the tank then unscrew mounting bolts E and lift tank away from the machine Replacement Replace the tank by reversing the removal procedure If a new tank is being fitted remove the tool box from the ol...

Page 149: ...7 Remove pin C from opposite end withdraw ram Replacement 1 Locate the ram at one end with pin C Adjust the ram eye end so the the opposite end of the ram aligns with mounting bracket 2 Secure the op...

Page 150: ...ket assembly D inside the side console as shown Withdraw the handle through the slot in the panel 6 Remove the screws from around the base of the stabiliser control levers E carefully withdraw the lev...

Page 151: ...umn pedestal cover 5 Remove the column switches B 6 Remove the instrument panel C 7 Remove the fixings D 4 off securing the front console panel at positions shown and then carefully lift up the front...

Page 152: ...ch 4 11 Pole Planter 4 11 Smooth Ride System SRS 4 11 Return to Dig Shovel Reset 4 11 Hydraulic Speed Control HSC 4 11 6 Speed Powershift Shiftmaster 4 13 214e Machines 4 15 Service Procedures Electri...

Page 153: ...lternator Removal and Replacement 30 1 Starter Motor Removal and Replacement 40 2 Inspection 40 2 Dismantling and Assembly 40 2 Earth Points 145 1 Harness Data Drawings 150 1 Harness Interconnection 1...

Page 154: ...Digital Tachometer 5 892 00282 100 amp Shunt open type 6 892 00285 Hydraulic Temperature Probe 825 00410 15 mm Crowfoot Wrench 825 99833 Adapter 1 1 Section C Electrics 9803 3280 Section C 1 1 Issue...

Page 155: ...C 0 deg F 410 Reserve capacity minutes for 25 amp load 170 Alternator 2WS 65 Amp nominal output 4WS 72 Amp nominal output 4WS air conditioning or ServoPlus builds 85 Amp nominal output Section C Elec...

Page 156: ...working lights 25 Amp COLUMN C 1 Lights 7 5 Amp 2 Hazard light 15 Amp 3 Beacon Interior light 10 Amp 4 Radio 5 Amp 5 Thermostart 20 Amp 6 Heater 30 Amp 7 Ignition relay coils 3 Amp 8 Main beam 15 Amp...

Page 157: ...g lights 25 Amp COLUMN C 1 Lights 7 5 Amp 2 Hazard light 15 Amp 3 Beacon Interior light 10 Amp 4 Radio 5 Amp 5 Thermostart 20 Amp 6 Heater 30 Amp 7 Ignition relay coils 3 Amp 8 Main beam 15 Amp 9 Fog...

Page 158: ...ow are located in the front console as shown at C FD1 Forward HI LO FD2 Forward FE1 Reverse HI LO FE2 Reverse FF1 Interlock FF2 Drive FG1 Blank FG2 Transmission dump FH1 Auto 2WD FH2 4WB The relays li...

Page 159: ...INSTRUMENT PANEL 2 LH SPEAKER HAZARD SWITCH 004 3 FLASHER UNIT 860 BATTERY NEUTRAL START RELAY CLOCK THERMOSTART 1 3 830 HOURMETER 806 007 200 407 LH REAR INDICATOR MASTER B O TACHOMETER 837 5 001 810...

Page 160: ...ing Lights 44 Turn Signal Indicator 45 Side Lights Indicator 46 Hazard Warning Indicator 47 Main Beam Warning Indicator Light 48 Rear Working Light Indicator 49 Front Working Light Indicator 50 Rear F...

Page 161: ...ngine Running Relay 92 Front Working Lights Relay 93 Rear Working Lights Relay 94 Front Working Lights Switch 95 Rear Working Lights Switch 96 Front Working Lights 97 Rear Working Lights 98 Cab Interi...

Page 162: ...B U 5 855 6 836 HEATER FAN MOTOR 1133 116 830 3 RH SIDE LIGHT M 3 B 861 862 LIGHTS RELAY FUSE C3 6 REAR WIPER HEATED SEAT REMOVED FOR TERRITORIES ITALY GERMAN ONLY REAR WASH WIPE SWITCH 2 3 303 903 B...

Page 163: ...6 19 7 8 15 17 18 20 852 30241sht3 Iss1 A409182 Electrics Basic System Operation Section C Section C 9803 3280 Issue 3 4 5 4 5 FORWARD RELAY FOR REV TO NEUTRAL START RELAY 1 R P BRAKE SWITCH PROXIMITY...

Page 164: ...n 1 Parking Brake Warning Light Relay 2 Parking Brake Relay 3 Parking Brake Switch 4 Transmission Dump Relay 5 Transmission Dump Switch on Loader Lever 6 Drive Relay 7 Mainshaft Solenoid 8 Layshaft So...

Page 165: ...e 18 2 Wheel Steer Indicator Light Front Console Connections L From L on page C 4 1 M From M on page C 4 1 2 Wheel Steer Brake Mode 1 LH Brake Light 2 RH Brake Light 3 Brake Light Switch 4 4 Wheel Bra...

Page 166: ...280 Issue 2 4 8 4 8 824 FUSE A4 4CX STEERMODE 3CX SUPER 4X4X4 STEERMODE 106 FRONT PROX SW FRONT CONSOLE 4WS RELAY STEER MODE P C B PROXIMITY SWITCHES IGNITION RELAY 2 CRAB 4WS RELAY 2WS SOLENOID FUSE...

Page 167: ...R SOLENOID HYDRACLAMP SOLENOID AUX HYD SWITCH HYDRACLAMP SWITCH FUSE A5 4 1 4WB RELAY 2 FUSE A5 830 SPEED SENSOR FUSE C4 FUSE A10 SPEED SENSOR SPEEDO 4WD SWITCH 818 304 874 8 FUSE A8 853 873 875 870 P...

Page 168: ...draclamp Hydraulics 1 Jaw Relay 2 Push Button Switch on Excavator Lever 3 Jaw Solenoid 4 Auxiliary Hydraulics Selector Switch 5 Hammer Solenoid 6 Hammer Relay 7 Footpedal Switch 8 Hydra clamp Selector...

Page 169: ...SRS 1 Accumulator Solenoids 2 Hose Burst Control Valve Relay if fitted 3 Selector Switch 4 Hose Burst Control Valve Solenoids if fitted Return to Dig Shovel Reset 5 Lever hold in Solenoid 6 Ram Proxi...

Page 170: ...3 Smooth Ride System Return To Dig SRS Shovel Reset Hydraulic Speed Control HSC 1 10 H S C SWITCH 9 FUSE A1 4 FROM 4 TH GEAR SELECTOR H S C RELAY 829 101 8 8 FUSE A9 H S C BUTTON 2 6 3 7 1857 6 5 7 H...

Page 171: ...FUSE A7 FOOTBRAKE F 1866 922 STARTER SOLENOID NEUTRAL 4WD 4WB REVERSE ALARM 8 CAN LOW U SOLENOID 9 BANK 2 VE BUZZER THROTTLE SWITCH Z SOLENOID 4WD SW 303 FORWARD 933 847 FUSE A6 4WD SOLENOID 1873 4WD...

Page 172: ...lenoid X 15 Solenoid Y 16 Solenoid Z 17 4 Wheel Drive Solenoid 18 Transmission Dump Switch 19 Transmission Dump Relay 20 Kick down Switch 21 Throttle Switch 22 4 Wheel Drive Switch 23 Brake Mode Selec...

Page 173: ...tch 33 Face Level Fan Switch 34 Rear Proximity Switch 35 Wheel Align Switch 36 Hammer Isolaton Switch 37 Hammer Foot Switch 38 Hammer Solenoid 39 Front Washer Wiper Switch 40 Front Washer Motor 41 Fro...

Page 174: ...1 FUSE B6 853 815 003 REAR WASH WIPE SWITCH 300 934 8 STARTER SOLENOID FORWARD RELAY 2 REVERSE SOLENOID FORWARD SOLENOID HEATER 1 103 864 010 816 5 U P BRAKE WARNING RELAY 49 011 863 HOURMETER PARKBR...

Page 175: ...OWER SOCKET 114 106 8 8 8 6 6 6 5 5 5 4 4 4 2 2 2 3 9 10 11 12 16 17 18 7 407 411 RH DIP BEAM LH DIP BEAM 833 LIGHTS RELAY 836 837 FUSE C3 6 830 FUSE C2 LH SIDE LIGHT 829 2 FUSE C10 DIPPER SOCKET 311...

Page 176: ...78 Rear Working Lights Switch 79 Rear Working Lights 80 Beacon Strobe Light Socket 81 Road Lights Relay 82 Road Lights Switch 83 Head Light Dip Switch 84 RH Dip Beam Light 85 LH Dip Beam Light 86 LH...

Page 177: ...t with bare metal free from grease dirt and corrosion as these can cause a false reading 3 When measuring voltage Make sure that the correct range is selected that is set the selector to a value equal...

Page 178: ...19 2 Section C Electrics 9803 3280 Section C 19 2 Issue 1 Service Procedures S153070 www WorkshopManuals co uk Purchased from www WorkshopManuals co uk...

Page 179: ...e AV0 2003 Move the right hand slider switch to position B and the left hand slider switch to the appropriate Ohms range c On an analogue meter Move the dial to the appropriate Ohms range 3 Measuring...

Page 180: ...19 4 Section C Electrics 9803 3280 Section C 19 4 Issue 1 Service Procedures www WorkshopManuals co uk Purchased from www WorkshopManuals co uk...

Page 181: ...left hand slider switch to position C Connect the black probe to the end of the diode marked with a band or to the male connector of the diode wire the red probe should be connected to the other end...

Page 182: ...water or milk Then drink milk of magnesia beaten egg or vegetable oil Get medical help GETS ONTO YOUR SKIN Flush with water remove affected clothing Cover burns with a sterile dressing then get medic...

Page 183: ...ng a hydrometer when the electrolyte temperature is 15 C 60 F If the battery has recently been on charge wait approximately one hour or slightly discharge the battery to dissipate the surface charge b...

Page 184: ...a fully charged condition switch on the working lights for 3 minutes before commencing the test Alternatively operate the starter for a few moments with the engine shut off solenoid ESOS fuse removed...

Page 185: ...position 9 5V A low reading probably indicates a fault in the starter motor Test 2 Connect the voltmeter between the starter main terminal A and the commutator end bracket B In the start position the...

Page 186: ...lly zero maximum permissible reading 0 25V If the reading is above 0 25V a high resistance in the earth lead or connections is indicated Test 5 Connect the voltmeter between battery positive and the s...

Page 187: ...ion prohibiting the use of Naked Flames or where risk of explosive gas or similar safety parameters apply No other heat source should be used to attempt a sealed joint ELEC 2 2 CAUTION When the heater...

Page 188: ...from inside the reflector assembly into the hole at the top of the gas cartridge Then press the gas cartridge up into the reflector assembly as far as possible until the two elements are clasped firm...

Page 189: ...minutes until the catalytic reaction occurs This is indicated when the blue flame fades and the ceramic element glows red Then turn the small ring E until the air holes at F are completely open The to...

Page 190: ...Position the alternator until belt deflection is approximately 10mm 3 8 in before tightening bolts B and C It may be necessary to slacken bolt D to allow full movement of alternator Tighten bolt A la...

Page 191: ...40 1 Section C Electrics 9803 3280 Section C 40 1 Issue 1 Starter Motor S02043C www WorkshopManuals co uk Purchased from www WorkshopManuals co uk...

Page 192: ...see Electrical Testing Methods between the stud terminal B and each positive brush 14A in turn A high or infinity reading indicates an open circuit Similarly connect the meter between brushes 14A and...

Page 193: ...arth Points Section C Electrics 9803 3280 Section C 145 1 Issue 1 Harness Data A405010 DR2 E2 MB F F1 F2 F NJ E A C47 E F A E1 E G FB1 H DR2 www WorkshopManuals co uk Purchased from www WorkshopManual...

Page 194: ...cab lift moulded roof panel DR2 Earth side console harness Remove side console E Earth cable E cab to engine E1 Earth cable E cab end Undo one side on the flexible grey moulding at the front on the ca...

Page 195: ...43 1 6 speed Powershift ShiftMaster 160 1 721 10942 1 4 speed Powershift Synchro Shuttle 160 3 7 Transmission 721 10941 1 6 speed Powershift 160 5 721 10938 2 Synchro Shuttle 160 7 721 10939 1 4 speed...

Page 196: ...this harness Left and right column switches Gearbox control relays ShiftMaster E C U if applicable Front wiper motor Front console switches Speedometer Front console warning lamps TRANSMISSION HARNES...

Page 197: ...Diodes FL Column Switch Powershift FM Footbrake Switch FN Wiper Motor FP Column Switch RH FR Front Warning Lights FS Speedometer FSA Speedometer Illumination FSB Speedometer Illumination FT Steer Mode...

Page 198: ...812 848 853K SP FW6 REVH L FY 3 SW 9 49 2 9 SIZE SD 1 0 1 0 0 6 934C 4WB 3 2 0 G H 852P 4 1 0 0 6 0 6 877 SPEEDO SN AF AG 820 DEST TYPE 806 4 SIZE FS2 FA 10 2 4WDSELECT 3 0 6 1 833 1 0 TYPE WIRE 8 60...

Page 199: ...Brake Lights FK Diodes FL Column Switch Powershift FM Footbrake Switch FN Wiper Motor FP Column Switch RH FR Front Warning Lights FS Speedometer FSA Speedometer Illumination FSB Speedometer Illuminati...

Page 200: ...E FK TERM BN BP DEST TYPE DIODES 2 1 1 0 804A AF AG AF AG FV17 806 1 0 SM 1 830AK FSA WIRE TERM AN DEST SR TYPE S 2 600JA AN SA 0 6 SPEEDOILLUM 0 6 SIZE 1 830AU FSB WIRE TERM AN DEST SR TYPE S 2 600JB...

Page 201: ...Section C Section C 9803 3280 Issue 2 153 1 153 1 721 10936_1 Harness Drawing Side Console page 1 of 4 CAD 721 10936 Issue 1 Machines up to serial no 933756 www WorkshopManuals co uk Purchased from ww...

Page 202: ...h CV Instrument Panel CW Fuel Gauge CWA Fuel Gauge Illumination CX Water Temperature Gauge CXA Water Temperature Illumination CY Tachometer CYA Tachometer Illumination CYB Tachometer Illumination CZ R...

Page 203: ...Data Section C Section C 9803 3280 Issue 2 153 3 153 3 721 10936_3 Harness Drawing Side Console page 3 of 4 CAD 721 10936 Issue 1 Machines up to serial no 933756 www WorkshopManuals co uk Purchased fr...

Page 204: ...rness Data Section C Section C 9803 3280 Issue 2 153 4 153 4 721 10936_4 Harness Drawing Side Console page 4 of 4 CAD 721 10936 Issue 1 Machines up to serial no 933756 www WorkshopManuals co uk Purcha...

Page 205: ...arness Data Section C Section C 9803 3280 Issue 1 153 5 153 5 721 10970_1 Harness Drawing Side Console page 1 of 5 CAD 721 10970 Issue 2 Machines from serial no 933757 www WorkshopManuals co uk Purcha...

Page 206: ...CH Direction Indicator Relay CJ Front Work Light Relay CK Rear Work Light Relay CL Engine Run Relay CM Rear Horn CN Hydraulic Speed Control Relay CP Jaw Bucket Relay CR Cab Roof CS Headliner CU Ignit...

Page 207: ...Tachometer CYA Tachometer Illium A CYB Tachometer Illium B CZ Radio Cassette DA Radio Speaker DC Front Work Light Switch DD Beacon Switch DE Hydraulic Speed Control Switch DF Smooth Ride System Switch...

Page 208: ...arness Data Section C Section C 9803 3280 Issue 1 153 8 153 8 721 10970_2 Harness Drawing Side Console page 4 of 5 CAD 721 10970 Issue 2 Machines from serial no 933757 www WorkshopManuals co uk Purcha...

Page 209: ...arness Data Section C Section C 9803 3280 Issue 1 153 9 153 9 721 10970_3 Harness Drawing Side Console page 5 of 5 CAD 721 10970 Issue 2 Machines from serial no 933757 www WorkshopManuals co uk Purcha...

Page 210: ...ion C Electrics 9803 3280 Section C 155 1 Issue 1 Harness Data Harness Drawing Cab Roof USA only page 1 of 2 CAD 721 10966 Issue 1 721 10966_1 www WorkshopManuals co uk Purchased from www WorkshopManu...

Page 211: ...LH Headlights C30 RH Headlights C35 RH Front Indicators C40 Cab Horn C47 Earth C50 RH Rear Lights C55 RH RR Out Worklight C60 RH RR In Worklight C65 LH RR In Worklight C70 LH RR Out Worklight C75 LH...

Page 212: ...e 1 of 2 CAD 721 10965 Issue 1 200 2500 10 600 350 1375 2575 LH HEADLIGHTS 300 1175 S5 12 LH WORKLIGHT 60 S15 S22 RH WORKLIGHT C80 AUX BEACON SOCKET EARTH 250 C55 C60 C65 C70 200 CAB HRN 250 S20 S21 1...

Page 213: ...rs C5 LH Worklight C10 Beacon Socket C20 RH Worklight C25 LH Headlights C30 RH Headlights C40 Cab Horn C47 Earth C55 RH RR Out Worklight C60 RH RR In Worklight C65 LH RR In Worklight C70 LH RR Out Wor...

Page 214: ...E F RH SPEAKER INTERIOR LIGHT 0 6 860 602 G H SIZE LH SPEAKER CP 2 CP 2 CP 1 CP 1 0 6 TYPE 600EJ 2 TERM IL CP 4 CP 4 DEST 303F WIRE 1 1 0 SIZE 1 0 1 0 C D DEST WIRE LS1 TYPE IL 1 IL 1 C D CAB PANEL 30...

Page 215: ...ess Data Harness Drawing Steer Controls page 1 of 1 CAD 721 10968 Issue 1 721 10968_1 Key to Connectors MA 2WS MD 4WS ME Cab Connector MF Rear Proximity Switch SA Steer Mode Feed SM Steer Mode Feed ww...

Page 216: ...Harness Drawing Steer Controls page 1 of 1 CAD 721 10967 Issue 1 1 0 1 0 DEST DA 721 10967_1 Key to Connectors MA 2WS MB 4WS com MC Crab MD 4WS ME Cab Connector MF Rear Proximity Switch SA Steer Mode...

Page 217: ...721 10943 Issue 1 37 49 13 721 10943_1 Key to Connectors LA Front Console Harness LB Side Console Harness LC Gearbox LD Transmission Oil Temperature Switch LE Kickdown Switch SB Transmission Fused Sp...

Page 218: ...ection C Electrics 9803 3280 Section C 160 2 Issue 1 Harness Data Harness Drawing Transmission page 2 of 2 CAD 721 10943 Issue 1 721 10943_2 www WorkshopManuals co uk Purchased from www WorkshopManual...

Page 219: ...RONT CONSOLE HARNESS SIDE CONSOLE HARNESS TRANSMISSION OIL TEMP SW GEARBO HARNESS DATUM CELLS 1 30 CELLS 1 30 CELLS 31 60 CELLS 31 60 10 11 12 721 10942_1 Key to Connectors LA Front Console Harness LB...

Page 220: ...60 4 Section C Electrics 9803 3280 Section C 160 4 Issue 1 Harness Data Harness Drawing Transmission page 2 of 2 CAD 721 10942 Issue 1 www WorkshopManuals co uk Purchased from www WorkshopManuals co u...

Page 221: ...n page 1 of 2 CAD 721 10941 Issue 1 SOLENOID IDENTIFICATION HSG ID FUNCTION ID CHAR C20 FORWARD HIGH C30 FORWARD LOW C40 MAINSHAFT C50 LAYSHFT C60 REVERSE LOW C70 REVERSE HIGH C80 2 4 WHEEL DRIVE C90...

Page 222: ...0BZ A B H 1 0 H 2 1 H C D 600CA 600Z H H SIZE SIZE 1 0 H C20 2 1866 H 1 C70 2 TERM H H H C10 6 1 0 C80 2 600CB 600Z C40 2 WIRE 1 0 C10 1 SA C50 2 DEST C10 1860 1862 1 0 12 C20 1 C30 1 C17 1 1 1 0 DEST...

Page 223: ...TYPE TRANS DUMP SW GA 12 DEST 1 0 GD B 2 0 TERM 600Z GF D TERM D C C H J E F 2 H J G C C E F 1 1 0 600BT GB 2 1 0 600BS DEST 1 0 D C C SA 600Z 600CB GE 2 1 0 C SIZE GA 1 SA C C D D GF 1 1 0 GC 2 E F C...

Page 224: ...M H 1 0 C30 TYPE FORWARDLOW C602 C108 H DEST 1 0 SIZE C15 TERM 2 1 1 0 1 0 600BZ A B J 1 0 H 2 H C D 600CA 600Z J H SIZE 1 0 H C202 850 1 C702 H H H 1 0 C802 600CB 600Z C402 WIRE 1 0 C101 SA C502 DEST...

Page 225: ...rawing Engine Mainframe page 1 of 2 CAD 721 10935 Issue 2 721 10935_1 165 1 Section C Electrics 9803 3280 Section C 165 1 Issue 2 Harness Data www WorkshopManuals co uk Purchased from www WorkshopManu...

Page 226: ...NH 28 842 TYPE 3 0 1 SIZE 402 WIRE S T 600CF 2 SA TERM 1 0 R MT TYPE AIR FILTER NH 2 S T DEST 1 0 SIZE TERM AF AE DEST 1 THERMOSTART WIRE MU NH 13 003 TYPE 2 0 WIRE 600DE BF 1 0 P 600B 25 TYPE U 1 0...

Page 227: ...10944 Issue 1 721 19044 Key to Connectors LA Cab Plug LB Hydraclamp LC RH Rear Lights LD LH Rear Lights SA Earth SB Brake Lights 165 3 Section C Electrics 9803 3280 Section C 165 3 Issue 2 Harness Dat...

Page 228: ...N C105 G H DEST 1 0 1 SIZE 830E WIRE P 600BB 2 S10 TERM 1 0 N C40 TYPE REARSOCKET S20 P DEST 1 0 SIZE 847A 1 0 T T S10 1 0 T DEST 7 835 1 T 3 6 830T 5 8 C10 CABCONNECTION TYPE C601 C201 600GL X 921 C5...

Page 229: ...TON C105 G H DEST 1 0 1 SIZE 830E WIRE P 600BB 2 S10 TERM 1 0 N C40 TYPE REARSOCKET S20 P DEST 1 0 SIZE 847A 1 0 T T S10 1 0 T DEST 7 835 1 T 3 6 830T 5 8 C10 CABCONNECTION TYPE C601 C201 600GL X 921...

Page 230: ...0 P DEST 7 101Y 1 P 3 6 874C 5 8 C10 CABCONNECTOR TYPE S10 S20 875 S 899 C201 TERM F G F G 1 0 2 C401 4 2 0 1 0 600KH S C502 P WIRE P 1 0 1 0 101AA H J SIZE 101Z 1 0 DEST C30 A C30 A S10 C102 1 0 WIRE...

Page 231: ...trol Lever Adjustment 38 4 Pilot Control Valves Removal and Replacement 40 1 Dismantling and Assembly 40 3 Electrical Switches Removal and Replacement 41 1 Precision Control Servo Machines from Januar...

Page 232: ...antling and Assembly 51 2 Control Rods and Linkages Dismantling and Assembly Loader Valve Controls 60 1 Excavator Valve Controls 61 1 Control Cables Removal and Replacement Cab Heater Controls 70 1 St...

Page 233: ...A396921 30 1 Section D Controls 9803 3280 Section D 30 1 Issue 2 Steering Column G A B R D N C H C B L F F B B E J H H M P T G S H www WorkshopManuals co uk Purchased from www WorkshopManuals co uk...

Page 234: ...to threads of nuts T Note The coupling bolt G must engage with the cut out in the shaft After re fitting check that the steering tilt functions correctly and that the direction indicators and lights...

Page 235: ...2065mm A320510 31 1 Section D Controls 9803 3280 Section D 31 1 Issue 1 Shovel Reset H E B G F H A J L M K C www WorkshopManuals co uk Purchased from www WorkshopManuals co uk...

Page 236: ...plate is the centre position Because of component variation it is permissible to fit the cable end ball joint in either the forward or rear position The forward position will advance the levelling and...

Page 237: ...33 1 Section D Controls 9803 3280 Section D 33 1 Issue 1 Return To Dig A374040 1 2 X www WorkshopManuals co uk Purchased from www WorkshopManuals co uk...

Page 238: ...he lever it will stay in the detent position until the shovel reaches the return to dig position when the lever will automatically return to the central hold position 3 When return to dig is no longer...

Page 239: ...803 3280 Section D 35 1 Issue 1 Precision Control Servo A402030 V P R H P G F S J M U K A C L S E Q D T N U U U U B Basic System Operation Component Location www WorkshopManuals co uk Purchased from w...

Page 240: ...oil at servo pressure to the right and left hand pilot control valves H and J The valves are mounted at the rear of the seat arm rests The joysticks each operate a hydraulic pilot control valve H or...

Page 241: ...S2b S3b S4b S3b S2b S2a ISO SAE SAE S3a S1a S2a S3a S4a 4J 1J 3J H H J J A N G B D D Z Q L K R F E A402070 M T 4 T P 1 2 3 Q E G F S TP PL P TR TL PR T TL 2 T P 3 4 T P 4 3 2 1 1 Controls Precision Co...

Page 242: ...led The left hand joystick houses a horn switch On some machines the joysticks also incorporate switches for control of a hydraulic quickhitch and changeover from auxilary typically jaw bucket to exte...

Page 243: ...1AG 875B 600HX 1805F 101Y 600KH 921 929 931 101N 1805C 929 101BJ 1805C 875 101Z 930 1 4 3 6 9 10 2 2 5 7 875 101Y 600KH 2 5 7 5 7 8 921 929 931 5 7 8 7 8 931 930 921 600GT 1 2 3 4 1 2 1 2 1 2 3 4 5 6...

Page 244: ...nector HG Seat microswitch connector HH Left hand joystick connector 2 Right hand joystick 2a Microswitch Mode 2b Microswitch Excavator quickhitch latch control if fitted 2c Microswitch Hydraulic chan...

Page 245: ...that the hydraulic fluid is at the correct working temperature 50o C 122o F 2 Be sure to remove ALL contamination and if possible identify its origin It may be part of a component from elsewhere in th...

Page 246: ...t supply valve solenoid valve stem Renew coil Repair as applicable See Electrical Connections Check seat mounted micro switch function and condition of associated wiring for damage Repair or renew as...

Page 247: ...ew as applicable Renew filter Remove any contamination Check condition of hydraulic oil drain and replace if necessary Is the pilot supply valve operating correctly Remove the valve stem and check for...

Page 248: ...plicable Inspect the associated pilot spool valve capsule for signs of wear damage or contamination Is the valve in good working order A402380 See Service Procedures Control Linkage Adjustment See Pil...

Page 249: ...operate with the operator seat set in the rear facing position A402390 See Electrical Connections See Fault Finding Chart A No Servo Controls system fails to operate See Electrical Switches Joystick M...

Page 250: ...be 35 bar 36 kgf cm2 507 lbf in2 If necessary adjust the pressure as follows 1 Stop the engine Loosen lock nut B and adjust screw C Turn screw C clockwise to increase pressure and anti clockwise to de...

Page 251: ...38 2 Section D Controls 9803 3280 Section D 38 2 Issue 1 Precision Control Servo A402430 A C B F D E D D www WorkshopManuals co uk Purchased from www WorkshopManuals co uk...

Page 252: ...ons Plug the open ports Remove the hose from any ties under the machine 3 Working in the cab remove the plastic shrouds A from the seat as required Disconnect the hose at the pilot control valve B Not...

Page 253: ...sed adjust the control lever as follows If the arms do not release 1 Slacken lock nut 3 and screw the stop bolt 4 out anti clockwise Test the operation of the control lever and then tignten the lock n...

Page 254: ...A402540 40 1 Section D Controls 9803 3280 Section D 40 1 Issue 1 Precision Control Servo 1 1 3 7 2 6 5 9 4 8 10 8 www WorkshopManuals co uk Purchased from www WorkshopManuals co uk...

Page 255: ...st fixing bolts 1 Carefully lift the rear of the arm rest 2 and pull it to the rear to release 2 Undo the retaining screws and remove the plastic covers 3 and 4 Undo and remove bolt 5 together with lo...

Page 256: ...ection D Controls 9803 3280 Section D 40 3 Issue 1 Precision Control Servo A402440 6 14 8 6 7 8 X 7 Y 15 10 5 11 2 Z Z 2 4 1 5 2 9 3 A B 16 www WorkshopManuals co uk Purchased from www WorkshopManuals...

Page 257: ...ng faces of spools 8 and body 9 If scoring is evident the complete valve must be renewed 5 Make sure that one way restrictors 4 are free from debris Assembly Assembly is the reverse dismantling but no...

Page 258: ...ection D Controls 9803 3280 Section D 41 1 Issue 1 Precision Control Servo A402410 A B B C F N D E J H G P K F E J M L K A402590 V U Z X W www WorkshopManuals co uk Purchased from www WorkshopManuals...

Page 259: ...hes Make sure that bush M is fitted correctly if applicable If spigot N has been removed make sure it is fitted with its alignment pin P correctly located Fit a new plastic cap G 2 When screwing the j...

Page 260: ...45 1 Section D Controls 9803 3280 Section D 45 1 Issue 1 Precision Control Servo Basic System Operation Component Location TBA www WorkshopManuals co uk Purchased from www WorkshopManuals co uk...

Page 261: ...cilitates operation of the backhoe excavator via joystick controllers A and B mounted in the arms of the operator s seat Unlike manual machines the excavator valve spools are moved by hydraulic pressu...

Page 262: ...to the joystick controllers A and B Each joystick controller contains four spool valve capsules numbered 1 to 4 on each valve The valves are operated by moving the associated joystick With the joysti...

Page 263: ...90 3 1 4 2 R H 3 1 4 2 L H A B A B A B A B A B A B A B T1 LS P M P T T3 C 4 1 3 2 P T 4 3 2 1 P T 1H 1H S3a S3b S4a S4b S7a S7b 2 1 P 4 T 3 P2 P1 P2 T P1 R H 1 2 1 2 1 2 SAE Controls Precision Control...

Page 264: ...14H 629C 629B 184F 114J 114D 3 5 1 921A 921B 628A 921C 929 931 930 875 114K 628B 6 7 8 2 4 3 2 1 3 2 1 3 2 1 3 2 1 921A 929 931 875 A405100 PUMP DUMP CONTROLLER A B C D E F G H J K L M N P Q R S T U V...

Page 265: ...ydraulic oil temperature when operating hammer attachments for example the pump dump controller J automatically activates the unloading valve HSC circuit dumping the hydraulic oil flow from the second...

Page 266: ...en the control lever 5 is operated plunger 9 pushes against return spring 8 and control spring 7 The control spring 7 moves the control spool 6 down wards and closes the connection between the relevan...

Page 267: ...allowing excess pressure to vent to tank Down stream of the pressure regulating valve is located the servo accumulator 4 with its associated non return valve The accumulator traps and stores servo pr...

Page 268: ...finding note the following 1 Make sure that the hydraulic fluid is at the correct working temperature 50o C 122o F 2 If hydraulic contamination is found be sure to remove ALL debris and if possible id...

Page 269: ...essure isolation valve solenoid coils faulty Renew the solenoid coil s Are the relevant electrical fuses intact Inspect and test all relevant wiring for damage and short circuits Repair as applicable...

Page 270: ...the load sense relief valve out of adjustment or defective Adjust repair or renew as required Refer to Section E Service Procedures Pressure Testing Load Sense Relief Valve Refer to Section E Excavato...

Page 271: ...e Dismantling and Assembly Is the associated pressure compensator blocked Test the pressure compensator network Refer also to Section E Hydraulics Fault Finding One hydraulic service fails or is slow...

Page 272: ...48 1 Service Procedures Testing the Servo Pressure Section D Controls 9803 3280 Section D 48 1 Issue 1 Precision Control Servo TBA www WorkshopManuals co uk Purchased from www WorkshopManuals co uk...

Page 273: ...g the engine Operate the joystick controls several times to vent the hydraulic pressure from the servo system and backhoe rams Turn the starter switch to the OFF position and remove the key 3 Remove t...

Page 274: ...D Controls 9803 3280 Section D 50 2 Issue 1 Precision Control Servo 1 3 4 6 5 2 A404770 8 7 A404780 Joystick Controllers Dismantling and Assembly www WorkshopManuals co uk Purchased from www WorkshopM...

Page 275: ...oint assembly 4 Take care to keep all the shims 5 together 4 Remove the retaining plate 6 Carefully withdraw the regulating valve assemblies 7 from the valve body 8 Assembly Assembly is the reverse of...

Page 276: ...Removal 1 Park the machine on firm level ground engage the parking brake and set the transmission to neutral Lower the attachments to the ground and stop the engine Before attempting to remove the val...

Page 277: ...5 6 7 A404760 Servo Pressure Supply Valve Dismantling and Assembly 51 2 Section D Controls 9803 3280 Section D 51 2 Issue 1 Precision Control Servo www WorkshopManuals co uk Purchased from www Worksho...

Page 278: ...0 3 22 1 3 100 10 2 73 8 4 100 10 2 73 8 5 150 15 3 110 6 6 100 10 2 73 8 7 15 20 1 5 2 11 14 8 Accumulator The accumulator 1 can be removed as shown Take great care when handling the accumulator the...

Page 279: ...ontrols 9803 3280 Section D 60 1 Issue 1 Control Rods and Linkages X B A K C D J E G H F Dismantling and Assembly Loader Valve Controls Locking Pin A404660 K www WorkshopManuals co uk Purchased from w...

Page 280: ...and H to the lever assembly Ensure that the locking flats X are at the top Note If necessary loosen the lock nuts and rotate the end fittings to give equal amounts of adjustment thread at each end of...

Page 281: ...ols 9803 3280 Section D 61 1 Issue 1 Control Rods and Linkages Dismantling and Assembly Excavator Valve Controls JCB Pattern A J B D C E F G H H K L Locking Pin www WorkshopManuals co uk Purchased fro...

Page 282: ...nting plate 2 Assemble the pivot levers B and spacers C to the mounting bracket and insert the pivot shaft D Fit the short control rods E 2 off to the pivot lever assembly as shown 3 Assemble the exca...

Page 283: ...1 2 3 70 1 Section D Controls 9803 3280 Section D 70 1 Issue 1 Control Cables S X Z R D C X E Removal and Replacement Cab Heater Controls R T Y www WorkshopManuals co uk Purchased from www WorkshopMan...

Page 284: ...from the clips X at each end and unhooking the cable from the vent Y and from the pin Z at the control knob Replacement Replacement is the reverse of the removal sequence After fitting the cables oper...

Page 285: ...ection D Controls 9803 3280 Section D 71 1 Issue 1 Control Cables Removal and Replacement Stabiliser Controls A404730 A404700 H D B E C F G www WorkshopManuals co uk Purchased from www WorkshopManuals...

Page 286: ...l 3 Feed the end of the cable back underneath the cab to the rear wheel arch on the R H side of the machine and release the cable from the clamp assembly at position X as shown 4 Working in the cab re...

Page 287: ...Section D Controls 9803 3280 Section D 72 1 Issue 1 Control Cables A394410 Removal and Replacement Boom Lock Cable B A C 6 4 2 5 1 3 A405180 X D www WorkshopManuals co uk Purchased from www WorkshopM...

Page 288: ...cable should be tight but must not lift the boom lock from its fully down position 2 Operate the boom and check that the boom lock will engage and disengage correctly using the control knob in the cab...

Page 289: ...D Controls 9803 3280 Section D 73 1 Issue 1 Control Cables Removal and Replacement Engine Throttle Cable A404690 A404670 A404680 D G J K K E F E C www WorkshopManuals co uk Purchased from www Workshop...

Page 290: ...the bulkhead remove the screws E and ease back the rubber bulkhead cover to reveal the end of the footpedal lever as shown Remove the nut F and disconnect the cable pivot block from the footpedal Loo...

Page 291: ...wer the loader arms and excavator to the ground switch OFF the engine and remove the starter key 2 Working at the rear of the machine at the auxiliary valve undo the locknut B Remove the screws C and...

Page 292: ...mp 3 3 Variable Flow 3 7 Introduction to Hydraulic Schematic Symbols 3 10 Circuit Schematics Fixed Flow 3 20 Variable Flow 3 26 Precision Control Servo Machines up to serial no 931159 3 31 Machines fr...

Page 293: ...18 Smooth Ride System 10 1 Hose Burst Protection Valves if fitted Boom Dipper Operation 11 1 Loader Operation 11 5 Fault Finding Hydraulic System Fixed Flow 15 1 Variable Flow 15 10 Smooth Ride System...

Page 294: ...bly 31 1 Variable Flow Dismantling and Assembly 35 1 Loader Valve Fixed Flow Removal and Replacement Manual Control 50 1 Dismantling and Assembly Main Relief Valve MRV 50 6 Auxiliary Relief Valves ARV...

Page 295: ...r Valve 62 22 Load Sense Relief Valve 62 23 Auxiliary Relief Valves ARV s 62 24 Anti cavitation Valve 62 25 Hose Burst Protection Valves if fitted Removal and Replacement 70 1 Dismantling and Assembly...

Page 296: ...on E v Issue 1 Contents Page No Hydraulic Oil Cooler Removal and Replacement 95 1 Smooth Ride System Accumulator Removal and Replacement 96 1 Dismantling and Assembly 96 2 www WorkshopManuals co uk Pu...

Page 297: ...n M BSP x 1 2 in F BSP x Test Point 892 00263 5 8 in M BSP x 5 8 in F BSP x Test Point 892 00264 3 4 in M BSP x 3 4 in F BSP x Test Point 892 00265 1 in M BSP x 1 in F BSP x Test Point S188131 S188121...

Page 298: ...8140 S193850 892 00881 Valve Spool Seal Fitting Tool Components for Valve Block A R V Testing For 4CX Variable Flow machines use 25 201103 892 00309 A R V Pressure Test Kit 1 892 00340 Test Block Body...

Page 299: ...190 1 2 in BSP 816 00197 5 8 in BSP 816 00196 3 4 in BSP 816 00193 1 in BSP S193880 892 00047 3 8 in BSP A x 1 4 in BSP B 892 00048 1 2 in BSP A x 1 4 in BSP B 892 00049 5 8 in BSP A x 1 4 in BSP B 81...

Page 300: ...Rod Diameter slew ram 892 01021 For 60 mm Rod Diameter 892 01022 For 60 mm Rod Diameter slew ram 892 01023 For 65 mm Rod Diameter 892 01024 For 70 mm Rod Diameter 892 01025 For 75 mm Rod Diameter 892...

Page 301: ...rev min Approximate Weight 23 8kg 52 lbs Model Reference Double pump 7441N Mounting Gearbox Theoretical displacement cc rev cu in rev Pump section 1 mounting flange end 41 2 50 Pump section 2 26 1 59...

Page 302: ...low at 2200 rev min and system pressure 90 min displacement litres min UK gal min US gal min Pump section 1 mounting flange end 57 4 12 6 15 1 Pump section 2 45 5 10 0 12 0 Maximum speed pressure P1 3...

Page 303: ...rev Flow at 2200 rev min and 2500 lb in2 pressure minimumum acceptable flow rate new or rebuilt pump 75 80 litres min 16 5 17 6 UK gal min minimumum acceptable flow rate used pump 70 75 litres min 15...

Page 304: ...late Section E Hydraulics 9803 3280 Section E 2 4 Issue 1 Technical Data 1 7 2 3 A262160 bar kgf cm2 lbf in2 Main Relief Valve M R V 236 241 240 245 3420 3500 Unloader Valve 207 214 207 211 3000 3100...

Page 305: ...ve M R V 227 231 232 235 3300 3350 Unloader Valve 203 207 207 211 2950 3000 Auxiliary Relief Valves A R V Loader Shovel Ram Head Side 172 175 175 179 2500 2550 Shovel Ram Rod side 308 312 315 318 4475...

Page 306: ...bar kgf cm2 lbf in2 Auxiliary Relief Valves A R V Shovel Ram Head Side 310 315 4500 Shovel Ram Rod Side 170 175 2500 Note Instructions for pressure testing and adjustment are described in Service Pro...

Page 307: ...used in the loader valve must be set at 2500 lb in2 this will ensure it does not interfere with the operation of the relief valve housed in the hydraulic steer unit Weight 2 Spool TBA kg TBA lbs 3 Spo...

Page 308: ...le fitted 248 255 253 260 3600 3700 Sideshift 248 255 253 260 3600 3700 Bucket Ram Rod Side Machines with Rockbreaker only 248 255 253 260 3600 3700 Dipper Ram Head Side 248 255 253 260 3600 3700 Dipp...

Page 309: ...358 5000 5100 Bucket Ram Head Side 248 255 253 260 3600 3700 Bucket Ram Rod Side 248 255 253 260 3600 3700 Dipper Ram Head Side 248 255 253 260 3600 3700 Dipper Ram Rod Side 248 255 253 260 3600 3700...

Page 310: ...3700 Dipper Ram Head Side 255 260 3700 Dipper Ram Rod Side 255 260 3700 Slew Left and Right 265 270 3850 Load Sense Relief Valve 250 255 3650 Note Instructions for pressure testing and adjustment are...

Page 311: ...1 148 2000 2100 Knuckle Ram Rod Side 207 214 211 218 3000 3100 Hammermaster 207 214 211 218 3000 3100 Power Sideshift both 207 214 211 218 3000 3100 Hand Held Tools 138 150 141 153 2000 2200 Component...

Page 312: ...l guide for given shovel weights loaded see below bar kgf cm2 lbf in2 Shovel weights up to 700 kg 1540 lb 13 8 14 200 Shovel weights 700 kg to 950 kg 1540 2100 lb 19 19 4 275 Shovel weights over 950 k...

Page 313: ...Hydraulics 9803 3280 Issue 1 3 1 3 1 Basic System Operation Section E Section E A401400 26 T 1C 6 13 4 3 P 7 1B Component Location www WorkshopManuals co uk Purchased from www WorkshopManuals co uk...

Page 314: ...eering priority valve 7 and in neutral circuit flows through the priority valve to the loader valve 3 From the loader valve neutral gallery oil flows via a high pressure carry over line 1B to the exca...

Page 315: ...aulics 9803 3280 Issue 1 3 3 3 3 Basic System Operation Section E Section E 5 A401420 P2 P1 7 1B 13 62 6 26 1C T 3 4 5 Component Location www WorkshopManuals co uk Purchased from www WorkshopManuals c...

Page 316: ...ows through the priority valve to the auxiliary valve 5 and then to join the flow from P1 at the loader valve From the loader valve neutral gallery oil flows via a high pressure carry over line 1B to...

Page 317: ...Hydraulics 9803 3280 Issue 1 3 7 3 7 Basic System Operation Section E Section E 5 A401430 26 6 T 3 4 1A 13 P Component Location www WorkshopManuals co uk Purchased from www WorkshopManuals co uk...

Page 318: ...elected the pump senses the demand and oil is drawn from the hydraulic tank T Pressurised oil from the pump flows to the loader valve 3 and or the excavator valve 4 via hose and pipe assembly 1A The l...

Page 319: ...rcuit diagrams as an aid to fault finding It will be possible to see the complete hydraulic circuit and decipher the relationship between hydraulic components General Basic Functional Symbols Rams Sec...

Page 320: ...osition 6 Port spring centred hand operated valve 3 Position 4 Port spring centred solenoid pilot pressure operated valve 3 Position 4 Port spring centred detent hand operated valve Non return valve N...

Page 321: ...ged also pressure test point Line plugged with take off line Quick release couplings connected Quick release couplings disconnected Working line return or feed Reservoir return line above fluid level...

Page 322: ...rol Push button operated Lever operated Pedal operated Stem operated Spring operated Roller operated Roller trip operated one directional M Solenoid one winding Solenoid two winding Electric motor ope...

Page 323: ...the spool would connect Port 1 to Port 4 and Port 3 to Port 2 It must be noted that not all spools are of the same type Their operating designs can be seen by following the path the flow arrows take i...

Page 324: ...is in neutral position flow from the pump passes through the spool and returns to the hydraulic tank If the lever operated spool is moved away from neutral position hydraulic fluid is directed to eit...

Page 325: ...4M Dipper Ram Head Side A R V 4N Dipper Ram Rod Side A R V 4P Bucket Ram Head Side A R V 5 Auxiliary Valve Block foot operated 5A Auxiliary Spool 5B A R V 5C A R V 6 In tank Filter 6A Filter By pass...

Page 326: ...3 3A 3B 3Q 3N 3M 3L 3C 3D 3E 3F 3G 3J 3J 4 4A 4B 4D 4C 4E 4F 4G 62 4H 4J 4K 4L 4N 4M 4P 7 31 35 33 34 36 32 26 13 59 53 59 54 57 56 52 55 51 65 42 44 43 41 39 40 38 5B 5C 5A 11 10 12 14 M 66 P1 P2 T A...

Page 327: ...Power Sideshift Cylinder 74 Relief Valve 75 Manual Change Over Valve 76 Isolation Valve 3CX S Series Options This circuit shows the Low Flow Hammer Extending Dipper and Power Sideshift for the main hy...

Page 328: ...HPCO High Pressure Carry Over From Excavator Valve Block 4 M Hydraulic Connections T Hydraulic Tank Return 11 Sequence valve 69 Extending Dipper Ram 76 Isolation Valve 77 Hammer Section E Hydraulics 9...

Page 329: ...ve P Auxiliary Rams Q Priority Valve S Excavator Valve Block S1 Slew Spool S2 Boom Spool S3 Stabiliser Spool S4 Stabiliser Spool S5 Dipper Spool S6 Bucket Spool W Stabiliser Rams Y One Way Restrictor...

Page 330: ...ENGINE MRV P LS T LS EF P CF L R PP NEUTRAL CIRCUIT TANK RETURN S S1 S2 S3 S4 S5 S6 NEUTRAL CIRCUIT H P C O SLEW BOOM STABILISER STABILISER DIPPER BUCKET H P C O EE W G G HAMMER RETURN HAMMER FEED K Y...

Page 331: ...17 18 17 18 17 18 17 18 16A 16 34 16 15 33 32 31 15 15 30 28 16 16 P T A B R L 45 48 46 47 LS P T 7 8 P T B 5 6 4 3 L L1 S 2 P 1 20 20 21 21 22 22 ACC T 24 P2 P1 23 44 LS 17 18 19 17 18 19 17 18 19 1...

Page 332: ...ector Valve 24 Smooth Ride Accumulator 25 Backhoe Loader Valve Block 26 Extradig Priority Valve 27 Extradig Service Spool 28 Compensator Valves 29 Slew Service Spool 30 Boom Service Spool 31 Stabilise...

Page 333: ...Rams 22 Lift Rams 23 Smooth Ride Selector Valve 24 Smooth Ride Accumulator 25 Backhoe Loader Valve Block 28 Compensator Valves 29 Slew Service Spool 30 Boom Service Spool 31 Stabiliser Service Spool 3...

Page 334: ...17 18 17 18 16A 16 34 16 15 33 32 31 15 15 30 28 16 16 P T A B R L 45 48 46 47 LS P T 7 8 P T B 5 6 X 4 3 L L1 S 2 P 1 20 20 21 21 22 22 ACC T 24 P2 P1 23 44 LS 17 18 19 17 18 19 17 18 19 14 15 15 13...

Page 335: ...Pressure Flow Spool 3 Relief Valve 2000 lb in2 138 bar 146 kgf cm2 4 Load Sense Solenoid 5 Hand Held Tool 6 Shuttle Valve 9 Excavator Valve Block 25 Loader Valve Block Section E Hydraulics 9803 3280 S...

Page 336: ...ucket Spool 4G Auxiliary Spool 4H Hydraclamp Valve Sideshift Only 4J Slew A R V 4K Slew A R V 4L Dipper Ram Head Side A R V 4M DipperRam Rod Side A R V 4N Boom Ram Rod Side A R V 4P Boom Ram Head Side...

Page 337: ...3E 3F 3G 3H 11 12 13 14 15 16 1 1A 1B 1C 2A 2 8 3A 3 3M 3Q 3N 3P 3L 3B 3C 3D 10 Hydraulics Circuit Schematics Section E Section E 9803 3280 Issue 2 3 32 3 32 A396210 Precision Control Servo Machines...

Page 338: ...b P M a A3 B7 b a A403921 1 1B 1C 5 2 2A 6 11 9 7 8 10 12 3 3A 3B 3C 3E 3D 15 16 13 14 18 17 4K 4L 4M 4N 4P 4Q 4R 4S 4T 21 20 23 24 25 22 26 27 40 41 42 43 44 45 4U 4V 4W 4A 4J 4B 4C 4D 4E 4F 4G 4H 4...

Page 339: ...SO 4F Bucket Spool 4G Extending Dipper Spool 4H Hydraclamp Valve Sideshift Only 4J Slew A R V 4K Slew A R V 4L Boom Ram Rod Side A R V 4M Boom Ram Head Side A R V 4N Dipper Ram Head Side A R V 4P Boom...

Page 340: ...ings Refer to Technical Data pages at the begining of this section for more information Ports A and B are always identified as service ports feed and return from respective ram 4 Excavator Valve Block...

Page 341: ...P2 P A7 T 2 B4 b T a 2 1 C P2 T3 B3 1 A2 a a B6 P 2 1 b a T A6 3 T 1 P a P 2 4 b P1 T A5 a T B7 b 2 b a M B1 b P T2 LS T1 P B5 3 30 31 32 33 34 4 35 19 22 26 25 23 24 20 27 21 A405700 Precision Contro...

Page 342: ...er Oil is picked up by the gear teeth on the inlet side of the pump and carried around betwwen the teeth and the pump body As the gears come into mesh the space carrying the oil is filled by a gear to...

Page 343: ...9803 3280 Issue 1 5 2 5 2 Circuit Descriptions Section E Section E A B Full Pressure Pressure Servo Neutral Exhaust Cavitation Lock Up A390630 Key to Oil Flow Pressure www WorkshopManuals co uk Purcha...

Page 344: ...housing the pressure flow regulators that provide servo control Rotation of the cylinder barrel causes linear movement of the axial pistons and fluid from the suction port is drawn into the pump thro...

Page 345: ...E 5 4 Issue 1 Circuit Descriptions 13 P LS T A P 4 11 6 5 12 10 9 3 2 1 8 7 Neutral Circuit Pressure Pressure Generated by Operation of a Service Trapped Oil Exhaust A275730 www WorkshopManuals co uk...

Page 346: ...port P of the regulator valve The increasing pressure pushes flow compensating spool 4 up against its spring 6 This movement creates a flow path from port P to port A Oil now flows from the flow regu...

Page 347: ...E 5 6 Issue 1 Circuit Descriptions 13 P LS 2 1 8 7 4 3 T A P 11 6 5 12 10 9 Neutral Circuit Pressure Pressure Generated by Operation of a Service Trapped Oil Exhaust A275740 www WorkshopManuals co uk...

Page 348: ...spring 6 and the signal pressure in cavity 11 Pump output pressure is now sent to control piston 7 via port A Control piston 7 will overcome the force of spring 1 The pump swashplate angle decreases a...

Page 349: ...E 5 8 Issue 1 Circuit Descriptions 13 P LS T A P 4 11 6 5 12 10 9 3 2 1 8 7 Neutral Circuit Pressure Pressure Generated by Operation of a Service Trapped Oil Exhaust A275750 www WorkshopManuals co uk...

Page 350: ...essure as pump output pressure The force of spring 6 is sufficient to move spool 4 down The pressure in the system is also sufficient to move spool 3 up against the force of spring 12 this creates a c...

Page 351: ...sure in inlet gallery C is sensed by pilot valve 3M via the bore of spool 3L At pressures below the setting of the unloader valve both pilot valve 3M and spool 3L remain closed Loader Valve Unloader O...

Page 352: ...E Section E 3M 3L B C 3B 3C 3D 3E 3Q 1B T 3J 3N 1C P2 1A P1 A401150 3L C 3M 3P T 3N P1 D P2 A401160 Full Pressure Pressure Servo Neutral Exhaust Cavitation Lock Up A390630 Key to Oil Flow Pressure ww...

Page 353: ...scriptions Section E Section E 3M 3L 3P 3C C 3D 3E 3Q T 3J 3N 1C P2 1A P1 W A401170 Full Pressure Pressure Servo Neutral Exhaust Cavitation Lock Up A390630 Key to Oil Flow Pressure www WorkshopManuals...

Page 354: ...l is moved by spring pressure This spool movement makes a connection from the unloader spool chamber 3P to tank Because the unloader chamber is now connected to tank and so at exhaust pressure pressur...

Page 355: ...roduces a higher pressure in service line D than in the parallel gallery B This pressure differential causes load hold check valve 3J to close thus preventing the load from dropping Operation 2 As the...

Page 356: ...criptions Section E Section E 33 B 1A 34 3C 3J D A396410 33 B 1A 34 3C 3J D A396420 Full Pressure Pressure Servo Neutral Exhaust Cavitation Lock Up A390630 Key to Oil Flow Pressure www WorkshopManuals...

Page 357: ...scriptions Section E Section E 33 B 1A 34 3C 3J D C E A396390 33 34 3C A A A396400 Full Pressure Pressure Servo Neutral Exhaust Cavitation Lock Up A390630 Key to Oil Flow Pressure www WorkshopManuals...

Page 358: ...the selected spool E blocks the flow from the parallel gallery to the head side port and oil returning from the rams is diverted into the exhaust gallery Float The float facility is provided to allow...

Page 359: ...ully tipped when the arms are being raised the shovel is unable to tip further producing back pressure in the head side of the shovel rams 31 and 32 and cavitation in the rod side As the arms continue...

Page 360: ...10 Circuit Descriptions Section E Section E 1A 3C 3G 3F 32 31 A396370 Full Pressure Pressure Servo Neutral Exhaust Cavitation Lock Up A390630 Key to Oil Flow Pressure www WorkshopManuals co uk Purcha...

Page 361: ...riptions Section E Section E B E A D C 3B 3D 1A A H D G F 1A 2 D C A E F 1A 3 1 A401180 Full Pressure Pressure Servo Neutral Exhaust Cavitation Lock Up A390630 Key to Oil Flow Pressure www WorkshopMan...

Page 362: ...amber is not high enough to lift the plunger off its seat 2 Pilot Valve Opens If as shown in view 2 pump pressure rises high enough to force the pilot valve F from its seat against spring G the pressu...

Page 363: ...pump where the pump subsequently swashes to meet this load sense demand Component Key 1 Auxiliary optional spool 2 Shovel spool 3 Arms lift spool 4 Pump inlet 5 Tank port 6 Load sense port from valve...

Page 364: ...flow out to the hydraulic steer unit via priority work port PR It must be noted that relief valve assembly J is redundant This relief valve is part of the inlet section however the hydraulic steer un...

Page 365: ...nst the force of spring D The position of the spool now allows oil from the pump inlet port P to flow into passage H and on to the selected service via the valve block service ports Component Key P Pu...

Page 366: ...the service ports D Oil from the pump must overcome the force of spring E to lift poppet F and make the connection from the pump passage J to the service ports D via passage C In some instances there...

Page 367: ...in the head side of the shovel rams and cavitation in the rod side As the arms continue to rise the back pressure increases until it reaches the setting of A R V 30A This A R V then opens allowing th...

Page 368: ...ontours as the machine is driven over uneven ground This is achieved by moving the lift spool 18 down beyond arms lower into the float detent Both service ports are connected to exhaust via the spool...

Page 369: ...t loader valve block 9 inlet section which is connected to the steer valve 45 The last secondary shuttle in the loader valve block is connected to the first secondary shuttle in the backhoe valve bloc...

Page 370: ...per Spool 4F Bucket Spool Note Machines with ISO control pattern have the boom and dipper spools interchanged Manual Control Neutral Circuit Oil from the loader valve enters the excavator valve at A a...

Page 371: ...Circuit Descriptions Section E Section E 4A 4B A 4C 4D 4E 4F C B A401190 Full Pressure Pressure Servo Neutral Exhaust Cavitation Lock Up A390630 Key to Oil Flow Pressure www WorkshopManuals co uk Purc...

Page 372: ...ircuit Descriptions Section E Section E 4B B 4S D A401200 4B 4S E A401210 Full Pressure Pressure Servo Neutral Exhaust Cavitation Lock Up A390630 Key to Oil Flow Pressure www WorkshopManuals co uk Pur...

Page 373: ...gallery B The valve prevents reverse flow from the rams into the pressure feed line so maintaining ram pressure until exceeded by system pressure The illustration shows a service selected but back pr...

Page 374: ...e lapse while the ram filled with oil before the service would operate again To prevent this from happening the boom service is fitted with a one way restrictor When the boom is being raised the poppe...

Page 375: ...Circuit Descriptions Section E Section E C 4H 4J 4A D B A401220 E A396350 Full Pressure Pressure Servo Neutral Exhaust Cavitation Lock Up A390630 Key to Oil Flow Pressure www WorkshopManuals co uk Pur...

Page 376: ...Descriptions Section E Section E 4H 4J 4A A396360 4P 4Q 4F 4E 4M 4N 4E A396430 Full Pressure Pressure Servo Neutral Exhaust Cavitation Lock Up A390630 Key to Oil Flow Pressure www WorkshopManuals co...

Page 377: ...xhaust gallery to fill the L H cylinder Excavator Valve A R V Operation The illustration shows the bucket spool 4F selected to operate the service against an immovable object This forces the dipper aw...

Page 378: ...acting on the upper faces of poppet B and piston C keeps poppets B and E tightly seated The force of spring F is adjustable to suit the relevant service by means of adjuster screw and locknut G 2 Pilo...

Page 379: ...criptions Section E Section E G B A 1 K F E D C B A 3 K E L D C A 2 K F E J H A390480 Full Pressure Pressure Servo Neutral Exhaust Cavitation Lock Up A390630 Key to Oil Flow Pressure www WorkshopManua...

Page 380: ...rce of spring G The oil flows past the poppet and out to the hydra clamps 62 2 Clamps Released Not Precision Control Machines When the hydraclamp switch A is in the ON position pressed down the soleno...

Page 381: ...egulator and Relief Valve G Hydra clamp Solenoid Valve H Pilot Operated Check Valve J Load Sense Drain Port 4A Slew Spool 4B Boom Spool 4C Stabiliser Spool 4D Stabiliser Spool 4E Dipper Spool 4F Bucke...

Page 382: ...n the end of the service spool is reduced the force of the centering spring overcomes the servo pressure and the service spool will move back proportionaly to the central neutral position Note that sp...

Page 383: ...00 bar 20 bar LS 0 bar S A402780 PUMP 40 bar LS 20 bar LOAD 100 bar 20 bar E1 2 E T 5 R 1 3 H U 4 P S A402790 Full Pressure Pressure Servo Exhaust Lock Up Key to Oil Flow Pressure PUMP 120 bar LS 100...

Page 384: ...load pressure isolator spool U moves down and closes off the auxiliary pump gallery 1 from load sense gallery 2 If the load pressure subsequently rises or falls the isolator spool moves due to pressur...

Page 385: ...clamps release the hydraclamp switch A must be in the ON position and an excavator service must be operated With the hydraclamp switch A in the ON position pressed down the solenoid valve E is energi...

Page 386: ...s the spool proportionally against the force of the centering spring E allowing the oil to flow to move the required service When the servo pressure on the end of the service spool is reduced the forc...

Page 387: ...S is moved by servo pressure connecting the oil from the pump P to the gallery P1 The pressure in this chamber opens the pressure compensator valve PC allowing oil into the load sense gallery LS Oil...

Page 388: ...riptions M P LS T T1 A405030 P R S CV PC LS E E1 T F B A M P LS T T1 A405040 P S P1 CV PC LS E E1 T G B A R Full Pressure Pressure Servo Neutral Exhaust Cavitation Lock Up A390630 Key to Oil Flow Pres...

Page 389: ...uit Descriptions A405050 Bucket Actuation PC LS P1 P2 A405060 LS Bucket Actuation Boom Actuation PC Full Pressure Pressure Servo Neutral Exhaust Cavitation Lock Up A390630 Key to Oil Flow Pressure www...

Page 390: ...ucket as shown The higher load pressure in the boom service causes the pressure compensator valve PC in the bucket service to partially close reducing the size of the opening through which the oil mus...

Page 391: ...ue 1 10 1 10 1 Circuit Descriptions Section E Section E Smooth Ride System 1 1 2 3 4 T A391100 4 3A 3B 3C 3D 3E 3F 3G 3H 3J 1 1 3J 3J T ACC P1 P2 3 2 S307310 www WorkshopManuals co uk Purchased from w...

Page 392: ...elector valve 3 is energised and opens Hydraulic oil from the piston head side is dead ended at the loader valve block 4 but is connected to the accumulator The rod side of the loader ram is connected...

Page 393: ...d the position of spool F A cross drilling G in the valve connects the A port gallery to cavity J The pressure in cavity J increases to such a point that it moves spool F to the left against the force...

Page 394: ...11 2 Issue 1 Circuit Descriptions D C E A X B Y A395760 E H F G J A X B Y A395770 Full Pressure Pressure Servo Neutral Exhaust Cavitation Lock Up A390630 Key to Oil Flow Pressure www WorkshopManuals c...

Page 395: ...1 3 Issue 1 Circuit Descriptions H F J L K A X B Y A395780 B A A X B Y D C A395790 Full Pressure Pressure Servo Neutral Exhaust Cavitation Lock Up A390630 Key to Oil Flow Pressure www WorkshopManuals...

Page 396: ...a connection from the rod side of the ram to port B Note that oil exhausted via port B will not reduce to low pressure until the A R V in the excavator valve block also opens Operation 4 Hose Burst C...

Page 397: ...essure is sufficient to move piston G to the right thus moving plunger J off its seat against spring H With the plunger off its seat oil from the opposite side of the ram enters the HBPV at port C2 pa...

Page 398: ...1 Circuit Descriptions E C2 P T V2 A J H Q B N D F L G C 9 A395810 E C2 P T V2 A B 9 A395800 Full Pressure Pressure Servo Neutral Exhaust Cavitation Lock Up A390630 Key to Oil Flow Pressure www Worksh...

Page 399: ...e 1 Circuit Descriptions E C2 P T V2 A B J H 9 A395820 E C2 P T V2 A J H B L K G 9 A395830 Full Pressure Pressure Servo Neutral Exhaust Cavitation Lock Up A390630 Key to Oil Flow Pressure www Workshop...

Page 400: ...nger J will be held on its seat by the force of spring H Also back pressure and the force of spring B will hold check valve seat A firmly against the plunger thus trapping a column of oil in the head...

Page 401: ...ilter Unloader valve pressure Check pressure setting of the setting too high unloader valve continued Introduction The purpose of this section is to help you trace hydraulic faults to a faulty unit va...

Page 402: ...ng incorrect Associated valve block section Check for leaks rectify as required leaking or not operating Also see fault 6 Leaking Oil Seal Control Valves Make sure that the associated load hold check...

Page 403: ...nd torque tighten bolts Temperature distribution within Warm the entire system up before control valve not uniform using service 6 Leaking Oil Seal Control Valves Paint or dirt on the seal face Remove...

Page 404: ...from cooler fins Restriction in neutral circuit Check hoses replace as necessary lines Hydraulic filter clogged and Change hydraulic filter by pass valve not working Section E Hydraulics 9803 3280 Sec...

Page 405: ...a component from elsewhere in the circuit 7 Replace any seals such as O rings before re assembling hydraulic components Section E Hydraulics 9803 3280 Section E 15 10 Issue 1 Fault Finding PROBLEM Hi...

Page 406: ...eck and re torque 4 Disassemble and check that each tie rod has one shim PROBLEM Mechanical detent will not hold POSSIBLE CAUSE 1 Broken detent shaft CORRECTIVE ACTION 1 Remove detent inspect PROBLEM...

Page 407: ...Head side solenoid valve closed Check if solenoid operating replace when switched ON solenoid or selector valve as required 5 Accumulator gas pressure decrease Leak across accumulator piston Recharge...

Page 408: ...n the fluid These contaminants can appear during manufacture assembly and operation Cleaning Operation The purpose of cleaning oil is to remove contaminants of all types and sludge by filtering hydrau...

Page 409: ...21 1 Section E Hydraulics 9803 3280 Section E 21 1 Issue 1 Service Procedures A C B A B A D A396190 www WorkshopManuals co uk Purchased from www WorkshopManuals co uk...

Page 410: ...ump section 1 disconnect hose C from the pump Fit the flow meter and load valve see Note 2 between hose C and the pump b Pump section 2 disconnect hose D from the pump Fit the flow meter and load valv...

Page 411: ...iable Flow Pumps Flow and Pressure Testing 22 1 Section E Hydraulics 9803 3280 Section E 22 1 Issue 1 Service Procedures A B C D S315770 www WorkshopManuals co uk Purchased from www WorkshopManuals co...

Page 412: ...may have to be removed and checked for sticking shuttle valves However this should not be done until all other checks have been completed 8 Machines with the load sense pressure relief valve adjust t...

Page 413: ...erate the control levers to vent residual hydraulic pressure 3 Connect a 0 400 bar 0 6000 lbf in2 pressure gauge to pressure test connector B located on the pump pressure out line 4 Start the engine a...

Page 414: ...ion 9 Refer to Regulator Valve Adjustment Load Sense Line Flow The load sense line communicates the load pressure required at a service to the pump If there is a blockage or leak in the line the hydra...

Page 415: ...sly and establish valve is set correctly 6 Tighten locknut refit cap Pressure Regulator Spool As previously explained there is no main relief valve to control the system pressure the pump swashplate a...

Page 416: ...ms are experienced carry out the following 1 Lower the backhoe bucket and loader shovel to rest on the ground Stop the engine and remove the starter key 2 Gain access to the regulator valve assembly 3...

Page 417: ...ound screwdriver to remove the drive shaft sealing ring 2 2 Examine the seal running area driveshaft and housing for wear or damage Damage in these areas will require the pump to be further dismantled...

Page 418: ...or more valve sections next to each other fail to operate correctly check the secondary shuttles To check the secondary shuttle operate each service in sequence the last correctly functioning service...

Page 419: ...aising or lowering the loader arms until the rams are fully open or closed and noting the maximum gauge reading CAUTION Do not select float The maximum pressure should be as stated in Technical Data N...

Page 420: ...valve A R V Selecting this service ensures that the pressure vents through the M R V and not an A R V 3 When the service reaches full travel return the lever to the neutral position Select the servic...

Page 421: ...1500 revs min slowly operate arms raise the pressure should be approximately 138 bar 2000 lbf in2 3 Make sure that the HSC rocker switch mounted on the console is in the OFF position Raise the arms sl...

Page 422: ...assembly 7 remains in the valve block proceed as follows a Fit extractor cap 11 over the A R V sub assembly 7 into the valve block E b Fit C washer 12 on top of the extractor cap but under the anti c...

Page 423: ...c hand pump to port P pump of the test block 1 Make sure that the hand pump is filled with JCB Hydraulic fluid Connect a 0 to 400 bar 0 to 6000 lbf in2 pressure test gauge to port G gauge of the test...

Page 424: ...able for the test block application and must NEVER be fitted to the valve block The bung can be extracted using a 3 8 16 UNC threaded bolt 10 Release the A R V adjusting screw lock nut see note Engage...

Page 425: ...ttained release the pressure in the test block Remove the A R V sub assembly and its setting body from the test block Separate the A R V sub assembly from its setting body Install the A R V sub assemb...

Page 426: ...ssure test procedures To pressure test and re set the auxiliary relief valves A R V s service kit 892 00309 must be used The service kit comprises a test block 1 a setting body 2 with adjusting pin 3...

Page 427: ...he M R V pressure is correct see Loader Valve Pressure Testing Main Relief Valve 3 With the engine running at 1500 revs min operate a stabiliser service fully and at the same time note the reading in...

Page 428: ...03 3280 Section E 23 11 Issue 1 Service Procedures TBA Excavator Valve Precision Control Servo Machines from January 2003 Pressure Testing Load Sense Relief Valve www WorkshopManuals co uk Purchased f...

Page 429: ...sator valve is suspected of malfunctioning do the following check 3 Stall any control valve that is nearer the pump inlet section than the suspected control valve section This should stall the entire...

Page 430: ...aulic oil temperature probe service tool 892 00285 2 Fit an appropriate pressure gauge A to a tee piece in the service hose which is pressurised when the ram in question is supported Fig 1 3 Operate t...

Page 431: ...abilisers or to the bucket rod side service except when a Rockbreaker is fitted 1 Render the A R V s inoperative in the suspect service This is achieved by removing the A R V and replacing with a blan...

Page 432: ...5 Loader Clam 70 40 6 22 45 Lift 80 50 5 17 35 Lift 90 50 4 13 28 ROD SIDE Backhoe Boom 110 60 8 26 52 Boom 120 65 6 22 44 Boom 130 70 5 19 37 Boom 140 75 5 16 32 Bucket 90 50 11 45 114 Bucket 100 60...

Page 433: ...ical line intercepts the graph line draw a horizontal line and read the permitted ram displacement In this example the permitted maximum displacement is 18 mm Note A blank graph is provided on the nex...

Page 434: ...ulics 9803 3280 Section E 24 5 Issue 1 Service Procedures 0 50 100 150 200 250 20 40 60 80 100 120 MAXIMUM RAM MOVEMENT PERMITTED mm PRESSURE BAR 380220 www WorkshopManuals co uk Purchased from www Wo...

Page 435: ...he sleeve female coupling when the coupling has been disconnected the locking ball will wedge underneath the sleeve and destroy the coupling DON T damage the faces of the couplings this can prevent co...

Page 436: ...ressure is exceeded with the gas bottle closed open bleed valve D Reduce pressure as required then close bleed valve CAUTION To reduce pressure use the recommended charging tool or the charge valve co...

Page 437: ...as intended DANGER Do not stand underneath the raised load during the lowering procedure Stand clear and to one side until the load has been safely lowered Make sure that the area is clear of other pe...

Page 438: ...pressure from the loader rams head side 7 Move all the backhoe control levers back and forth to vent any other residual hydraulic pressure from the backhoe service hoses Pilot Valve Setting Procedure...

Page 439: ...3 Remove hose J from port V2 Plug the hose but DO NOT cap the valve port adapter 4 Remove plug A and in its place fit a 0 400 bar 0 6000 lbf in2 pressure gauge connected to a hand pump 5 Use the hand...

Page 440: ...ement is the reverse of the removal procedure 1 Clean off all traces of gasket compound from the pump and gearbox mounting faces Apply a thin bead of JCB Multigasket to the gearbox mounting face 2 Loc...

Page 441: ...31 1 Section E Hydraulics 9803 3280 Section E 31 1 Issue 1 Main Pump S401450 www WorkshopManuals co uk Purchased from www WorkshopManuals co uk...

Page 442: ...ps are fitted to ensure correct fitting of new seals on re assembly 10 Remove driveshaft 23 from front body 5 Removal will also remove balance plate 28 complete with seal 29 and seal energiser 30 Disc...

Page 443: ...31 3 Section E Hydraulics 9803 3280 Section E 31 3 Issue 1 Main Pump S401450 www WorkshopManuals co uk Purchased from www WorkshopManuals co uk...

Page 444: ...front pump assembly on the mounting flange but not the driveshaft Fit O rings 8 into the grooves on the rear face of the front body 5 Install splined coupling 7 10 Fit rear body 6 onto front body 5 in...

Page 445: ...and Assembly 35 1 Section E Hydraulics 9803 3280 Section E 35 1 Issue 1 Main Pump S272610 S213160 S272640 6 12 B 7 9 17 3 5 8 18 4 13 15 11 14 16 2 18 1 10 C A www WorkshopManuals co uk Purchased from...

Page 446: ...sembly of the pump is not recommended Inspecting Parts Generally check all pump parts for damage and or wear Any parts that are scored or damaged must be replaced with new ones The shaft O ring groove...

Page 447: ...the housing fixing screws and slide it down the cable Remove the pin F 3 Disconnect all hydraulic hoses from the valve block and plug all orifices to prevent ingress of dirt Label each hose before di...

Page 448: ...50 6 Section E Hydraulics 9803 3280 Section E 50 6 Issue 1 Loader Valve Fixed Flow S262710 S262720 2 1 13 14 12 11 10 9 8 7 6 4 5 3 www WorkshopManuals co uk Purchased from www WorkshopManuals co uk...

Page 449: ...grooves Discard ALL O rings and back up rings DO NOT use worn or damaged items Inspect the valve components for scratches nicks or any other type of damage replace with new if required Assembly Renew...

Page 450: ...8 Section E Hydraulics 9803 3280 Section E 50 8 Issue 1 Loader Valve Fixed Flow S197420 1 2 3 4 5 6 7 8 9 10 11 12 14 15 16 17 18 A B 13 www WorkshopManuals co uk Purchased from www WorkshopManuals co...

Page 451: ...ecial tool see Service Tools The special spanner locates in cross holes B Make sure that small drilling A is not blocked Ensure good condition of seating faces on poppet 18 and on the mating face of t...

Page 452: ...E Hydraulics 9803 3280 Section E 50 10 Issue 1 Loader Valve Fixed Flow 1 2 4 5 6 7 8 9 10 11 12 13 15 16 17 18 19 21 22 23 24 25 26 27 14 3 S197430 www WorkshopManuals co uk Purchased from www Worksho...

Page 453: ...ts move freely Ensure that the small drilling through the centre of items 23 is clear Shims 21 are intended to limit the maximum pressure setting the specified pressure setting is achieved by adjustin...

Page 454: ...50 12 Section E Hydraulics 9803 3280 Section E 50 12 Issue 1 Loader Valve Fixed Flow 1A 2 3 4 15 14 13 12 11 10 7 9 5 6 8 1 www WorkshopManuals co uk Purchased from www WorkshopManuals co uk...

Page 455: ...e square Fit wiper 3 on top of lipseal 3 Fit the seal plate and boot assembly to valve block section but do not torque tighten capscrews 1 at this stage Ensure wiper locates into seal plate 4 Use clea...

Page 456: ...5 6 7 8 10 16 11 21 15 23 14 9 17 18 19 20 13 12 22 2 50 14 Section E Hydraulics 9803 3280 Section E 50 14 Issue 1 Loader Valve Fixed Flow www WorkshopManuals co uk Purchased from www WorkshopManuals...

Page 457: ...2 Fit a new lipseal 5 into the valve block ensure square Fit wiper 4 on top of lipseal 3 Fit the seal plate and boot assembly to valve block but do not torque tighten capscrews 1 at this stage Ensure...

Page 458: ...1 2 5 6 7 8 9 10 11 12 13 14 15 16 17 18 50 16 Section E Hydraulics 9803 3280 Section E 50 16 Issue 1 Loader Valve Fixed Flow 1A 3 4 www WorkshopManuals co uk Purchased from www WorkshopManuals co uk...

Page 459: ...t assembly to valve block but do not torque tighten capscrews 1 at this stage Ensure wiper locates into seal plate 4 Use clean hydraulic oil as a lubricant From the bottom insert spool through the val...

Page 460: ...draulics 9803 3280 Section E 50 24 Issue 1 Loader Valve Fixed Flow A402610 10B 11B 12B 1B 3B 4B 5B 6B 7B 8B 9B 3A 4A 1A 1A 2C 1C 2A 6A 5A 7A 8A E 2C 1C www WorkshopManuals co uk Purchased from www Wor...

Page 461: ...ol Section Auxiliary Relief Valves When Dismantling When removing O rings and seals use an appropriately rounded tool that WILL NOT cause any damage to the spool or seal grooves When dismantling the s...

Page 462: ...tion E Hydraulics 9803 3280 Section E 50 26 Issue 1 Loader Valve Fixed Flow S402620 1 2 5 7 6 8 9 10 12 11 14 13 4 3 15 20 19 16 18 17 A402630 www WorkshopManuals co uk Purchased from www WorkshopManu...

Page 463: ...se an appropriatly rounded tool that WILL NOT cause any damage to the seal grooves Discard ALL O Rings and back up rings DO NOT use worn or damaged items Inspection Inspect the valve components for sc...

Page 464: ...8B 8C 6 8D A 4 9B 6 9C 9A 9 Hydraulics Loader Valve Fixed Flow Section E Section E 9803 3280 Issue 1 51 1 51 1 Dismantling and Assembly Precision Control Servo Machines from January 2003 www Workshop...

Page 465: ...4 9C 10 1 7 4 10 70 7 1 51 6 10A 70 7 1 51 6 11 60 6 1 44 3 12 30 3 22 1 Service Spools Care must be taken to ensure that the spools 6 are not damaged when removing them from the block Note that all s...

Page 466: ...ary 2003 Standard Spool 51 3 Section E Hydraulics 9803 3280 Section E 51 3 Issue 1 Loader Valve Fixed Flow A403690 T LS P B A B A B A A403990 1 2 4 3 5 8 15 14 13 12 11 10 9 7 6 A403950 A A404060 B 16...

Page 467: ...seals use an appropriatly rounded tool that WILL NOT cause any damage to the seal grooves Discard ALL O Rings and back up rings DO NOT use worn or damaged items Inspection 1 Inspect the valve componen...

Page 468: ...Electric Detent Spool 51 5 Section E Hydraulics 9803 3280 Section E 51 5 Issue 1 Loader Valve Fixed Flow A403970 T LS P B A B A B A A404000 18 17 16 15 14 8 7 13 12 11 10 6 1 3 5 4 9 2 A404070 A A404...

Page 469: ...t may be necessary to pre heat the spool to 200 C in an oven or with a heat gun to remove the spool end Note When removing O Rings and seals use an appropriatly rounded tool that WILL NOT cause any da...

Page 470: ...nical Detent Spool 51 7 Section E Hydraulics 9803 3280 Section E 51 7 Issue 1 Loader Valve Fixed Flow A403980 T LS P B A B A B A A404010 21 1 3 4 5 8 2 20 19 18 17 16 15 14 13 12 11 10 9 7 6 A404080 A...

Page 471: ...1 4 Unscrew the spool end 13 and remove the centring spring 16 with spring retainers 15 and 17 It may be necessary to pre heat the spool to 200 C in an oven or with a heat gun to remove the spool end...

Page 472: ...hose before disconnecting this will ensure correct position when refitting 4 Loosen and remove nuts B spacers C the loader valve and resilient mounts D Inspection Inspect the resilient mounts D for d...

Page 473: ...s 9803 3280 Section E 55 2 Issue 1 Loader Valve Variable Flow S276050 A276060 Dismantling and Assembly Priority Inlet Section 1 6 3 3 3 2 7 8 5 5 16 17 4 5 4 4 14 13 11 12 10 15 A 9 18 www WorkshopMan...

Page 474: ...owever in this application it does not perform any duties This is because the steer system pressure is controlled by a relief valve in the orbitrol steer unit see Steering section NOT relief valve ass...

Page 475: ...ection E 55 4 Issue 1 Loader Valve Variable Flow S276070 A276080 17 6 7 8 9 10 11 12 13 14 15 18 16 19 20 21 22 23 24 25 26 27 1 2 3 3 3 21 22 23 24 7 8 6 9 20 13 5 26 27 4 5 4 5 4 25 19 18 17 15 16 1...

Page 476: ...16 and cups 15 and 18 Assembly Renew all O rings and back up rings When fitting bolt 14 clean the threads then apply a small quantity of JCB Threadlocker Sealer to the threads of the spool When fittin...

Page 477: ...Loader Valve Variable Flow 6 7 8 9 10 11 12 13 15 16 17 19 20 21 22 23 24 25 26 27 28 29 30 31 32 33 35 34 36 38 37 14 18 1 2 3 3 3 26 29 28 27 33 32 31 30 35 21 6 7 8 9 4 5 5 4 36 14 13 12 11 10 15...

Page 478: ...with a new one if required When fitting coupling 22 clean the threads then apply a small quantity of JCB Threadlocker Sealer to the threads of the spool Check the operation of the solenoid 12 after as...

Page 479: ...1 Loader Valve Variable Flow S276110 A276120 6 7 8 9 10 11 12 13 14 15 16 17 18 19 20 21 22 23 24 25 26 27 28 29 30 31 32 33 34 1 2 3 3 3 31 32 33 34 6 9 27 18 8 7 5 29 30 4 4 5 5 4 28 26 24 22 23 21...

Page 480: ...ve retaining ring 12 Take care not to lose detent balls 16 Assembly Renew all O rings and back up rings When fitting coupling 20 clean the threads then apply a small quantity of JCB Threadlocker Seale...

Page 481: ...shown and then install the O ring B It is important to note that the spool must not be moved beyond the position shown otherwise the edge of the spool face C may damage the first fitted O ring item A...

Page 482: ...ponent is heavy Do not attempt to remove it unless its weight is held by a sling Make sure that the sling is attached to a suitable lifting appliance HYD 2 3 1 6 Wrap a suitable sling around the valve...

Page 483: ...60 4 Section E Hydraulics 9803 3280 Section E 60 4 Issue 1 Excavator Valve Removal and Replacement Variable Flow S278930 A B C C C www WorkshopManuals co uk Purchased from www WorkshopManuals co uk...

Page 484: ...ee spools each end as shown Make sure the bolt has a retaining nut on each end When the bolts are in place thread suitable slings around the bolts as shown CAUTION This component is heavy Do not attem...

Page 485: ...E Hydraulics 9803 3280 Section E 60 6 Issue 2 Excavator Valve A402450 A402460 6 15 8 7 2 2 11 14 15 11 15 10 4 3 3 5 11 11 1 9 11 11 11 11 13 A B www WorkshopManuals co uk Purchased from www WorkshopM...

Page 486: ...ontrol cables 3 as follows 1 Undo the lock nut 4 2 Undo the housing retaining screws 5 and slide the housing down the cable 3 Push out the cable connecting pin 6 and disconnect the cable at the spool...

Page 487: ...E Hydraulics 9803 3280 Section E 60 8 Issue 2 Excavator Valve A402450 A402460 6 15 8 7 2 2 11 14 15 11 15 10 4 3 3 5 11 11 1 9 11 11 11 11 13 A B www WorkshopManuals co uk Purchased from www WorkshopM...

Page 488: ...pressure can penetrate the skin Do not use your fingers to check for hydraulic fluid leaks Do not put your face close to suspected leaks Hold a piece of cardboard close to suspected leaks and then in...

Page 489: ...61 1 Section E Hydraulics 9803 3280 Section E 61 1 Issue 1 Excavator Valve www WorkshopManuals co uk Purchased from www WorkshopManuals co uk...

Page 490: ...ed sealing washer must also have JCB Threadseal applied to the threads of the adapter Assembly 1 Fit the boot 10 to the seal plate 11 2 Fit a new lipseal 12A into the valve block ensure square Fit wip...

Page 491: ...Relief Valves 61 3 Section E Hydraulics 9803 3280 Section E 61 3 Issue 2 Excavator Valve A401470 4N 4Q 4L 4J 4M 4P 4K 4H A401470 S161700 B A www WorkshopManuals co uk Purchased from www WorkshopManua...

Page 492: ...ricate O rings and back up rings with JCB Hydraulic Fluid Fit back up ring 13 on the upper side of O ring 12 as shown in the inset Fit flat face of sleeve 9 against shoulder of poppet 10 Torque tighte...

Page 493: ...4 Dismantling Loosen nut 1 turn anti clockwise and then remove the check valve assembly from the valve block If required the check valve assembly can be dismantled into its component parts items 1 to...

Page 494: ...ABILISER STABILISER DIPPER DIPPER DIPPER DIPPER CROWD CROWD CROWD CROWD SLEW SLEW SLEW SLEW JCB EXCAVATOR VALVE S270740 S270750 Dismantling and Assembly Hoses and Pipes Sideshift Valve Refer to Excava...

Page 495: ...ER DIPPER DIPPER CROWD CROWD SLEW SLEW JCB EXCAVATOR VALVE S273370 S273380 Dismantling and Assembly Hoses and Pipes Centremount Valve Refer to Excavator Valve Removal and Replacement for valve block r...

Page 496: ...J4 J5 H1 A2 A3 A4 B1 B2 B3 B4 B5 RA1 K RB1 B6 B7 G5 A5 A6 A7 A8 A9 A10 A12 L M G7 G8 G9 G10 G11 G12 G13 G14 G15 G1 G2 G3 N G4 B10 B9 A11 B8 G6 B11 B12 RA2 RB2 RE1 RF1 B13 B14 A14 A13 A15 A16 A17 A18...

Page 497: ...ecommended that that spool A is not dismantled The spool has additional valve components in each end and can easily be damaged when dismantling If the spool is damaged then the valve must be renewed O...

Page 498: ...62 3 Section E Hydraulics 9803 3280 Section E 62 3 Issue 3 Excavator Valve A402640 8 7 6 7 11 8 1 2 3 4 5 14 6 13 12 11 10 9 www WorkshopManuals co uk Purchased from www WorkshopManuals co uk...

Page 499: ...ion of the valve When Dismantling When removing O Rings and seals use an appropriatly rounded tool that WILL NOT cause any damage to the seal grooves Discard ALL O Rings and back up rings DO NOT use w...

Page 500: ...es the clamp valve assembly shown at A and the solenoid assembly shown at B Dismantling Unsecrew the clamp valve assembly A from the excavator valve block Withdraw the piston 3 from the excvator valve...

Page 501: ...5 14 14A 12 13 13 Hydraulics Excavator Valve Section E Section E 9803 3280 Issue 1 62 20 62 20 Dismantling and Assembly Precision Control Servo Machines from January 2003 www WorkshopManuals co uk Pur...

Page 502: ...t damaged when removing it from the block Note that all spools are similar in appearance but must not be interchanged as they are matched to their bores All spools have the same centring and sealing c...

Page 503: ...uld be taken when dismantling and assembling a valve to avoid the following Contamination Damage to spools Damage to seal grooves Any of the above may result in possible problems with the operation of...

Page 504: ...ssure from the servo system and backhoe rams Turn the starter switch to the OFF position and remove the key 1 Gain access to the excavator valve and disconnect and blank any hoses or pipes which may i...

Page 505: ...backhoe rams Turn the starter switch to the OFF position and remove the key 1 Gain access to the excavator valve and disconnect and blank any hoses or pipes which may interfere with the removal of th...

Page 506: ...switch to the OFF position and remove the key 1 Gain access to the excavator valve and disconnect and blank any hoses or pipes which may interfere with the removal of the anti cavitation valve 2 Unsc...

Page 507: ...control levers back and forth to vent residual pressure For instance if the HBPV is fitted on the boom or dipper then operate the backhoe control levers If the HBPV is fitted on the loader arms then o...

Page 508: ...aler or any other type of locking fluid to the threads of item 17 The threads form an integral part of the valve operating sequences applying locking fluid to the threads will seriously effect the ope...

Page 509: ...se the machine with a broken seal If the assembly is fitted to the machine before removing the check valve A operate the main service control levers back and forth to vent residual pressure After fitt...

Page 510: ...emoval and Replacement Loader Lift Ram 75 1 Section E Hydraulics 9803 3280 Section E 75 1 Issue 1 Hydraulic Rams A B D E F G C S266330 www WorkshopManuals co uk Purchased from www WorkshopManuals co u...

Page 511: ...his component is heavy Do not attempt to remove it unless its weight is held by a sling Make sure that the sling is attached to a suitable lifting appliance HYD 2 3 1 5 Fasten lifting straps to the li...

Page 512: ...and Replacement Loader Shovel Ram 76 1 Section E Hydraulics 9803 3280 Section E 76 1 Issue 1 Hydraulic Rams A B B D D B B C C C E E C S266340 www WorkshopManuals co uk Purchased from www WorkshopManua...

Page 513: ...revent loss of fluid and ingress of dirt CAUTION This component is heavy Do not attempt to remove it unless its weight is held by a sling Make sure that the sling is attached to a suitable lifting app...

Page 514: ...Removal and Replacement Slew Ram Section E Hydraulics 9803 3280 Section E 77 1 Issue 1 Hydraulic Rams 1 Y 7 10 10 8 9 2 2A 3 4 5 6 S254901 www WorkshopManuals co uk Purchased from www WorkshopManuals...

Page 515: ...y 10 Remove the slew ram eye end pivot pin 6 and swing the ram to clear the kingpost casting 11 Lift the slew ram assembly clear of the machine Inspection Inspect the liner bearings 7 located in the t...

Page 516: ...78 1 Section E Hydraulics 9803 3280 Section E 78 1 Issue 1 Hydraulic Rams S271860 A C B F G G E E L H D L www WorkshopManuals co uk Purchased from www WorkshopManuals co uk...

Page 517: ...ent residual hydraulic pressure by moving the backhoe and stabiliser control levers back and forth Note If a check valve is fitted on the ram the system will not vent Extreme caution must be used when...

Page 518: ...ly Release the connections slowly CAUTION This component is heavy Do not attempt to remove it unless its weight is held by a sling Make sure that the sling is attached to a suitable lifting appliance...

Page 519: ...Removal and Replacement Dipper Ram 79 1 Section E Hydraulics 9803 3280 Section E 79 1 Issue 1 Hydraulic Rams A C C D D B B S266350 www WorkshopManuals co uk Purchased from www WorkshopManuals co uk...

Page 520: ...move the dipper ram hoses A Plug and cap all open orifices to prevent loss of fluid and ingress of dirt CAUTION This component is heavy Do not attempt to remove it unless its weight is held by a sling...

Page 521: ...moval and Replacement Bucket Crowd Ram 80 1 Section E Hydraulics 9803 3280 Section E 80 1 Issue 1 Hydraulic Rams S266360 A B B C D D C www WorkshopManuals co uk Purchased from www WorkshopManuals co u...

Page 522: ...bucket crowd ram hoses A Plug and cap all open orifices to prevent loss of fluid and ingress of dirt CAUTION This component is heavy Do not attempt to remove it unless its weight is held by a sling M...

Page 523: ...Removal and Replacement Boom Ram 81 1 Section E Hydraulics 9803 3280 Section E 81 1 Issue 1 Hydraulic Rams S266370 A B C F H G D E www WorkshopManuals co uk Purchased from www WorkshopManuals co uk...

Page 524: ...ponent is heavy Do not attempt to remove it unless its weight is held by a sling Make sure that the sling is attached to a suitable lifting appliance HYD 2 3 1 8 Fasten lifting straps to the boom ram...

Page 525: ...and bucket rams pivot pin grease seals are fitted 85 1 Section E Hydraulics 9803 3280 Section E 85 1 Issue 1 Hydraulic Rams 17 12 13 18 19 10 11 1 2 9 3 4 4 5 6 7 8 20 14 16 15 s263650 A263680 www Wor...

Page 526: ...sure that lubricants used during assembly do not come into contact with the JCB Threadlocker and Sealer High Strength Refer to JCB Ram Sealing Procedure for the correct method of fitting seals to the...

Page 527: ...rength a weakening of the bond will result Cure times vary according to the ambient temperature Allow a minimum of 2 hours between assembly and filling the ram with oil Note Cold weather operation Whe...

Page 528: ...ulics 9803 3280 Section E 86 1 Issue 1 Hydraulic Rams 17 15 10 18 16 13 14 1 2 12 11 9 3 4 5 8 6 7 21 22 19 20 S263740 S263730 13 14 1 12 11 8 3 4 5 6 7 www WorkshopManuals co uk Purchased from www Wo...

Page 529: ...igh Strength Ensure that lubricants used during assembly do not come into contact with the JCB Threadlocker and Sealer High Strength Refer to JCB Ram Sealing Procedure for the correct method of fittin...

Page 530: ...ts the uncured JCB Threadlocker and Sealer High Strength a weakening of the bond will result Cure times vary according to the ambient temperature Allow a minimum of 2 hours between assembly and fillin...

Page 531: ...lics 9803 3280 Section E 87 1 Issue 1 Hydraulic Rams S263710 2 7 8 9 12 6 14 16 15 13 2 3 4 5 1 6 10 9 8 7 11 12 14 13A 13 16 15 17 18 19 20 22 21 S263690 www WorkshopManuals co uk Purchased from www...

Page 532: ...e that lubricants used during assembly do not come into contact with the JCB Threadlocker and Sealer High Strength Refer to JCB Ram Sealing Procedure for the correct method of fitting seals to the end...

Page 533: ...temperature Allow a minimum of 2 hours between assembly and filling the ram with oil Note Cold weather operation When operating in conditions which are consistently below freezing it is recommended t...

Page 534: ...E Hydraulics 9803 3280 Section E 88 1 Issue 1 322580 Hydraulic Rams 8 3 2 5 1 7 4 7 8 A258580 A258590 A B C D 2 5 4 6 8 8 1 2 3 2 4 5 6 7 8 8 A326710 www WorkshopManuals co uk Purchased from www Works...

Page 535: ...Sealing Procedure for the correct method of fitting seals to the end cap and piston head 4 Clamp the cylinder vertically and lower the piston rod assembly in from the top as shown at B Take care not...

Page 536: ...s are free of contamination and sharp edges 4 Locate the seal in the end cap groove shown at D when the seal is in position open the tool to release the seal Make sure the seal is correctly installed...

Page 537: ...r to the relevant section for torque figure and completion of ram assembly 9 Fit the piston head retaining dowel see ram dismantling and assembling relevant section 10 Fit wear rings J and K Rotate th...

Page 538: ...al to note that adaptor C must be held with a spanner whilst installing or removing the hose It may be easier to remove the top hose connection once the cooler has been removed from the machine discon...

Page 539: ...e System Charging Discharging the Accumulator 3 Disconnect hydraulic hose A and plug 4 Loosen both U clamps B and slide the accumulator towards the front of the machine When clear of the U clamps care...

Page 540: ...tion E Hydraulics 9803 3280 Section E 96 2 Issue 1 Smooth Ride System S308280 1 10 11 8 7 4 13 12 3 2 6 11 10 9 8 7 5 8 7 9 10 10 8 7 A 7 7 A www WorkshopManuals co uk Purchased from www WorkshopManua...

Page 541: ...es or scoring Inspect end caps for damaged threads or burrs on O ring grooves Minor nicks scratches or light scoring of the body bore may be removed by using a very fine paper Dress the bore until all...

Page 542: ...cs 17 5 Drive Paths 4 Speed 18 1 Drive Paths 6 Speed 18 5 Torque Converter Component Identification 20 1 Principle of Operation 20 1 Systems Description Synchro Shuttle Gearbox Syncromesh Blocking Pin...

Page 543: ...ction Strainer Removal and Replacement 64 1 Stall Test 65 1 Pressure and Flow Tests 66 1 Speed Sensor Testing 67 1 ShiftMaster Electronic Control Unit 68 1 Diagnostics User Guide 69 1 Diagnostics Trou...

Page 544: ...n 111 1 Assembly 112 1 Clutch Dismantling and Assembly Procedures Forward Reverse Clutch 113 1 2 4 Wheel Drive Clutch 4WD Pressure On 114 1 2 4 Wheel Drive Clutch 4WD Pressure Spring On 115 1 2 4 Whee...

Page 545: ...arbox Selector Shaft Lock Screw A395350 Synchro Shuttle Gearbox Setting ring socket spanners A396590 A396600 892 01078 Synchro Shuttle Gearbox Mainshaft Adjuster A396510 892 01079 Mainshaft setting ri...

Page 546: ...er S188200 S188160 892 00922 12 2 Torque Converter Alignment Tool S267260 892 00812 Drive Coupling Spanner S107750 A 892 00920 Flow Test Adapter B 892 00301 Flow Test Adapter C 892 00302 Flow Test Ada...

Page 547: ...including seal drag is 40 Nm 29 5 lbf ft S261230 892 00224 Impulse Extractor Set for Hub Bearing Seals 892 00225 Adapter Impulse Extractor Small 17mm to 25mm Medium 25mm to 45mm Large 45mm to 80mm 993...

Page 548: ...lication when tightening pinion nuts 892 00822 Splined Bolt Socket for driveshafts 892 00174 Measuring Cup Pinion Head Bearing S197060 S190770 S197030 892 00182 Bearing Pad Driver S216310 992 04800 Fl...

Page 549: ...1604 0006 Adapter 3 4 in M x 3 4 in M BSP 1612 0006 Adapter 3 4 in F x 3 4 in M BSP 892 00271 Adapter 3 4 in F x 5 8 in M BSP 892 00272 Adapter 5 8 in F x 3 4 in M BSP 816 20008 Adapter 3 4 in F x 1...

Page 550: ...1 6 Section F Transmission 9803 3280 Section F 1 6 Issue 2 Service Tools 1 2 8 9 7 6 5 A396950 3 4 A396580 A396930 A396960 A396940 www WorkshopManuals co uk Purchased from www WorkshopManuals co uk...

Page 551: ...Sychro Shuttle Gearbox SD70 SD80 Axles Comprises of Spacer thickness mm 921 52628 12 600 829 30405 12 625 921 52629 12 650 829 30406 12 675 921 52630 12 700 829 30407 12 725 921 52601 12 750 829 3040...

Page 552: ...sed with special support plates see the facing page for details 892 01083 Powershift Assembly tool transfer gear 892 01084 Powershift Transfer gear bearing assembly 892 01085 Powershift Seal fitting t...

Page 553: ...ools cont d Rear plate 4 speed and 6 speed Front plate 6 speed Front plate 4 speed Powershift gearbox support plates for use with hydraulic jack Plates should be locally manufactured from 5 mm thick m...

Page 554: ...111 6 1 0 9 0 R 125 0 R 137 0 R 62 0 R 1 2 1 0 R 30 6 0 7 REF 73 2 2 9 53 2 95 0 TYP 9 PLACES 25 0 2 0 0 13 9 TYP 9 PLACES 20 0 4 8 4 9 REF 325 6 20 0 TYP 5 0 R A402690 A 892 01082 Powershift Assembly...

Page 555: ...included to enable compatibility with different PC port types 3 Interconnecting cable DLA to machine ECU diagnostics socket 4 Kit carrying case Powershift Gearbox hydraulic pump removal tools The too...

Page 556: ...PIC TUBELESS 2 6 38 11 16 9x28x12 IND OLYMPIC TUBE 2 6 38 12 14 9x24x12 IND GOODYEAR TUBELESS 2 75 40 13 16 9x28 IND GOODYEAR TUBELESS 2 5 36 2WS 2WD MACHINES 21 11 0x16x12 RIB ARMSTRONG TUBELESS 4 4...

Page 557: ...D GOODYEAR TUBELESS 2 75 40 13 16 9x28 IND GOODYEAR TUBELESS 2 5 36 2WS MACHINES 21 16 9x24x10 IND ARMSTR0NG TUBELESS 2 2 32 22 16 9x24x12 IND GOOOYEAR TUBELESS 2 2 32 23 19 5x24x10 IND ARMSTRONG TUBE...

Page 558: ...5 Toe in 0 Castor Angle 0 Camber Angle 1 King pin inclination 0 2 WHEEL STEER MACHINES 4 Wheel Drive Type JCB spiral bevel input with epicyclic hub reduction Designation SD55 Installation Centre pivot...

Page 559: ...e Yoke Oscillation 5 Toe in 0 Castor Angle 0 Camber Angle 1 King pin inclination 0 Hub Reduction 5 4 1 Ratios OPTION 1 OPTION 2 OPTION 3 Overall 15 78 1 18 16 1 13 7 1 Crownwheel and Pinion 2 923 1 3...

Page 560: ...ev min 3 0 4 0 3 1 4 1 43 58 Converter Out at 100 deg C 1000 rev min 0 3 0 9 0 3 0 6 4 9 2000 rev min 2 1 2 9 2 1 3 0 30 42 Lubrication Pressures in neutral bar kgf cm2 lbf in2 At 50 deg C 1000 rev mi...

Page 561: ...2 Converter In at 50 C 1000 rev min 2 0 4 95 2 0 5 0 29 72 2000 rev min 4 0 6 8 4 1 6 9 58 99 Converter Out at 50 C 1000 rev min 0 6 2 25 0 6 2 3 8 7 33 2000 rev min 1 25 2 50 1 3 2 6 18 36 Converter...

Page 562: ...2000 rev min 4 0 6 8 4 1 6 9 58 99 Converter Out at 50 C 1000 rev min 0 6 2 25 0 6 2 3 8 7 33 2000 rev min 1 25 2 50 1 3 2 6 18 36 Converter Inlet Relief Valve Pressure max 7 1 7 2 103 Lubrication Pr...

Page 563: ...figures relate to tests conducted at an ambient of 25 deg C and barometric pressure of 100 kPa sea level Note that changes in ambient temperature pressure and humidity and fuel grade will affect engi...

Page 564: ...2150 2150 2140 2140 2130 2190 2190 Min r p m 2060 2040 2045 2035 2035 2025 2100 2090 2 Convertor M R V Max r p m 1700 1690 1805 1800 1745 1735 1835 1825 Min r p m 1550 1530 1665 1655 1590 1585 1700 1...

Page 565: ...0 2140 2130 2190 2190 2200 2190 2235 2230 Min r p m 2045 2035 2035 2025 2100 2090 2095 2090 2140 2130 2 Convertor M R V Max r p m 1805 1800 1745 1735 1835 1825 1825 1820 N A N A Min r p m 1665 1655 15...

Page 566: ...30 2160 2140 2270 2270 2190 2190 Min r p m 2020 2020 2060 2025 2170 2160 2090 2090 2 Convertor M R V Max r p m 1330 1330 1700 1685 1870 1865 1825 1820 Min r p m 970 970 1550 1520 1720 1715 1690 1685 B...

Page 567: ...217S Engine Speed Stall Combination 1 Convertor only Max r p m 2190 2190 Min r p m 2090 2090 2 Convertor M R V Max r p m 1825 1820 Min r p m 1690 1685 Build specification Engine size N A 75hp 56kw T2...

Page 568: ...lustration shows a typical steer drive front axle A Yoke connection to propshaft B Pinion C Crownwheel D Differential unit E Drive shaft F Universal coupling G Reduction gear hub H Steer swivel trunni...

Page 569: ...The disc is fitted to the pinion instead of a yoke The propshaft is bolted to the centre of the disc The axle casing also carries a bracket for location of the park brake caliper B Pinion C Crownwheel...

Page 570: ...03 3280 Issue 1 16 1 16 1 Basic Operation Section F Section F Synchro Shuttle Gearbox A388431 A396620 A U S B T Y N X L M P H J F G C V W E R D K Q www WorkshopManuals co uk Purchased from www Worksho...

Page 571: ...ral reverse drive Oil pressure is provided by a crescent type pump B driven at engine speed by the drive lugs of the torque converter The oil pressure is controlled by maintenance valve D and clutch s...

Page 572: ...3 16 3 Basic Operation Section F Section F A396520 M A A1 E E2 L E1 D Q B V C Z S F P A2 A3 A4 K N Full Pressure Pressure Lubrication Exhaust Key to Oil Flow Pressure www WorkshopManuals co uk Purchas...

Page 573: ...eturning at the rear of the transmission unit to pass through the centre of the reverser shaft for clutch lubrication Lubrication oil is also provided via a pump drain line to the forward reverse fron...

Page 574: ...ransmission 9803 3280 Issue 1 17 1 17 1 Basic Operation Section F Section F A401070 A401080 M Q K C H 5 N 1 A 2 3 J B C D R P E F L G www WorkshopManuals co uk Purchased from www WorkshopManuals co uk...

Page 575: ...the selected clutch packs A combined lever swivel switch 4 on the steering column actuates both gear ratio and direction solenoids The Powershift unit consists of a torque converter A forward clutch...

Page 576: ...Ws Ss Ts Us Xs H Q G K C 1 5 L D E P N J 6 A F B R 2 1 3 1 3 2 M Transmission Basic Operation Section F Section F 9803 3280 Issue 1 17 3 17 3 www WorkshopManuals co uk Purchased from www WorkshopManua...

Page 577: ...rse clutch assembly C is similar to the forward clutch assembly It contains two hydraulically operated clutches one clutch W provides a reverse low ratio drive and the other V a reverse high ratio dri...

Page 578: ...box If the road speed is too high a single double beep is sounded Pressing the kick down switch a second time causes the ECU to select the previous gear Automatic gear selection When A auto and F forw...

Page 579: ...WARD 4 wheel drive Clutches Engaged Solenoids Energised U Forward High Us Z Layshaft Zs S 2 4 Wheel Drive Ss 3F 3rd GEAR FORWARD 4 wheel drive Clutches Engaged Solenoids Energised T Forward Low Ts Y M...

Page 580: ...F Transmission 9803 3280 Section F 18 2 Issue 1 Basic Operation A396660 W V U T Y S Z A396670 W V U T Y Z S A396680 W V U T Y S Z A396690 W V U T Y S Z 1F 2F 3F 4F www WorkshopManuals co uk Purchased...

Page 581: ...F Transmission 9803 3280 Section F 18 3 Issue 1 Basic Operation A396700 U T Y S Z W V U T Y S Z W V A396720 A396710 W V U T Y S Z W V U T Y S Z A396730 1R 2R 3R 4R www WorkshopManuals co uk Purchased...

Page 582: ...ERSE 4 wheel drive Clutches Engaged Solenoids Energised V Reverse High Vs Z Layshaft Zs S 2 4 Wheel Drive Ss 3R 3rd GEAR REVERSE 4 wheel drive Clutches Engaged Solenoids Energised W Reverse Low Ws Y M...

Page 583: ...ORWARD 4 wheel drive Clutches Engaged Solenoids Energised U Forward High Us Z Layshaft Zs S 2 4 Wheel Drive Ss 4F 4th GEAR FORWARD 4 wheel drive Clutches Engaged Solenoids Energised X 6 Speed Xs Y Mai...

Page 584: ...Issue 1 Basic Operation A387850 X W V U T Y S Z A387870 X W V U T Y Z S A387890 X W V U T Y S Z A387860 X W V U T Y S Z A387880 X W V U T Y S Z A387900 X W V U T Y S Z 1F 2F 3F 4F 5F 6F www WorkshopMa...

Page 585: ...n 9803 3280 Section F 18 7 Issue 1 Basic Operation A387910 U T Y S Z X W V U T Y S Z X W V A387930 A387920 X W V U T Y S Z X W V U T Y S Z A387940 1R 2R 3R 4R www WorkshopManuals co uk Purchased from...

Page 586: ...Layshaft Zs S 2 4 Wheel Drive Ss 3R 3rd GEAR REVERSE 4 wheel drive Clutches Engaged Solenoids Energised W Reverse Low Ws Y Mainshaft Ys S 2 4 Wheel Drive Ss 4R 4th GEAR REVERSE 4 wheel drive Clutches...

Page 587: ...a centrifugal pump imparting energy to the transmission oil This energy is transferred to another set of shaped blades which form the turbine B The turbine is connected to the gearbox and converts th...

Page 588: ...25 1 Section F Transmission 9803 3280 Section F 25 1 Issue 1 Systems Description F G H J A B C D E www WorkshopManuals co uk Purchased from www WorkshopManuals co uk...

Page 589: ...ective gears whilst synchronisation is taking place SYNCHROMESH OPERATION Diagram F shows the gearbox with first gear engaged Syncro ring B is in contact with syncro cup E and the syncro hub dog teeth...

Page 590: ...G1 Clutch A2 is disengaged and no drive is transmitted to gear plate carrier G2 The gear is also free to rotate on the input shaft assembly Actuation of the hydraulic pistons 10 and 5 is controlled vi...

Page 591: ...1 Syncro Shuttle Gearbox Forward Reverse Clutch Operation 26 2 26 2 Systems Description Section F Section F 1 A3 G1 G2 A1 6 6 8 9 7 E 4 3 E2 E1 5 10 A2 A390970 www WorkshopManuals co uk Purchased fro...

Page 592: ...n Pressure ON Spring OFF Type 4 Wheel Drive Operation This clutch is of the Pressure ON 4WD Spring OFF 2WD type The clutch is engaged and disengaged by introducing or dumping pressurised oil behind pi...

Page 593: ...ed With the solenoid A1 de energised the valve spool moves under the force of the spring A2 The oil supply to the piston C is blocked shown at port 3 At the same time oil vents from the back of piston...

Page 594: ...s operated by a switch in the cab When the switch is in the 4 wheel drive position solenoid valve A is de energised With the solenoid A1 de energised the valve spool moves under the force of the sprin...

Page 595: ...l to move and form a connection between ports 3 and 2 Pressurised oil is directed to piston C via ports 3 and 2 The piston moves actuating sleeve F and then pressure plate G against the force of sprin...

Page 596: ...of the hydraulic pistons 10 and 5 is controlled via two position solenoid valves E1 and E2 When neutral is selected solenoids E1 and E2 are deactivated and the flow of pressurised oil to the clutches...

Page 597: ...sue 1 Powershift Gearbox Clutch Operation Forward Reverse 30 2 30 2 Systems Description Section F Section F 1 A3 G1 G2 A1 6 6 8 9 7 4 3 5 10 A2 E2 E1 A396830 www WorkshopManuals co uk Purchased from w...

Page 598: ...r and forward reverse lever B The transmission dump switch C or park brake switch D also operate a relay at A The contacts inside the relays energise the gearbox mounted solenoid control valves E Diod...

Page 599: ...y have failed For wire and connector details see the relevant schematic Diagram X The diagram X opposite shows the electrical circuit for the gearbox control It is shown with 3rd gear forward selected...

Page 600: ...2F 1F T Z T Z U Z U Z T Y T Y U Y U Y 1 4 1 4 1 4 1 4 1 4 1 4 1 4 1 4 1 4 1 4 1 4 1 4 1 4 1 4 1 4 1 4 1 4 1 4 1 4 1 4 1 4 1 4 3 5 1 2 3 5 1 2 3 5 1 2 3 5 1 2 3 5 1 2 3 5 1 2 3 5 1 2 6 9 6 9 6 9 6 9 6...

Page 601: ...40 3R 4R 2R 1R 6 9 6 9 8 10 6 7 8 10 6 7 1 4 1 4 3 5 1 2 3 5 1 2 1 4 1 4 1 4 1 4 1 4 1 4 1 4 1 4 1 4 1 4 1 4 1 4 3 5 1 2 3 5 1 2 3 5 1 2 3 5 1 2 8 10 6 7 8 10 6 7 8 10 6 7 8 10 6 7 W Z W Z V Z V Z W Y...

Page 602: ...wire and connector details see the relevant schematic Diagram Y The diagram Y opposite shows the electrical circuit for the gearbox control It is shown with 3rd gear reverse selected Live feed wires...

Page 603: ...see subsequent pages Component Key Relay actuation The following key identifies the component connectors on the opposite diagrams Note that the wires coloured red show the electrical live feed to the...

Page 604: ...6 11 7 11 7 2 600AC 5 809 3 884D 621 8 600AE 10 600AD 5 808 3 1858A 2 884C 8 600AF 10 883B 3 600AG 5 1858C 8 600LF 10 2c 6 8 7 9 10 2 5 1 4 3 8 10 6 7 9 3 5 1 2 4 6 8 7 9 10 2 5 1 4 3 8 10 6 7 9 3 5 1...

Page 605: ...48 1 852P 846B 852N 4 2 846 1 11 10 9 3 8 4 1 11 10 9 3 8 4 600DN 600Z 851 850 849 811 848 812 49 50 600DP 19 851 15 811 849 16 850 13 811 6 812 11 812 848 6 846 9 812 848 7 812 1 999 4 851 2 850 1 10...

Page 606: ...wings see Section C Connectors h1 FA h1 h2 FB1 Earth point FD1 Forward high low relay FD2 Forward relay FE1 Reverse high low relay FE2 Reverse relay FF1 Interlock relay FF2 Mainshaft layshaft relay FG...

Page 607: ...cal system is not described in this section Section F Transmission 9803 3280 Section F 33 1 Issue 2 Electrical Connections Powershift Gearbox 6 Speed ECU input devices B Gear select switch C Forward N...

Page 608: ...SPEED Z SOLENOID U SOLENOID LOW TRANS OIL PRESS X SOLENOID BANK 1 GROUND RETURN T SOLENOID Y SOLENOID GEAR A GEAR 1 THROTTLE D 4WD FORWARD GEAR 2 LOW SPEEDOMETER OIL PRESSURE DRIVER INDICATOR GEAR 3 N...

Page 609: ...es show live connector pins and also relevant earth destinations for given gearbox functions systems as follows E C U feeds and earths Transmission Dump Park Brake ON Transmission Dump 1 2 3 4 A 5 A 6...

Page 610: ...NG LIGHT 3rd GEAR REVERSE ALARM RELAY P BRAKE SWITCH 1865 REV ALARM 974 SPEED SENSOR N 1st GEAR KICKDOWN 808 810 2 8 18 38 28 7 30 27 17 2 1 4 37 39 19 26 36 1 2 A B 13 5 9 12 10 6 4 7 12 11 10 3 1 3...

Page 611: ...ark brake switch DZ Park brake relay FL Column switch FG1 Transmission dump relay FG2 Reverse alarm relay GB Harness connector ECU A GC Harness connector ECU B GG Throttle switch LE Kick down switch N...

Page 612: ...h GEAR A 14 13 FORWARD 7 4 A A T Y T Y U Y U Y X X 1 2 FB1 1 2 FB1 1 2 FB1 1 2 FB1 1 2 FB1 1 2 FB1 1 2 FB1 1 2 FB1 1 2 FB1 1 2 FB1 1 2 FB1 1 2 FB1 Gearbox Column Switch FL E C U GB E C U GC Solenoid C...

Page 613: ...quent pages Component Key Input controls The following key identifies the component connectors on the opposite diagrams Note that the wires coloured red show the electrical live feed to the column gea...

Page 614: ...A404930 A B A B h3 h4 40 39 38 10 9 37 36 8 7 6 30 29 28 27 20 19 18 17 26 16 35 34 33 5 4 32 31 3 2 1 25 24 23 22 15 14 13 12 21 11 24 23 22 6 5 4 88 17 18 17 16 16 21 20 19 3 2 1 15 14 13 9 8 7 24...

Page 615: ...h2 1 2 3 4 12 11 10 9 5 6 8 7 C10 12 11 10 9 1 2 3 4 8 7 5 6 T F C30 2 600BX 1 1860 1 2 2 1 U E C20 2 600BS 1 1861 1 2 2 1 Y G C40 2 600BZ 1 1865 1 2 2 1 Z H C50 2 600BY 1 1866 1 2 2 1 W I C60 2 600CA...

Page 616: ...C Connectors h1 GC E C U connector B FA h1 h2 FB1 Earth point Connectors h2 LA h1 h2 LC h2 h5 Connectors h5 C10 h5 h2 C20 Gearbox solenoid U labelled E C30 Gearbox solenoid T labelled F C40 Gearbox s...

Page 617: ...in 1st NO Check 19 3 Is there air in the hydraulic system YES Continue running to expel air NO Check 4 4 Is the fluid level correct YES Check 5 NO Check level only when machine is cold and top up as r...

Page 618: ...S Check gears for damage or wear NO Check 21 21 Is the noise a hiss thump or bumping YES Check bearings for damage or wear NO Check 22 22 Is the noise a squeal YES Check free running gears for seizure...

Page 619: ...hips will either embed below bronze or be rejected NO Check 38 38 Are the synchroniser components damaged YES Renew NO Check free running gears for seizure or damage 39 Are the sliding gears tight on...

Page 620: ...nline pressure if the pressure is correct the fault must be within the 2 4WD see step 8 If the reading is still low check the transmission in the normal manner 8 Low mainline pressure due to 2 4WD clu...

Page 621: ...valve fitted 10 Check solenoid Note Powershift and Syncro Shuttle machines have different types of solenoid check parts list 11 Non return valve faulty noticeable because 2WD 11 Check the non return...

Page 622: ...g procedures are carried out until a fault can be identified with a good degree of certainty Full details of the test procedures referred to in the charts are given in Service Procedures Powershift Ge...

Page 623: ...ration of the parking and service brakes Check reason for contamination Rectify as applicable Drain and flush oil see Flushing the Gearbox Oil Carry out Torque Converter In Pressure Test Is torque con...

Page 624: ...ble Renew switch or repair wiring as applicable Renew solenoid or repair wiring as applicable Clean connectors and fit securely YES YES Are the clutch control solenoids working Check control valve sol...

Page 625: ...Clear oilways renew clutches as applicable Renew applicable switch or repair wiring as applicable Are the solenoids or associated wiring faulty Clean connectors and fit securely 6 Speed Is the gearbo...

Page 626: ...iftMaster Diagnostics software to check ECU inputs and outputs See Service Procedures Powershift Gearbox Diagnostics User Guide Is the gearbox ECU connected correctly Renew the ECU See Service Procedu...

Page 627: ...applicable Educate operator Check reason for contamination Rectify as applicable Drain and flush oil see Flushing the Gearbox Oil Remove gearbox Check condition of pump casings for internal external l...

Page 628: ...oid valve stem Is oil leaking between the torque converter housing to front case joint Drain oil to correct level Check oil for water contamination Rectify as applicable Rectify as applicable Remove g...

Page 629: ...converter relief valve Make sure that the cooler lines are not restricted Rectify as applicable Remove and dismantle gearbox Check all components for signs of wear or damage especially shaft seals and...

Page 630: ...amaged Inspect renew damaged components Carry out flushing procedure Refill with the correct oil see Section 3 5 Gearbox oil circuit pipes hoses damaged Inspect renew damaged components Carry out flus...

Page 631: ...n the lips of the new seal with grease before fitting Typical Axle Shown 4 Check the sealing surface on the yoke for wear or damage renew the yoke if necessary 5 Fit the yoke and temporarily fit the o...

Page 632: ...xle pinion oil seal is renewed using the same procedure as Front Axle SD55 SD70 but note the following The rear axles are fitted with a brake disc drive flange in place of the yoke on front axles For...

Page 633: ...sion 9803 3280 Section F 52 1 Issue 1 Service Procedures Rear Axle SD80 PD70 Brakes Testing for Piston Seal Leakage See Section G Brakes Service Procedures www WorkshopManuals co uk Purchased from www...

Page 634: ...55 1 Section F Transmission 9803 3280 Section F 55 1 Issue 1 Service Procedures A396910 A B C S266880 E L D K J G H F www WorkshopManuals co uk Purchased from www WorkshopManuals co uk...

Page 635: ...A low reading indicates a worn pump or blocked suction strainer The pressure gauge will show the Main Line Pressure see Technical Data A low reading can be caused by either a faulty pressure maintena...

Page 636: ...d spool 12 Inspect the spool and spool bore for signs of wear nicks scratches etc Assembling Assembly is reversal of the dismantle procedure Renew all O rings Lightly lubricate all parts with clean tr...

Page 637: ...63 1 Section F Transmission 9803 3280 Section F 63 1 Issue 1 Service Procedures A405990 C D C D A B B 2 6 1 2 3 4 5 X www WorkshopManuals co uk Purchased from www WorkshopManuals co uk...

Page 638: ...g 4 Screw in a 250 mm 10 in length of M10 threaded rod C into each hole B Position the reaction bar A as shown Progressively screw down the M10 nuts D to withdraw the pump assembly from its housing 5...

Page 639: ...arbox 6 Push the suction strainer B away from you towards the rear of the gearbox to disengage it from the gearbox casing Remove the strainer via the 4WD aperture 7 Make sure that the gasket C is retr...

Page 640: ...y 2 Apply parking brake and footbrake firmly If necessary set the machine against a fixed obstruction 65 1 Note When fully engaged the parking brake electrically disconnects the transmission drive thi...

Page 641: ...e transmission for clutch slippage or internal leakage Look at the example below and see how the results can be used to isolate a suspect clutch In the example shown we can see that the engine speed i...

Page 642: ...Transmission 9803 3280 Section F 66 1 Issue 1 Service Procedures A396470 Powershift Gearbox Pressure and Flow Testing Y A Z J T U S X L M F B W V C www WorkshopManuals co uk Purchased from www Worksho...

Page 643: ...the ground and supported by axle stands If only one pair of wheels is raised the machine could still drive through the other axle Trans 2 2 2 WARNING Under no circumstances must the engine be run with...

Page 644: ...96990 66 3 Section F Transmission 9803 3280 Section F 66 3 Issue 1 Service Procedures Powershift Gearbox Pressure and Flow Testing A B www WorkshopManuals co uk Purchased from www WorkshopManuals co u...

Page 645: ...n be caused by either a faulty pressure maintenance valve or a worn pump A high or low reading may indicate a faulty pressure maintenance valve 3 Repeat step 2 with engine running at 2000 rev min note...

Page 646: ...00 B 66 5 Section F Transmission 9803 3280 Section F 66 5 Issue 1 Service Procedures Powershift Gearbox Pressure and Flow Testing P C K J www WorkshopManuals co uk Purchased from www WorkshopManuals c...

Page 647: ...o casing seal or a faulty converter relief valve 5 Stop engine remove test gauges and load valve Refit hoses to original position Converter Out Pressure Oil Cooler Flow Rate Note that the converter ou...

Page 648: ...Transmission 9803 3280 Section F 66 7 Issue 1 Service Procedures A396470 Y A Z J T U S X L M F B W V C Powershift Gearbox Pressure and Flow Testing www WorkshopManuals co uk Purchased from www Worksho...

Page 649: ...eading Repeat the test for 2nd and 3rd gears forward and 1st 2nd and 3rd gears revers Record the pressure readings as shown in the example below Readings should not vary between clutches by more than...

Page 650: ...ransmission 9803 3280 Section F 66 9 Issue 1 Service Procedures A396470 Y A Z J T U S X L M F B W V C Powershift Gearbox Pressure and Flow Testing R www WorkshopManuals co uk Purchased from www Worksh...

Page 651: ...rd low clutch in this instance 2nd gear forward Note When testing the 2 4WD clutch remove the feed pipe R and fit service tool This pipe incorporates a test point Replace the original pipe when testin...

Page 652: ...harness 892 01096 1 Park the machine on firm level ground engage the parking brake and set the transmission to neutral Lower the loader arms to the ground Switch OFF the engine and remove the starter...

Page 653: ...Powershift Gearbox 6 Speed See also Section C Harness Data If the facilities to use the ShiftMaster Diagnostics software system are not available the gearbox and ECU can still be checked using a conv...

Page 654: ...be found on Disk 3 CD3 Adobe of the JCB Technical Information Parts and Service CD ROM set from Issue 19 onwards This disk is also supplied as part of the Electronic Service Tool Kit Copies of this CD...

Page 655: ...Section F 69 2 Issue 1 Service Procedures 4 Starting ShiftMaster Diagnostics This document assumes that JCB Service Master has already been installed Step 1 Connect either the Serial PC Cable 717 2013...

Page 656: ...tMaster Diagnostics will start and can be partly used even if there are connection problems In general whenever there are problems communicating with the DLA there will be an error message displayed M...

Page 657: ...wo main methods of navigation described below Pressing the ALT key will cause the File option on the Menu Bar to be highlighted You can then use the arrow keys to navigate the menus Notice that all th...

Page 658: ...y etc At present language support is not offered for the text within the Page displays The Preferences Dialogue also offers the ability to change the background colour of the Page displays Select the...

Page 659: ...unctions of the ShiftMaster Diagnostics tool operate Troubleshooting Guide Sometimes users may experience problems with getting ShiftMaster Diagnostics to communicate properly with the ShiftMaster ECU...

Page 660: ...there are communications errors present then this will contain either a NO DLA COMMS if there are problems communication with the DLA or b NO ECU COMMS if the DLA is working but the ShiftMaster ECU i...

Page 661: ...explains the colours The following is a brief explanation of each feature For further information and examples of typical scenarios please refer to the accompanying Fault Finding Guide accessible via...

Page 662: ...ch or Transmission Disconnect Signal usually derived from a momentary switch fitted to a loader lever Temporarily selects Neutral when pressed usually to divert engine power to hydraulics Throttle Swi...

Page 663: ...the majority of cases conflicts are caused by either software already running on the PC or by certain driver files which hog the COM port s Note a PC which has many users and uses is likely to contai...

Page 664: ...type of port is present but never used then try disabling the driver System Properties Device Manager Ports infrared 6 Modem Drivers Check that only the correct modems are installed on the machine Exp...

Page 665: ...Apply JCB Threadlocker and Sealer to threads of all flange bolts Retaining straps C stretch with use therefore these straps must always be replaced with new ones The propshaft must have both ends exac...

Page 666: ...moval and Replacement Section F Transmission 9803 3280 Section F 80 1 Issue 1 Front Axle SD55 SD70 238 14 A401290 C D A C G H E F B B K J J www WorkshopManuals co uk Purchased from www WorkshopManuals...

Page 667: ...ket and switch assembly 3 Using tool 892 00822 remove bolts A to disconnect the drive shaft from the axle 4 Disconnect the hydraulic pipes B from the steer rams blank off all exposed connections 5 Dis...

Page 668: ...ess Fit the correct thickness shim between the rear of the axle and the yoke plate as shown at Y 2WS Machines a Fit a 5 0 mm thick master shim coloured blue between the rear of the axle and the yoke p...

Page 669: ...ring carrier Clean off all traces of sealant from the mating faces or remove O ring as applicable 4 Remove planet gears only if defective Note that gears can only be removed as assemblies which compri...

Page 670: ...olt heads Use as short an extension bar as possible 11 Using 2 high grade M14 bolts as jacking screws remove the annulus carrier Note Fretting between the hub swivel and annulus carrier mating faces m...

Page 671: ...inboard side of the carrier Note To prevent damaging the axle case inner seal do not lever against the half shaft Place a tube over the half shaft and lever against the tube as shown at X Hub and Driv...

Page 672: ...n of top and bottom trunnions H and remove Withdraw the hub carrier Note 1 Trunnions may be removed easily by pumping grease through the grease nipple 18 Use adaptor 993 59500 with slide hammer tool 8...

Page 673: ...veshaft Dismantling cont d 19 Use a puller to remove the trunnion seal and bearing S258270 255990 20 Withdraw drive shaft 21 Prise out drive shaft inner oil seal J 22 Remove circlip K 23 Remove bearin...

Page 674: ...l seal into position followed by the bearing Grease bearing and oil seal before fitting to axle 5 Fit driveshaft needle roller bearing to the hub carrier Pack the cavity between the oil seal lips with...

Page 675: ...g balance reading which should be 4 5 kgf 10 lbf more than the reading recorded at fig 7 9 Lightly oil the inner wheel bearing Assemble the inner and outer bearing cups and the inner bearing cone into...

Page 676: ...to Service Tools 14 To measure seal drag rolling force Refit the planet gear carrier DO NOT FIT THE SUN GEAR Use a spring balance and cord wrapped around the planet carrier flange as shown Pull the s...

Page 677: ...the recess in the planet carrier 18 Fit new planet gears in place of any that were removed See step 4 in Dismantling Secure with circlip Note Make sure that the SMALL radius on the gear bearing inter...

Page 678: ...JCB Lock and Seal to the threads Note Do not strike the centre of the planet gear carrier when fitting as this may dislodge the driveshaft thrust pad fitted at step 17 Re fill hubs with the correct g...

Page 679: ...82 1 Section F Transmission 9803 3280 Section F 82 1 Issue 1 ITL00670 Front Axle SD55 Drive Head Dismantling www WorkshopManuals co uk Purchased from www WorkshopManuals co uk...

Page 680: ...hers 12 from the case halves 9 Remove the thrust washers 13 from both case halves 10 Pull off the bearing 6 from case half 8A 11 Remove the Verbus Ripp bolts 14 and separate the crownwheel 15 from the...

Page 681: ...82 3 Section F Transmission 9803 3280 Section F 82 3 Issue 1 Front Axle SD55 Drive Head Assembly cont d ITL00670 www WorkshopManuals co uk Purchased from www WorkshopManuals co uk...

Page 682: ...earing 21 lightly oiled Do not fit the oil seal 19 at this stage Note It should be noted that the axle is assembled using a solid spacer However in the absence of the special tools required or the cor...

Page 683: ...82 5 Section F Transmission 9803 3280 Section F 82 5 Issue 1 Front Axle SD55 Drive Head Assembly cont d www WorkshopManuals co uk Purchased from www WorkshopManuals co uk...

Page 684: ...he rolling torque should be between 2 3 and 3 4 Nm including seal drag Note The nut tightening torque can be increased to a maximum of 300 Nm provided that the pinion rolling torque does not exceed th...

Page 685: ...fferential housing bolt flange If negative add to bearing depth if positive subtract from bearing depth 4 Subtract the total of the above figures from the standard value of 31 19 mm The result will be...

Page 686: ...nd Pinion Meshing Correct tooth marking Pinion too deeply in mesh Decrease the shim thickness between the pinion inner bearing cup and the axle casing Move the crown wheel towards the pinion to correc...

Page 687: ...83 1 Section F Transmission 9803 3280 Section F 83 1 Issue 1 Front Axle SD70 S161871 www WorkshopManuals co uk Purchased from www WorkshopManuals co uk...

Page 688: ...retaining bolts 11 and separate case halves 12 and 13 11 Remove the differential side gears and thrust washers 14 and 15 respectively 2 off each 12 Remove planet gears and thrust washers 16 and 17 re...

Page 689: ...83 3 Section F Transmission 9803 3280 Section F 83 3 Issue 1 Front Axle SD70 S161871 www WorkshopManuals co uk Purchased from www WorkshopManuals co uk...

Page 690: ...bearing 26 lightly oiled Do not fit the oil seal 25 at this stage Note It should be noted that the axle is assembled using a solid spacer However in the absence of the special tools required or the co...

Page 691: ...83 5 Section F Transmission 9803 3280 Section F 83 5 Issue 1 Front Axle SD70 www WorkshopManuals co uk Purchased from www WorkshopManuals co uk...

Page 692: ...rque should be between 2 3 and 3 4 Nm including seal drag Note The nut tightening torque can be increased to a maximum of 300 Nm provided that the pinion rolling torque does not exceed the maximum of...

Page 693: ...fferential housing bolt flange If negative add to bearing depth if positive subtract from bearing depth 4 Subtract the total of the above figures from the standard value of 31 19 mm The result will be...

Page 694: ...se the shim thickness between the pinion inner bearing cup and the axle casing Move the crown wheel towards the pinion to correct the backlash Pinion too far out of mesh Increase the shim thickness be...

Page 695: ...on which is not pertinent to the 2 wheel drive axle Please note when using a cradle to remove the axle from the machine the balance point see step 10 page F 80 2 of the axle on 2 wheel drive machines...

Page 696: ...en Dismantling The numerical sequence shown on the illustration is intended as a guide to dismantling For assembly the sequence should be reversed A suitable press will be required to remove and repla...

Page 697: ...238 14 90 1 Removal and Replacement Section F Transmission 9803 3280 Section F 90 1 Issue 1 Rear Axle PD70 SD80 D D C B H H E F G J K A M L www WorkshopManuals co uk Purchased from www WorkshopManual...

Page 698: ...re that the front wheels are blocked use the stabiliser legs to raise the rear end of the machine with the wheels and tyres clear of the ground 8 Prop the machine on each side as shown at F 9 Remove t...

Page 699: ...1 Section F Transmission 9803 3280 Section F 91 1 Issue 1 Rear Axle PD70 SD80 8 7 9 16 17 15 11 13 14 12 5 2 2 A 6 3A 4 10 3 B 1 378120 www WorkshopManuals co uk Purchased from www WorkshopManuals co...

Page 700: ...brake pack 5 Remove the circlip 4 If the brake pack is to be re used note the positions of the plates before removing them 6 Wear limit of friction plates is to the depth of the cross hatching A Chec...

Page 701: ...3 Section F Transmission 9803 3280 Section F 91 3 Issue 1 Rear Axle PD70 SD80 8 7 9 16 17 15 11 13 14 12 5 2 2 A 6 3A 4 10 3 B 1 378120 www WorkshopManuals co uk Purchased from www WorkshopManuals co...

Page 702: ...r original positions see Dismantling Soak new friction plates in JCB Special Gear Oil before assembly Fit circlip 4 On assembly of the brake packs the oil flow holes B must be aligned with each other...

Page 703: ...n F Transmission 9803 3280 Section F 92 1 Issue 1 Rear Axle SD80 24 25 3 6 7 2 4 5 13 14 11 12 18 16 15 1 17 10 19 20 23 22 21 8 26 2 5 A313631 www WorkshopManuals co uk Purchased from www WorkshopMan...

Page 704: ...moval Note Fretting between the hub swivel and annulus carrier mating faces might be evident this condition is normal do not attempt to repair If the hub swivel and annulus carrier are to be renewed t...

Page 705: ...n F Transmission 9803 3280 Section F 92 3 Issue 1 Rear Axle SD80 24 25 3 6 7 2 4 5 13 14 11 12 18 16 15 1 17 10 19 20 23 22 21 8 26 2 5 A313631 www WorkshopManuals co uk Purchased from www WorkshopMan...

Page 706: ...ng force To measure rolling torque simplified process a special tool is required See Service Tools in this section 9 Measure seal drag rolling force as follows a Refit the planet gear carrier 2 DO NOT...

Page 707: ...previous pages F 92 1 to F 92 4 However note that the wheel bearing carrier shown as item 15 on page F 92 1 is mounted directly on to the axle arm Disregard references to the hub carrier shown as ite...

Page 708: ...emove the other brake piston housing only if damaged but remove its locking pin regardless to allow sideload adjustment on assembly 4 Lift out the crownwheel differential assembly Note If both brake p...

Page 709: ...assembly first remove bolts 11 Lift off the top half housing 12 Remove the differential gears and spherical washers Pull off both differential bearing cones Section F Transmission 9803 3280 Section F...

Page 710: ...a gear tooth D 4 If dimension B is positive add it to the bearing depth If dimension B is negative subtract it from the bearing depth 5 If dimension C is positive subtract it from the total If dimensi...

Page 711: ...ilable spacer e g 14 20 mm Note It should be noted that the axle should be assembled using a solid spacer However in the absence of the special tools required or the correct size solid spacer it is ac...

Page 712: ...from the solid spacer size 14 20 mm Also subtract 0 04 mm to allow for theoretical bearing tolerance and pre load The result is the size of spacer to be fitted from the solid spacer setting kit If th...

Page 713: ...e nut tightening torque can be increased to a maximum of 300 Nm provided that the pinion rolling torque does not exceed the maximum of 3 4 Nm 22 Finally stake the nut 16 into the slot 23 If both brake...

Page 714: ...ure the crownwheel backlash which should be 0 17 0 28 mm 0 006 0 010 in Adjust the differential side nuts by equal amounts when altering backlash When backlash and preload are both correct fit the sid...

Page 715: ...and Pinion Meshing Correct tooth marking Pinion too deeply in mesh Decrease the shim thickness between the pinion inner bearing cup and the axle casing Move the crown wheel towards the pinion to corr...

Page 716: ...27 with JCB HP Grease before refitting Fit bearing cup 28 over pinion shaft 23 and assemble into drive head casing 2 Fit NEW collapsible spacer 24 after smearing with JCB HP Grease fit outer bearing 2...

Page 717: ...Differential 100 1 Section F Transmission 9803 3280 Section F 100 1 Issue 1 S171530 S212790 S212800 1 2 3 4 6 7 8 9 10 11 12 6 7 8 9 10 5 13 14 www WorkshopManuals co uk Purchased from www WorkshopMa...

Page 718: ...10 counter plates 8 friction plates 9 planet gears 13 and thrust washers 14 into the crownwheel half of the differential assembly 5 Note Do not fit the shims 6 at this point 2 Align the two halves of...

Page 719: ...on 9803 3280 Section F 105 1 Issue 1 Synchro Shuttle Gearbox Removal and Replacement A401310 M F K H R R M G N H A J J J J P G E Y X Z L S D B a a b b c c d d www WorkshopManuals co uk Purchased from...

Page 720: ...rter housing Through the access hole loosen and remove the torque converter to engine flywheel retaining bolts D 11 At a later stage the gearbox and engine assembly is tilted to allow access to fixing...

Page 721: ...9803 3280 Section F 105 3 Issue 1 Synchro Shuttle Gearbox Removal and Replacement cont d A401310 M K H M G H A J J J J P G E Y X Z L S D B a a b b c c d d F N T www WorkshopManuals co uk Purchased fr...

Page 722: ...drive plate bolt hole to a convenient point on the outside of the gearbox Take note of the flywheel and drive plate fixing hole phasing The heads of the bolts 3 will foul the flywheel 4 if phasing is...

Page 723: ...asings Note For details of service tools refered to see Service Tools at the front of this section Note If the main hydraulic pump has not been removed remove it Support the pump undo the 2 fixing bol...

Page 724: ...Unscrew bolts and withdraw pump 6 Remove and discard pump sealing ring 7 Separate pump components Note that the pump components are held together with a security screw at the rear of the assembly 8 Re...

Page 725: ...amp carefully press the top lever 11a down to compress spring 11b just enough to release pressure on circlip 11c Note BEWARE of spring pressure acting on nylon seat when circlip is removed c Remove ci...

Page 726: ...mbly 14a Remove the torque converter pressure regulating valve spool and spring assembly 14b 15 Unscrew bolts and lift off output end casing 15a Be sure to retrieve bearing outer cups from inside the...

Page 727: ...ure they are replaced correctly Remove selector forks 20 Push out the interlock plunger on disassembly 21 Lift off 3rd 4th synchro hub Note the positions for refitting with mating cups 22 Lift out lay...

Page 728: ...n the end of the spindle for extraction Note that the spindle should only be removed if it is damaged and is required to be replaced 110 6 Section F Transmission 9803 3280 Section F 110 6 Issue 2 Sync...

Page 729: ...gear 39 Remove 1st gear needle roller bearings 40 Note that the 1st 2nd synchro unit 40 is of a different design to the 3rd 4th gear unit There are components which may be lost during removal unless c...

Page 730: ...ewed the associated setting ring must be removed and discarded as follows 1 Carefully prise out the staked section of the ring Z clear of the casing 2 Using the special socket adaptor unscrew and disc...

Page 731: ...111 1 Section F Transmission 9803 3280 Section F 111 1 Issue 1 Synchro Shuttle Gearbox B2 B1 X A1 A2 C G Y www WorkshopManuals co uk Purchased from www WorkshopManuals co uk...

Page 732: ...el drive clutch is suspected see the relevant dismantling and assembly procedure in this section 1st 2nd Gear Synchromesh Unit The 1st 2nd gear synchro unit must be checked for wear before assembly as...

Page 733: ...quired Inspect the original casings and identify the blanking plug and adapter positions Transfer the plugs and adapters to the new casings Apply JCB Threadlocker and Sealer to the threads Note that n...

Page 734: ...ines slide spacer over splines 5 Press bearing 5a and 5b onto the assembled layshaft Smear the bearings with JCB HP Grease Mainshaft Assembly 6 Smear bearing surface of mainshaft with JCB HP Grease Fi...

Page 735: ...s the output yoke and secure with special tool nut B torque tighten to 50 Nm 36 9 lbf ft Note Check for end float while tightening nut B if there is no end float check The bearing cups are pushed full...

Page 736: ...tal 13 29 Subtract tolerance preload 0 12 Result 13 17 Use next smallest spacer ie 13 15 d Remove special nut B and sleeve A Remove rear bearing and 13 70 mm spacer Fit correct size spacer Do no fit t...

Page 737: ...the rolling torque measured is too high fit the next larger size spacer If the rolling torque is too low fit the next smaller size spacer d Finally carefully stake nut T into slot using a square ended...

Page 738: ...bearing assembly 112 6 Section F Transmission 9803 3280 Section F 112 6 Issue 2 Synchro Shuttle Gearbox Assembly cont d 20 Smear front end bearing of layshaft with JCB HP Grease and carefully lower la...

Page 739: ...ly from position B Lift the selector rod J to select 4th gear With 4th gear selected temporarily lock the rod in in position by screwing in service tool 892 01077 at B Temporarily fit service tool 892...

Page 740: ...y to push on tool T to keep the shaft correctly aligned Rotate the output shaft S back and forth to engage the gears on the layshaft Do not use excessive force when fitting the casing 31 Apply JCB Thr...

Page 741: ...the shaft via the output yoke a gear must be engaged Do not over tighten the ring Overtightening will damage the bearings c Undo the ring a small amount to obtain a shaft end float of 0 03 to 0 08 mm...

Page 742: ...rew the ring in or out until the end float is correct d When the correct setting has been obtained stake the setting ring to the casing as shown at the two positions Y see the note below Note that onc...

Page 743: ...2 11 Synchro Shuttle Gearbox Assembly cont d 114 015 A388140 36 Place new pump sealing ring in position Make sure that the charge pump drain hole is clear before fitting a new oil seal to the pump hou...

Page 744: ...ealer to bolts and tighten to 10 Nm 7 4 lbf ft Note To avoid contamination of sealant printed on gasket face keep in protective wrapper until needed 41 Assemble pressure maintenance valve spool and sp...

Page 745: ...the slots in the levers A with the pegs B in the housing E b After fitting spring C rotate it so that the end of the bottom coil butts with the the spigot D in the housing E 45 Locate a new gasket not...

Page 746: ...ter on until it just contacts the filter head c Turn the filter at least another 3 4 of a turn 49 Install dipstick oil filler tube not shown as follows a Fit nut to tube followed by seal b Insert tube...

Page 747: ...ined hub assembly 4 with the needle roller bearing and spacer Note the location of the spacer to ensure it is returned to its original position on re assembly 5 Remove the thrust bearing and thrust wa...

Page 748: ...to remove the piston Note If the piston does not loosen when the clutch shaft is knocked on aluminimum then hand pump air down the shaft oil inlet hole 15 Remove and discard piston and shaft O rings...

Page 749: ...d plain steel plates finishing with a friction plate 9 Fit the pressure end plate Make sure that the chamfered face is fitted facing the clutch pack as shown at A Make sure that the prongs on the pres...

Page 750: ...d by the needle roller bearing Note Ensure that the spacer is fitted first 15 Fit the thrust bearing and thrust washers 16 Smear the clutch end bearing with JCB HP Grease and press the bearing onto sh...

Page 751: ...4 1 Section F Transmission 9803 3280 Section F 114 1 Issue 2 Synchro Shuttle Gearbox Hydraulic 2 4 Wheel Drive Unit 4WD Pressure ON Y B www WorkshopManuals co uk Purchased from www WorkshopManuals co...

Page 752: ...the mating faces of the gearbox and 4WD casings for damage 114 2 Section F Transmission 9803 3280 Section F 114 2 Issue 2 Synchro Shuttle Gearbox Assembly If only the clutch pack has been removed beg...

Page 753: ...115 1 Section F Transmission 9803 3280 Section F 115 1 Issue 1 Synchro Shuttle Gearbox Hydraulic 2 4 Wheel Drive Unit 4WD Spring ON www WorkshopManuals co uk Purchased from www WorkshopManuals co uk...

Page 754: ...or scoring must be replaced with a new set Do not mix old new and worn plates Two different suppliers of the thinner friction plates 1 6 to 1 7 mm 0 062 to 0 067 in approx have been used identify as b...

Page 755: ...115 3 Section F Transmission 9803 3280 Section F 115 3 Issue 1 Synchro Shuttle Gearbox www WorkshopManuals co uk Purchased from www WorkshopManuals co uk...

Page 756: ...the gearbox 16 Apply a thin bead of JCB Multigasket to the 4WD mating face of the gearbox front case Fit the case P apply JCB Threadlocker and Sealer to bolts D and progressively torque tighten to 56...

Page 757: ...Note the pressure gauge reading DO NOT EXCEED 200 lb in2 13 8 bar 5 If the pressure gauge reading is between 125 135 lbf in2 8 6 9 3 bar then the clutch is operating correctly and can be fitted in the...

Page 758: ...inger pressure as shown to make the seal flush with the shaft CAUTION If the seal is not set below or flush with the outer diameter of the shaft then the seal will cut when the shaft is fitted to its...

Page 759: ...on F Transmission 9803 3280 Section F 120 1 Issue 1 Powershift Gearbox Removal and Replacement R F R K G H G E N Z Y X T J S M L P H B D c d a b a b d c www WorkshopManuals co uk Purchased from www Wo...

Page 760: ...rter housing Through the access hole loosen and remove the torque converter to engine flywheel retaining bolts D 10 At a later stage the gearbox and engine assembly is tilted to allow access to fixing...

Page 761: ...ission 9803 3280 Section F 120 3 Issue 1 Powershift Gearbox Removal and Replacement cont d A401320 R F N K G H G E Z Y X T J S M L P H B D c d a b a b d c www WorkshopManuals co uk Purchased from www...

Page 762: ...t a drive plate bolt hole to a convenient point on the outside of the gearbox Take note of the flywheel and drive plate fixing hole phasing The heads of the bolts 3 will foul the flywheel 4 if phasing...

Page 763: ...25 1 Section F Transmission 9803 3280 Section F 125 1 Issue 1 Powershift Gearbox A395260 A395540 A395250 2b 2a 1b 1c 1e 1d 1a 3a 3b 1a www WorkshopManuals co uk Purchased from www WorkshopManuals co u...

Page 764: ...the pump clear b Remove the circlip 1b followed by bearing 1c Withdraw the driveshaft 1d Remove the sealing ring 1e 2 Remove the Solenoid Control Valve Block a Undo the 8 socket head cap screws 2a and...

Page 765: ...ransmission 9803 3280 Section F 125 3 Issue 1 Powershift Gearbox A395330 A395240 A395230 A396090 A b B 6b 6g 6a 6b 6d 6f 4a 4a 4a 4b 6c 5b 5b 5d 5c 5a www WorkshopManuals co uk Purchased from www Work...

Page 766: ...d may have caused further damage to the gearbox Dismantle and inspect the gearbox fully For details of dismantling and inspecting the pump see Powershift Gearbox Inspection 6 Remove the 4WD Clutch Ass...

Page 767: ...nsmission 9803 3280 Section F 125 5 Issue 2 Powershift Gearbox A396120 7d 9b 9a 10b 8a 8b 8c 7a 7b 7c 9e 9c A395210 9h 9f 9g 10a 10c 10e 10d 10f 10g 10h www WorkshopManuals co uk Purchased from www Wo...

Page 768: ...9f 9g and 9h located inside the front case need not be removed unless they are damaged or the gearbox oil has been contaminated If they are to be removed see Powershift Gearbox Inspection 4x4 Gearbox...

Page 769: ...7 Section F Transmission 9803 3280 Section F 125 7 Issue 1 Powershift Gearbox A395280 11m 11f 11e 11a 11r 11c 11b 11d 11g 11h 11j 11k 11p www WorkshopManuals co uk Purchased from www WorkshopManuals c...

Page 770: ...aper roller bearing 11e and spacer 11f e Remove the outer taper roller bearing 11h f Remove circlip 11j followed by bearing double outer cup 11k Note The inner and outer taper roller bearing assembly...

Page 771: ...6 1 Section F Transmission 9803 3280 Section F 126 1 Issue 1 Powershift Gearbox Inspection A395110 A395210 A395290 5f 4b 4a 5c 5a 5e 5b www WorkshopManuals co uk Purchased from www WorkshopManuals co...

Page 772: ...damage If either is evident the pump must be renewed Carefully remove and discard the oil seal 4b Take care not to damage the seal housing Fit a new seal and then re assemble the pump c Make sure that...

Page 773: ...ction F Transmission 9803 3280 Section F 127 1 Issue 1 Powershift Gearbox A395280 C 1e 1c 1d 1k 1h 1j 1g 1f 11f 1b 1a A396070 B D 1b 1b 1a 1a www WorkshopManuals co uk Purchased from www WorkshopManua...

Page 774: ...onships Components from another set are not interchangeable If any components are worn or damaged the whole assembly must be renewed as a complete matched set a Make sure that you have fitted the lays...

Page 775: ...F Transmission 9803 3280 Section F 127 3 Issue 1 Powershift Gearbox A395060 A335160 A395210 A395620 4c 4b 3f 4a 3a 3b 3g 3e 3c 3d 4b A396050 A B 3e www WorkshopManuals co uk Purchased from www Worksho...

Page 776: ...ling rings on the ends of the clutch shafts 3c 3d 3f and 3g are in good condition and lubricated with oil 4x4 Gearbox clutch 3g 6 speed not fitted 4 Assemble the Front and Rear Casings a Make sure tha...

Page 777: ...127 5 Section F Transmission 9803 3280 Section F 127 5 Issue 1 Powershift Gearbox A335160 5b 5d 5c 5a X Y 5e www WorkshopManuals co uk Purchased from www WorkshopManuals co uk...

Page 778: ...Reverse clutch unit Shaft 5c Layshaft Shaft 5d 6 speed shaft not fitted to 4x4 gearboxes a Remove the plugs X and Y from the front casing 4x4 Gearbox plug Y not fitted b Fit a bolt to the threaded ho...

Page 779: ...803 3280 Section F 127 7 Issue 3 Powershift Gearbox A395570 A395240 6j 6h 6g 6f 6c 6b 7a 6e 6a 7c 7b 7b 7a 8c 8b 8a A395230 9a 9b 9c 9d A405220 A Y Y Y Y 7c C B X www WorkshopManuals co uk Purchased f...

Page 780: ...ve end float e Fit a new oil seal 6f Make sure the seal is pushed square to the housing f Fit the output yoke 6g followed by thick washer 6h and bolt 6j Hold the yoke using service tool 892 00812 and...

Page 781: ...ion F Transmission 9803 3280 Section F 127 9 Issue 2 Powershift Gearbox A396130 A402660 X X A B X 9 7 5 2 1 3 10 13 4 11 14 18 17 19 8 6 12 15 www WorkshopManuals co uk Purchased from www WorkshopManu...

Page 782: ...itical in these areas Be sure not to block galleries with sealant Fit a new O ring 10d to the housing 10a b Carefully locate the torque converter casing on the front case Fit new 10 9 grade bolts as f...

Page 783: ...0 Section F 127 11 Issue 2 Powershift Gearbox A404970 A404980 9 3 8 6 13 17 16 19 12 14 22 18 10 23 20 21 15 11 5 2 1 4 7 X X A B X Y Y Y Y Y Y Y M8 x 45 mm M8 x 25 mm 10a www WorkshopManuals co uk Pu...

Page 784: ...n Take extra special care at positions X as sealing is critical in these areas Be sure not to block galleries with sealant Fit a new O ring 10d to the housing 10a b Carefully locate the torque convert...

Page 785: ...ection F Transmission 9803 3280 Section F 127 13 Issue 1 Powershift Gearbox A390510 11b 8 1 3 1 0 1 7 7 A 11a A395260 13a 12b 12a 13b 12c 12d www WorkshopManuals co uk Purchased from www WorkshopManua...

Page 786: ...ic Pump Driveshaft a Fit a new sealing ring 12a to the shaft 12b Apply clean oil to the sealing ring and fit the shaft inside the gearbox b Apply clean oil to the ball bearing 12c Fit the bearing foll...

Page 787: ...19 20 21 23 22 25 24 13 12 11 10 9 8 26 27 28 30 29 18 19 12 20 21 22 23 9 8 15 14 15 14 13 4 5 7 1 2 3 6 A396140 PS 760 Forward Input Reverser Clutch Dismantling A396270 2 3 6 12 14 15 16 11 23 29 27...

Page 788: ...ning circlip 11 7 Remove pressure end plate 13 and shim 12 if fitted 8 Remove the friction plates 14 and counter plates 15 Keep them together in sets DO NOT mix the plates with those from other clutch...

Page 789: ...r Clutch Assembly 11 10 16 17 16 17 18 19 20 21 23 22 25 24 13 12 11 10 9 8 26 27 28 30 29 18 19 12 20 21 22 23 9 8 15 14 15 14 13 4 5 7 1 2 3 6 A396140 A396270 2 3 6 12 14 15 16 11 23 29 27 26 24 28...

Page 790: ...ction plate 7 Fit the pressure end plate 13 Make sure that the chamfered face is fitted facing the clutch pack as shown at A Make sure the teeth are not aligned with the lubrication slots in the housi...

Page 791: ...Powershift Gearbox A396230 1 2 6 5 13 14 16 17 24 12 3 4 7 8 11 15 18 20 19 21 23 22 2 3 6 4 7 6 5 13 14 15 12 24 23 22 21 20 19 18 8 8 9 9A 10 11 1 17 16 A396160 PS760 Layshaft Clutch Dismantling www...

Page 792: ...und the gear is fitted for assembly The 2 wheel drive machines have a spacer fitted instead of a gear 4 Withdraw the gear and splined hub 5 together with thin thrust washers 6 and thrust bearing 7 5 R...

Page 793: ...11A 11A A405340 B 6 9 B 9A 5 3 4 7 8 11 10 PS760 Layshaft Clutch Assembly 131 3 Section F Transmission 9803 3280 Section F 131 3 Issue 3 Powershift Gearbox www WorkshopManuals co uk Purchased from ww...

Page 794: ...rust washer 6 and thrust bearing 7 followed by the remaining thrust washer 6 3 Temporarily fit the 4 wheel drive transfer gear 4 onto the layshaft spline Make sure that the gear is fitted the correct...

Page 795: ...Gearbox 2 3 6 4 7 6 5 13 14 15 12 24 23 22 21 20 19 18 8 8 9 9A 10 11 1 17 16 A396160 A396230 1 2 6 5 13 14 16 17 24 12 3 4 7 8 11 15 18 20 19 21 23 22 A 4 0 2 7 0 0 A 13 14 PS760 Layshaft Clutch Ass...

Page 796: ...e that the chamfered face is fitted facing the clutch pack as shown at A Make sure the teeth are not aligned with the lubrication slots in the housing Note A spring disc is not fitted in this clutch p...

Page 797: ...1 Powershift Gearbox PS760 Mainshaft Clutch Dismantling 17 16 15 14 12 11 18 5 6 10 9 13 7 8 12 2 3 20 19 4 1 1 A396150 4 speed type A396250 1 2 3 4 18 19 15 10 9 7 5 6 8 11 12 13 16 14 17 20 www Wor...

Page 798: ...oller bearing 5 5 Remove the clutch friction counter plates retaining circlip 6 6 Remove the pressure end plate 7 and shim 8 if fitted 7 Remove the clutch friction plates 9 and counter plates 10 Keep...

Page 799: ...wershift Gearbox PS760 Mainshaft Clutch Assembly 17 16 15 14 12 11 18 5 6 10 9 13 7 8 12 2 3 20 19 4 1 1 A396150 4 speed type A396250 1 2 3 4 18 19 15 10 9 7 5 6 8 11 12 13 16 14 17 20 A402700 A 8 6 w...

Page 800: ...ferent shaped spring retaining plate fitted 6 Compress the spring and secure with circlip 11 7 Fit one counter plate 8 followed by one friction plate 9 Continue fitting alternate counter and friction...

Page 801: ...Powershift Gearbox 15 13 3 25 23 24 18 1 4 6 10 8 7 5 2 19 20 21 22 1 17 16 A396170 9 12 11 14 PS760 6 Speed Clutch Dismantling A396240 2 3 25 18 16 17 15 13 19 12 9 7 1 6 8 5 20 21 14 23 24 22 www W...

Page 802: ...ing a collet tool and press 3 Withdraw the gear 3 Make a note which way round the gear is fitted for assembly 4 At the opposite end remove the clutch end bearing 4 using a puller 5 Withdraw the gear a...

Page 803: ...shift Gearbox 15 13 3 25 23 24 18 1 4 6 10 8 7 5 2 19 20 21 22 1 17 16 A396170 9 12 11 14 PS760 6 Speed Clutch Assembly A396240 2 3 25 18 16 17 15 13 19 12 9 7 1 6 8 5 20 21 14 23 24 22 A402700 A 14 1...

Page 804: ...lubrication slots in the housing 6 Fit one counter plate 17 followed by one friction plate 16 Continue fitting alternate counter and friction plates finishing with a friction plate 7 Fit the pressure...

Page 805: ...ion 9803 3280 Section F 134 1 Issue 1 Powershift Gearbox PS 760 2 4WD Clutch Pressure ON Dismantling A396260 2 3 7 10 9 12 11 18 1 15a 17 16 15 13 14 8 5 6 4 www WorkshopManuals co uk Purchased from w...

Page 806: ...ted 6 Remove the clutch friction plates 11 and counter plates 12 Keep them together in sets DO NOT mix the plates with those from other clutches 7 Position clutch assembly in a suitable press with a c...

Page 807: ...3280 Section F 134 3 Issue 2 Powershift Gearbox PS 760 2 4WD Clutch Pressure ON Assembly A396260 2 3 7 10 9 12 11 18 1 15a 17 16 15 13 14 8 5 6 4 A 4 0 2 7 0 0 A 8 10 www WorkshopManuals co uk Purchas...

Page 808: ...r plate 12 followed by one friction plate 11 Continue fitting alternate counter and friction plates finishing with a friction plate 6 Fit the pressure end plate 10 do not fit shim 9 at this stage Make...

Page 809: ...Seals Fitting Procedure 140 1 Section F Transmission 9803 3280 Section F 140 1 Issue 1 Powershift Gearbox Polytetrafluoroethylene PTFE Piston Ring Seals Fitting Procedure www WorkshopManuals co uk Pu...

Page 810: ...flywheel 6 Install the torque converter with its drive plate assembly onto the transmission input shaft make sure that the dogs on the converter pump drive shaft engage with the recesses in the pump...

Page 811: ...150 2 Section F Transmission 9803 3280 Section F 150 2 Issue 1 Torque Converter 2 1 3 A265990 www WorkshopManuals co uk Purchased from www WorkshopManuals co uk...

Page 812: ...rake Light Switch Adjustment 20 1 Brake Piston Seal Leakage Test 20 2 Parking Brake Testing 20 3 Adjustment 20 4 Switch Adjustment 20 5 Renewing the Brake Pads 20 6 Master Cylinder and Servo Unit Remo...

Page 813: ...mm 7 992 in Inside Diameter 160 mm 6 299 in Nominal Facing Area per Plate 18603 mm2 28 8 in2 Hydraulic Piston Diameter 216 mm 8 5 in Master Cylinder combined servo assistance Number of Cylinders 2 Ty...

Page 814: ...ion of the brake packs H and H1 is as described in Pedals Locked Normal Operation If however the brakes have not worn equally then the amount of fluid displaced from each master cylinder will vary and...

Page 815: ...r cylinder fault 2 Friction counter plate distortion 3 Air in hydraulic system 1 External fluid leaks 2 Internal fluid leaks 1 Compensating feature not working ACTION 1 Check master cylinder in single...

Page 816: ...to test circuits individually 3 Renew friction counter plates BOTH sides 4 Adjust push rod 1mm minimum 5 Adjust servo operating rod 6 See item J6 1 Renew friction counter plates BOTH sides 2 Check mas...

Page 817: ...ction plates worn beyond limits 4 Friction counter plates in poor condition 1 Slight cut or nick in the brake piston seal refer to Service Procedures Brake Piston Seal Leakage Test ACTION 1 Strip axle...

Page 818: ...eler gauges to set the proximity switch A so that there is clearance of 2mm MIN 3mm MAX between the end of the switch and the brake pedal lever The light emitting diode L E D on the switch should be i...

Page 819: ...e the hand pump to generate a pressure in the brake piston housing c If the pressure falls off rapidly or if no pressure reading can be obtained the seal is severely damaged and needs replacing with a...

Page 820: ...ning light 6 is just extinguished 9 Slowly release the foot brake pedal 4 10 If the machine has not moved use the accelerator pedal to gradually increase the engine speed to 1500 RPM The machine shoul...

Page 821: ...st repeat steps 1 2 and 3 If there is no more adjustment and pin F is at the end of its travel adjust the cable Section G Brakes 9803 3280 Section G 20 4 Issue 2 Service Procedures A390850 Cable Adjus...

Page 822: ...A so that there is clearance of 2mm MIN 3mm MAX between the end of the switch and the handbrake lever The light emitting diode L E D on the switch should be illuminated and the audible alarm should s...

Page 823: ...otor 9 there is no need to remove the rotor from the calliper Pad Inspection WARNING Oil on the brake disc will reduce brake effectiveness Keep oil away from the brake disc Remove any oil from the dis...

Page 824: ...30 1 Section G Brakes 9803 3280 Section G 30 1 Issue 1 A396450 A B 327340 J K E E G H D H B F www WorkshopManuals co uk Purchased from www WorkshopManuals co uk...

Page 825: ...ake rod as shown at J which should be 8 5 to 8 3mm 0 334 to 0 326in 2 Adjust measurement J by screwing domed bolt K in out as required secure in position with JCB Threadlocker Sealer Note If no adjust...

Page 826: ...ke care not to damage the piston assembly or the bore of the cylinder body 3 Examine the working surfaces of piston and cylinder If these are not in perfect condition the master cylinder assembly must...

Page 827: ...r axle as shown at A Instructions for dismantling and assembly of the brake are described in Section F Rear Axle Brakes 40 1 Section G Brakes 9803 3280 Section G 40 1 Issue 1 Service Brakes A264180 A...

Page 828: ...ew and apply full pedal strokes of the right hand brake pedal until all air is expelled c Close the brake bleed screw with the pedal fully depressed 4 Left Hand Master Cylinder a Repeat procedure as f...

Page 829: ...ted in parenthesis eg 10 9 Refer also to relevant dismantling and assembly procedures Torque Settings Item Nm lbf ft A 166 122 12 9 B 13 15 9 12 C 255 188 10 9 Tuflok Section G Brakes 9803 3280 Sectio...

Page 830: ...d 3 Undo locknuts B and disconnect the cable from the bracket D 4 Support the calliper and remove the two mounting bolts and hardened washers C Lift the calliper and bracket D clear of the brake disc...

Page 831: ...1 11 4 3 5 2 14 228362 Component Listing 1 Carrier Side Pad 2 Lever Side Pad 3 Bolt 4 Anti rotation Clip 5 Washer 6 Washer 7 Lever 8 Spring 9 Rotor 10 Ball Spacer 11 Ball Bearings 12 Mounting Bush 13...

Page 832: ...7 against the tension of the spring as the bolt is removed 3 Note the position of lever 7 and the splines of the shaft Mark the end of the shaft and lever 7 to aid assembly Remove lever 7 and spring 8...

Page 833: ...50 5 Section G Brakes 9803 3280 Section G 50 5 Issue 1 Parking Brake 6 7 8 15 13 13 13 12 13 12 10 9 1 11 4 3 5 2 14 228362 www WorkshopManuals co uk Purchased from www WorkshopManuals co uk...

Page 834: ...rk made during dismantling 8 Hold the lever against the tension of the spring and fit washers 6 and 5 and new anti rotation clip 4 Fit bolt 3 and tighten to 13 16 Nm 9 12 lbf ft 9 Bend up a tab of the...

Page 835: ...the calliper from the axle mounting bracket F refer to Calliper Removal and Replacement 3 Undo the stake nut and withdraw the brake disc from the drive pinion shaft Note If the axle is not mounted to...

Page 836: ...ty Valve Operation 5 1 Fault Finding 10 1 Service Procedures Steering System Bleeding 20 1 Pressure Testing 20 2 Proximity Switch Setting 20 3 Steer Mode Valve Checking Solenoid Operation 20 4 Priorit...

Page 837: ...03 3280 Section H 1 1 Issue 1 Service Tools S191750 Hexagon Spanners for Ram Pistons and End Caps 992 09300 55mm A F 992 09400 65mm A F 992 09500 75mm A F 992 09600 85mm A F 992 09700 95mm A F 992 099...

Page 838: ...OSPC Volumetric Displacement 250 cc rev Relief Valve Fitted Check Valve Fitted Shock Valve Not Fitted Relief Valve Operating Pressure at 1500 revs min 120 3 bar 122 3 5 kgf cm2 1740 50 lbf in2 PRIORI...

Page 839: ...ck Rod Ram 42 Steer Unit 43 Shock Valve 44 Steer Unit Relief Valve Note Hydraulic component port identification letters are shown in parenthesis e g LS The same letters will be stamped on the actual c...

Page 840: ...via load sensing line LS Oil from the hydraulic pump P2 is then distributed via the priority valve to the steer unit 42 which then directs the oil to the front power track rod ram 10 untill the requi...

Page 841: ...ilter 7 Priority Valve 8 Steer Mode Control Valve 10 Front Power Track Rod Ram 11 Rear Power Track Rod Ram 42 Steer Unit 43 Shock Valve 44 Steer Unit Relief Valve Note Hydraulic component port identif...

Page 842: ...hen distributed via the priority valve to the steer unit 42 When left turn is selected oil is distributed from steer unit 42 to the rear power track rod ram 11 via the steer mode control valve 8 When...

Page 843: ...currently operative In 2 wheel steer mode only the front wheels are steered In 4 wheel steer mode both axles are steered giving a smaller turning circle and so improving manoeuvrability The crab stee...

Page 844: ...e 4 wheel steer machines except the unit pumps oil out directly to a power track rod ram fitted on the front axle only Also therefore the 2 wheel steer machines do not have a steer mode control valve...

Page 845: ...eve B are held in the neutral position by the centring springs K As the unit is closed centre the flow from the pump is dead ended by the steering unit Component Key A Inner Spool B Sleeve D Stator K...

Page 846: ...3 Circuit Descriptions Section H Section H K B D X B 43C A A395640 Full Pressure Pressure Servo Neutral Exhaust Cavitation Lock Up A390630 Key to Oil Flow Pressure www WorkshopManuals co uk Purchased...

Page 847: ...Circuit Descriptions Section H Section H B X 41 D B LS 43B A A395650 40 Full Pressure Pressure Servo Neutral Exhaust Cavitation Lock Up A390630 Key to Oil Flow Pressure www WorkshopManuals co uk Purch...

Page 848: ...is linked to the spools by a cross pin As the steering is operated the oil is diverted by inner spool A into the stator D The rotor lobes pump the oil out to one side of the rear power track rod ram 4...

Page 849: ...r a left hand turn except that the oil is diverted by spool A to the other side of stator D and power track rod rams 40 and 41 Component Key A Inner Spool B Outer Spool D Stator LS Load Sensing Port X...

Page 850: ...rcuit Descriptions Section H Section H B D B LS 43C 43B A A395660 X 41 40 Full Pressure Pressure Servo Neutral Exhaust Cavitation Lock Up A390630 Key to Oil Flow Pressure www WorkshopManuals co uk Pur...

Page 851: ...8 Circuit Descriptions Section H Section H B D B F A A395670 X 41 40 Full Pressure Pressure Servo Neutral Exhaust Cavitation Lock Up A390630 Key to Oil Flow Pressure www WorkshopManuals co uk Purchase...

Page 852: ...d pumping it out to power track rod rams 40 and 41 under manual pressure only As there is no supply from the pump oil from one side of the power track rod rams supplemented by exhaust oil if necessary...

Page 853: ...43A vents this pressure to exhaust preventing damage to the steering unit Non return valve J2 is held on its seat by the generated pressure and non return valve 43C closes to prevent the shock wave be...

Page 854: ...Circuit Descriptions Section H Section H B D B J1 J2 43A 43C A A395680 X Full Pressure Pressure Servo Neutral Exhaust Cavitation Lock Up A390630 Key to Oil Flow Pressure www WorkshopManuals co uk Purc...

Page 855: ...ircuit Descriptions Section H Section H B D B LS 43C 43B A A395700 X 41 40 Full Pressure Pressure Servo Neutral Exhaust Cavitation Lock Up A390630 Key to Oil Flow Pressure www WorkshopManuals co uk Pu...

Page 856: ...tor lobes pump oil out to the front power track rod only The rear wheels are held in the straight ahead position by the locked up oil in the rear power track rod ram Component Key A Inner Spool B Oute...

Page 857: ...e other side of the rear power track rod ram 41 hence turning the rear wheels in the same direction as the front wheels causing the machine to crab to the right Component Key A Inner Spool B Outer Spo...

Page 858: ...ircuit Descriptions Section H Section H B D B LS 43C 43B A A395690 X 41 40 Full Pressure Pressure Servo Neutral Exhaust Cavitation Lock Up A390630 Key to Oil Flow Pressure www WorkshopManuals co uk Pu...

Page 859: ...riptions Section H Section H T 43B LS 2 2B 2C 2A EF LS R CF 43B T P 43 LS 3 A395710 Full Pressure Pressure Servo Neutral Exhaust Cavitation Lock Up A390630 Key to Oil Flow Pressure www WorkshopManuals...

Page 860: ...ing 2C to the rear of spool 2B The high pressure differential created across the spool causes it to move to the left against the force of the spring 2A This allows full pump flow to the loader control...

Page 861: ...S of the steering unit ceases restoring the pressure differential across spool 2B The spool moves back to the left allowing full pump flow to the loader control valve 3 Because the pump output is alwa...

Page 862: ...riptions Section H Section H A395720 T 43B LS 2 2B 2C 2A EF LS R CF 43B T P 43 LS 3 Full Pressure Pressure Servo Neutral Exhaust Cavitation Lock Up A390630 Key to Oil Flow Pressure www WorkshopManuals...

Page 863: ...lve continued Introduction The purpose of this section is to help you trace hydraulic faults to a faulty unit valve actuator ram etc Once you have traced the faulty unit refer to the appropriate disma...

Page 864: ...unit damaged broken or missing Steer control valve position of Refer to Hydraulic Steer rotor to shaft slot incorrect Unit Dismantling and Assembly Correct as required 3 Machine will not turn when the...

Page 865: ...Check power track rod for signs of damge leaks etc 4 Steering fails to respond to Selector switch faulty Check selector switch selected mode 4WS Machines only replace as required Proximity switches n...

Page 866: ...ll right lock b Turn steering wheel to full left lock c Turn steering wheel to full right lock 4 Select 4 Wheel Steer a Turn steering wheel to left until the front wheels are fully locked to the left...

Page 867: ...test adaptor A Note The pressure test point for the steering circuit is fitted next to the priority valve as shown 4 Run the engine at 1500 revs min and turn the steering to full lock Check the gauge...

Page 868: ...r C 3 With the starter switch on loosen the proximity switch lock nut D and slide the switch in line with the target disc A 4 Loosen the bracket fixing bolts E and adjust the assembly up or down to br...

Page 869: ...eer mode solenoid combinations function correctly 2 If the fuse is intact remove the electrical connector from the malfunctioning solenoid s and check that the 12V supply is present across the connect...

Page 870: ...t each end of the spool Dry off and lubricate with clean hydraulic fluid 5 Refit the priority valve spool 12 making sure that the spring seat end of the spool faces towards the LS port Refit blanking...

Page 871: ...e engine speed to 1000 rev min while checking the maximum pressure gauge reading which should be 5 9 to 8 7 bar 86 to 126 lbf in2 If the pressure is outside the limits try cleaning the priority valve...

Page 872: ...luid and ingress of dirt Label hoses for identification and correct refitting 2 On 4WD machines remove the split pin and nut A Remove the track rod ball joint from the wheel hub assembly On 2WD machin...

Page 873: ...and Replacement Section H Steering 9803 3280 Section H 31 1 Issue 1 Power Track Rod A258480 A258470 E J J E F F A B G Y X H S258450 K L M N M S300370 C C www WorkshopManuals co uk Purchased from www...

Page 874: ...c G where applicable 2 Use JCB Threadlocker Sealer on the trackrod link arms 3 If the link arms have been renewed the wheel alignment must be checked as follows a Set the wheels to the straight ahead...

Page 875: ...g and Assembly 6 1 32 1 Section H Steering 9803 3280 Section H 32 1 Issue 1 S258430 Power Track Rod 8 5 3 3 5 1 6 7 2 4 7 8 A258580 A258590 A B C D www WorkshopManuals co uk Purchased from www Worksho...

Page 876: ...JCB Ram Sealing Procedure for the correct method of fitting seals to the end cap and piston head 4 Clamp the cylinder vertically and lower the piston rod assembly in from the top as shown at B Take ca...

Page 877: ...ures Priority Valve Cleaning A faulty unit must be replaced Dismantling Press out the spool item 12 using a nylon pin Take care not to damage the bores of the valve Assembly Make sure that spring seat...

Page 878: ...wheels Disconnect the battery to prevent the engine being started while you are beneath the machine GEN 1 2 DANGER Hydraulic Pressure Hydraulic fluid at system pressure can injure you Before disconne...

Page 879: ...3 None of the component parts of the CETOPS valve assembly can be renewed individualy The extent of permissible servicing is cleaning and the consequential renewal of O ring seals If damage to any co...

Page 880: ...lacement WARNING Fine jets of hydraulic fluid at high pressure can penetrate the skin Do not use your fingers to check for hydraulic fluid leaks Do not put your face close to suspected leaks Hold a pi...

Page 881: ...50 2 Section H Steering 9803 3280 50 2 Issue 1 Hydraulic Steer Unit Section H S10221A www WorkshopManuals co uk Purchased from www WorkshopManuals co uk...

Page 882: ...ted Section H Steering 9803 3280 Section H 50 3 Issue 1 Hydraulic Steer Unit Dismantling and Assembly The numerical sequence shown on the illustration is intended as a guide to dismantling Note 1 Duri...

Page 883: ...over rotor 13 Refit the end plate and fit at least one bolt 2 before removing support material 14 Fit remaining bolts ensuring that special bolt 1 is correctly located Tighten all bolts to 29Nm 22 lbf...

Page 884: ...ction K i Issue 1 Contents Page No Service Tools 1 1 Technical Data 2 1 Service Procedures Fuel Lift Pump Cleaning the Strainer 20 1 Engine Removal Replacement 30 1 www WorkshopManuals co uk Purchased...

Page 885: ...res to assist bedding in of new piston rings S192390 For details of other engine service tools refer to Engine Service Manual Publication No 9806 0100 or 9806 2140 for low emission engines 892 00936 T...

Page 886: ...1 3 4 2 Valve Clearance Cold Inlet 0 20mm 0 008 in Exhaust 0 45mm 0 018 in Oil Pressure hot at maximum speed AA 2 1 bar 30 lbf in2 AB AK AM 2 6 bar 40 lbf in2 AR 2 0 bar 30 lbf in2 Maximum Air Cleane...

Page 887: ...fuel inlet connection Fit the inlet connector A and tighten to 20Nm 15 lbf ft Fit the fuel inlet pipe carefully to prevent damage to the strainer and tighten the union nut IMPORTANT The fuel strainer...

Page 888: ...30 1 Section K Engine 9803 3280 Section K 30 1 Issue 1 Engine A401530 S S R A Q Q N P a a c b b c www WorkshopManuals co uk Purchased from www WorkshopManuals co uk...

Page 889: ...quipment Note If required the shroud radiator and coolers can be removed as individual items 16 Loosen and remove the exhaust silencer retaining bolts remove the silencer 17 Loosen and remove the reta...

Page 890: ...antling and assembly procedures are detailed in the Engine Service Manual publication number 9806 0100 Replacement Replacement is a reversal of the removal procedure 1 When mating the gearbox torque c...

Reviews: