background image


43 

Mass storage, Web Cam 

White balance 

Auto/manual: Daylight, cloudy, Tungsten and Fluorescent 

Exposure 

Automatic/manual (-2.0EV~+2.0EV, 0.3EV/step) 

Self-timer 

2/10 seconds delay 

Video 

AVI 

File format 

Photo 

JPEG 

External 
Memory   

SD Card slot - accepts up to 8 GB card (card not supplied) 

USB interface 

USB 2.0 interface 

Power supply 

Battery: 4

×

AAA alkaline 1.5V (not supplied) 

Dimensions 
(L

×

W

×

H) 

4.5 

×

 1.65 

×

 2.45 inches 

Weight 

5.3oz (excluding batteries) 


E 2011 09 27


Summary of Contents for HDV105

Page 1: ...1...

Page 2: ...2 I In n t th he e p pa ac ck ka ag ge e Video Recorder User Manual CD USB cable TV cable W Wa ar rr ra an nt ty y C Ca ar rd d Q Qu ui ic ck k G Gu ui id de e Warranty Card Quick Guide...

Page 3: ...m me e 1 13 3 L LE ED D L Li ig gh ht t I In nd di ic ca at to or rs s 1 13 3 V Vi id de eo o M MO OD DE E 1 15 5 C Ca am me er ra a M MO OD DE E 1 18 8 V Vo oi ic ce e R Re ec co or rd di in ng g M M...

Page 4: ...ital device pursuant to Part 15 of the FCC Rules These limits are designed to provide reasonable protection against harmful interference in a residential installation This equipment generates uses and...

Page 5: ...ustrations and information shown in the manual are for detailed understanding of the recorder functions Some information illustrations may slightly differ from your recorder as a result of continuous...

Page 6: ...1 Lens 2 Self timer LED light 3 LED support light 4 Zoom in button 5 Zoom out button 6 Direction buttons Up Down Left Right 7 OK button 8 Display button 9 MENU button 10 LCD screen 11 Mode indicator 1...

Page 7: ...7 TOP VIEW BOTTOM VIEW 15 Macro Normal lens switch 16 Zoom button 17 Shutter button 18 Tripod Socket 19 SD Memory card slot...

Page 8: ...W LEFT SIDE VIEW with LCD SCREEN opened 20 Built in speaker 21 Battery cover 22 Battery cover LOCK Button 23 TV USB port 24 Voice recording button 25 Support LED light button 26 Power Indicator 27 Pow...

Page 9: ...e the Battery cover the LOCK will click securing the cover Note Batteries are not supplied and need to be purchased separately 2 Using the SD Card Insert remove the SD Card 1 Insert SD Memory Card int...

Page 10: ...ch to select required position TOP VIEW 1 Normal Set to Normal for typical video or picture taking when the subject is located at 5 feet or more from the recorder 2 Macro Set to Macro only for shootin...

Page 11: ...ree seconds when recorder is active to turn the power OFF Auto Power OFF Your recorder has Auto Power OFF feature If recorder is unused for 1 minute the power will turn OFF automatically to save batte...

Page 12: ...r button to start Video Recording Press again to stop Still Pictures Camera In camera mode press shutter button once to take a Still Picture Voice recording Press voice audio recording button to start...

Page 13: ...m selection and menu button to exit A Ad dv va an nc ce ed d O Op pe er ra at ti io on ns s 7 Setting Date Time 1 Press MENU button then select Setup to enter setting date time adjustment mode 2 Use t...

Page 14: ...er is active in Self timer Mode Refer to section in manual for Self timer setting details Display Button operation Pressing the Display Button will create following changes Press once to remove all in...

Page 15: ...re multi 4 640 Video resolution indicator 1080x720 640x480 or 320x240 5 00 00 00 Video recording counter hours min sec 6 SD Card icon the icon appears when the SD card is inserted 7 the battery power...

Page 16: ...r will start counting the elapsed recording time 3 Press the Up button to pause recording and press again to continue 4 Press the Shutter button again if you wish to stop recording 5 You can zoom IN o...

Page 17: ...ght button to review available settings Press Up Down button to select desired setting then press OK button to confirm your selection Press the Menu button to exit the Video Menu mode and return to Pr...

Page 18: ...ce Auto 4 Metering exposure mode 5 Exposure value 6 Picture resolution value 7 Image quality icon 8 Image counter shows number of available pictures remaining 9 Self timer delay time in seconds 10 SD...

Page 19: ...ress the Shutter Button to take a picture Note The LCD will display Card Locked message if the inserted SD memory card is set in LOCK locked position and recorder will NOT take a picture Remove unlock...

Page 20: ...o browse and select available Menu options then press the Right button to review available options Press Up Down button to select desired setting then press OK button to confirm Press the Menu button...

Page 21: ...Shutter button and recorder will beep while counting down the delay time then the picture will be automatically taken Note You can also quickly access the Self Timer Setting mode when the recorder is...

Page 22: ...ns 2 Press the Shutter button to start recording 3 Press Up button to pause recording press again to continue recording 4 Press the Shutter button to stop recording Recording Stop 1 Voice Recording Mo...

Page 23: ...recorded voice file You can zoom the displayed photo images by pressing the zoom IN OUT buttons or sliding Zoom IN OUT switch When the image is zoomed IN press OK button and you can pan the displayed...

Page 24: ...u can use the direction key to select desired image file and press OK key or Zoom IN key to exit this Thumbnail mode and return to full screen display mode Playing the Video or Voice file Select the V...

Page 25: ...press MENU button to enter available settings as below Use Up Down buttons to select desired function use Right button to obtain access to available setting Use Up Down buttons to select option then...

Page 26: ...26 Note The locked files can not be deleted Unlock the file first then delete...

Page 27: ...27 Resize function You can resize the image only to the smaller size than original Press Shutter button to stop the recording...

Page 28: ...image with the Voice Memo 2 Press OK to start playing the selected jpg with voice memo 3 Press Up key to pause resume playing press OK to stop Start up image You can set your favorite picture as your...

Page 29: ...ng mode 1 Turn the recorder ON then press the MENU and Right button to enter internal settings 2 Use the Up Down buttons to select desired setting and press the Right button to access available option...

Page 30: ...30 Note Format Formatting the SD card when the card is inserted will erase all data...

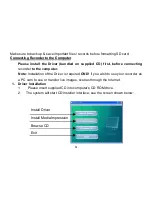
Page 31: ...plied CD first before connecting recorder to the computer Note Installation of the Driver is required ONLY if you wish to use your recorder as a PC cam to see or transfer live images scenes through th...

Page 32: ...rogram located in the CD root directory Driver installation Click Install Driver button follow provided steps and complete installation Restart computer when installation has been completed Note The D...

Page 33: ...ra webcam can be used for transferring live images scenes into the computer 3 Download video picture files to the computer Power ON recorder and connect to the computer using USB cable Select and open...

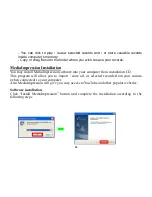
Page 34: ...You may install MediaImpression software into your computer from installation CD This program will allow you to import store all or selected records from your camera when connected to your computer Al...

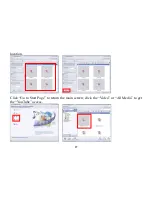
Page 35: ...the Desktop Using MediaImpression The MediaImpression program will also provide one button access to the YouTube website post your video and share with millions of Internet users Double click the icon...

Page 36: ...36 Choose the video camera storage and choose the output location Choose required file and click Import selected file will be stored in the indicated output...

Page 37: ...37 location Click Go to Start Page to return the main screen click the Video or All Media to get the YouTube access...

Page 38: ...on is complete please reboot the computer for the first time operation 5 PC Camera function Power ON the recorder and set it at the PC Cam Mode refer to the Manual if required Connect recorder with yo...

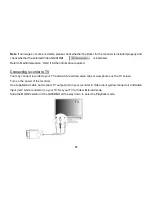
Page 39: ...n ne ec ct ti in ng g recorder t to o T TV V You may connect recorder to your TV and watch recorded video clips or view photos on the TV screen Turn on the power of the recorder Use supplied AV cable...

Page 40: ...harmful chemical substances u The recorder is not waterproof Protect from humidity Do not use recorder if your hands are wet u Keep your recorder away from extreme heat and do not point recorder dire...

Page 41: ...rd alignment and reinsert card carefully 3 Note that the card has a tiny LOCK slide switch set the slide to non LOCK position when you wish to save recordings or images on the card S Sy ys st te em m...

Page 42: ...SDHC card capacity Macro Normal lens settings T Te ec ch hn ni ic ca al l S Sp pe ec ci if fi ic ca at ti io on ns s Video record resolution HD 1280 x 720 VGA 640x480 QVGA 320 240 Still Picture resol...

Page 43: ...2 0EV 0 3EV step Self timer 2 10 seconds delay Video AVI File format Photo JPEG External Memory SD Card slot accepts up to 8 GB card card not supplied USB interface USB 2 0 interface Power supply Bat...

Reviews: