PVB Series Second Floor International Net System Instructions
- 3 of 11-
JSL-Inst046
www.jayprosports.com
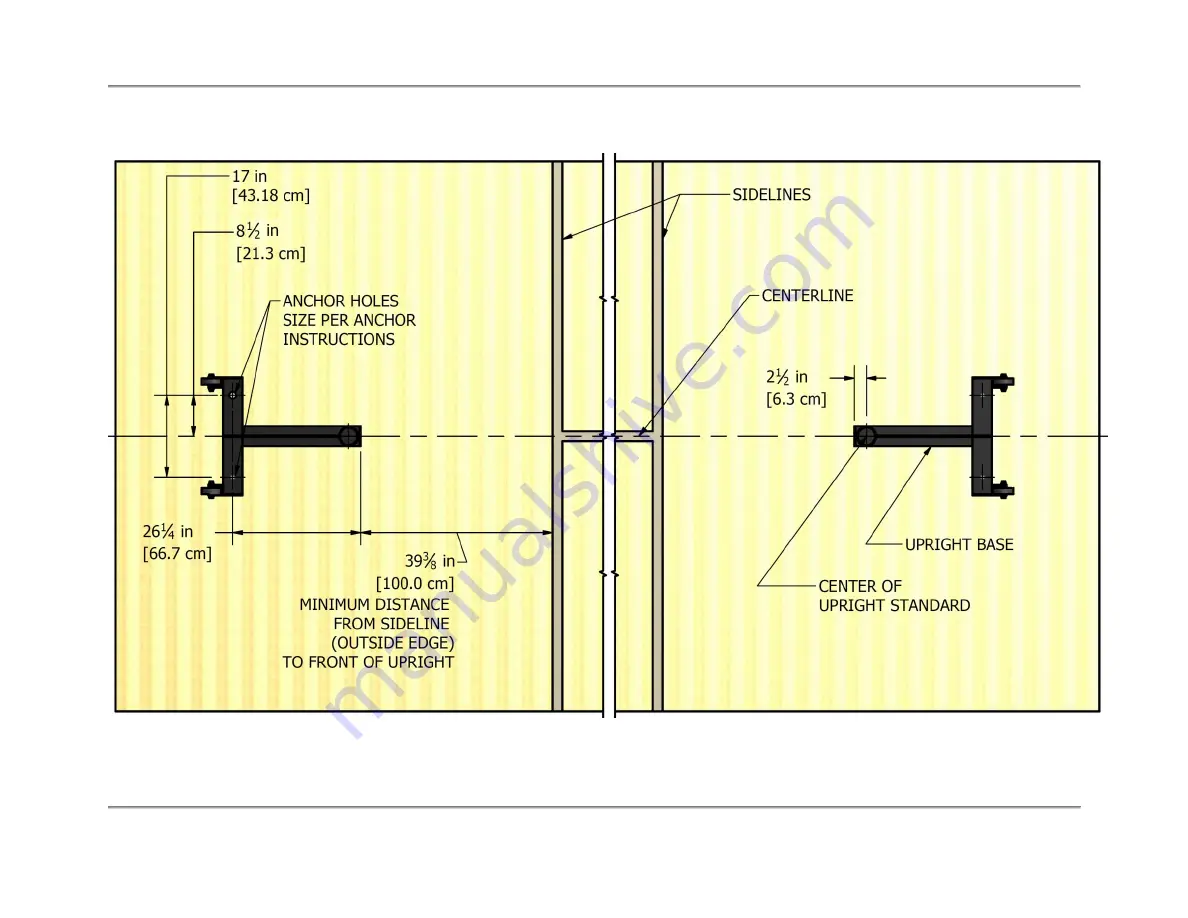
Figure 3-1: Correct floor anchor layout.
Refer to instructions included with floor anchors for anchor installation details.
Page 1: ...Inst046 www jayprosports com JAYPRO PVB SERIES SECOND FLOOR INTERNATIONAL NET SYSTEM Installation and Operating Instructions Applicable Part Numbers Models PVB 2500 Second Floor International Net Sys...
Page 2: ...if the net is under tension WARNING Always use protective padding around each upright during use WARNING Uprights are heavy Do not attempt to lift or install without assistance IMPORTANT Follow all wa...
Page 3: ...anchors must be internally threaded with 1 2 13 threads The anchors must be installed 17 apart on center see Figure 3 1 The Flex Net will work with upright standards spaced 35 to 37 apart on center1...
Page 4: ...econd Floor International Net System Instructions 3 of 11 JSL Inst046 www jayprosports com Figure 3 1 Correct floor anchor layout Refer to instructions included with floor anchors for anchor installat...
Page 5: ...egiate Net System Adjustable wrench Hex keys 3 16 5 16 5 Included Hardware Components Before continuing please open all packages to verify that you have all the required hardware for installation and...
Page 6: ...Second Floor International Net System Instructions 5 of 11 JSL Inst046 www jayprosports com Figure 5 3 Winch with strap PVBWINCH 1X Figure 5 4 Flex Net PVBN 6 1X Figure 5 5 Antennae and Net Tapes VBA...
Page 7: ...Instructions 6 of 11 JSL Inst046 www jayprosports com Figure 5 6 Anchor Strap PVB 604 1X 5 2 Hardware Figure 5 7 Socket Cap Screw HS5098 1X Figure 5 8 Button Head Cap Screw HS5201 1X Figure 5 9 Acorn...
Page 8: ...ance 1 Install each upright into the t bases and tighten each square headed set screw 2 Follow instructions included with winch to set the winch clamp to the correct upright diameter 3 1 2 3 Install w...
Page 9: ...thout the winch Figure 6 2 Figure 6 2 Install anchor strap 6 Roll the standards into position with the hand knob assemblies directly over the floor anchors 7 Thread the hand knob into the anchor be su...
Page 10: ...to anchor strap then attach other end to winch strap Figure 6 5 Figure 6 5 Attach net to straps 10 Adjust the length of the anchor strap as necessary to center net on court The net will stretch 6 8 i...
Page 11: ...ou may need to adjust their heights and or re center the net 13 Attach the bottom net straps to each upright as shown in Figure 6 6 Wrap Velcro straps around buckles for additional player safety Figur...
Page 12: ...commended that the components be inspected at least once every season for signs of excessive wear Key areas to inspect include but are not limited to Strap webbing Net Spring clips and D rings Winch m...