background image


EN/1508.V01 

PD-12307T 

25 

EN 

Resolution 

You can change this setting if the picture resolution does not appear to be correct. This setting is to match 
the most common setting.   

[480p]

  : for NTSC TV system 

[576p]

  : for PAL TV system 

[720p]

  : for NTSC or PAL TV system 

[1080i]

  : for NTSC or PAL TV system 


TV Format 

If the picture does not appear to be correct you can change this setting. 

[NTSC]

 : for NTSC system TV. 

[PAL]

  : for PAL system TV. 


3. CHANNEL SEARCH   

To access the menu, press SETUP select [Channel Search] using the RIGHT/LEFT keys. 
Press UP/DOWN to select an option and press RIGHT/LEFT to adjust the setting .Press EXIT to exit the 

Menu. 


Auto Search 

This option will automatically search for channels and save them once the scanning is complete. All 
previously saved channels and settings will be deleted. 

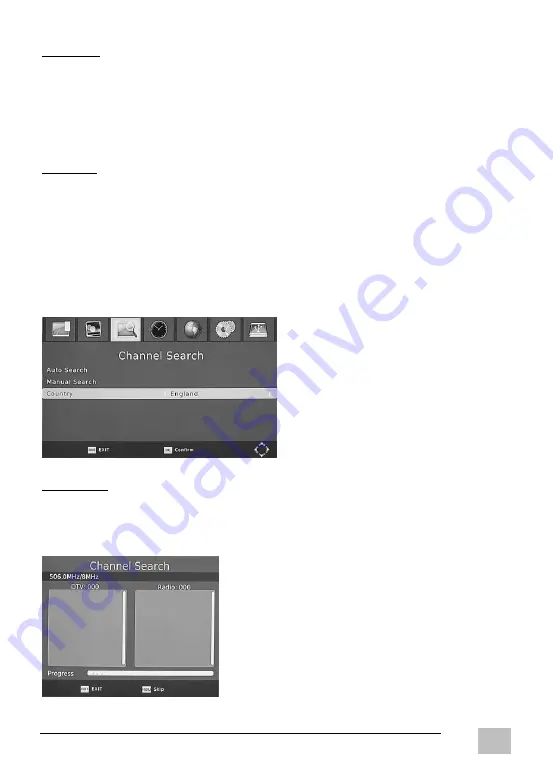
1.  Select [Auto Search] and press OK or RIGHT to start channel search. 
2.  To cancel channel search, press EXIT. Any channels that have been found will be saved. 


Summary of Contents for PD12307T

Page 1: ......

Page 2: ...Under DVB T mode 12 PLAYBACK FROM A DISC 13 How to start playback from the menu screen 13 Fast Forward Fast Backward 13 Play in slow motion 13 PLAYING BACK A DISC WITH JPEG FILES 13 LOCATING A SPECIFIC TITLE CHAPTER OR TRACK 14 Locating a title using the title menu 14 PLAYING REPEATEDLY 14 How to repeat a specific segment 15 PLAYING IN FAVORITE ORDER 15 How to set titles chapters or tracks in a fa...

Page 3: ...PD 12307T EN 1508 V01 EN 2 MENU 20 1 Program 21 2 Picture Setting 24 3 Channel Search 25 4 Time 26 5 Option 27 6 System 28 7 USB 29 SPECIFICATIONS 31 GENERAL TROUBLESHOOTING 32 ...

Page 4: ...the user to be careful of electrical shock because of high voltage contained inside The exclamation mark in a black triangle warns the user that important instructions for operation and assistance are provided Laser product mark This mark is on the rear panel of the device indicating that class 1 laser beam is weak that there is no radiation hazard outside of the device LASER SAFETY This set emplo...

Page 5: ... heat sources Please do not place the device close to objects with magnetic field Please do not place the device near liquid area If incidentally liquid penetrates into the device please remove the plug immediately and seek for technician s assistance Please place the device on a horizontal surface and do not place heavy objects on top of the device Please use standby mode when the player is suspe...

Page 6: ...tery immerse into water or any other liquids please keep the battery away from damp area when storage it Please do not stab hammer or trample the battery If you want to have a rest or sleep or the player is not to be used for a long time please unplug the power adaptor of the player and turn off the power switch to prevent battery damage and any incident caused by overcharging When lithium battery...

Page 7: ...SB SD switching between DVD USB and memory card 2 Mode switching between DVD mode and DVB T mode 3 Previous file 4 Next file 5 Left Volume 6 Up Channel 7 OK 8 Right Volume 9 Down Channel 10 Menu 11 Setup 12 Stop 13 Play pause 14 Open open the disc tray cover ...

Page 8: ...7T 7 EN 1 USB DVD To play multimedia files under DVD mode 2 Memory card slot in DVD mode 3 Earphone jack 4 AV out 5 Power switch 6 DC in socket 7 USB DVB T To play media files under DVB T digital TV mode 8 Antenna socket ...

Page 9: ...3 Number 1 Repeat 4 TV Radio 5 Number 4 Angle 6 Favorite 7 Number 7 Title 8 EGP Electronic Program Guide 9 TTX Teletext 10 Subtitles 11 Up Channel 12 Setup 13 OK 14 Left Volume 15 Down Channel 16 Back 17 No function 18 No function 19 Fast forward 20 Fast backward ...

Page 10: ... button NOTE When you need to use REPEAT A B ANGLE SLOW PRGM ZOOM TITLE which are combined with numbers please press the SHIFT button to set it at On To switch back to number function please press the SHIFT button again to set it at Off OPERATING WITH THE REMOTE CONTROL 1 The remote control must point at the remote sensor in order for the DVD player to function correctly 2 The remote control works...

Page 11: ...VD player to start playing files in the disc 8 Press the Stop button to stop playing PLAY MULTIMEDIA FILES Please insert a USB disk or SD SDHC memory card to the corresponding port for multimedia playback 1 Play multimedia files under DVD mode supports up to 32 GB Please insert the USB disk into the USB DVD port 2 Play multimedia files under DVB T digital TV mode supports up to 32 GB Please insert...

Page 12: ... like to connect the DVD player with external equipment please use the included AV cable for the connection NOTE Before the connection it is suggested to turn off both the DVD player and the external equipment or please set the sound volume at a low level Connection Example ...

Page 13: ...e Page 3 Use DIRECTION keys and select Default then press OK UNDER DVB T MODE 1 In the System menu select Restore Factory Default 2 Use Right Left keys and press OK or Right key 3 Enter the password default password is 000000 and press OK again to confirm This option will delete all preset settings and return to the factory default settings ...

Page 14: ...W MOTION You can play the file in slow motion by the following order and speeds by pressing the Number 6 Slow button during playback if the file supports this feature To resume normal playback please press the Play Pause button PLAYING BACK A DISC WITH JPEG FILES 1 Load the disc with JPEG files in the DVD player 2 Use Up or Down key to select a folder and press OK or Play Pause button to open the ...

Page 15: ... preferred title you can also locate the preferred tile by pressing the assigned number by the number buttons on remote control 3 Press the OK button and the DVD player will start playing from chapter 1 of the selected title NOTE You can also press or repeatedly to select the title or track PLAYING REPEATEDLY This DVD player allows you to playback a specific TITLE CHAPTER TRACK or SEGMENT repeated...

Page 16: ...B repeatedly 3 Press the A B button again can cancel this function PLAYING IN FAVORITE ORDER HOW TO SET TITLES CHAPTERS OR TRACKS IN A FAVORITE ORDER 1 Press the PROGRAM button to enter the PROGRAM menu 2 Use number keys to key in the preferred title and chapter 3 Highlight START and press OK or Play Pause button to start the program playback 4 To cancel the programming move the cursor to STOP and...

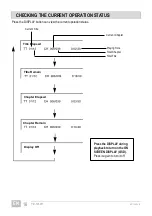
Page 17: ... button can view the current operation status Current Title Current Chapter Playing Time Total Chapter Total Title Title Elapsed Title Remain Chapter Elapsed Chapter Remain Display Off Press the DISPLAY during playback to turn on the ON SCREEN DISPLAY OSD Press it again to turn it off ...

Page 18: ...the parental lock function only with DVD discs that are equipped with the parental lock feature SETTING THE PARENTAL LOCK DVD video discs equipped with the parental lock function are rated according to their content The contents allowed by a parental lock level and the way a DVD disc can be controlled may vary from disc to disc For example if the disc allows you could edit out violent scenes unsui...

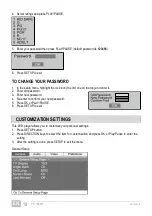
Page 19: ... on the top and enter it 2 Enter old password 3 Enter new password 4 Re enter to confirm your new password 5 Press OK or PLAY PAUSE 6 Press SETUP to exit CUSTOMIZATION SETTINGS This DVD player allows you to customize your personal settings 1 Press SETUP button 2 Press DIRECTION keys to select the item for customization and press OK or Play Pause to enter the setting 3 After the setting is done pre...

Page 20: ...EN 1508 V01 PD 12307T 19 EN Audio Setup Video Setup ...

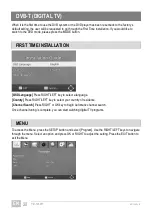
Page 21: ...FIRST TIME INSTALLATION OSD Language Press RIGHT LEFT key to select a language Country Press RIGHT LEFT key to select your country of residence Channel Search Press RIGHT or OK key to begin Automatic channel search Once channel tuning is complete you can start watching digital TV programs MENU To access the Menu press the SETUP button and select Program Use the RIGHT LEFT keys to navigate through ...

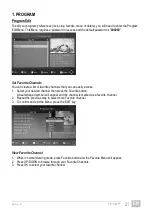
Page 22: ...channels that you can easily access 1 Select your desired channel then press the Favorite button A heart shaped symbol will appear and the channel is marked as a favorite channel 2 Repeat the previous step to select more Favorite channel 3 To confirm and exit the Menu press the EXIT key View Favorite Channel 1 While in normal viewing mode press Favorite button and the Favorite Menu will appear 2 P...

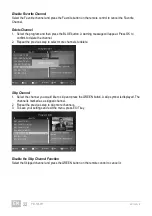
Page 23: ... confirm to delete the channel 2 Repeat the previous step to select more channels to delete Skip Channel 1 Select the channel you would like to skip and press the GREEN button A skip symbol is displayed The channel is marked as a skipped channel 2 Repeat the previous step to skip more channels 3 To save your settings and exit the menu press EXIT key Disable the Skip Channel Function Select the Ski...

Page 24: ...s EXIT key Lock Program You can lock selected programs for restricted viewing 1 Select the preferred channel then press the YELLOW button A lock shaped symbol is displayed The channel is now marked as locked 2 Repeat the previous step to select more channels 3 To confirm your settings and exit the menu press the EXIT button 4 Press the YELLOW button to disable the locking 5 To view the locked chan...

Page 25: ...he channels in ascending order By Service Name Sort the channels in alphabetical order By Service ID Sort the channels according to the station By ONID Sort the channels according to ONID LCN Logical Channel Number Set LCN on or off 2 PICTURE SETTING To access the Menu press SETUP then select Picture using the RIGHT LEFT key The Menu provides options to adjust the picture setting Press UP DOWN to ...

Page 26: ... NTSC for NTSC system TV PAL for PAL system TV 3 CHANNEL SEARCH To access the menu press SETUP select Channel Search using the RIGHT LEFT keys Press UP DOWN to select an option and press RIGHT LEFT to adjust the setting Press EXIT to exit the Menu Auto Search This option will automatically search for channels and save them once the scanning is complete All previously saved channels and settings wi...

Page 27: ... found it is saved and added to the channels list If channels cannot be found during searching the DVD player will exit automatically Country Select the preferred country 4 TIME To access the Menu press SETUP then select Time using the RIGHT LEFT keys The Menu provides options to adjust the time settings Press UP DOWN to select an option and press RIGHT LEFT to adjust the settings Press EXIT to ex...

Page 28: ... using the RIGHT LEFT keys The menu provides options to adjust the OSD Language Subtitle Language and Audio Language Select an option and press RIGHT LEFT to adjust the setting Press EXIT to exit the Menu OSD On Screen Display Language Select an OSD language Subtitle Language Select the preferred subtitle language Audio Language Select the preferred audio language of TV channels If the language is...

Page 29: ...ograms Enter your old password or the default password 000000 You will then be asked to enter your new password Press OK button to confirm your new password Once it is confirmed press EXIT to exit the Menu Restore Factory Default In Main Menu select Restore Factory Default using the RIGHT LEFT keys and press OK or RIGHT key to select Enter your password default password is 000000 and press OK to c...

Page 30: ...he unit will support USB device with FAT32 NTFS file system Multimedia When a USB device is inserted in to the USB port either USB DVD or USB DVB T depending on which mode is in you can select from the Music Photo or Movie options in this menu using the RIGHT LEFT keys and OK to select If a USB device is not connected the warning message No USB device is Found will appear Press OK to enter full sc...

Page 31: ...Play movie in full screen mode Subtitle Specific Small Display the subtitle as small font Normal Display the subtitle as normal font Big Display the subtitle as large font Subtitle BG White Display the subtitles in white background Transparent Display the subtitles in transparent background Grey Display the subtitles in grey background Yellowgreen Display the subtitles in yellowish green backgroun...

Page 32: ...VD DVD RW DVD R DVD RW DVD R CD CD R CD RW Supported File Formats Video DVD Mode AVI MP4 MPG MOV FLV DVB T Mode AVI MP4 MOV FLV MKV TS Music DVD Mode MP3 WMA DVB T Mode MP3 WMA AAC Photo DVD Mode JPG JPEG DVB T Mode JPG JPEG BMP PNG Digital TV DVB T MPEG 4 OSD Languages German English French Italian Spanish Portuguese Battery Built in Li ion battery 7 4V 1000mAh Power Supply DC 9 V 1 5 A Power Con...

Page 33: ...s set to the AV state of the machine 2 Make sure that the audio output of the Audio Setting in the menu has been set correctly 3 Check that the cable has been connected appropriately 4 Clean the disc 5 Make sure that the screen display switch is in its normal position without been pressed down The image is indistinct 1 The disc has been damaged or become dirty 2 Rest the output of the TV set or DV...

Page 34: ... am to 5 00 pm Friday from 8 00 am to 2 00 pm Phone No 02161 575 8950 Email info jay tech de Please do not send your product to our address unless requested to do so by our service team All costs and the risk of loss are the responsibility of the sender We reserve the right to reject unrequested deliveries or return the package at the sender s expense EC Declaration of Conformity The product compl...

Page 35: ......

Reviews: