

Owner and/or Operator Responsibility
The owner and/or operator shall study the product instructions and retain them for
future reference.
Operation
The owner and/or operator shall have an understanding of the product and safety
operating instructions before operating the LIFT. Safety information shall be
emphasized and understood. If the operator is not fluent in English, the product and
safety instructions shall be read to and discussed with the operator in the operator’s
native language by the purchaser/owner or his designee, making sure that the operator
comprehends their contents.
Maintenance
The LIFT shall be maintained in the accordance with the product instructions.
Inspection
(a) Visual inspection shall be made before each use of the LIFT by checking for
abnormal conditions, such as cracked welds, leaks, and damaged, loose, or
missing parts.
(b) Other inspections shall be made per product operating instructions.
(c) Each LIFT shall be inspected immediately if the lift is believed to have been
subjected to an abnormal load or shock. It is recommended that this inspection be
made by a manufacturer’s or supplier’s authorized repair factility.
(d) Owners and/or operators should be aware that repair of this equipment may
require specialized knowledge and facilities. It is recommended that an annual
inspection of the LIFT be made by a manufacturer’s or supplier’s authorized repair
facility and that any defective parts, decals, or safety labels or signs be replaced with
maufacturer’s or supplier’s specified parts.
Damaged Equipment
Any LIFT that appears to be damaged in any way, is found to be worn or operates
abnormally SHALL BE REMOVED FROM SERVICE UNTIL REPAIRED. It is
recommended that necessary repairs be made by a manufacturer’s or supplier’s
authorized repair facility if repairs are permitted by the manufacturer or supplier.
2.
Alterations
Because of potential hazards associated with this type of equipment, no alterations
shall be made to the products.
Attachments and Adaptors
Only attachments and/or adaptors supplied by the manufacturer shall be used.
3.
- Study, understand, and follow all instructions before operating this device.
- This is a lifting device only.
- Do not exceed rated capacity.
- Use 3/4” plywood for soft surfaces.
- Failure to heed these markings may result in personal injury and/or property damage.
- No alterations to the LIFT shall be made to this product.
WARNING
!
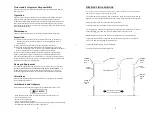
INSTRUCTIONS FOR USE
Set up can be easily completed by one person. Assembly of the lift can be accomplished
with the pieces laying horizontially on the ground
.
1. Assemble the two telescoping leg assm. using the two spring hitch pins. Set for maximum
height. Height can be easily adjusted after the lift is set up. Orientation of pieces are optional.
2. Slide the trolley assembly on the beam. Note orientation.
3. Insert the beam in to leg assemblies. Pins must be installed for safety.
4. Lift up assembly. Position lift so that space is provided to allow compressor to be lowered
to the ground. NOTE : Chain hoist can be installed before or after lift is set up.
NOTE : Remove all connections & fasteners of compressor at any step before Step 5.
5. Install the small lift on the compressor. Position the lifting ring so that it is slightly off
center, away from the lifting ring on the compressor.
6. Install the chain hoist hook onto the lifting ring.
7. Compressor can now be lifted and removed.
CHAIN HOIST
LEG
ASSM.
BEAM
SPRING
HITCH
PIN
TROLLEY
SPRING
HITCH
PIN
LEG
ASSM.
Spread leg assemblies
for increased stability.
SPRING
HITCH
PIN
SPRING
HITCH
PIN


