AAASewing.com
Janome Sewist 509
Instruction Manual
MANUAL DE INSTRUCCIONES
LIVRE D'INSTRUCTIONS
Model/ Modelo/Modèle
509
Janome Sewist 509 Instruction Manual
www.aaasewing.com
Sewist 509 Owners Manual/ User Guide
Page 1: ... w i n g c o m Janome Sewist 509 Instruction Manual MANUAL DE INSTRUCCIONES LIVRE D INSTRUCTIONS Model Modelo Modèle 509 Janome Sewist 509 Instruction Manual www aaasewing com Sewist 509 Owners Manual User Guide ...
Page 2: ...ir electrical or mechanical adjustment 4 Never operate the appliance with any air opening blocked Keep ventilation openings of this sewing machine and foot controller free from accumulation of lint dust and loose cloth 5 Never drop or insert any object into any opening 6 Do not use outdoors 7 Do not operate where aerosol spray products are being used or where oxygen is being administered 8 To disc...
Page 3: ...to si tiene bloqueada alguna vía de ventilación Mantenga las vías de ventilación de esta máquina de coser y el pedal de control libres de pelusa polvo y trozos de tela 5 No deje caer ni introduzca ningún tipo de objeto en ninguna abertura 6 No utilice la máquina en exteriores 7 No utilice la máquina donde se empleen productos de aerosol spray o donde se administre oxígeno 8 Para desconectar ponga ...
Page 4: ... cette machine si les orifices d aération sont colmatés Tenir les orifices d aération de cette machine à coudre et le curseur d escamotage du pied de biche exempts de toute accumulation de peluches poussières et de morceaux de chiffon 5 Il ne faut jamais laisser tomber ou introduire d objet dans les orifices 6 Il ne faut pas l utiliser en plein air 7 Il ne faut pas la faire fonctionner si des prod...
Page 5: ...ing the Stitch Pattern 30 Pattern selector dial 30 Stitch Length Dial 30 Balancing Needle Thread Tension 32 SECTION 3 BASIC SEWING Straight Stitch Sewing 34 Changing the sewing direction 34 Finishing sewing 34 Seam guides on the needle plate 36 Turning a square corner 36 SECTION 4 UTILITY STITCHES Basic Zigzag 38 Overcasting 38 Tricot Stitch Multiple Zigzag Stitch 40 Button Sewing 42 4 Step Button...
Page 6: ...bobina 29 Selección del patrón de la puntada 31 Selector de patrones 31 Regulador de la longitud de la puntada 31 Ajuste de la tensión del hilo de la aguja 33 SECCIÓN 3 COSTURA BÁSICA Puntada recta 35 Cambio de la dirección de costura 35 Acabado de la costura 35 Guías de costura en la placa de agujas 37 Esquinas en ángulo 37 SECCIÓN 4 PUNTADAS PRÁCTICAS Zigzag básico 39 Sobrehilado 39 Puntada al t...
Page 7: ...ection du motif de point 31 Sélecteur de motif 31 Sélecteur de longueur de point 31 Équilibrage de la tension du fil d aiguille 33 SECTION 3 COUTURE STANDARD Couture à point droit 35 Pour modifier le sens de la couture 35 Pour terminer la couture 35 Guides de couture de la plaque à aiguilles 37 Tourner un angle vif 37 SECTION 4 POINTS ULITAIRES Point zigzag 39 Point de surfilage 39 Point pour tiss...
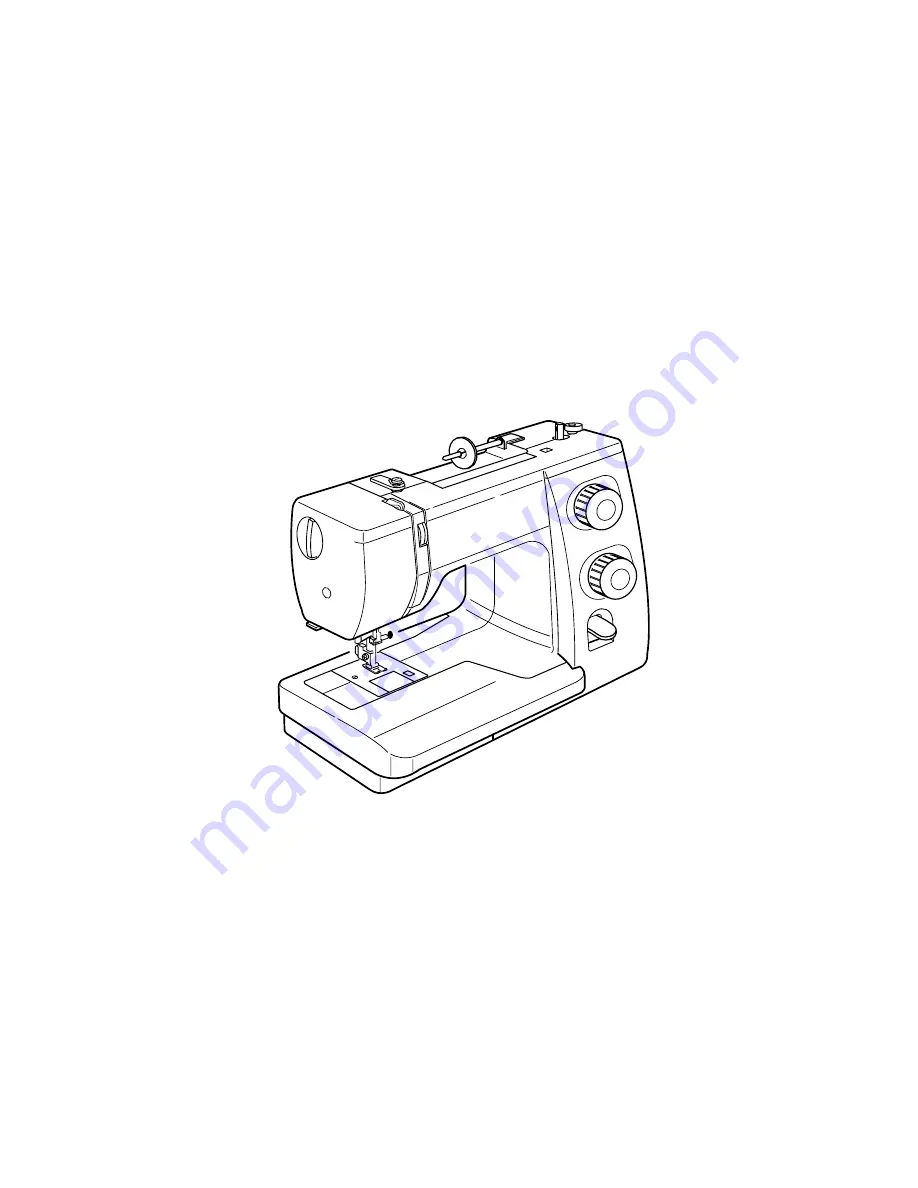
Page 8: ...read cutter 1 Needle plate 2 Extension table Accessory storage 3 Hook cover plate 4 Hook cover plate release button 5 Thread tension dial 6 Reverse stitch lever 7 Stitch length dial 8 Pattern selector dial 9 Presser foot 0 Needle 1 Needle clamp screw 2 Foot holder 3 Setscrew 4 Carrying handle 5 Handwheel 6 Power switch 7 Machine socket 8 Drop feed lever 9 Free arm 0 Foot lifter SECTION 1 KNOW YOUR...
Page 9: ...NNAISSEZ VOTRE MACHINE Dénomination des composants Butée du dévidoir Broche du dévidoir Trou pour porte bobine supplémentaire Disque fixe bobine Porte bobine Guide fil du dévidoir Levier releveur de fil Sélecteur de pression du pied de biche Plaque frontale Coupe fil Plaque à aiguilles Table d extension boîte de rangement d accessoires Couvercle de crochet Bouton d ouverture du couvercle de croche...
Page 10: ...int brush o Seam ripper buttonhole opener 0 Spool holder large 1 Spool holder small 2 Additional spool pin 3 Felt cushion Accessory storage The standard accessories can be stored in the accessory storage box under the extension table Draw out the storage box from the table as shown q Accessory storage box q Janome Sewist 509 Instruction Manual www aaasewing com Sewist 509 Owners Manual User Guide ...
Page 11: ...ez la boîte de rangement se trouvant sous la table comme illustré q Boîte de rangement des accessoires Accesorios estándar Pie para cremalleras E Pie para dobladillo invisible G Pie para ojales B Pie deslizante para ojales J Agujas Bobinas Destornillador Cepillo para pelusa Descosedor abridor de ojales Portacarretes grande Portacarretes pequeño Segundo pasador de carrete Cojín de fieltro Compartim...
Page 12: ...and push the extension table to snap it in place q Pin w Hole Free arm sewing Free arm sewing is used for stitching sleeves waistbands pant legs or any other tubular garments It is also useful for darning socks mending knees and elbows q w Janome Sewist 509 Instruction Manual www aaasewing com Sewist 509 Owners Manual User Guide ...
Page 13: ...éal pour repriser les chaussettes les genoux de pantalons et les coudes de chemises Tabla de ampliación Desmontaje Extraiga la tabla de ampliación hacia la izquierda Montaje Introduzca el pasador por el orificio y empuje la tabla de ampliación para colocarla en su sitio Pasador Orificio Costura con el brazo libre La costura con el brazo libre se utiliza para coser mangas cinturillas perneras y dem...
Page 14: ...achine Do not place anything on the foot control otherwise the machine will run intermittently Operating Instructions The symbol O of a switch indicates the off position of the switch For an appliance with a polarized plug one blade wider than the other To reduce the risk of electrical shock this plug is intended to fit in a polarized outlet only one way If it does not fit fully in the outlet reve...
Page 15: ... ou TJC 150 s utilise avec la machine à coudre Modèle 521 réservé au marché des États Unis seulement SECCIÓN 2 PREPARATIVOS ANTES DE COSER Conexión a la alimentación Ponga el interruptor en la posición OFF Introduzca el enchufe de la máquina en la toma de corriente Introduzca el enchufe de alimentación en la toma de la pared Ponga el interruptor en la posición ON Interruptor de encendido Enchufe d...
Page 16: ...the setting mark at 1 when sewing chiffon lace organdy and other fine fabrics q Setting mark Dropping the Feed Dog The drop feed lever is located underneath the free arm bed on the backside of the machine To drop the feed dog push the lever in the direction of the arrow as illustrated To raise the feed dog push the lever in the direction of the arrow as illustrated and turn the handwheel toward yo...
Page 17: ...ure normale q Levier d escamotage des griffes d entraînement w Position relevée e Position abaissée Palanca de retroceso Baje la palanca de retroceso para coser hacia atrás Mientras presione la palanca la máquina coserá en sentido contrario Indicador de la presión del prensatelas Gire el regulador de la presión del pie prensatelas para ajustar la presión del pie El controlador de la presión del pr...
Page 18: ... The wrong foot can cause the needle to break Do not push the lever down to prevent it from being broken To attach Place the desired presser foot so that the pin on the foot lies just under the groove on the foot holder Lower the presser foot lifter to lock the foot in place w Groove e Pin Removing and Attaching the Foot Holder WARNING Turn OFF the power switch before detaching or attaching the fo...
Page 19: ... la vis de blocage dans le trou Serrez la vis avec un tournevis en tournant dans le sens des aiguilles d une montre q Vis de blocage w Porte pied e Trou r Trou fileté Subida y bajada del prensatelas El alzador del prensatelas sube y baja el prensatelas Puede subirlo hasta unos 0 6 cm por encima de la posición normal para facilitar el desmontaje del prensatelas o para colocar tejidos pesados bajo é...
Page 20: ...e Chine Sheer Crepe Chambray Handkerchief Linen Gingham Challis Percale Wool Crepe Peau de Soie Taffeta Satin Silk Surah Satin backed Crepe Qiana Single Knits Jersey Swimwear and Tricot Leather Suede Flannel Velour Velvet Muslin Velveteen Poplin Corduroy Broadcloth Linen Chintz Gabardine Felt Terry Burlap Quilted Fabrics Double Knits synthetic and natural Stretch Velour Stretch Terry Sweater Knits...
Page 21: ...asa linón seda pura crespón de china crespón puro Cambray estopilla guinga chalí percal crespón de lana piel de seda tafetán satén seda surah crespón con revés de satén quiana Punto sencillo jersey ropa de baño y tricot Cuero ante Franela terciopelado terciopelo muselina velludillo popelina pana velarte lino indiana gabardina fieltro tejido de rizo arpillera tejidos acolchados Puntos dobles sintét...
Page 22: ...Fin Moyennement épais Épais Très épais TISSU Chiffon georgette dentelle fine organdi tulle Baptiste voile linon soie naturelle crêpe de Chine crêpe fin chambray cambrai vichy challis percale crêpe de laine peau de soie taffetas satin surah crêpe doublé de satin qiana Tricots simples jersey vêtements de bain et tissu tricot Cuir suédine Flanelle velours mousseline veloutine popeline velours côtelé ...
Page 23: ...A A A S e w i n g c o m 19 Janome Sewist 509 Instruction Manual www aaasewing com Sewist 509 Owners Manual User Guide ...
Page 24: ...pool pin The additional spool pin is for bobbin winding without unthreading the machine Insert the additional spool pin into the hole Place the felt and a spool on the pin e Additional spool pin r Spool pin felt t Spool pin hole Removing the bobbin z Push the hook cover plate release button to the right and remove the cover plate q Hook cover plate release button w Hook cover plate x Lift out the ...
Page 25: ... Soulevez la canette pour la sortir e Canette Bobinado de la bobina Fijación del carrete Coloque el carrete de hilo en el pasador del carrete haciendo que el hilo salga del carrete como se muestra A Presione el sujetador de carrete grande firmemente contra el carrete de hilo Sujetador de carrete grande B Para un carrete pequeño utilice el sujetador pequeño Sujetador de carrete pequeño Segundo pasa...
Page 26: ...in to the right NOTE Do not move the bobbin winder spindle while the machine is running b With the free end of the thread held in your hand depress the foot control Stop the machine when the bobbin has been wound a few layers and cut the thread close to the bobbin n Depress the foot control again When the bobbin is fully wound it will stop automatically Return the bobbin winder to its original pos...
Page 27: ...uche et coupez le fil comme illustré m Poussez le volant vers l intérieur pour engager l embrayage Bobinado de la bobina Tire del volante para soltar el acoplamiento Volante Tire del hilo del carrete Guíe el hilo alrededor del guía hilos de la bobinadora Guía hilos de la bobinadora Inserte el hilo por el agujero de la bobina pasándolo del lado interior al exterior Ponga la bobina en la bobinadora ...
Page 28: ...iding it between the tension spring blades w Front notch e Tension spring blade c Continue to draw the thread lightly until the thread slips into the side notch r Side notch v Pull out about 4 10 cm of thread Attach the hook cover plate Check the threading by referring to the chart shown on the hook cover plate t Thread y Hook cover plate q w e r t y z x c v Janome Sewist 509 Instruction Manual ww...
Page 29: ...sur le couvercle de crochet t Fil y Couvercle de crochet Colocación de la bobina Coloque la bobina en el portabobinas con el hilo saliendo por donde muestra la ilustración Hilo Pase el hilo por la muesca de la parte delantera del portabobinas Saque el hilo por la izquierda pasándolo entre las hojas del muelle de tensión Muesca delantera Hoja del muelle de tensión Continúe sacando hilo hasta que al...
Page 30: ...e thread guide plate Pull the thread up along the left channel e Thread guide plate r Left channel c Firmly draw the thread from right to left over the thread take up lever and down into the take up lever eye t Thread take up lever v Draw the thread down along the left channel and slip the thread behind the needle bar thread guide from the left y Needle bar thread guide b Pass the thread through t...
Page 31: ...il de la barre d aiguille b Enfilez le fil dans le chas de l aiguille depuis l avant Enhebrado de la máquina Para colocar el hilo de la aguja Levante la palanca tira hilos hasta su posición más elevada girando el volante Eleve el prensatelas Tire el hilo del carrete y páselo por debajo del guiahilos Después hágalo pasar por el canal derecho hacia abajo Guiahilos Canal derecho Haga pasar el hilo al...
Page 32: ...edle thread x Turn the handwheel slowly toward you one complete turn Bring the bobbin thread up by pulling the needle thread as illustrated q Needle thread w Bobbin thread c Pull 4 10 cm of both threads back and under the presser foot q w q z c x w q Janome Sewist 509 Instruction Manual www aaasewing com Sewist 509 Owners Manual User Guide ...
Page 33: ... la parte posterior debajo del pie prensatelas Remonter le fil de la canette z Relevez le pied de biche et maintenez légèrement le fil d aiguille entre les doigts de votre main gauche q Fil d aiguille x Tournez lentement le volant vers vous d un tour complet Faites remonter le fil de canette en tirant sur le fil d aiguille comme illustré q Fil d aiguille w Fil de canette c Tirez 10 cm des deux fil...
Page 34: ...ION Do not turn the pattern selector dial while the needle is in the fabric otherwise the needle may bend or break Stitch Length Dial Turn the stitch length dial to set the desired stitch length number at the setting mark The higher the number the longer the stitch The mark shows the adjustment range when sewing the buttonhole r Setting mark t Stitch length dial q w r t Janome Sewist 509 Instructi...
Page 35: ...réglage pour coudre la boutonnière r Repère de réglage t Sélecteur de longueur de point Selección del patrón de la puntada Levante la aguja hasta la posición más alta Selector de patrones Gire el selector de patrones para fijar el símbolo del patrón de puntada deseado en la marca de referencia Selector de patrones Marca de referencia PRECAUCIÓN No gire el selector de patrones mientras la aguja est...
Page 36: ... slightly on the wrong side bottom side of the fabric w Needle thread Top thread e Bobbin thread Bottom thread r Right side Top side of fabric t Wrong side Bottom side of fabric Needle thread tension is too tight The bobbin thread bottom thread will appear on the right side top side of the fabric Loosen the needle thread tension by moving the dial to a lower number Needle thread tension is too loo...
Page 37: ...es sur la face inférieure l envers du tissu Augmentez la tension du fil d aiguille en réglant le sélecteur sur un numéro supérieur Ajuste de la tensión del hilo de la aguja La tensión se debe ajustar en función de los materiales las capas de tejido y el método de costura Para ajustar la tensión del hilo gire el regulador de tensión Regulador de tensión Tensión equilibrada La puntada recta ideal ti...
Page 38: ...verse then sew forward Changing the sewing direction Stop the machine and turn the handwheel toward you to bring the needle down into the fabric Raise the presser foot Pivot the fabric around the needle to change sewing direction as desired Lower the presser foot and continue sewing in the new direction Finishing sewing Press the reverse stitch lever and sew several stitches in reverse at the end ...
Page 39: ... et amenez les dans le coupe fil Les fils sont coupés à la bonne longueur pour entamer la couture suivante q Coupe fil SECCIÓN 3 COSTURA BÁSICA Puntada recta Configuración de la máquina Patrón de puntadas A Longitud de la puntada 1 5 4 Tensión del hilo 2 6 Pie prensatelas Pie para zigzag A Empezando a coser Suba el prensatelas y coloque la tela bajo el pie Baje la aguja hasta la tela Baje el prens...
Page 40: ...ner When the fabric edge facing you lines up with the cornering guide as illustrated stop stitching and lower the needle into the fabric by turning the handwheel toward you Raise the presser foot and pivot the fabric so the edge of the fabric will align with the 5 8 1 6 cm seam guide Lower the presser foot and start stitching in the new direction w Cornering guide Number 15 20 4 8 5 8 6 8 Spacing ...
Page 41: ...r dans le nouveau sens w Guide de couture des coins Guías de costura en la placa de agujas Las guías de costuras en la placa de agujas ayudan a medir el margen entre el borde de la tela y la costura Los números indican la distancia entre la posición central de la aguja y la guía de costura q Guías de costura Número 15 20 4 8 5 8 6 8 Separación cm 1 5 2 0 1 3 1 6 1 9 Separación pulgadas 1 2 5 8 3 4...
Page 42: ...djust the stitch length to suit your sewing needs NOTE Use a stabilizer for stretch fabrics such as tricot and knits to prevent puckering Overcasting Machine setting q Stitch pattern C w Stitch length 1 2 e Thread tension 3 7 r Presser foot Zigzag foot A The zigzag stitch is used on the seam allowance to prevent fabric from fraying at raw edges q w e r q w e r Janome Sewist 509 Instruction Manual ...
Page 43: ... que le tissu ne s effiloche sur les bords SECCIÓN 4 PUNTADAS PRÁCTICAS Zigzag básico Configuración de la máquina Patrón de puntadas C Longitud de la puntada 0 5 3 Tensión del hilo 2 5 Pie prensatelas Pie para zigzag A La puntada en zigzag simple se usa para los sobrehilados para coser botones etc Ajuste la longitud de la puntada para adecuarla a sus necesidades de costura NOTA Utilice un estabili...
Page 44: ...nsion 3 6 r Presser foot Zigzag foot A This stitch is used to finish a raw edge on synthetics and other fabrics that tend to pucker Place the fabric to leave a 5 8 1 6 cm allowance Trim the extra allowance after sewing It is also used for mending tears Janome Sewist 509 Instruction Manual www aaasewing com Sewist 509 Owners Manual User Guide ...
Page 45: ... point est également utile pour raccommoder les déchirures Puntada de tricot puntada al zigzag múltiple Configuración de la máquina Patrón de puntadas D Longitud de la puntada 0 5 1 5 Tensión del hilo 3 6 Pie prensatelas Pie para zigzag A Esta puntada se utiliza para acabar los bordes no terminados de telas sintéticas y otras telas que tienden a encoger Coloque la tela de forma que quede un margen...
Page 46: ...orm a shank Make sure to check if the needle enters into both holes in the button q Pin Re thread the needle and sew about 10 stitches and cut the needle and bobbin threads at the beginning Raise the presser foot and remove the fabric Cut the needle and bobbin threads leaving 8 20 cm tails Bring the needle thread between the button and fabric through the holes in the button Pull the needle thread ...
Page 47: ...Fil d aiguille e Fil de canette REMARQUE Relevez la griffe d entraînement une fois la couture terminée Costura de botones Configuración de la máquina Patrón de puntadas C Ajuste Según las necesidades Longitud de la puntada Cualquiera Tensión del hilo 3 7 Pie prensatelas Pie para ojales B Dientes de arrastre bajados Saque el hilo de la aguja Ajuste el ancho de la puntada de forma que coincida con l...
Page 48: ...graved in centimeters c Raise the needle to its highest position Set the pattern selector dial at Sew 5 stitches Then stop sewing with the needle in the right position v Raise the needle to its highest position Set the pattern selector dial at Sew until the needle reaches the back marking of the buttonhole b Raise the needle to its highest position Set the pattern selector dial at Sew 5 stitches T...
Page 49: ...ur déterminer la densité du point de boutonnière Boutonnière plus dense Boutonnière plus grossière q w q w e r q w e r u i t y Ojales en 4 pasos Configuración de la máquina Patrón de puntadas Longitud de la puntada 0 5 1 Tensión del hilo 1 5 Pie prensatelas Pie deslizante para ojales J o pie para ojales B Ponga el selector de patrones en Marque con cuidado la longitud del ojal en la tela Ponga la ...
Page 50: ...d bobbin thread to the left Move the slider toward you so that the top mark r on the slider meets the start mark e e Start mark r Top mark t Needle thread y Bobbin thread Lower the needle into the fabric at the starting point and lower the foot Depress the foot control gently and sew the buttonhole over the cord The sewing sequence is the same as the 4 step buttonhole c Pull the left end of the fi...
Page 51: ...l ouverture de boutonnière référez vous à la page 49 q w e r c Ojal acordonado Configuración de la máquina Patrón de puntadas Longitud de la puntada 0 5 1 Tensión del hilo 1 5 Pie prensatelas Pie deslizante para ojales J Con el prensatelas para ojales levantado enganche el cordón de relleno en el puntal de la parte posterior del pie Traiga los extremos hacia usted por debajo del pie dejando libre ...
Page 52: ... q Right side of the fabric w 3 8 1 cm e Opening size r Zipper length t Slider y Zipper teeth u Zipper tape i Wrong side of the fabric o End of the opening x Place the right top sides of the fabric together Sew a bottom seam 5 8 2 cm from the right edge to the zipper bottom stop position Sew a few stitches in reverse to lock Increase the stitch length to 4 set needle thread tension to 1 and baste ...
Page 53: ... tissu 2 cm Faufilage Point arrière Extrémité de l ouverture Couture inférieure q w e r q w q w e r t y u i o 0 1 2 3 4 Costura de cremalleras Configuración de la máquina Patrón de puntadas A Longitud de la puntada 1 5 4 Tensión del hilo 3 6 Pie prensatelas Pie para cremalleras E Instalación del pie prensatelas A Para coser el lado izquierdo de la cremallera fije el pie para cremalleras con el pas...
Page 54: ...ayer Align zipper foot with margin edge Return thread tension and stitch length to original settings Sew a seam the entire length of zipper tape c Stop the machine 2 5 cm before reaching the slide with the needle in the fabric Raise the foot Unzip the zipper a few inches to clear a path for stitching o Slider 0 2 5 cm v Remove fabric and close zipper Take the upper fabric layer and lay it flat ove...
Page 55: ...re Faufilez le ruban de la fermeture à glissière sur l épaisseur de tissu supérieure Faufilage Ruban de la fermeture à glissière q w e r t y u i o 0 1 2 Para coser Fije el pie para cremalleras con el pasador derecho Doble hacia atrás el margen de la costura de la capa superior Doble hacia atrás el margen de la costura de la capa inferior para dejar un margen de 0 4 cm de tela Capa inferior Final d...
Page 56: ...r tape Before reaching the slider stop the machine with needle in fabric and raise the foot Use seam ripper to open a few inches of basting stitch 3 Unstitch basting 4 3 8 1 cm n Unzip the zipper a few inches to clear a pathfor stitching At end of seam sew a few stitches in reverse to lock Once both sides of zipper are sewn use the seam ripper to open the basting stitch 3 4 b n Janome Sewist 509 I...
Page 57: ... arrière pour arrêter la couture Une fois que les deux côtés de la fermeture sont cousus retirez le faufilage à l aide du découd vite 3 4 Levante y suelte el pie y vuelva a fijarlo con el pasador izquierdo Empiece justo debajo del tope inferior de la cremallera a coser la tela hasta una distancia de aproximadamente 1 cm desde la línea de hilván Gire la tela 90º y cosa el resto de la longitud de la...
Page 58: ...ed edge when the needle comes over to the extreme left side Lower the presser foot c Turn the screw to align the guide on the foot with the folded edge so that the needle just pierces the fold If the needle pierces too far left move the guide slightly to the left If the needle misses the fold move the guide slightly to the right Sew slowly while guiding the folded edge along the guide t Screw y Gu...
Page 59: ... à l endroit du tissu q w e r q w e r t y u i Dobladillo invisible Configuración de la máquina Patrón de puntadas E o F Longitud de la puntada 2 3 Tensión del hilo 1 4 Pie prensatelas Pie para dobladillo invisible G En telas pesadas que se deshilachen el borde no terminado se tiene que sobrehilar primero Forme el dobladillo bajo la tela como se muestra en la figura para telas finas o medias Forme ...
Page 60: ... fabric and iron press the tucks q Screw w Guide e Folded edge Shell Tucking Machine setting q Stitch pattern G w Stitch length 2 3 e Thread tension 6 8 r Presser foot Buttonhole foot B Use a lightweight fabric tricot for example Fold and stitch on the bias When the needle swings to the right allow the needle to just clear the folded edge of the fabric After stitching open the fabric and iron pres...
Page 61: ...er des nervures saillantes q w e r q w e q w e r Prendido con alfileres Configuración de la máquina Patrón de puntadas A Longitud de la puntada 1 5 3 Tensión del hilo 2 6 Pie prensatelas Pie para dobladillo invisible G Doble juntos los reversos de la tela y baje la aguja hasta la tela a 0 1 0 2 cm dentro del borde doblado Baje el pie y gire el tornillo para alinear la guía del pie con el borde dob...
Page 62: ...so the needle catches the folded edge on each side Tear away the backing after sewing is finished Patchwork Machine setting q Stitch pattern D w Stitch length 1 3 e Thread tension 1 4 r Presser foot Zigzag foot A Place two layers of the fabric with the right sides together Using a straight stitch sew a seam Open seam flat Place the fabric under the foot so that the seam line matches the center of ...
Page 63: ...pied de biche et cousez le motif le long de la ligne de couture Endroit du tissu q w e r q q w e r q Uniones Configuración de la máquina Patrón de puntadas H Longitud de la puntada 1 3 Tensión del hilo 1 4 Pie prensatelas Pie para zigzag A Utilice esta puntada para unir dos piezas de tela con un aspecto de trabajo abierto y darle un interés añadido al diseño Realice un pliegue de 1 3 cm bajo los d...
Page 64: ...Lift up the bobbin holder and remove it w Bobbin holder c Brush out dust and lint Wipe the bobbin holder with a soft dry cloth v Clean the feed dogs and hook race with the lint brush e Lint brush r Feed dogs b Wipe the hook race with a soft dry cloth t Hook race NOTE You may also use a vacuum cleaner z x c v b q w e r t Clean the outside of the machine with a soft cloth and mild soap Store the mac...
Page 65: ...e como se indica en esta sección Limpie la máquina por fuera con un paño y jabón suaves Limpieza de la carrera del portabobinas y los dientes de arrastre Retire el prensatelas y las agujas Retire el tornillo de la placa de agujas con el destornillador Retire la placa de agujas y saque la bobina Tornillo Levante el portabobinas y sáquelo Portabobinas Limpie el polvo y la pelusa con un cepillo Limpi...
Page 66: ...ten the screw firmly with the screwdriver e Guide holes r Screw Replacing the Light Bulb WARNING When replacing the bulb switch off and unplug the machine Wait for the light bulb to cool down before touching it Remove the cap and screw Remove the face plate q Cap w Screw e Face plate Push and turn the bulb counterclockwise to remove it Push and turn the bulb clockwise to replace it r Light bulb q ...
Page 67: ...ontre pour la retirer Poussez et tournez l ampoule dans le sens des aiguilles d une montre pour la mettre en place Ampoule q w e r q w e Cambio del portabobinas Introduzca el portabobinas en la carrera Asegúrese de que la manilla del portabobinas encaja cerca del tope de la carrera Manilla Tope Cambie la bobina Fije la placa de agujas introduciendo los dos pasadores guía en los orificios de la pla...
Page 68: ...he needle thread is not threaded properly 6 A poor quality needle is used 1 The needle thread tension is too tight 2 The needle thread is not threaded properly 3 The needle is too heavy for the fabric being sewn 4 The stitch length is too long for the fabric Use a stabilizer for very fine fabrics 1 The feed dog is packed with lint 2 The stitches are too fine 3 The feed dog was not raised after bei...
Page 69: ...3 La aguja y o los hilos no son adecuados para la tela que se va a coser 4 No se utiliza la aguja de punta azul para coser telas muy finas elásticas o sintéticas 5 El hilo de la aguja no está correctamente enhebrado 6 Se utiliza una aguja de mala calidad 1 El hilo de la aguja está demasiado tenso 2 El hilo de la aguja no está correctamente enhebrado 3 La aguja es demasiado gruesa para el tejido co...
Page 70: ...nnent pas au tissu utilisé 4 Vous n utilisez pas d aiguille à pointe bleue pour coudre des tissus extensibles très fins ou synthétiques 5 Le fil d aiguille n est pas bien enfilé 6 L aiguille utilisée est de mauvaise qualité 1 Le fil d aiguille est trop tendu 2 Le fil d aiguille n est pas bien enfilé 3 L aiguille est trop lourde pour le tissu utilisé 4 Le point est trop long pour le tissu Utilisez ...
Page 71: ...A A A S e w i n g c o m 507 800 200 E S F Printed in Taiwan Impreso en Taiwán Imprimé en Taiwan Janome Sewist 509 Instruction Manual www aaasewing com Sewist 509 Owners Manual User Guide ...