background image

21

2

1

CLOSE

OPEN

OK

OK

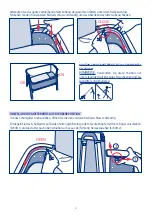
Verstecken Sie das ganze verbleibende Netz entlang des gesamten Gitters unter dem Reißverschluss.

Schließen Sie den horizontalen Reißverschluss vollständig, um das Absenken des Gitters abzuschließen.

POSITION 2 (IN DER UNTEREN STELLUNG VERRIEGELTES
GELÄNDER)

HINWEISE:

 Verwenden Sie diese Position nur 

unter ständiger Aufsicht eines Erwachsenen und bis 
zum Alter von 4 Monaten.

UMSTELLUNG DER GITTERHÖHE AUF DIE OBERE POSITION 

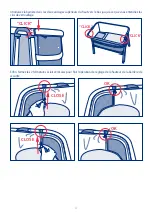
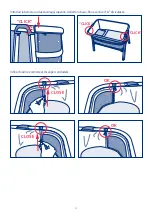
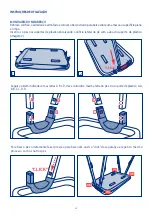
Um das Schutzgitter hochzuziehen, öffnen Sie die den vorderen Reißverschluss vollständig.

Entriegeln Sie das Schutzgitter auf beiden Seiten gleichzeitig, indem Sie die Knöpfe mit Ihrem Finger verschieben 

(Schritt 1) und das Gitter nach oben schieben, um es aus der Führung herauszuziehen (Schritt 2).   

Summary of Contents for 6870 T01

Page 1: ...MINI CUNA NOON MINI COT NOON MINI BERCEAU NOON MINI WIEGE NOON MINI CULLA NOON MINI BER O NOON...

Page 2: ...NTI A Insieme di struttura e rivestimento in tessuto B Supporto verticale C Barra inferiore estraibile D Materasso COMPONENTES A Conjunto estrutura e vestu rio t xtil B Suporte vertical C Barra inferi...

Page 3: ...rrectamente fijada y las cremalleras totalmente cerradas NOutilizar el producto si alguna de sus piezas est rota deteriorada o falta Contactar con JAN S A para la sustituci n de las piezas e instrucci...

Page 4: ...jando el orificio lateral de la pata con la pesta a del soporte de pl stico imagen 2 Seguir el orden marcado con las letras A B C D debe coincidir la misma letra en la pata y en el soporte de pl stico...

Page 5: ...ada en el interior Abrochar los 4 velcros a los travesa os asegurarse que las 4 fijaciones est n abrochadas Para desmontar la cuna proceda de manera inversa CAMBIAR LA ALTURA DE LA BARRERA A LA POSICI...

Page 6: ...POSICI N BAJA ADVERTENCIAS nicamente utilizar esta posi ci n con la supervisi n permanente de un adulto y hasta los 4 meses CAMBIAR LA ALTURA DE LA BARRERA A LA POSICION SUPERIOR Para subir la altura...

Page 7: ...K CLICK CLICK CLICK CLOSE OK CLOSE Introducir la barrera en los dos anclajes superiores de arriba abajo hasta o r o r los click de seguridad Y finalmente cerrar las 2 cremalleras verticales para termi...

Page 8: ...sure that the rail is always up correctly fastened in place and that the zips are fully closed DONOTusetheproductifanyofthepartsarebroken damagedormissing ContactJAN S A forreplacementpartsand extra...

Page 9: ...surface Insert the 4 legs into the plastic supports aligning the side orifice on the leg with the plastic support flange diagram 2 Follow the order marked by the letters A B C D The letter on the leg...

Page 10: ...e pillow back in it Fasten the 4Velcro flaps around the crosspieces making sure that they are fully fastened At the same time on both sides unlock the safety rail by sliding buttons with your finger S...

Page 11: ...ON WARNINGS Only use this position when an adult is permanently supervising the child and only up to the age of 4 months CHANGINGTHE HEIGHT OFTHE RAILTOTHE HIGHER POSITION To raise the height of the s...

Page 12: ...12 OK CLICK CLICK CLICK CLOSE OK CLOSE Insert the rail into the 2 upper anchor points from top to bottom until you hear the safety clicks Lastly close the 2 vertical zips to finish the process...

Page 13: ...x e et que les fermetures clair sont compl tement ferm es N utilisez pas le mini berceau si l une de ses pi ces est cass e d t rior e ou manquante Veuillez contacter JAN S A pour remplacer les pi ces...

Page 14: ...troduisez les 4 pieds dans les supports en plastique en embo tant l orifice lat ral du pied dans l onglet du sup port en plastique image 2 Suivez l ordre indiqu par les lettres A B C D La lettre du pi...

Page 15: ...achez les 4 velcros aux traverses V rifiez si les 4 fixations sont bien attach es Pour d monter le berceau proc dez dans le sens inverse R GLER LA HAUTEUR DE LA BARRI RE DE S CURIT SUR LA POSITION INF...

Page 16: ...BLOQU E SUR LA POSITION LA PLUS BASSE AVERTISSEMENTS Utiliser uniquement cette position sous la surveillance permanente d un adulte et jusqu 4 mois R GLER LA HAUTEUR DE LA BARRI RE DE S CURIT SUR LA...

Page 17: ...isez la barri re dans les deux ancrages sup rieurs du haut vers le bas jusqu ce que vous entendiez les clics de verrouillage Enfin fermez les 2 fermetures clair verticales pour finir l op ration de r...

Page 18: ...kt befestigt ist und die Rei verschl sse vollst ndig geschlossen sind Verwenden Sie das Produkt NICHT wennTeile zerbrochen oder besch digt sind oder fehlen Kontaktieren Sie JAN S A f r den Austausch v...

Page 19: ...e 4 Beine in die Kunststoffhalter ein indem Sie die seitliche ffnung des Beins in der Lasche des Kunststoffhalters einrasten Abbildung 2 Folgen Sie der mit den Buchstaben A B C und D markierten Reihen...

Page 20: ...igen Sie die 4 Klettverschl sse an den Querstangen Stellen Sie sicher dass die 4 Befestigungselemente befestigt sind Zum Abbauen derWiege gehen Sie in umgekehrter Reihenfolge vor UMSTELLUNG DER GITTER...

Page 21: ...GEL NDER HINWEISE Verwenden Sie diese Position nur unter st ndiger Aufsicht eines Erwachsenen und bis zum Alter von 4 Monaten UMSTELLUNG DER GITTERH HE AUF DIE OBERE POSITION Um das Schutzgitter hoch...

Page 22: ...LICK CLICK CLICK CLOSE OK CLOSE F hren Sie das Gitter in die zwei oberen Befestigungen von oben nach unten ein bis Sie das Sicherheitsklicken h ren Zum Schluss schlie en Sie die 2 vertikalen Rei versc...

Page 23: ...correttamente fissata e che le cerniere siano completamente chiuse NON utilizzare il prodotto se uno o pi pezzi sono rotti deteriorati o mancanti Contatta JAN S A per la sostituzione dei pezzi e per...

Page 24: ...e pulita Inserisci le 4 gambe nei supporti di plastica incastrando il foro laterale della gamba nel perno del supporto di plastica figura 2 Segui l ordine indicato dalle lettere A B C D che devono co...

Page 25: ...l interno il materasso e il cuscino Chiudi i 4 velcri sulle traverse e assicurati che i 4 fissaggi siano chiusi Per smontare la culla segui lo stesso procedimento all inverso ABBASSARE LA BARRIERA Per...

Page 26: ...ONE 2 SPONDA BLOCCATA NELLA POSIZIONE BASSA AVVERTENZE utilizzare questa posizione solo con la supervisione permanente di un adulto e no ai 4 mesi ALZARE LA BARRIERA Per alzare la barriera protettiva...

Page 27: ...27 OK CLICK CLICK CLICK CLOSE OK CLOSE Introduci la barriera sui due ancoraggi superiori dall alto in basso fino a sentire i clic di sicurezza Infine chiudi le 2 cerniere verticali per concludere...

Page 28: ...ra est sempre elevada corretamente fixada e os fechos de correr totalmente fechados N Outilizaroprodutosealgumadasuaspe asestiverpartida deterioradaoufaltar ContactaraJAN S A paraasubstitui o das pe a...

Page 29: ...erf cieplana e limpa Inserir os 4 p s nos suportes de pl stico encaixando o orif cio lateral do p com a aba do suporte de pl stico imagem 2 Seguir a ordem indicada com as letras A B C D deve coincidir...

Page 30: ...no interior Prender os 4 velcros s travessas certificar se de que as 4 fixa es est o presas Para desmontar o ber o proceda de forma inversa MUDAR A ALTURA DA BARREIRA PARA A POSI O INFERIOR Para baixa...

Page 31: ...ao mesmo tempo desbloquear a barreira protetora deslizando os bot es com o dedo Passo1 e deslocar a barreira para cima para extrai la da guia Passo 2 POSI O 2 REDE BLOQUEADA NA POSI O BAIXA AVISOS Uti...

Page 32: ...OK CLICK CLICK CLICK CLOSE OK CLOSE Introduzir a barreira nas duas fixa es superiores de cima para abaixo at ouvir os click de seguran a E finalmente fechar os 2 fechos de correr verticais para termin...

Page 33: ...33...

Page 34: ...34...

Page 35: ...35...

Page 36: ...IM 2118 UNE EN 16890 2018 JAN S A Pol Industrial Riera de Caldes C Mercaders 34 08184 Palau de Plegamans Barcelona SPAIN Tel 34 93 703 18 00 Fax 34 93 703 18 04 www janeworld com...

Reviews: