J&W JW-N7AS-HD User Manual Download Page 9

-  -

 JW-N7AS-HD                                                                                               User's Manual 

2.3 Installation of the CPU and CPU Cooler

    Before installing the CPU, please comply with the following conditions:

    1. Please make sure that the mainboard supports the CPU.

    2. Please take note of the one indented corner of the CPU. If you install the CPU in the wrong     

       direction, the CPU will not insert properly. If this occurs, please change the insert direction      

       of the CPU.

    3. Please add an even layer of heat sink paste between the CPU and CPU cooler.

    4. Please make sure the CPU cooler is installed on the CPU prior to system use, otherwise 

        overheating and permanent damage of the CPU may occur.

    5. Please set the CPU host frequency in accordance with the processor specifications. It is not 

        recommended that the system bus frequency be set beyond hardware specifications since 

        it does not meet the required standards for the peripherals. If you wish to set the frequen-     

        cy beyond the proper specifications, please do so according to your hardware     

        specifications including the CPU, graphics card, memory, hard drive, etc.

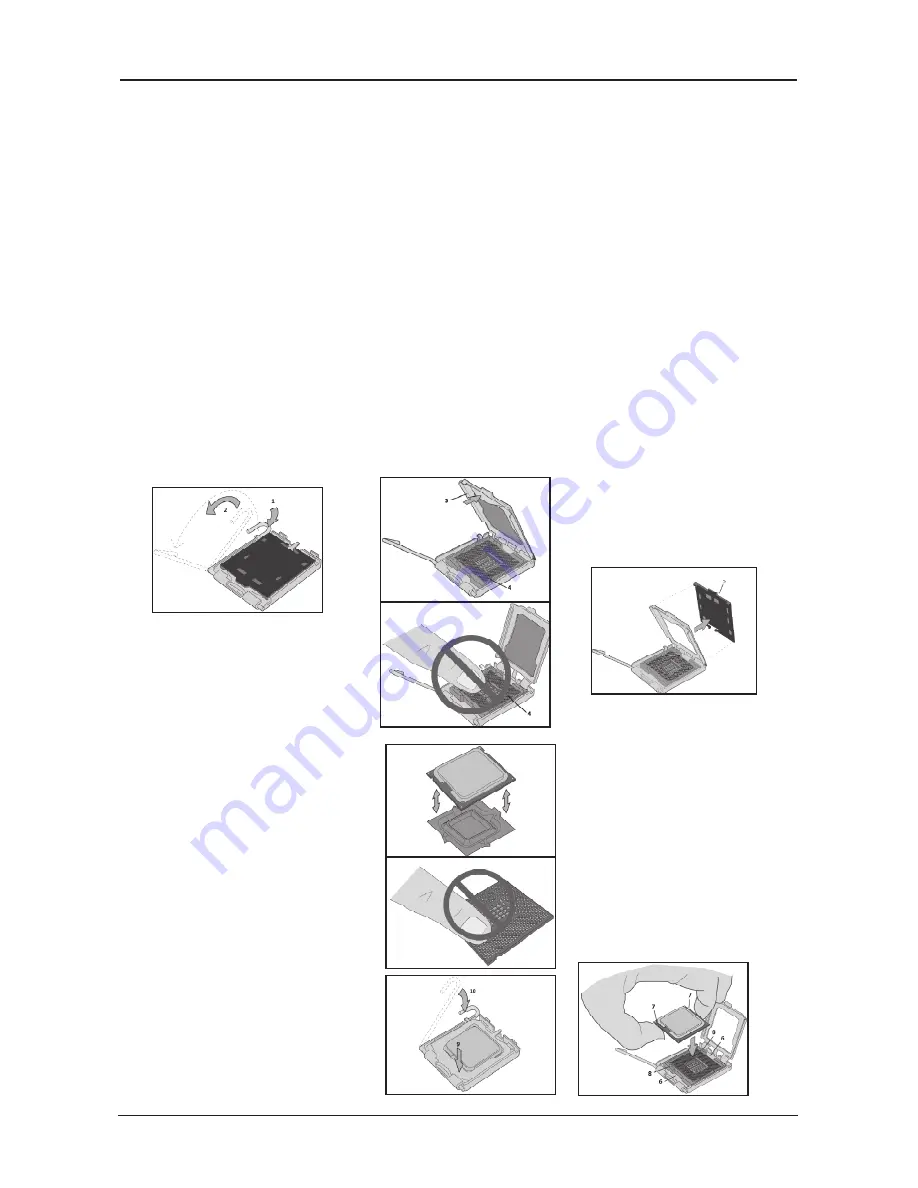
    2.3.1 Installation of the CPU

1. Open the socket lever by 

pushing the lever down and 

away from the socket (see 

Figure 1, 1 and 2).

2. Lift the load plate. Do not 

touch  the  socket  contacts 

(see Figure 2, 3 and 4)

3 .   Re m ove   t h e   p l a s t i c 

protective  socket  cover 

from  the  load  plate  (see 

Figure 3, 5). Do not discard 

the protective socket cover. 

Always  replace  the  socket 

cover  if  the  processor  is 

removed from the socket.

4.  Remove  the  processor 

f r o m   t h e   p r o t e c t i v e 

processor  cover.  Hold  the 

processor only at the edges, 

being  careful  not  to  touch 

the bottom of the processor 

(see  Figure  4).  Do  not 

d i s c a rd   t h e   p ro t e c t i ve 

processor  cover.  Always 

r e p l a c e   t h e   p r o c e s s o r 

back to the package if the 

processor is removed from 

the socket.

5. Hold the processor with 

your   t humb  and  inde x 

fingers oriented as shown in 

Figure 5. Make sure fingers 

align to the socket cutouts 

(see  Figure  5,  6).  Align 

notches  (see  Figure  5,  7) 

with the socket see (Figure 

5, 8). Lower the processor 

straight down without tilting 

or  sliding  the  processor  in 

the socket.

6.  Pressing  down  on  the 

load  plate  (Figure  6,  9) 

c l o s e   a n d   e n g a g e   t h e 

socket lever (Figure 6, 10).

Summary of Contents for JW-N7AS-HD

Page 1: ...User s Manual Socket LGA775 Processor Mainboard JW N7AS HD Rev 2 0 July 2009 P N 80ECG41A20 Motherboard Website http www jwele com...

Page 2: ...not guarantee the accuracy of the contents This manual is purely technical documentation without any hint or other meanings and we won t commit users misunderstanding of the typesetting error Our prod...

Page 3: ...cking Jumper Settings 11 3 2 CMOS Memory Clearing Header 11 3 3 Keyboard Power Function 11 3 4 USB_PWR1 jumper 12 3 5 Dual BIOSS Fuction Optional 12 3 6 FAN Power Connectors 13 3 7 Front Panel Switche...

Page 4: ...of accessories if there is any broken or missing part please contact your dealer or the local distributor IDE Cable X 1 Rear I O Panel X 1 User Manual X 1 Driver Utility CD X 1 Serial ATA Power Cable...

Page 5: ...6 x Audio ports Line In Line Out MIC In Optional Internal I O Connectors 1 x 24 pin ATX main power connector 1 x 8 pin ATX 12V power connector 1 x Floppy disk drive connector 1 x IDE connector for 2...

Page 6: ...JW N7AS HD User s Manual 1 3 Mainboard Layout This picture is only for reference ESATA USB SATA7 JBIOSSLC...

Page 7: ...pherial SATA devices USB Connects to USB devices such as scanner digital speakers monitor mouse keyboard hub digital camera joystick etc LAN Connects to Local Area Network AUDIO1 Cen Sub Center Subwoo...

Page 8: ...is If the holes line up and there are screw holes you can attach the board with studs If the holes line up and there are only slots you can only attach with spacers Take the tip of the spacers and ins...

Page 9: ...ations including the CPU graphics card memory hard drive etc 2 3 1 Installation of the CPU 1 Open the socket lever by pushing the lever down and away from the socket see Figure 1 1 and 2 2 Lift the lo...

Page 10: ...e DIMM modules of the same type and size on slots DIMM2 DIMM4 To install system memory 1 Power off the computer and unplug the AC power cord before installing or removing memory modules 2 Locate the D...

Page 11: ...PCIE1 Install PCI card into slots PCI1 or PCI2 Each of the IDE port connects up to two IDE drives at Ultra ATA 100 66 33 mode by one 40 pin 80 conductor and 3 connector Ultra ATA 66 ribbon cables Conn...

Page 12: ...ock was incorrectly set in the BIOS menu or d whenever there is modification on the CPU or memory modules This header uses a jumper cap to clear the CMOS memory and have it reconfigured to the default...

Page 13: ...ease adjust BIOS jumper to 2 3 while USER_BIOS boot failure then pc will be boot from BAK_BIOS download the correctly BIOS in our website or save a new BIOS under dos model by BIOS flash tools then ad...

Page 14: ...ts to the case mounted reset switch for rebooting your computer without having to turn off your power switch This is a preferred method of rebooting in order to prolong the lift of the system s power...

Page 15: ...rts via an optional USB bracket Pin No Header HD Audio Definition AC97 Audio Definition 1 PORT1L Microphone Microphone 2 AGND Ground Ground 3 PORT1R Microphone N A 4 PRESENCE Detection sense line from...

Page 16: ...d degrade the signal quality 3 11 ATX Power Input Connectors This mainboard provides two power connectors to connect power supplier This connector allows you to connect an ATX 24 pin power supply To c...

Page 17: ...ecial features on or off etc 3 Enhancing your computer s behavior For example speeding up performance by turning on shadowing or cache 4 2 To Run BIOS Setup First access BIOS setup menu by pressing F1...

Page 18: ...rated in this manual are for your reference only and may not completely match with what you see on your screen Do not change the BIOS parameters unless you fully understand its function The menu bar o...

Page 19: ...al help F2 F3 Change Colors F5 Restore the previous CMOS value from CMOS only for Option Page Setup Menu F7 Discard Changes F8 Load Failsafe Defaults F9 Load Optimal Defaults F10 Save configuration ch...

Page 20: ...by the BIOS SATA Port 1 2 3 4 SATA IDE device Press Enter Key to enter the submenu BIOS SETUP UTILITY Main System Overview Select Screen Select Item F1 General Help F10 Save and Exit ESC Exit AMIBIOS...

Page 21: ...1 General Help F10 Save and Exit ESC Exit Module Version 2 24 3 13 4 USB Devices Enabled None Legacy USB Support USB 2 0 Controller Mode BIOS EHCI Hand Off Enabled FullSpeed Enabled v02 61 C Copyright...

Page 22: ...tem to Disable forces the XD feature flag to always return to zero 0 BIOS SETUP UTILITY Main Advanced Boot Security Power JUSTw00t Exit Advanced Settings Configure CPU Select Screen Select Item Enter...

Page 23: ...um 3 00 Tri Down iGPU and Ext VGA Selection Disabled iGPU if Ex iGPU Frame Buffer Detect Disabled iGPU Frame Buffer Size 128MB Hybrid SLI support Disabled v02 61 C Copyright 1985 2006 American Megatre...

Page 24: ...u PCIPnP The PCIPnP menu items allow you to change the advanced settings for PCI PnP devices BIOS SETUP UTILITY Advanced Advanced PCI PnP Settings Clear NVRAM during System Boot Select Screen Select I...

Page 25: ...t will be display boot setting configuration and the all functions allow BIOS to skip certain tests while booting whether displays normal POST messages or OEM Logo instead of POST messages through set...

Page 26: ...to Boot menu Boot Device Priority Click Enter key to enter its submenu it will be display specifies the boot sequence from the available devices Press Esc key to return to Boot menu Hard Disk Drives...

Page 27: ...may prevent the change hard disk boot sector district table thus prevents the infection computer virus Flash Write Protection This option is for BIOS protection function selects disabled state then it...

Page 28: ...n set to Enabled the ACPI APIC table pointer is included in the RSDT pointer list Optional Enabled Desabled SouthBridge ACPI HPET TABLE Optional Enabled Desabled ACPI PM Timer width Optional 24 bits 3...

Page 29: ...mouse wake up event Power on By RTC Alarm Allows you to enable or disable RTC to generate a wake event When this item is set to Enable the items RTC Alarm Date Days RTC Alarm Time will become user0co...

Page 30: ...CPUFAN0 Mode Setting setup as Thermal Cruise Mode is activated Optional 0 255 CPUFAN0 Stop Value CPUFAN Stop Value This item only when CPUFAN0 Mode Setting setup as Thermal Cruise Mode is activated O...

Page 31: ...Auto FSB 1066 FSB 533 FSB 800 FSB 1333 Select Screen Select Item Change Option F1 General Help F10 Save and Exit ESC Exit Current FSB Speed 800MHz Current Memory Speed 667MHz Target Memory Speed 667MH...

Page 32: ...es and exit setup Ok Cancel Ok BIOS SETUP UTILITY Main Advanced Boot Security Power JUSTw00t Exit Exit Options Exit system setup after saving the changes F10 key can be used for this operation Select...

Page 33: ...Exit Discard Changes Load Optimal Defaults Load Failsafe Defaults v02 61 C Copyright 1985 2006 American Megatrends Inc Discard changes and exit setup Ok Cancel Ok BIOS SETUP UTILITY Main Advanced Boo...

Page 34: ...on opens a dialog box that let you install optimized defaults for all appropriate items in the Setup Utility Select OK and then Enter to install the defaults select Cancel and then Enter to not instal...

Page 35: ...elow If the menu does not appear double click My Computer double click CD ROM drive or click Start click Run type X AUTORUN EXE assuming X is your CD ROM drive This picture is only for reference From...

Page 36: ...r as below This picture is only for reference From the Drivers MENU you may make 4 selections 1 nForce Chipset Installation Utility 2 Onboard LAN Driver 3 Realtek HD Audio Driver 4 Exit Click to exit...

Reviews: