background image

11


         Connections and Setup

Initial Setup

Initial  setup  involves  selecting  all  the  settings 
required  to  be  able  to  search  for  and  store  all 
the  analogue  and  digital  channels  you  can 
receive.
Make sure that the television is switched on and 

Note:
If  the  channel  search  retrieved  only  the 
analogue  channels  it  could  be  caused 
by  poor  broadcasting  and  therefore  is 
not  coverd  by  manufacturer  warranty. 
Manufacturers  cannot  be  held  responsible 
for  lack  of  or  poor  broadcasting  in  some 
areas.

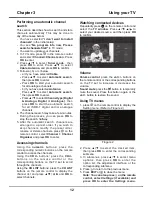
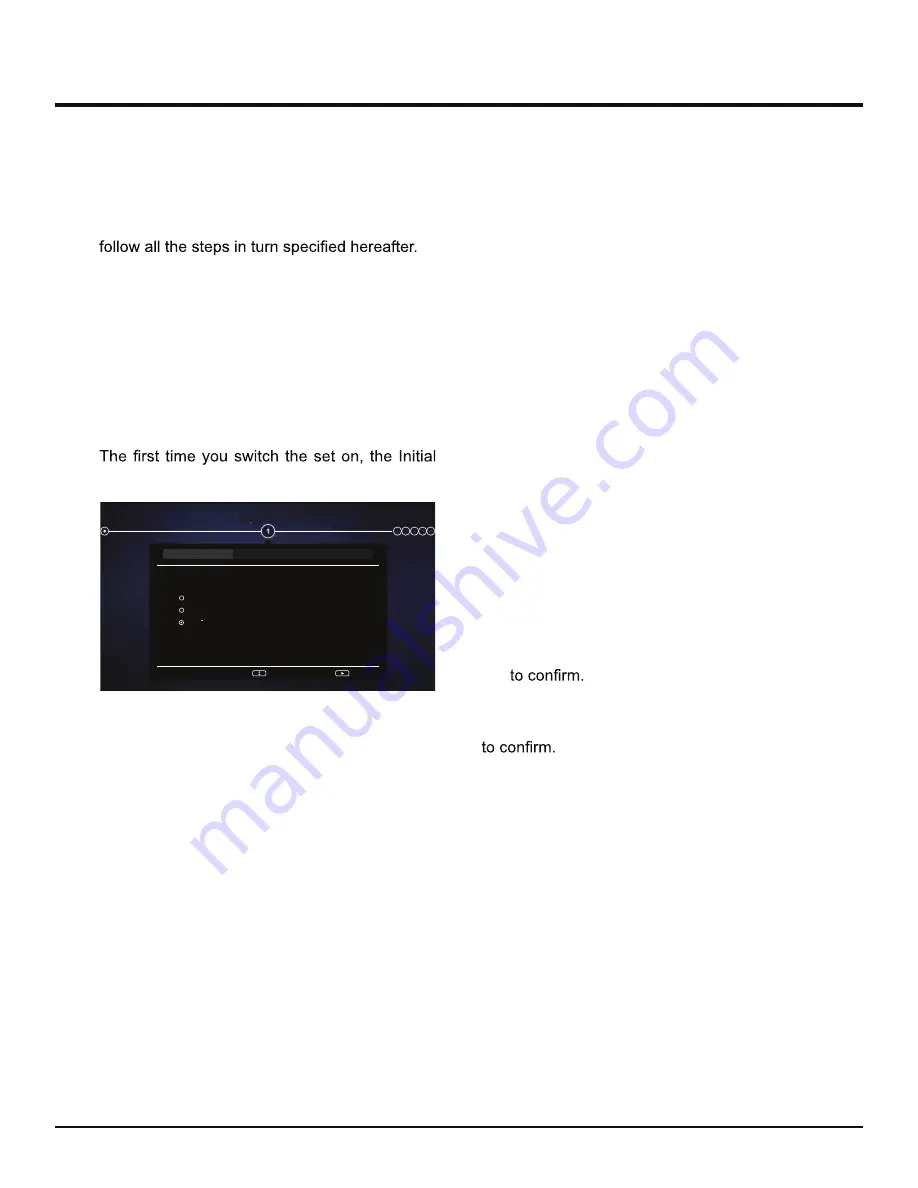
Setup wizard opens, which guides you through 
the initial setup process. (Refer to Figure 1.)

Figure 1

Step 1: Environment setup

1.   Press 

Ÿź

  to  select  your  language,  then 

press 

OK 

to enter the next step.

2.   Press 

Ÿź

  to  select  your  conntry,  then 

press 

OK 

to enter the next step.

3.   Press 

Ÿź

  to  select  your  location,  then 

press 

OK 

to enter the next step.

Step 2: Network setup

1.   P r e s s  

Ÿ  ź

  t o   s e l e c t   y o u r   n e t w o r k 

connection  type(Wired  or  wireless),  then 
press 

OK 

to enter the next step.

2.   Follow  the  guides  on  the  screen  and  press 

the  corresponding  buttons  on  the  remote 
control to proceed.

    Note:
     

You  can  also  skip  this  step  and  step  3 
by  selecting  "

I  do  not  have  a  network 

connection

",  and  connect  to  the  internet 

later.  For    details  please  refer  to

  section 

Network Connection.

Step 3: Software setup

1.   If  the  set  has  connected  to  the  network 

successfully,  it  will  search  for  upgrade  files 
automatically.

2.   Follow  the  guides  on  the  screen  and  press 

the  corresponding  buttons  on  the  remote 
control to proceed.

Step 4: Channel installation

1.   Press 

Ÿź

  to  select  Continue  to  install 

cannels.

2.   Follow  the  guides  on  the  screen  and  press 

the  corresponding  buttons  on  the  remote 
control to proceed.

    Note:

     To  prevent  the  channel  installation  process 

form being interrupted, wait for the message 
indicating  that  the  installation  is  complete. 
You  can  also  skip  this  step  by  selecting  "

don't want to install channels

".

     In  this  case,  to  search  and  store  your 

channels you may do an automatic channel 
search by follwing the instructions in the next 
section 

Performing  an  automatic  channel 

search

.

Step 5: Clock setup

If the set was not connected to the network, you 
can  use  the  numeric  buttons  to  enter  the  date 
and time, then select the 

OK

 button and press 

OK

When  the  initial  setup  is  completed,  the 

Congratulations

 message appears. Press 

OK 

Select

2

Next

3

4

5

6

Environment

Please select your language:

English

Português

Espanol

Summary of Contents for TVJ LED S32 D1600

Page 1: ...Manual del usuario TVJ LED S32 D1600 TVJ LED S40 D1500 TVJ LED S49 D1600 TVJ LED S55 D1600...

Page 2: ...0 123 1 2 3 4 5 0 5 3 0 0 315 3 3 6 7 8 1 0 5 3 0 13 0 01 9 3 0 3 123 1 2 0 5 3 03...

Page 3: ...A B 0 C D D E F D D G H I D D H D D H J D 1 K D D K L 1 D D D A 0 D D H MMM B D N O 0 N N D D C P D D P 5 K 5 K F 0 1 D G 2 3 I H J 4 1 0 F J O 1 K CJI GF D I I 5 2 2 P Q I P H P 59 F JI J 0 6 3 7 8...

Page 4: ...02 02 9 4 5 6 02 02 A A D A A R A 0 A A D A B 1 A C UHPRWR D 0 6 6 E F G 9 9 0 9 9 F 9 F G 0 D 5 1 E A H I 5HVWDXUDU 6 9 A R A 6 8 2 R60 R B 4 B 0 6 C 0 5 C F 5 J 0 9 G 9...

Page 5: ...P 5 1 A P D 59 I1 H I1 D K I1 1 59 I1 59 P D H 0 5 P P P P P 59 P 59 P 59 D 59 0 E P 59 P D H P 59 P 59 P 1 P 59 P H P 59 H 5 59 6 0 0 0 1 5 R P D P 1 P P P P A 0 P R H P P P 5 D A S 4A S S GA S 6 D J...

Page 6: ...lista de canales En el sistema del men act an como los botones de direcci n arriba abajo del mando a distancia y ajustan los controles del men 4 Bot n para SUBIR BAJAR VOLUMEN Aumenta o disminuye el v...

Page 7: ...egrado y v deo USB 2 0 enchufe entrada Este enchufe se puede utilizar para conectar un dispositivo USB Nota Por favor no encender la unidad cuando se inserta la unidad USB 3 0 ya que podr a causar pro...

Page 8: ...UHPRWR 0 D 8K 1 H 6 H H 6 H 5 O 9 7 5 930 R O K O U3 8 9 0 O K O U3 9 9 6 H D D 1O H D 1 N D HN 59 1 R D D 9 1O...

Page 9: ...H H D 59 D D C R K 9 K K H H D D 1 1 R51 R51 59 9 H K H 0 H 1O...

Page 10: ...ministro de corriente alterna Deber a no estar conectado a una alimentaci n de CC Si el enchufe se separa de el cable no bajo ninguna circunstancia conectarlo a una Hembra de red el ctrica ya que exis...

Page 11: ...SXOVH ORV ERWRQHV FRUUHVSRQGLHQWHV HQ HO FRQWURO UHPRWR FRQWURO GH SURFHGHr Nota Tambi n puede omitir este paso y paso 3 seleccionando la opci n No tengo una conexi n de red FRQHFWDUVH D LQWHUQHW OXHJ...

Page 12: ...W K X E O W K X O 1 I 1 W K X KF G O O I 1 W K X KF G O W K X 6 6 6 6 O K 1 OI5 0 O A 1 P 6 E O E F G D I 6 N I 9 6F 0 6 A 1 0 A 0 F 59N I 4 H H 3 M M 0 59 H W K XKY Z O 0 W K XKY Z D O M D M F W K X...

Page 13: ...K X H O G D H P 62 G O W K X 1 O A 1 59 W K X O H D D A O B W K XKY Z O H D C 1 62 6 P P 1 62 O Y Z O 0 I 1 1 P 0 O W K X O I 1 D 1 D 6 I R D R 2 I 1 R D 1 D I 1 Q 1 89 45 Y Z 2 I D 0 P O Y Z O Y Z 1...

Page 14: ...45 E A H 2 0 P E A H O 5 H D M I K D M 1O 1O D M 1O 1 K O 1 I D M O 1 3 2 P E O W K X 1 6 O I D 6 R I W K X I O 0 0 0 9 9 D 9 0 59 6 R 4 5 5HVWDXUDU 0 D P O Y Z O O 6 1 6 0 D P O W K X 1 6 0 6 O 5 La...

Page 15: ...D W K X 9 3V W K XKY Z 3V H Y Z H X 3V H D D A D H F D W K X R 3V 5 W K X 3V Y Z D D D D Y Z H 3V H D D H A D H 6 8 2 2 2 2 D D W K XK Y Z D 2 I H 2 I H 2 I 0 I 59 P H P D H P 1 5 3V H P H P P 59 1 0...

Page 16: ...I I 1 M D P 0 0 D P 3V 2 4 0 4 P 0 0 A P 1 0 0 A P H 0 0 59 A 5 3V 3 3V D H 3V 3V A 3V 9 R I 1 H I R 3 P P H D 1 1...

Page 17: ......

Page 18: ...JUDItDV HVFXFKDU P VLFD R YHU YtGHRV TXH VH DOPDFHQDQ HQ VX PC Notas Si Compartir y Ver est encendido el televisor mostrar OD OLVWD GH VHUYLGRUHV GLVSRQLEOHV TXH VRQ DUA disponible en la red local Con...

Page 19: ...0 P 0 1OI D P 0 D D G 0 1 G P 5 2 8 K G 6 P D 59 6 2 0 6 P 0 D B 6 P D C 7 3 2 0 1 6 E A H P H D M P H D M P H D M D 1 5 A E 0 3 E A H P O H D M H D 59 D H D H J 7 3 1 0 E A H 0 0 6 S P 1 H D M 1O 1O...

Page 20: ...i olvida su c digo introduzca la contrase a de s per anular cualquier c digo existente Puntos nevadas y la interferencia Si la antena se encuentra en la zona perif rica de una se al de televisi n dond...

Page 21: ...OPERATION MANUAL TVJ LED S32 D1600 TVJ LED S40 D1500 TVJ LED S49 D1600 TVJ LED S55 D1600...

Page 22: ...ON RISK OF ELECTRIC SHOCK DO NOT OPEN 7KH OLJKWQLQJ DVK ZLWK DUURZ KHDG V PERO ZLWKLQ DQ HTXLODWHUDO WULDQJOH LV LQWHQGHG WR DOHUW WKH XVHU WR WKH SUHVHQFH RI XQLQVXODWHG GDQJHURXV YROWDJH ZLWKLQ WKH...

Page 23: ...3...

Page 24: ...el search 12 Accessing channels 12 Watching connected devices 12 Volume 12 Using TV menus 12 Selecting menu language 13 Instant power on 13 6HWWLQJ XS RXU IDYRXULWH FKDQQHOV 13 QHUJ VDYLQJ 13 63 W SH...

Page 25: ...WLRQ R QRW XVH WKH VHW QHDU GDPS DQG FROG DUHDV 3URWHFW WKH VHW IURP RYHUKHDWLQJ HHS WKH VHW DZD IURP GLUHFW VXQOLJKW 7KH DSSDUDWXV VKDOO QRW EH H SRVHG WR GULSSLQJ RU VSODVKLQJ DQG QR REMHFWV OOHG ZL...

Page 26: ...direction buttons on the remote and adjust menu controls Note In some menus VOLUME UP also acts like the OK button on the remote Note The location and names of the function buttons and power button on...

Page 27: ...a USB device Note Please don t turn on the unit when USB 3 0 drive is inserted as it might cause compatibility problems USB 2 0 AV audio video mini sockets input The AV IN sockets can be used to conne...

Page 28: ...ons Enters channel numbers Goes to the YouTube homepage VOL VOLUME UP DOWN Increases or decreases the TV s volume MUTE button Turns the volume off or on HOME button Goes to the smart TV homepage CH CH...

Page 29: ...sunshine UH RU WKH OLNH SLEEP 5HSHDWHGO SUHVV WR VHW WKH 79 WR WXUQ RII DIWHU D JLYHQ DPRXQW RI WLPH 7R FDQFHO WKH VOHHS WLPHU SUHVV XQWLO 2II DSSHDUV GUIDE 7RJJOHV WKH OHFWURQLF 3URJUDPPH XLGH EHWZHH...

Page 30: ...A n a o t d e t c e n n o c e b y l n o d l u o h s t e s V T r u o Y not be connected to a DC supply If the plug is detached from the cable do not under any circumstances connect it to a mains socke...

Page 31: ...and step 3 by selecting I do not have a network connection and connect to the internet later For details please refer to section Network Connection Step 3 Software setup 1 If the set has connected to...

Page 32: ...WKH UHPRWH FRQWURO VHOHFW Channel Channel Organiser DQG SUHVV OK WR HQWHU Accessing channels 8VLQJ WKH numeric EXWWRQV SUHVV WKH FRUUHVSRQGLQJ QXPHULF EXWWRQV RQ WKH UHPRWH FRQWURO WR DFFHVV WKH FKDQQ...

Page 33: ...VHOHFW D GHVLUHG SRZHU VDYLQJ PRGH DQG SUHVV OK WR FRQ UP 3UHVV EXIT RU WR FORVH WKH PHQX 63 W SH RQQHFW WKH 79 WR DQ DXGLR GHYLFH WKURXJK the SPDIF RXWSXW 7R VHOHFW D SURSHU VRXQG W SH IRU RXU 63 RXW...

Page 34: ...HQWHU 3UHVV WR VHOHFW Home Shop RU Shop with demo DQG SUHVV OK WR HQWHU 3UHVV EXIT RU WR FORVH WKH PHQX T Link 8VH WKLV IXQFWLRQ WR VHDUFK IRU GHYLFHV FRQQHFWHG WR WKH 0 VRFNHWV LQ RXU 79 DQG HQDEOH...

Page 35: ...15 8VLQJ RXU 79 LED Indicator Picture Video Music and pres s OK to confirm Using EPG Electronic Programme Guide...

Page 36: ...16 8VLQJ RXU 79 0 0RELOH LJK H QLWLRQ LQN HDMI 1 port identified with MHL on the TV and the USB Network connection...

Page 37: ...17 8VLQJ RXU 79 Access Smart TV portal...

Page 38: ...displayed on the big screen of your TV Whenever you want to use wireless display To do it follow the steps below 1 press on the remote control select Smart TV Wireless Display and press OK to enter Yo...

Page 39: ...s are connected ZLWK WKH 79 DW WKH VDPH WLPH WKH ZLOO QRW be recognized some times OO PRELOH KDUG GLVNV FRQVXPH D ORW RI SRZHU ZKLFK PD UHVXOW LQ SRZHU VXSSO SUREOHPV H UHFRPPHQG LQVHUWLQJ RQO RQH KDU...

Page 40: ...72 40D1MT X56Z1...

Page 41: ...cluye nuestra responsabilidad por da os y perjuicios directos o indirectos que pudieren sufrir el adquirente usuarios o terceros En aquellos casos en que la unidad est destinada a usos no dom sticos e...

Reviews: