3
2
2
1
10
9
8
3
4
6
7
5
A
B
DE
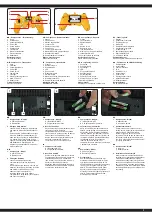
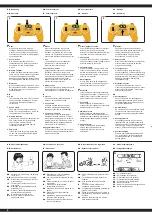
- Komponenten - Fernsteuerung:
1. Hupe
2. Schild heben
3. Vorwärts/rückwärts
4. Power LED
5. Sound ein/aus
6. Schild senken
7. Links/rechts
8. Memory/Lernfunktion
9. Ein-/Ausschalter
10. Batteriefach
Batterien einlegen
Auf Polarität achten.
GB
- Components - Transmitter:
1. Horn
2. Lift Blade
3. Forward/backward
4. Power LED
5. Sound on/off
6. Lower Blade
7. Left/right
8. Memory/Learning function
9. ON/OFF Switch
10. Battery cover
Fitting the batteries
Observe the polarity.
FR
- Composants - Radiocommande:
1. Klaxon
2. Lame en haut,
3. Marche avant/arriére
4. Lumière LED
5. Effets sonores on/off
6. Lame en bas
7. Tourner à droite/gauche
8. Mémoire/Fonction d’apprentissage
9. Interrupteur ON/OFF
10. Compartiment de la batterie
Mise en place des piles
Respectant la polarité.
IT
- Componenti - Trasmittente:
1. Clacson
2. Sollevare la pala
3. Avanti/Indietro
4. LED
5. Suono on/off
6. Ribassare la pala
7. Sinistra/Destra
8. Memoria/funzione di apprendimento
9. Interruttore ON/OFF
10. Compartimento della batteria
Montaggio delle pile
Rispettando la polarità.
ES
- Componentes - Emisora:
1. Claxon
2. Levantar la Hoja
3. Adelante/Atrás
4. LED
5. Sonido on/off
6. Rebajar la Hoja
7. Izquierda/derecha
8. Memory/Función de aprendizaje
9. Interruptor ON/OFF
10. Compartimiento de las pilas
Instalación de las pilas
Preste atención a la polaridad
CZ
- Komponenty - Funkce:
1. Houkačka
2. Zvednutí lopaty
3. Vpřed/zpět
4. LED
5. Zvuk zapnutí/vypnutí
6. Spuštění lopaty
7. Doleva/doprava
8. Paměť/Výuková funkce
9. Vypínač zapnutí a vypnutí
10. Bateriová přihrádka
Vložení baterií
Dávejte pozor na správné umístění pólů.
PL
- Funkcje pilota:
1. Klakson
2. Podnoszenie czerpaka
3. Do przodu/do tyłu
4. Dioda LED
5. Dźwięki włącznik/wyłącznik
6. Opuszczanie czerpaka
7. w lewo/w prawo
8. pamięć/funkcja nauczania
9. Włącznik/wyłącznik
10. Komora na baterie
Zakładanie baterii
Uważać na prawidłowe ułożenie biegunów.
NL
- Functies van de afstandsbediening
1. Geluidssignaal
2. Bucket heffen
3. Vooruit / achteruit
4. LED
5. Geluid aan/ /uit
6. Bucket dalen
7. Links/rechts
8. Geheugen/leer-functie
9. Aanzetten/Uitzetten
10. Batterijcontainer
Batterij plaatsen
Op de polariteit letten.
DE
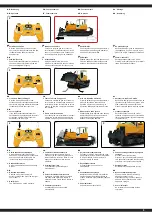
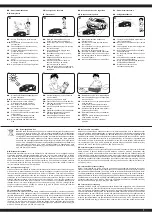
1. Komponenten - Modell:
A EIN/AUS Schalter
B Batteriefach
2. Einlegen der Batterien
Lösen Sie die Schraube am Batteriefach
und nehmen Sie den Batteriefachdeckel
ab.
Entnehmen Sie die Batteriebox und legen
Sie 4x AA Batterien (nicht enthalten) (je
oben und unten 2 Stück) in die Batteriebox
ein, achten Sie auf die richtige Polung.
Legen Sie anschließend die Batteriebox in
das Batteriefach. Schließen Sie die
Abdeckung und schrauben Sie diese mit
der Schraube fest.
GB
1. Components - Model:
A ON/OFF Switch
B Battery cover
2. Fitting the Batteries
Loosen the screw of the battery
compartment and remove the battery
cover.
Remove the battery box and insert 4x AA
batteries (not included) (each two in the top
and bottom of the battery box). Pay
attention to the correct polarity.
Insert the battery box in the battery
compartment. Put the battery cover in place
and secure it carefully.
FR
1. Composants - Modéle:
A Interrupteur ON/OFF
B Compartiment pour piles
2. Insertion des piles
Dévissez les vis du compartiment à piles et
retirez le couvercle. Retirez le
compartiment à pile et insérez 4x piles AA
(non fournies) (2 pièces chacune en haut et
en bas) dans le compartiment à pile.
Insérez ensuite le compartiment des piles
dans son emplacement. Fermez le
couvercle et le serrer à l‘aide de la vis.
IT
1. Componenti - Modello:
A Interruttore ON/OFF
B Compartimento batteria
2. Inserire le batterie
Svitare la vita del vano batteria e rimuovere
il coperchio del vano batteria. Rimuovere la
scatola batteria e inserire 4 batterie AA
(non incluse) (2 pezzi ciascuna in alto e in
basso) nel vano batterie, facendo
attenzione alla corretta polarità. Inserire la
scatola batteria nel vano batterie. Chiudere
il coperchio e serrarlo con la vite.
ES
1. Componentes - Modelo:
A Interruptor ON/OFF
B Compartimento de la batería
2. Colocación de las baterías
Afloje el tornillo del compartimento de la
batería y retire la tapa del compartimento
de las pilas. Retire la caja de la batería y
inserte 4 pilas AA (no incluidas) (2 piezas
cada una en la parte superior y inferior) en
la caja de la batería, prestando atención a
la polaridad correcta. A continuación,
inserir la caja de la batería en el
compartimento de la batería. Cierre la tapa
y apriétela con el tornillo.
CZ
1. Komponenty - Model:
A Zapnutí/vypnutí
B Bateriová přihrádka
2. Vložení baterií
Pomocí šroubováku odšroubujte kryt
prostoru pro baterie a odklopte jej. Potom
vyjměte box s bateriemi a vložte do něj
nové 4x AA baterie (nejsou součástí balení)
tak, aby v horní i spodní části byly dvě
baterie. Při vkládání baterií dejte pozor,
abyste je vložili se správnou polaritou.
Vložte box s bateriemi zpět do prostoru pro
baterie. Zašroubujte kryt bateriového
prostoru pomocí šroubků.
PL
1. Komponenten - Model:
A Włącz/wyłącz
B Komora na baterie
2. Umieszczanie baterii
Poluzuj śrubę komory baterii I zdejmij
osłonę baterii. Wyjmij pojemnik na baterie I
włóż do niego 4 baterie AA (brak w
zestawie) (po 2 na górze I 2 na dole
pojemnika). Zwróć uwagę na oznaczenia
polaryzacji. Włóż pojemnik na baterie do
komory. Umieść prawidłowo osłonę baterii
i przykręć ją starannie.
NL
1. Komponenten - Model:
A Aan/ /uit
C Batterijcontainer
2. Installatie van de batterijen
Draai de schroef in het batterijvak los en
verwijder deze verwijder het batterijdeksel.
Verwijder het batterijvak en plaats 4 x
AA-batterijen (inbegrepen) niet) (elk twee
bovenaan de accubak en onder). Aandacht
dat je de palen in de goede richting draait.
Plaats de accubak in het batterijvak. Plaats
het batterijklepje terug en bevestig het het
voorzichtig.
2x AA
1


