background image

SP-45000M-CXP4/SP-45000C-CXP4

— 6 —

Usage Precautions

Notes on cable configurations

The presence of lighting equipment and television receivers nearby may result in video noise. 

In such cases, change the cable configurations or placement.

Notes on attaching the lens

Avoiding dust particles

When attaching the lens to the camera, stray dust and other particles may adhere to the sensor surface 

and rear surface of the lens. Be careful of the following when attaching the lens.

• Work in a clean environment.

• Do not remove the caps from the camera and lens until immediately before you attach the lens.

• To prevent dust from adhering to surfaces, point the camera and lens downward and do not allow the 

lens surface to come into contact with your hands or other objects.

• Always use a blower brush to remove any dust that adheres. 

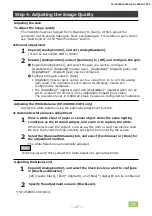
Never use your hands or cloth, blow with your mouth, or use other methods to remove dust.

Phenomena specific to CMOS image sensors

The following phenomena are known to occur on cameras equipped with CMOS image sensors.

These do not indicate malfunctions.

• Aliasing

When shooting straight lines, stripes, and similar patterns, vertical aliasing (zigzag distortion) may appear

on the monitor.

• Blooming

When strong light enters the camera, some pixels on the CMOS image sensor may receive much more

light than they are designed to hold, causing the accumulated signal charge to overflow into surrounding

pixels. This “blooming” phenomenon can be seen in the image, but does not affect the operation of the 

camera.

• Fixed pattern noise

When shooting dark objects in high-temperature conditions, fixed pattern noise may occur throughout

the entire video monitor screen.

• Defective pixels

Defective pixels (white and black pixels) of the CMOS image sensor are minimized at the factory according

to shipping standards. However, as this phenomenon can be affected by the ambient temperature, 

camera settings (e.g., high sensitivity and long exposure), and other factors, be sure to operate within the

camera’s specified operating environment.

Notes on exportation

When exporting this product, please follow the export regulations of your country or region.

Notes on temperature conditions

The guaranteed operating temperature and humidity of this camera are -5

℃ 

to +45

,  20% to 80% 

(non-condensing). Please make sure the following temperature condition is met when operating the unit.

1) The camera's internal temperature sensor detects temperatures of 98.8°C or less during operation. 

If the above temperature conditions are exceeded, take measures to dissipate heat according to your 

installation environment and conditions.

Depending on the operating environment,  the surface of the camera

may become very hot during operation.

Do not touch the camera during operation and while it is being cooled.

Also, make sure that the cable surface and other easily deformable 

items do not contact the surface of the camera.

Summary of Contents for SP-45000C-CXP4

Page 1: ...19 User Manual Thank you for purchasing this product Be sure to read this manual before use This manual includes important safety precautions and instructions on how to operate the unit Be sure to read this manual to ensure proper operation The contents of this manual are subject to change without notice for the purpose of improvement 2019 JAI ...

Page 2: ...mply with the limits for a Class B digital device pursuant to Part 15 of the FCC Rules These limits are designed to provide reasonable protection against harmful interference in a residential installation This equipment generates uses and can radiate radio frequency energy and if not installed and used in accordance with the instructions may cause harmful interference to radio communications Howev...

Page 3: ...ry 71 3 SP 45000M CXP4 SP 45000C CXP4 Contents Notice Warranty Certifications 2 Usage Precautions 6 Features 7 Parts Identifications 8 Preparation 14 Preparation Process 14 Step 1 Connecting Devices 15 Step 2 Verifying Camera Operation 14 Step 3 Verifying the Connection between the Camera and PC 16 Step 4 Adjusting the Image Quality 17 Step 5 Saving the Settings 18 Main Functions 19 Acquisition Co...

Page 4: ...34 36 54 AutoLevelControl 35 55 ImagingControl 25 26 27 28 29 41 55 LUTControl 36 37 55 DigitalIOControl 10 11 12 13 23 24 56 CounterAndTimerControl 48 49 57 UserSetControl 18 57 SequencerControl 45 46 58 TransportLayerControl 59 PulseGenerator 47 60 Shading 39 40 60 Correction 44 61 Misc 30 61 BlemishControl 38 61 MultiROIControl 42 61 LensCommunicationControl 50 61 ...

Page 5: ... Administration of the control of Pollution by Electronic Information Products known as China RoHS The table shows contained Hazardous Substances in this camera mark shows that the environment friendly use period of contained Hazardous Substances is 15 years SP 45000M CXP4 SP 45000C CXP4 ...

Page 6: ... causing the accumulated signal charge to overflow into surrounding pixels This blooming phenomenon can be seen in the image but does not affect the operation of the camera Fixed pattern noise When shooting dark objects in high temperature conditions fixed pattern noise may occur throughout the entire video monitor screen Defective pixels Defective pixels white and black pixels of the CMOS image s...

Page 7: ...onochrome CMOS image sensor Effective pixels 8192 h x 5460 v Pixel size is 3 2μm x 3 2μm Various integrated functions HDR High Dynamic Range Frame Integration Supports video output modes 8 bit 10 bit 12bit and 14 bit 14 bit output is only available for some integrated functions Interface CoaXPress v1 1 CXP6 6 25Gbps DIN 4 High speed scanning Maximum frame rate Full resolution 8192 x 5460 52 19fps ...

Page 8: ... a lens and the supported lens types POWER TRIG LED Indicates the power and trigger input status LED status and camera status SP 45000M CXP4 SP 45000C CXP4 8 LED Light Status POWER TRIG LED Lit amber Camera initializing Lit green Camera in operation Blinking green During operation in trigger mode trigger signals are being input The blinking interval is not related to the actual input interval of t...

Page 9: ...eing transmitted Lit red interval 500ms An error occurred during data transmission CRC error single bit error etc detected Lights for at least 200 ms before errors are displayed when multiple errors occur simultaneously Blinking green rapid Connection between device and host is established and data is being transmitted Red pulse slow No connection Alternating between red and amber slow A connectio...

Page 10: ...ut Output Signal Description 1 GND GND 2 Power In DC In DC 10 V 25 V 3 NC 4 NC 5 In Opto In 1 6 In Opto In 1 7 Out Opto Out 1 8 Out Opto Out 1 9 Out TTL Out 1 Line 1 10 In TTL In 1 Line 4 11 Power In DC In DC 10 V 25 V 12 GND Line 5 Line 2 Digital I O Control Note Be sure to use a power supply that can support the maximum power consumption of this camera The output impedance of TTL Out is high so ...

Page 11: ...d external input circuit diagram reference example Recommended external output circuit diagram reference example 11 1 2 Opto In 1 1 Pin6 Opto In 1 2 Pin5 Opto In 1 SP 45000M CXP4 SP 45000C CXP4 Digital I O Control ...

Page 12: ...rol Camera Output Signal Output Line Voltage Please note that the recommended load resistance of Opto output is 10 kΩ rated 1 10 W or more The 270 Ω resistor shown in the circuit diagram is the MINIMUM resistance that should be used The response speed from On High to Off Low depends on the voltage applied to Opto output and the value of the load resistance Higher load resistance results in slower ...

Page 13: ...ounting the camera directly to a wall or other structural system 13 SP 45000M CXP4 SP 45000C CXP4 Camera locking screw holes M3 3 mm depth Use these holes when mounting the camera directly to a wall or other structural system Digital I O Control Pin No Input Output Signal Description 1 Out TTL Out 2 Line 8 2 N C 3 In TTL In 2 Line 10 4 N C 5 GND GND 6 DC Out LENS Power DC9V 7 Out RS232C Tx 8 Input...

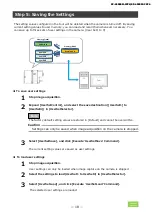
Page 14: ... the camera is turned on and ready for use Step 3 Verifying the Connection between the Camera and PC Set settings and display image using suitable tool for CXP frame grabber board Step 4 Adjusting the Image Quality Refer to the procedures for adjusting the gain white balance and black level as examples and adjust the image quality Step 5 Saving the Settings Save the current setting configurations ...

Page 15: ...XP4 CoaXPress frame grabber board PC CXP 1 CXP 1 CXP 2 CXP 2 CXP 3 CXP 3 CXP 4 CXP 4 CoaXPress cable Direct connection or MP 42 tripod adapter plate When mounting the camera directly to a wall or other device use screws that match the camera locking screw holes on the camera M3 depth 5 mm Use the supplied screws to attach the tripod adapter plate CXP cable Connect the CXP cable to the CXP connecto...

Page 16: ... being supplied to the camera by checking the rear LED When properly turned on Lit green For details on how to read the LEDs see LED status and camera status in the Parts Identification section Initialization of the camera is not complete until connection with the host is established If the power trigger LED does not switch to green within minutes of supplying power check the CXP cable and other c...

Page 17: ...is set in about 0 1dB steps Values are configured by multipliers The DigitalRed digital R gain and DigitalBlue digital B gain can be set to a value from x0 447 to the ADigitalAll master gain value The resolution is set in 0 000122 steps Values are configured by multipliers Adjust the white balance using the automatic adjustment function Automatic white balance adjustment 1 Place a white sheet of p...

Page 18: ...stored in Default and cannot be overwritten UserSet1 UserSet2 UserSet3 DefaultSet Working Set Memory Flash Memory RAM SP 45000M CXP4 SP 45000C CXP4 3 Select UserSetSave and click Execute UserSetSave Command The current setting values are saved as user settings SP 45000M CXP4 SP 45000C CXP4 User Set Control To load user settings 1 Stop image acquisition User settings can only be loaded when image c...

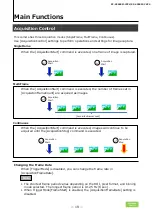
Page 19: ...is 0 125 Hz 8 sec When TriggerMode FrameStart is enabled the AcquisitionFrameRate setting is disabled SP 45000M CXP4 SP 45000C CXP4 Acquisition Start Acquisition Start Acquisition Start Acquisition Start Acquisition Stop AcquisitonFrameCount SingleFrame MultiFrame Continuous When the AcquisitionStart command is executed one frame of image is captured When the AcquisitionStart command is executed t...

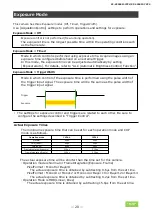
Page 20: ...lated to each other Be sure to configure the settings described in Trigger Control Actual Exposure Times Acquisition Control This camera has three Exposure modes Off Timed TriggerWidth Use AcquisitionControl settings to perform operations and settings for exposure The minimum exposure time that can be set for each operation mode and CXP mode is as follows The actual exposure time will be shorter t...

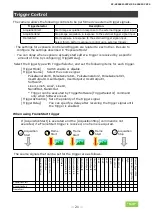
Page 21: ...iggerDelay You can specify a delay after receiving the trigger signal until the trigger is enabled Acquisition Start Acquisition Stop When using FrameStart trigger If AcquisitionStart is executed and the AcquisitionStop command is not executed if a FrameStart trigger is received one frame is acquired Frame Start Frame Start Frame Start The source signals that can be set for the trigger are as foll...

Page 22: ...by the image flip function Please refer to Image flip function ReverseX 0 False BayerRG ReverseX 1 True BayerGR 2 14bit output is available only in HDR Linear mode and FrameIntegration Exposure mode SP 45000M CXP4 SP 45000C CXP4 Image Format Control Note When using 12bit PixelFormat in normal operation mode Histogram values may be missing In this case please using VideoProcessBypass mode Caution ...

Page 23: ... I O Control Use the Digital I O Control to set the digital input output Select input or output in LineSelector you can check LineMode LineFormat and set LineInverter You can also check the status of each digital I O as shown in the table below with LineStatusAll LineMode LineFormat LineInverter LineStatusAll Line1 Output TTL True False bit0 DC IN TRIG IN connector 12 pin round Line2 Output OptoCo...

Page 24: ...can be set Off AcquisitionActive FrameActive ExposureActive FVAL LVAL PulseGenerator0 PulseGenerator1 PulseGenerator2 PulseGenerator3 UserOutput0 UserOutput1 UserOutput2 UserOutput3 Line4 Line5 Line7 Line10 Nand0Out Nand1Out Low High AcquisitionTriggerWait FrameTriggerWait Line1 Line2 Line4 Line5 Line7 Line8 Line10 Nand0In1 Nand0In2 Nand1In1 Nand1In2 TimestampReset 24 SP 45000M CXP4 SP 45000C CXP4...

Page 25: ...eration mode has restrictions on the Pixel Format that can be used and the functions that can be used at the same time Each Imaging Control mode and Pixel Format Functions available at the same time as each Imaging Control mode FrameIntegrationMode Frame FrameIntegrationMode Exposure HDR Linear HDR Knee VideoProcess BypassMode Bayer8 Bayer10 Bayer12 Bayer14 Mono8 Mono10 Mono12 Mono14 FrameIntegrat...

Page 26: ...one frame image and acquire by changing image sensor analog gain to low and high 2 An image captured with low gain is increased Digital Gain 3 Two images are combined into one frame of 14bit image data SP 45000M CXP4 SP 45000C CXP4 4 Output In Linear mode the synthesized 14 bit image is output as it is In Knee mode the synthesized 14bit image is Knee converted and output in 8bit 10bit or 12bit ima...

Page 27: ...92 4320 27 66 4096 2728 43 62 8192 5460 18 26 8192 4320 23 04 4096 2728 36 33 CXP6 2 Mono8 Bayer8 Mono10 Bayer10 Mono12 Bayer12 PixelFormat Width Height Maximum frame rate fps 8192 5460 23 78 8192 4320 30 01 4096 2728 47 31 CXP6 4 Mono14 Bayer14 PixelFormat Width Height Maximum frame rate fps 8192 5460 15 64 8192 4320 19 74 4096 2728 31 12 CXP6 2 Mono14 Bayer14 27 Maximum Frame Rate Reference SP 4...

Page 28: ...Imaging Control Maximum Frame Rate Reference The table below shows the maximum frame rate in Frame Integration Frame mode The maximum frame rate differs for each Frame Integration Frame Number 2 3 4 5 6 7 8 8192 5460 5 76 3 84 2 88 2 30 1 92 1 64 1 44 8192 4320 7 26 4 84 3 63 2 90 2 42 2 07 1 81 4096 2728 11 45 7 63 5 72 4 58 3 81 3 27 2 86 8192 5460 5 76 3 84 2 88 2 30 1 92 1 64 1 44 8192 4320 7 ...

Page 29: ...exposure time in Frame Integration Exposure1 and Frame Integration Exposure2 Frame Integration Exposure mode works in Trigger mode only Add Add Add Add Exposure Time 1 Exposure Time 2 Imaging Output Exposure Imaging Control Note Exposure Time 2 Exposure Time 2 Exposure Time 2 Exposure Time 1 Exposure Time 1 Exposure Time 1 Maximum Frame Rate Reference The table below shows the maximum frame rate i...

Page 30: ...utputs can only be performed in bypass mode Misc The following functions can be used in video process bypass mode AnalogBaseGain BlemishCompensation BinningVertical BinningHorizontal BinningVertical and BinningHorizontal work in Average mode only Functions available in VideoProcessBypassMode Functions unavailable in VideoProcessBypassMode Gain Shading Knee Enhancer BlackLevel LUT BalanceWhiteAuto ...

Page 31: ...d From Trigger start edge to Exposure start B usec Mono8 19231 41 45 Mono10 22884 41 45 Mono12 27473 41 45 BayerRG8 19231 41 45 BayerRG10 22884 41 45 BayerRG12 27473 41 45 Mono8 19321 41 45 Mono10 22884 41 45 Mono12 27473 41 45 Vertical Binning On Mono8 19231 41 45 Mono10 22884 41 45 Mono12 27473 41 45 Mono8 19231 41 45 Mono10 22884 41 45 Mono12 27473 41 45 Binning Off Horizontal Binning On Horizo...

Page 32: ... 41 43 19673 Mono10 22884 41 43 41 43 22789 Mono12 27933 41 43 41 43 27841 Mono8 19842 41 43 41 43 19750 Mono10 22936 41 43 41 43 22843 Mono12 28012 41 43 41 43 27921 Mono8 19608 41 43 41 43 19750 Mono10 22989 41 43 41 43 22843 Mono12 28012 41 43 41 43 27921 Horizontal Binning On Vertical Binning On Vertical Binning On Horizontal Binning On Binning Off 32 SP 45000M CXP4 SP 45000C CXP4 Acquisition ...

Page 33: ...ayer10 Mono12 Bayer12 PixelFormat Width Height Maximum frame rate fps 8192 5460 27 37 8192 4320 34 53 4096 2728 54 45 8192 5460 21 92 8192 4320 27 66 4096 2728 43 62 8192 5460 18 26 8192 4320 23 04 4096 2728 36 33 CXP6 2 Mono8 Bayer8 Mono10 Bayer10 Mono12 Bayer12 33 SP 45000M CXP4 SP 45000C CXP4 Acquisition Control Maximum Frame Rate Reference The table below shows the maximum frame rate in normal...

Page 34: ...dB 7dB 0dB 24dB 7dB 15dB 7dB 15dB x 16 x 1 0 15dB 15dB In SP 45000M CXP4 adjust the AnalogAll master gain setting Digital All 0dB 24dB x 16 x 1 0 SP 45000M CXP4 SP 45000C CXP4 Analog Control Automatic Gain Level Control Set GainAuto to Continuous to control the gain level automatically When GainAuto is set to Continuous you can configure the conditions for automatic adjustment in detail When GainA...

Page 35: ...ange in brightness Dark Bright AGC operation ASC auto shutter operation AGC Max AGC operation Max to min user specified Fixed at min gain value ASC operation Max to min user specified Fixed at min ASC value Fixed at max ASC value Operation during change from dark to bright Operation during change from bright to dark To use the ALC function Set GainAuto or ExposureAuto or both to Continuous mode Co...

Page 36: ...on can be used to correct the camera signals with an opposite direction curve and produce a display that is close to linear To use the gamma function Configure the settings as follows You can use the LUT function to configure a curve with more detailed points For details see Lookup Table LUT SP 45000M CXP4 SP 45000C CXP4 Analog Control LUT Control Note 0 0 2 0 4 0 6 0 8 1 0 1 2 Example of the ligh...

Page 37: ...UTValue 1 LUTValue 2 Index256 LUTValue 256 0 4095 SP 45000C CXP4 only SP 45000M CXP4 SP 45000C CXP4 LUT Control Item Setting value selectable range Description LUTMode LUT Use LUT LUTSelector Red Green Blue Select the LUT channel to control LUTIndex 0 256 Select the LUT index to configure Indexes represent the possible pixel values captured on the sensor from the lowest value Index 0 to the highes...

Page 38: ...s saved to the camera s internal memory To check the number of interpolated pixels after automatic detection You can check the number of pixels interpolated via automatic detection by loading the BlemishNum data Manual configuration 1 Select the index in BlemishCompensationIndex You can select from 1 to 3183 However configure the indexes in order starting with the smallest index If you skip indexe...

Page 39: ...ing is not symmetrical in relation to the center of the screen H V This function can be used even when the effective image area is limited an area with both Width and Height set to more than 128 must be configured by the ROI function In such cases the correction area is included in the image area configured by the ROI For a full image the number of correction blocks is 64 H 43 V blocks and calcula...

Page 40: ... pixels is limited to 8 times the amount of gain before correction The amount of gain cannot be increased to more than 8 times the amount of gain from before correction If the area in the screen with the highest brightness level is 175 LSB or less during 10 bit video output proper correction is not possible Caution To use the shading correction function Configure the settings as follows Display a ...

Page 41: ...re as follows JAI OffsetX Width OffsetY Height 8192 Width Max 5460 Height Max JAI OffsetX Width OffsetY Height 4096 Width Max 2730 Height Max ROI Function Single ROI SP 45000M CXP4 SP 45000C CXP4 Image Format Control Without Binning BinningHorizontal 1 BinningVertical 1 With Binning BinningHorizontal 2 BinningVertical 2 Scanning range Scanning range Width pixels Height lines BinningHorizontal Off ...

Page 42: ...mber and MultiRoiHorizontalEnableNumber Example JAI ROI Function Multi ROI OffsetY 0 OffsetY 1 OffsetX 0 OffsetX 1 Width 0 Width 1 Height 0 Height 1 Height 0 Height 1 Width 0 Width 1 SP 45000M CXP4 SP 45000C CXP4 Multi ROI Control To use four areas as shown below refer to the following 1 Set MultiROIControl MultiRoiMode On 2 Select 0 in MultiRoiIndex Set MultiRoiWidth MultiRoiHeight MultiRoiOffset...

Page 43: ...the image horizontally set ReverseX to True In SP 45000C CXP4 the Bayer array is changed by the image flip function ReverseX True ReverseY False R G R G R G R G G B G B G B G B R G R G R G R G G B G B G B G B BayerRG8 BayerRG10 BayerRG12 BayerRG14 G R G R G R G R B G B G B G B G G R G R G R G R B G B G B G B G BayerGR8 BayerGR10 BayerGR12 BayerGR14 Image Format Control ...

Page 44: ...CXP4 is equipped with an edge enhancer function for enhancing the contrast of lines or edges within images The edge enhancer function is enabled when EnhancerEnable Edge is set to True Four enhancement levels are available Low Middle High and Strong Correction ...

Page 45: ...rt If the result of the decrement is zero the status changes to Acquisition Stop and external triggers are not accepted The Sequencer function lets you define up to 128 index combinations of exposure time gain ROI and other settings which can be stepped through each time a trigger is received This is particularly useful for quickly capturing multiple exposures of objects under inspection to adjust...

Page 46: ...fy the number of repetitions in SequencerRepetition Command Sequencer mode The same index table will be executed for subsequent triggers unless the CommandSequencerIndex value is changed SequencerFrameNumber and SequencerSetNext cannot be used in CommandSequencer mode Index1 Index2 Index3 Index Selector MUX Command Sequencer Index 2 ROI1 Exposure1 Gain1 Binning1 LUT1 ROI2 Exposure2 Gain2 Binning2 ...

Page 47: ...he camera The following is an example of signal generation The table below shows the PulseGeneratorClearSource signals that can be set Off AcquisitionActive FrameActive ExposureActive FVAL LVAL PulseGenerator0 PulseGenerator1 PulseGenerator2 PulseGenerator3 UserOutput0 UserOutput1 UserOutput2 UserOutput3 Line4 Line5 Line7 Line10 Nand0Out Nand1Out Low High AcquisitionTriggerWait FrameTriggerWait Pu...

Page 48: ...0 Counts the number of FrameTrigger Counter1 Counts the number of ExposureStart Counter2 Counts the number of SensorReadOut Counter3 Counts the number of FrameTransferEnd When a problem occurs in a system that includes this camera comparing the values from multiple counters allows you to verify the extent of normal operability and can be useful when investigating the cause of the problem Counter o...

Page 49: ... Specify a counter Counter0 to Counter3 and configure the settings Setting value selectable range Description Counter 0 3 Select the counter CounterEventSource Counter0 Off FrameStartTrigger Counter1 Off ExposureStart Counter2 Off SensorReadOut Counter3 Off FrameTransferEnd Select the counter event signal for which to read the count value When set to Off the counter operation will stop but will no...

Page 50: ...date Lens Communication Control Connect to Birger Mount with AUX connector 10 pins Pin 7 RS 232C Tx Pin 8 RS 232C Rx Pin 6 Power supply DC9V Lens Communication Enable True only Pin 5 9 19 GND Communication settings between camera and Birger Mount Lens Communication Baudrate 9600bps 19200bps 38400bps 115200bps Lens Communication DataBit 7bit 8bit Lens Communication Parity None Odd Lens Communicatio...

Page 51: ...device After the camera receives this command it returns an ACK response Then execute reset 0 Mainboard Mainboard Select the area of the camera s interior for which to display the temperature sensor s reading fixed Mainboard DeviceTemperature ー ー Display the internal temperature C of the camera 0 9223372036854775807 maximum value of unsigned 64 bit ー Display the timestamp value Resets to 0 when th...

Page 52: ...e ReverseX and ReverseY settings ReverseX 0 False BayerRG ReverseX 0 True BayerGR ー SP 45000C CXP4 BayerRG8 SP 45000M CXP4 Mono8 Set the pixel format In SP 45000C CXP4 the PixelFormat that can be set differs depending on the ReverseX settings Setting range SP 45000C CXP4 ReverseX 0 False 0x01080009 BayerRG8 0x0110000D BayerRG10 0x01100011 BayerRG12 0x0110010A BayerRG14 ReverseX 0 True 0x01080008 B...

Page 53: ...put1 13 UserOutput2 14 UserOutput3 19 Software 23 Line4 24 Line5 26 Line7 29 Line10 36 Nand0Out 37 Nand1Out TriggerActivation 1 RisingEdge 2 FallingEdge 3 LevelHigh 4 LevelLow RisingEdge Select the polarity of the trigger signal i e location of signal at which trigger is applied TriggerOverlap 1 ReadOut ReadOut Select the trigger overlap operation ReadOut fixed TriggerDelay 0 500000 0 Set the time...

Page 54: ...dHighMidRight 8 MidHighRight 7 MidLowLeft 6 MidLowMidLeft 5 MidLowMidRight 4 MidLowRight 3 LowLeft 2 LowMidLeft 1 LowMidRight 0 LowRight AWBAreaEnable True False Enable disable the photometry area selected in AWBAreaSelector True False True Operate BalanceWhiteAuto with all areas designated as photometry areas regardless of the individual enabled disabled photometry area states configured in AWBAr...

Page 55: ... range 2 16 16 Set the maximum value for the GainAuto control range 0 Off 1 Linear 2 knee 50 When Linear is set PixelFormat is fixed at 14 bits AnalogBaseGain cannot be set when HDRMode is Linear or Knee 0 4095 0 Knee is set Set the value in the range of 0 to 4095 with 12 bit 0 01 1 1 Knee is set Set the tilt vertical horizontal 0 Off 1 Frame 2 Exposure 2 8 40 8000000 40 8000000 Configure LUT sett...

Page 56: ...ー ー Select the line source signal for the item selected in Line Selector Setting range 0 Off t LineSelector TimestampRese only 1 AcquisitionActive 2 FrameActive 4 ExposureActive 5 FVAL 6 LVAL 7 10 PulseGenerator0 3 11 14 UserOutput0 3 23 Line4 TTL In1 24 Line5 Opt In1 26 Line7 Cxp In 29 Line10 TTL In2 36 Nand0 Out 37 Nand1 Out 40 Not selectable for Output 41 Low 42 High 43 AcquisitionTriggerWait 4...

Page 57: ...owing data Counter0 Counter1 Counter2 RisingEdge Counter3 FallingEdge CounterReset ー ー Reset the counter CounterValue 0 65535 0 Display the count value CounterStatus ー ー Display the counter status 0 CounterIdle Idle 1 CounterTriggerWait 2 CounterActive Counting 3 CounterCompleted Complete counting 4 CounterOverflow Count value exceeded the maximum valule Configure user settings 0 Default 1 UserSet...

Page 58: ...rExposureTime 1μs ー Set the exposure time for the selected SequencerIndex SequencerGainDigitalAll x1 0 x16 0 x1 0 Set the GainDigitalAll value for the selected SequencerIndex SequencerGainDigitalRed x0 447 x5 624 x1 0 Set the DigitalRed Gain value for the selected SequencerIndex SequencerGainDigitalBlue x0 447 x5 624 x1 0 Set the DigitalBlue Gain value for the selected SequencerIndex SequencerBlac...

Page 59: ...ction to control CxpConnectionTestMode True False False Enables the test mode for an individual physical connection of the Device This can be used to test communication errors of the system cabling between devices Typically the test will need to be run for some time e g minutes to get a meaningful error rate CxpConnectionTestErrorCount Reports the current connection error count for test packets re...

Page 60: ...nterval in milliseconds When the counter reaches this value the output will be 0 The setting range varies depending on the ClockPreScaler value PulseGeneratorPulseWidth ー 25 Display the High interval width of the pulse in milliseconds The duration between the Start Point and End Point is calculated The setting range varies depending on the ClockPreScaler value PulseGeneratorRepeatCount 0 255 0 Set...

Page 61: ...for Multi ROI 0 Off 1 On Off Enable disable Multi Roi 0 7 Select the index for the Multi Roi mode MultiRoiWidth ー ー Set the width for the selected Multi Roi index MultiRoiHeight ー ー Set the height for the selected Multi Roi index MultiRoiOffsetX ー ー Set the horizontal offset for the selected Multi Roi index MultiRoiOffsetY ー ー Set the vertical offset for the selected Multi Roi index 1 8 ー Set the ...

Page 62: ... noticeable Use the gamma function to correct the display As the light emitting properties of the monitor are not linear the entire image may be darker or the gradation in the dark areas may be less noticeable when camera outputs are displayed without processing Using the gamma function performs correction to produce a display that is close to linear For details see Gamma Function Problem Cause an...

Page 63: ...e verified for up to 1 second 60 μs min s max Performance verified for up to 1 second Off Continuous Once 1 8 NormalMode TriggerSequencerMode CommandSequencerMode MultiRoiMode LineSelector DC IN TRIG connector 12 pin round AUX connector 10 pin GPIO IN GPIO OUT 8LSB 8bit DigitalAll 133 255 LSB 12bit DigitalRed 64 64 LSB 12bit DigitalBlue 64 64 LSB 12bit 1LSB 12bit 52 19 fps Acquisition Exposure Trigg...

Page 64: ...2 62 84 2 mm W H D excluding mount protrusions 330g F mount 340g M42 mount Power supply Dimensions housing Weight Verified performance temperature humidity Storage temperature humidity Regulations Lents mount Flange back Optical filter 12 pin connector LUT Vibration resistance Impact resistance ALC Gamma Blemish correction Detection Correction Correctable pixels White balance WhiteBalanceGain Bala...

Page 65: ... 65 SP 45000M CXP4 SP 45000C CXP4 Wave length nm Sensitivity SP 45000M CXP4 Spectral Response Wave length nm Sensitivity SP 45000C CXP4 ...

Page 66: ... 66 Dimensions SP 45000M CXP4 SP 45000C CXP4 M42 mount F mount Dimensional tolerance 0 3mm Unit mm ...

Page 67: ...M42 mount 67 SP 45000M CXP4 SP 45000C CXP4 Dimensional tolerance 0 3mm Unit mm ...

Page 68: ...1 3 0 708 2 0 794 1 0 891 0 1 1 1 122 2 1 259 3 1 413 4 1 585 5 1 778 6 1 995 7 2 239 8 2 512 9 2 818 10 3 162 11 3 548 12 3 981 13 4 467 14 5 012 15 5 623 16 6 31 17 7 079 18 7 943 19 8 913 20 10 21 11 22 22 12 589 23 14 125 24 15 849 25 17 783 26 19 953 27 22 387 28 25 119 29 28 184 30 31 623 31 35 481 32 39 811 33 44 668 34 50 119 35 56 234 36 63 096 ...

Page 69: ...t and Windows are trademarks or registered trademarks of Microsoft Corporation in the United States and other countries Intel and Intel Core are trademarks of Intel Corporation in the United States and other countries Other system and product names described in this document are trademarks or registered trademarks of their respective owners The and symbols are not used in this document 69 Trademar...

Page 70: ...vices 15 S Counter And Timer Control 48 Saving the Settings 18 CXP Connector 9 Sequencer Function 45 Setting List 51 D Shading Correction 39 DC IN 10 Specifications 63 DC IN TRIG connector 10 Spectral Response 65 Digital Input Output Settings 23 Dimensions 66 T Trigger Control 21 E Troubleshooting 62 Exposure Mode 20 U F User memory 18 Factory default settings 18 Feature Properties 62 V Frame rate...

Page 71: ... 71 Revision Date Changes Revision history SP 45000M CXP4 SP 45000C CXP4 ...

Reviews: