background image

GigE Vision Update Procedure 


10


Uninstall Previous Drivers & SW


After restoring the Ethernet driver to the original network interface card manufacturer’s driver, find and write 
down the MAC address of the GigE interface to which you will connect the camera.  

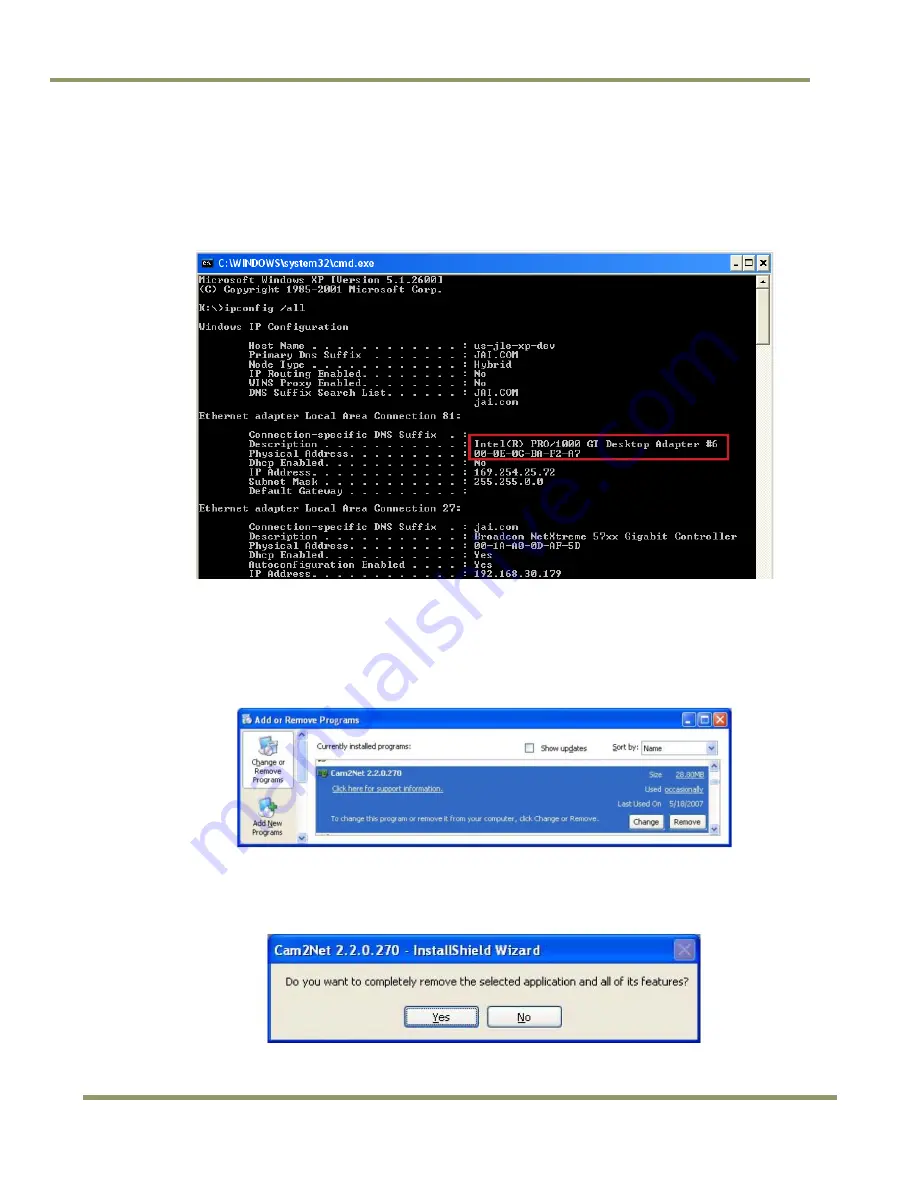
Open a command window and type “ipconfig /all” to view the MAC addresses of NICs installed on the computer 

system (see below). Locate the NIC card used to connect to GigE cameras (the Intel PRO card is shown below) 
and write down the physical address of the card for reference later in the process. 

Figure 7.


Recording the NIC MAC address  


2.2


Uninstalling versions of Cam2Net 2.2.x.x or older (Optional) 

To remove the previous versions of the Cam2Net software from a Windows XP system, click on the Start button 
and select the Control Panel. Inside the Control Panel double-click on Add or Remove Programs. Locate all 
installations of Cam2Net (version 2.2.x.x or older) and click on the Remove button. 

Figure 8.


Click the Remove button to uninstall Cam2Net  


The uninstall process asks if all software should be removed. Select Yes.  

Figure 9.


Click "Yes” to uninstall all Cam2Net related software.  


Summary of Contents for GigE Vision

Page 1: ...GigE Vision Update Procedure Digital Monochrome Color RM TM RMC TMC GE Camera Document Version A Document P N 10701 ...

Page 2: ......

Page 3: ...onsibility for any errors which may appear or for damages resulting from the use of the information contained herein JAI Inc reserves the right to make changes without notice Microsoft Windows 95 98 NT 2000 XP and Windows Explorer are either registered trademarks or trademarks of Microsoft Corporation in the United States and or other countries JAI Inc 625 River Oaks Parkway San Jose CA 95134 Tel ...

Page 4: ...GigE Vision Update Procedure iv Disclaimer ...

Page 5: ...n 7 1 1 Process Overview 7 2 Uninstall Previous Drivers and Software 8 2 1 Uninstall network drivers 8 2 2 Uninstalling versions of Cam2Net 2 2 x x or older Optional 10 3 Install the JAI SDK 11 4 Perform the firmware update 12 4 1 Download the update package 12 4 2 Updating CPU Firmware 12 4 3 Updating GEV firmware 15 5 Firmware Restore 20 6 Troubleshooting 22 ...

Page 6: ...l network drivers 8 Figure 3 Changing Intel PRO 1000 Drivers 9 Figure 4 The Device Class becomes Ethernet 9 Figure 5 Locating a Filter Driver 9 Figure 6 Uninstall any Filter Drivers 9 Figure 7 Recording the NIC MAC address 10 Figure 8 Click the Remove button to uninstall Cam2Net 10 Figure 9 Click Yes to uninstall all Cam2Net related software 10 ...

Page 7: ...ings and camera settings that may have been saved to the camera s memory pages It is recommended that you write down any changes that you have made to these settings before proceeding You will be able to use this information to re configure your boot up settings and any other saved data sets after the camera is updated JAI offers several models of Gigabit Ethernet cameras that were originally conc...

Page 8: ...Net 2 2 x x it is more difficult to access these drivers To begin the process Disconnect all attached cameras Launch the Cam2Net Driver Installation Tool from the desktop Figure 1 The driver tool launch shortcut The Driver Installation Tool displays all network drivers installed on the computer system Click on the Drivers tab to view the network driver listing Figure 2 The Drivers tab displays all...

Page 9: ... The Device Class becomes Ethernet The same Cam2Net Driver Installation Tool allows you to uninstall a Filter driver Click on the Universal IP Filter Driver tab This tab displays any filter drivers located on the system In this example the Broadcom filter driver is supplied Figure 5 Locating a Filter Driver Remove the filter driver by clicking on the Uninstall Filter Driver button at the bottom of...

Page 10: ...and write down the physical address of the card for reference later in the process Figure 7 Recording the NIC MAC address 2 2 Uninstalling versions of Cam2Net 2 2 x x or older Optional To remove the previous versions of the Cam2Net software from a Windows XP system click on the Start button and select the Control Panel Inside the Control Panel double click on Add or Remove Programs Locate all inst...

Page 11: ...Tool software from the JAI website The instructions for this step are available on the download page in a document called Getting Started Guide The latest version of the JAI GigE Vision SDK and Control Tool software as well as the Getting Started Guide can be downloaded from www jai com EN CameraSolutions Download Pages JAI_SDK_and_control_tool aspx ...

Page 12: ...e g TM 6740GE RM 6740GE TMC 6740GE RMC 6740GE The update package contains two folders CPU firmware and GEV firmware It is necessary to update the CPU firmware before the GEV firmware 4 2 Updating CPU Firmware 1 Connect the camera you will be updating directly to the PC and power up the camera 2 Go into the 1 CPU Firmware folder There should be 2 files a The updater program TMH8Update exe b The fir...

Page 13: ...yellow exclamation icon then proceed to step 8 Otherwise double click the yellow exclamation mark Enter a valid IP Address by copying the IP address from the NIC settings into the IP Address field for the IP Engine then change the last digit of the rightmost number to create a unique ID e g in the screen below 72 has been changed to 75 in the IP Engine Settings Click OK 7 If the IP Address is vali...

Page 14: ...a you can select Standard CameraLink Camera and click OK to continue the process There is no need to expand the JAI Inc listing to find your specific camera model 9 The camera s CPU version will now show up 10 Click Select File button Navigate to the folder where the PAT file is located usually the same folder as the TMH8Update exe Select the file and click Open ...

Page 15: ...v PAT format then you should update Click the Update button Warning Do not unplug the cables or power off the camera during the update 13 The status bar will increment to show progress When finished a DONE will show 14 Power the camera off and then back on so the new CPU firmware will take effect and move on to the GEV update section 4 3 Updating GEV firmware 1 With the camera connected and the po...

Page 16: ...ee any item in the Available IP Engines box make sure The camera has finished acquiring IP Address A High Performance or Filter driver is not blocking communication Firewall or 3rd party internet security software is disabled Note Recycling the power to the camera at the end of the previous section may cause the camera to lose its IP address as shown in the following screen If so an IP address can...

Page 17: ...he IP Engine then change the last digit of the rightmost number to create a unique ID e g in the screen below 72 has been changed to 75 in the IP Engine Settings Click OK 7 If the IP Address is valid the form will close and the IP Engine Selection window will refresh to show the IP Address following the MAC address of the selected IP Engine If the message Invalid IP address appears in the Warnings...

Page 18: ... camera settings Please wait about 30 seconds This must be done 10 After 30 seconds if the software cannot connect it will ask to redo the search Click Yes until the camera can be connected 11 You are now done with the updating process Make sure you see a SUCCESS in the status box Take note of any ERROR message you see ...

Page 19: ...Perform FW Upgrade 19 GigE Vision Update Procedure ...

Page 20: ...g date Once the proper package is downloaded extract the zipped files to a folder on your PC The directory contains three files Connect the camera to be restored directly to the PC and power up the camera Double click on RUN THIS GIGE_UPDATER_378 exe to open the restore window Select the IP Engine line containing the MAC address This will bring up more information about the camera in the right fra...

Page 21: ...ter the number of bits they are automatically detected and a wrong entry could cause the firmware restore to fail Click OK After the restore completes the operating system may report several incidences of found new hardware Ignore these reports from the operating system The software allows you to follow the status of the restore and displays whether the installation succeeds or fails ...

Page 22: ...han normal 1 Do NOT power down the camera 2 Run the CPU updater again The CPU Version will show strange text because the CPU is in a different state a A message box may show up saying the camera reply with an error Quit the CPU updater wait a bit and rerun again 3 After multiple tries of step 2 if you cannot complete an update power off the camera and rerun the updater ...

Page 23: ......

Page 24: ...www jai com Europe Middle East Africa Phone 45 4457 8888 Fax 45 4491 3252 Asia Pacific Phone 81 45 440 0154 Fax 81 45 440 0166 Americas Phone Toll Free 1 800 445 5444 Phone 1 408 383 0301 ...

Reviews: