background image

Operating Instructions

Now that your Santina  spa is in place, you are probably eager to take advantage of its unique designed-in features—

especially the patented Jacuzzi  Whirlpool Bath hydromassage performance. Besides being a beautiful addition to your
indoor decor or outdoor landscaping, your Jacuzzi

®

 whirlpool spa will provide you with the ultimate in spa pleasure.

Basic Control Set-Up

The control set-up on your Santina  spa is designed to give you fingertip control of the heater, light, air induction, and

whirlpool/filter pump and blower systems of your unit from inside or outside your spa.  Follow the basic control operation
described on page 9 to familiarize yourself with the several functions of the control panels located on the top of the spa.

CAUTION

Do not turn on power to the spa unless it is filled with water to the normal water level.  (See waterline indicator mark
on skimmer frame.) When the power is on, the built-in timer may activate the system even though the SYSTEM is
turned off at the control panel. If the spa’s motor/pump is actuated when there is insufficient water in the unit, the
circulation pump and heater could be irreparably damaged.  Not heeding this caution will nullify the warranty.  In
addition to damaging the unit, operating the spa with insufficient water could cause a fire.

SYSTEM CONTROL MODULE

• Using a garden hose, fill the spa with water to the water

line indicator mark on the skimmer frame (See page 20
for information on using the Water Rainbow  spout as a
fill spout if desired.)

• At the house service panel, turn on the circuit breaker or

a switch that controls the electrical service to your spa.
(Make sure there is no other appliance on that circuit.)

• Open the skirt door giving access to the System Control

Module.

7

OPERATION

• Your spa is provided with a ground fault circuit interrupter

(GFCI).  At initial start-up and at least once a month
thereafter, with power on, push the test button located on
the spa System Control Module.  The reset button should
pop out.  Push this button in to reset.  If the interrupter fails
to operate in this manner, there is a ground current
flowing or a device malfunctioning, indicating the possi-
bility of electric shock.  Turn off power and do not use
the spa until the source of the problem has been
identified and corrected.

HIGH TEMPERATURE SAFETY SWITCH

High temperatures above the thermostat range
will cause the high temperature safety switch to
trip and the system to turn off.  See operating
instructions.  When water temperature is less
than 100

°

 F., reset by pressing the safety switch

reset button located on the cover of the heater
enclosure.

CAUTION:  DO NOT BREAK DOOR SEAL;

OPENING DOOR VOIDS WARRANTY

THIS EQUIPMENT REQUIRES QUALIFIED SERVICE
PERSONNEL FOR PROPER REPAIR.  CONTACT YOUR
JACUZZI WHIRLPOOL BATH DEALER FOR SERVICE.

NO USER SERVICABLE PARTS BEHIND THIS DOOR.

CAUTION

This system is GFCI (Ground Fault Circuit Interrupter) pro-tected for your
safety.  Bypassing the GFCI or tampering with the system in any way may
cause electrical shock, in-jury or death and will void the warranty.  GFCI
protection does not extend to 230 VAC circuit conversion.  If test indi-cates
that the GFCI is not functioning, DO NOT USE THE UNIT until the electrical
problem has been corrected. (See installation instructions.)  TEST THE GFCI
ONCE A MONTH.

TEST PROCEDURE
Unit must be filled to proper water level and correct power supplied.

1. Push TEST button of GFCI.
2. RESET button should pop out.  This should cut off power

to the system.  CAUTION: if RESET button does not
pop out, or if RESET button does pop out and system
is still on, DO NOT USE YOUR SPA.

3. If the GFCI tests okay, restore power by pushing in the

reset button.  The RESET button must be pushed until
it locks into place and remains depressed.

IF THE GFCI FAIL TO RESET PROPERLY, DO NOT USE
THE SPA!  CONTACT A QUALIFIED ELECTRICIAN.

FLOW

SWITCH

TEMP.

SAFETY
SWITCH

INTERLOCK

SWITCH

LIGHT #1

LIGHT #2

M

o

n

d

a

y

T

u

e

s d

a y

Wednesd

ay

T

h

u

rs

d

a

y

F

rid

a

y

Sa

tu

rd

ay

Su

nd

a

y

Turn dial to correct time and day.  Slide tabs
toward center for desired operating periods.
(One tab = 2 hrs.)

HEATER

BLOWER

JETS

MOTOR/

PUMP

FILTER

MOTOR/

PUMP

GFCI

TIMER

PLUG-IN
C0NNECTORS

FIELD WIRING BOX

(System Control Module P/N 876000

IMPORTANT:  THIS UNIT IS FACTORY WIRED FOR USE
ON 115 VAC 30 AMP (3 WIRE) CIRCUIT ONLY.

Converting the electrical system to 230 VAC requires
a 4 wire 230 VAC 50 Amp circiut breaker;  refer to the
instructions on the rear of this cover.  The conversion
s h o u l d   b e   d o n e   b y   a   q u a l i f i e d   e l e c t r i c i a n .

REFER TO N.E.C. (NATIONAL ELECTRIC CODE AND
LOCAL CODES)

115 VAC ONLY

WHIRLPOOL

BATH

R

JUNCTION
BOX

CUIRCUIT BREAKERS

CIRCUIT
PROTECTOR
BUTTONS

TIMER
DIAL

Summary of Contents for THE SANTINA

Page 1: ...Portable Whirlpool Spa Owner s Manual WHIRLPOOL BATH R THE SANTINA...

Page 2: ...secured close to the head or a bathing cap should be worn Do not remove the suction grilles They are safety devices and must always be in place on the suction fitting to minimize the potential hazard...

Page 3: ...__________________________________ 11 Silent Air Induction ________________________________________ 11 Filtration ________________________________________________ 11 Maintenance ______________________...

Page 4: ...blower functions as well as thermostatic control of water temperature from inside or outside the spa Also adjustment of the Silent Air Induction feature may be madebymeansofthecontrolknobs A7 daytime...

Page 5: ...have resulted from shipping or handling All Jacuzzi Whirlpool Bath spas are factory tested for proper operation and water tight connections prior to shipping If leaks or other problems are detected im...

Page 6: ...atures of the spa A bond wire must also be used Bond according to procedure described on the next page Caution Without proper grounding and bonding a system malfunction may cause fatal shock Electrica...

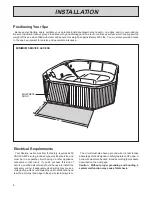
Page 7: ...esigning your indoor installation Electrical Precautions CAUTION Do not apply electrical power to the spa unless it is filled with water to the normal water level which is approx 7 below the spa rim s...

Page 8: ...Use care stepping into the spa with shoes will scratch the acrylic surface 2 Remove any packing materials from the spa 3 Remove each filter cartridge from its plastic bag 4 Pull open the skimmer filt...

Page 9: ...the source of the problem has been identified and corrected HIGH TEMPERATURE SAFETY SWITCH High temperatures above the thermostat range will cause the high temperature safety switch to trip and the s...

Page 10: ...outer dial and aligning the correct time with the small arrow on the inside of the dial Note Both correct time and day must be set Next slide one of the tabs toward the center of the dial at the time...

Page 11: ...e to indicate your location in the function sequence since that function is the most obvious when operating For best performance and increased equipment life pause a second or two between pushbutton s...

Page 12: ...out 6o F per hour with the optional spa cover foam insulation 10 and skirt panels in place and if the air temperature is 50o F or warmer This rate will necessitate a waiting period before using the sp...

Page 13: ...ould be damaged See page 8 for instructions on setting the timer Silent Air Induction The intensity of the whirlpool action is determined by how much air is inducted into the water You have control of...

Page 14: ...stry Maintaining water quality and water chemistry in your spa is extremely important and should be a regular part of your spa maintenance program as a neglected spa can be a breeding place for danger...

Page 15: ...es if the cover is in place Balancing pH For good hygiene and equipment longevity maintain the pH of your spa water according to the instructions provided pH is the measure to determine if the spa wat...

Page 16: ...on fitting to minimize potential hazard of hair and body entrapment If heavy rains raise the spa water level drain the spa to its normal level The optional rigid spa cover when in place over the spa w...

Page 17: ...at you drain the spa following the procedure described under Winterizing on this page as long periods without maintenance of water quality could be detrimental to the spa Anothermeansofmaintainingmini...

Page 18: ...to the acrylic surface with a soft cloth and wiped clean Use sparingly in small amounts to avoid contaminating the spa water If heavily soiled it may be advisable to lower the water level 2 3 inches...

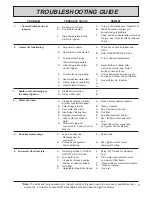
Page 19: ...nected to System Control Module A Normal operation in FILTER HTR FLTR or AIR mode B Low water level C Clogged or blocked suction strainer or skimmer basket D Dirty filter E Adjustable jet partially cl...

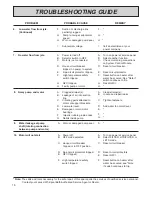
Page 20: ...y switch tripped G GFCI tripped H Faulty pump or motor A Clogged strainer s B Leakage of air into suction line C Vibrating parts attached to motor or support brackets D Low water level E Damaged or wo...

Page 21: ...Relay failure E Inadequate supply wiring 10 Motor will not start Continued 11 Motor stops A Power off B ACCESSORY switch is OFF C House circuit breaker tripped no power to system D GFCI tripped E Faul...

Page 22: ...To make the connections necessary to the Water Rainbow system of the spa Make sure spa is unplugged and completely drained Unscrew the spout from the 3 4 pipe Cut 3 4 piping as shown in illustration b...

Page 23: ...s type It is the responsibility of the installer owner to determine specific local code compliance prior to installation of the product Jacuzzi Whirlpool Bath makes no representation or warranty regar...

Reviews: