background image

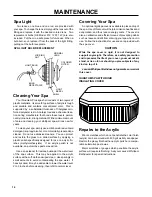
Spa Light

Two lenses, one blue and one red, are provided with

your spa.  To change the lens, simply pull the lens out of the
fitting and replace it with the desired colored lens.  Two
replacement bulbs (GE Model 912, 12W, 12V) are also
included.  Put them in a safe place for future use. When a
bulb burns out, replace it from the back of the light fitting,
pulling out the bulb receptacle.

16

Covering Your Spa

An optional rigid spa cover is available to place on top of

the spa.  Use of this cover will help to minimize heat loss and
evaporation, and thus reduce energy costs.  The cover is
also an attractive and efficient means of preventing debris
such as leaves and dirt from entering your spa when not in
use.  Follow the instructions for use and care provided with
the spa cover.

CAUTION

While the spa cover is rigid, it is not designed to
support any weight.  Therefore, as a safety precaution
and to preserve the life of your cover, you must not sit,
stand, or lie on it; nor should you place objects of any
kind on top of it.

Jacuzzi Whirlpool Bath does not guarantee or warrent

this cover.

Cleaning Your Spa

Your Quantum Plus spa shell consists of two layers of

plastic materials.  Its smooth top surface of acrylic is tough
and durable and contains concentrated color.  This is
supported by a substantial thickness of fiberglass-rein-
forced polyester resin. A catalyst causes a chemical reac-
tion during manufacture that bonds these layers perma-
nently into a hard, strong material. With a minimum amount
of care and cleaning, your whirlpool spa will look new for
years.

To clean your spa, simply use a mild non-abrasive liquid

detergent, isopropyl alcohol, or commercially prepared spa
cleaner.  Do not use abrasive cleaners.  You can protect
and restore the gloss to a dulled surface by applying a
plastic polish specifically designed for use on acrylic fin-
ishes (methylmethacrylate).  If an acrylic polish is not
available, an automotive paste wax will do.

Use a spa cleaner for residue buildup at the water level

of the spa surface.  This may be applied to the acrylic
surface with a soft cloth and wiped clean.  Use sparingly in
small amounts to avoid contaminating the spa water.  If
heavily soiled, it may be advisable to lower the water level
2 to 3 inches before cleaning; then refill to normal level.

MAINTENANCE

LIGHT BULB

NORMAL
LENS

COLORED
FILTER

LIGHT
BEZEL

SHELL

BULB
RECEPTACLE

LOCKING
NUT

SPA LIGHT BULB REPLACEMENT

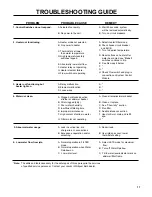
QUANTUM SPA WITH RIGID
INSULATING COVER

Repairs to the Acrylic

Minor scratches which do not penetrate the color finish

(acrylic) can be removed with 600-grit wet/dry sandpaper.
Restore the glossy finish with an acrylic polish or a compa-
rable automotive paste wax.

Major scratches or gouges which penetrate the acrylic

surface will require refinishing.  Ask your Jacuzzi Whirlpool
Bath dealer for special instructions.

Summary of Contents for Quantum Plus 770000

Page 1: ...TM Portable Whirlpool Spa Owner s Manual The Quantum Plus...

Page 2: ...tion pump and may cause a fire Read manufacturer s safety information provided with all optional equipment Jacuzzi Whirlpool Bath does not recommend spa water temperatures in excess of 40 C 104 F High...

Page 3: ..._______________________ 11 Silent Air Induction _______________________________________ 11 Filtration _______________________________________________ 11 Maintenance ___________________________________...

Page 4: ...ftwopatented front loadskimmer filtersformaximumefficiency Theunique 4 65m2 50 sq feet filtration system designed by Jacuzzi Whirlpool Bath allows easy access from inside the spa to both filter cartri...

Page 5: ...kirt panels and the acces sory package which contains the Owner s Manual filter cartridges and extra lenses and bulbs Set aside skirt panels until equipment set up Set aside the filter cartridges in a...

Page 6: ...mes from the factory requires a 230 VAC 50 AMP 4 wire grounded type electri cal service and must be in a separate circuit having no otherapplianceconnectedinthatcircuit Ifyoudonothave this kind of cir...

Page 7: ...nstallation If you install the spa outdoors we recommend that you provide a concrete pad for it to rest on To do this construct forms for a 8 x 8 x 4 thick level pad Install a 10 gauge wire mesh appro...

Page 8: ...plastic sheet covering the spa Use care stepping into the spa with shoes will scratch the acrylic surface 2 Remove any packing materials from the spa 3 Remove each filter cartridge from its plastic ba...

Page 9: ...position Move the switch to the ON 1 position to reset If the interrupter fails to operate in this manner there is a ground current flowing or a device malfunctioning indicating the possibility of ele...

Page 10: ...e reason the switches are tripped the reset button must be pushed in for the heater to operate again after the water has cooled to about 38 C 100 F Set the built in timer see below Use of the timer al...

Page 11: ...FILTER The next selection is OFF again Use the JETS function as a reference to indicate your location in the function sequence since that function is the most obvious when operating For best performan...

Page 12: ...as just turned off the indicator lamp on the control panel will turn off at this time 10 OPERATION Temperature Control Turn on the heater by selecting the HTR FILTER mode on the SYSTEM selector switch...

Page 13: ...fully adjustable jets will dramatically increase the Water Rain bow flow CAUTION The water circulating through the Water Rainbow spouts is not fresh water and therefore is not suitable for drinking A...

Page 14: ...its pores The addition of clarifier will make the water clearer but clogged filters must be cleaned as prescribed under the section entitled Filter Maintenance in this manual Hard Water Add a de miner...

Page 15: ...used heavily change the water at least every month pH A chemical term used in expressing relative acid ity or alkalinity in numeric values with 7 0 usually regarded as neutral and for purposes of this...

Page 16: ...nd winds etc accumulate in the spa and cannot be filtered out it is necessary to drain your spa and refill it with fresh water This should be done every 2 months or more often depending on the amount...

Page 17: ...idges clean them and store them dry 5 Keep water and debris out by covering with a rigid spa cover 6 Before using the spa again review the Operating In structions CAUTION Not winterizing will cause ir...

Page 18: ...n forced polyester resin A catalyst causes a chemical reac tion during manufacture that bonds these layers perma nently into a hard strong material With a minimum amount of care and cleaning your whir...

Page 19: ...Heater not functioning but heater light on A B C A Clogged or blocked suction strainer or skimmer basket B Filter clogged dirty C Poor water chemistry D Insufficient filtering time E Improper mainten...

Page 20: ...our power company A Turn on power at service panel B Select other function C Reset circuit breaker D Reset circuit protector E Reset button s on heater after water has cooled see Note if switch contin...

Page 21: ...D Inadequate supply wiring E High temperature safety switches tripped A Let cool for one hour Motor overload protector will reset if problem persists see Note B C D Consult electrician to cor rect wir...

Page 22: ...Do not interconnect water supply with recirculating system of the spa To make the connections necessary to use the Water Rainbow as a fill spout follow this procedure Make sure spa is unplugged and c...

Page 23: ......

Page 24: ...vailable on a national basis for products of this type It is the responsibility of the installer owner to determine specific local code compliance prior to installation of the product Jacuzzi Whirlpoo...

Reviews: