background image

2.

The Consumer Products Safety Commission has stated that the water 
temperature in a spa should not exceed 104 °F (40 °C). Immersion in
water in excess of 104 °F (40 °C) can be hazardous to your health.

3.

Observe a reasonable time limit when using the spa. Long exposures at
higher temperatures can cause high body temperature. Symptoms may
include dizziness, nausea, fainting, drowsiness, and reduced awareness.
These effects could possibly result in drowning.

4.

Do not use the spa under the influence of alcohol, narcotics, or other
drugs. Use of the spa under these conditions may lead to serious conse-
quences.

5.

Always test the spa water temperature before entering the spa. Enter and
exit the spa slowly. Wet surfaces can be very slippery.

6.

Never bring any electrical appliances into or near the spa.  Never operate
any electrical appliances from inside the spa or when you are wet unless
such appliances are built-in by the manufacturer.

7.

Proper chemical maintenance of spa water is necessary to maintain 
safe water and prevent possible damage to spa components.

8.

Use the straps and clip tie downs to secure the cover when not in use.
This will help to discourage unsupervised children from entering the spa
and keep the spa cover secure in high-wind conditions. There is no rep-
resentation that the cover, clip tie-downs, or actual locks will prevent
access to the spa.

3.4 GENERAL ELECTRICAL SAFETY INSTRUCTIONS

Your new Jacuzzi Premium spa is equipped with a "state-of-the-art" equip-
ment system. It contains the most advanced safety and self-protective equip-
ment in the industry. Nonetheless, this spa must be installed properly to
insure dependable usage. Please contact your dealer or local building
department should you have any questions regarding your installation.

Proper grounding is extremely important. Jacuzzi Premium spas are equipped
with a current collector system. A pressure wire connector is provided on the
surface of the control box, located outside the equipment door (Figure B, Page
11) to permit connection of a bonding wire between this point and any ground
metal equipment, metal water pipe or conduit within 5 feet (1.5m) of the spa,
or copper clad grounding rod buried within 5 feet (1.5m) of the spa. Bonding
wire must be at least No. 8 AWG (8.4mm

2

) solid copper wire. This is a most

important safety assurance feature.  Before installing this spa, check with the
local building department to insure installation conforms to local building
codes.

Page 5

Summary of Contents for 2003+

Page 1: ...2003 ProTechTM LED Series Owner s Manual...

Page 2: ...use the skimmer bag and both filter cartridges every month See page 30 31 for detailed filter cleaning replacement instructions Water Maintenance You will want to replace the spa s water every 3 to 6...

Page 3: ...12 7 2 Safety Check 13 7 3 Turn on Power 13 7 4 Initiate Water Circulation 13 7 5 Add Start Up Chemicals 13 7 6 Place Cover on Spa 13 8 0 Control Functions 14 8 1 Control Panel 14 8 2 Spa Features An...

Page 4: ...Water Quality Maintenance 35 12 1 pH Control 36 12 2 Sanitizing 36 12 3 Optional CD Ozone Water Maintenance System 36 13 0 Error Conditions Error Messages 36 13 1 Summer Logic 36 13 2 Overheat Conditi...

Page 5: ...otice This equipment has been tested and found to comply with the limits for a Class B Digital Device pursuant to Part 15 of the FCC Rules These limits are designed to provide reasonable protection ag...

Page 6: ...lace a suction fitting with one rated less than the flow rate marked on the original suction fitting 6 DANGER Risk of Electric Shock Install at least 5 feet 1 5m from all metal surfaces As an alternat...

Page 7: ...ecautions should always be followed including the following 1 READ AND FOLLOW ALL INSTRUCTIONS 2 A green colored terminal or a terminal marked G Gr Ground Grounding or the symbol is located inside the...

Page 8: ...ry in accordance with manufacturer s instructions M WARNING The use of alcohol or drugs can greatly increase the risk of fatal hyperthermia in spas 3 2 HYPERTHERMIA Prolonged immersion in hot water ma...

Page 9: ...is will help to discourage unsupervised children from entering the spa and keep the spa cover secure in high wind conditions There is no rep resentation that the cover clip tie downs or actual locks w...

Page 10: ...a owner to assure the integrity of the support over time We recommend a poured reinforced concrete slab with a minimum thick ness of 4 inches 10cm Wood decking is also acceptable provided it is constr...

Page 11: ...is preferable not to place the spa under an unguttered roof overhang since run off water will shorten the life expectancy of the spa cover 4 2 Indoor Location For indoor installations be certain to ma...

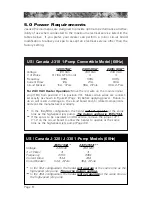
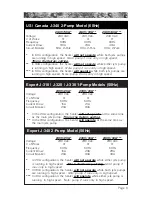
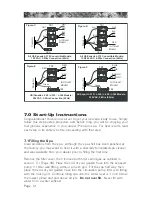
Page 12: ...to be operated on 40A service remove the jumper JP1 1 2 on the circuit board to allow the heater to operate at the same time as the high speed jets pump Page 44 US Canada J 320 J 330 1 Pump Models 60H...

Page 13: ...gh speed In 30A configuration the heater will not operate while both jets pumps are running in high speed Note pump 2 runs only in high speed In 40A configuration the heater will operate while either...

Page 14: ...ructions will void both the independent testing agency listing and the manufacturer s warranty 3 The power supplied to this spa must be a dedicated circuit with no other appliances or lights sharing t...

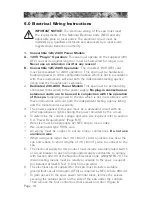
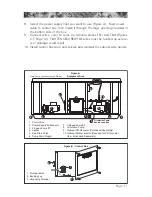
Page 15: ...tor Required for CD Ozonator Use Purchased Separately Flow Note Pump Locations Vary by Model Circulation Pump Behind Load Box 8 5 6 6 8 Select the power supply inlet you want to use Figure A Feed powe...

Page 16: ...lter wall fitting without a mesh grill Fill the spa half way then place the end of your garden hose into the circulation pump filter wall fitting with the mesh grill Continue filling spa until the wat...

Page 17: ...7 3 Turn on Power Turn on power to spa at the home s circuit breaker The heater and low speed pump 1 automatically activate and the control panel LED display flashes water temperature and COL or ICE...

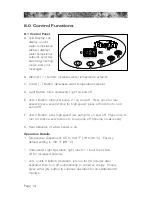
Page 18: ...high speed press a third time to turn pump off F Jets 2 Button turns high speed jets pump 2 on and off Press once to turn on press a second time to turn pump off 2 pump models only G Heat Indicator l...

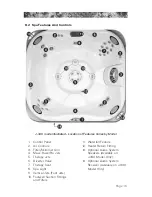
Page 19: ...r Valve 7 Therapy Seat 8 Spa Light 9 Vertical Jets Foot Jets 10 Footwell Suction Fittings and Filters 1 1 Waterfall Feature 12 Heater Return Fitting 13 Optional Audio System Speakers Available on J 34...

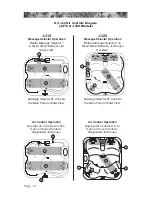
Page 20: ...rols the Main Pump s Water Flow Air Control Operation Depress Air Controls A or B to Open or Close Air Inlet to Designated Jet Groups Air Control Operation Depress Air Controls A C to Open or Close Ai...

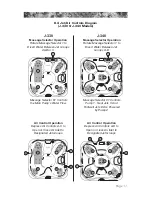
Page 21: ...to Open or Close Air Inlet to Designated Jet Groups Air Control Operation Depress Air Controls A D to Open or Close Air Inlet to Designated Jet Groups J 330 Massage Selector Operation Rotate Massage S...

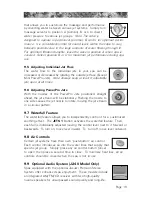
Page 22: ...filled because tap water is often very cold 9 1 Setting Water Temperature The spa s thermostat provides optimum control of water temperature The temperature setpoint set temperature can be adjusted fr...

Page 23: ...ned straight ahead the jet stream will be stationary Pushing the nozzle to one side causes the jet nozzle to rotate moving the jet stream in a circular pattern 9 7 Waterfall Feature The waterfall feat...

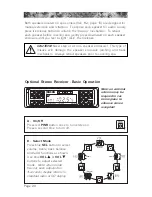
Page 24: ...rs prior to covering spa Optional Stereo Receiver Basic Operation Note an external antenna may be required in cer tain regions to enhance stereo reception A On Off Press red PWR button once to turn st...

Page 25: ...djust treble range from 7 to 7 E Adjust Bass Press blue SEL button three times to select bass mode Then press blue VOL or VOL button to adjust bass range from 7 to 7 F Adjust Balance Press blue SEL bu...

Page 26: ...nly H Bass Boost Press grey LOUD button to increase the bass output LOUD appears on the display I Set Clock Press and hold grey DISP button for 3 seconds until time display flashes Within 3 seconds pr...

Page 27: ...y Press the grey WB button to change radio to weather radio receiver Then press green W1 W2 or W3 to change between three weather channels in your area B Select a Radio Station 1 Slow Scan Press blue...

Page 28: ...Station Preset 1 Press grey BAND button to select desired radio band if necessary 2 Press green PRESET button to recall station preset E Automatically Store Stations Function selects 6 strongest stati...

Page 29: ...lot and flip panel up to close The CD will begin to play 2 Press orange OPEN button on front flip over panel then flip open panel Press black EJECT button on inner side of flip open panel to stop CD p...

Page 30: ...Press green SCN button again to stop SCAN and listen to track G Pause CD Play Press grey PLAY PAUSE button to pause CD play PAUS appears on display Press grey PLAY PAUSE button again to resume play W...

Page 31: ...107 9 MHz FM mono sensitivity 12 dBf 50 dB quieting sensitivity stereo 16 dBf Stereo separation 1 kHz 40 dBf Am Tuner Tuning Range 530 kHz 1 720 kHz Amplifier Total system power 160 watts peak Power...

Page 32: ...tandard Skimming Heating Modes F0 F3 Standard skimming heating modes are typically selected by customers in cold climates where heatup times are extended due to lower ambient temperatures In these mod...

Page 33: ...urs F6 2 hours of skimming heating per day one 30 minute cycle every six hours Lock Modes L1 Lock Out disables all spa functions to permit filter cleaning L2 Lock Mode disables the jets and light butt...

Page 34: ...s filtered by the 2 speed pump drawing water through the skimmer bag and main pump cartridge during normal operation and at each skimming heating cycle The skimmer bag and filter cartridges provide un...

Page 35: ...f water and a specially formulated filter cleanser available from your Jacuzzi Premium dealer We also recommend switching your two filter car tridges during each cleaning to maximize life The average...

Page 36: ...in mind when draining your spa If it is extremely cold and the spa is outdoors freezing could occur in the lines or the equipment see WINTER IZING Page 34 On the other hand if it is hot outdoors do n...

Page 37: ...nitizer reading drops below 5 ppm CAUTION Never attempt to remove the pillows by pulling on them The pillows utilize a bolt on design that prohibits removal without tools To remove pillows 1 Grasp cen...

Page 38: ...se for any reason since this action may induce an electrical short in the spa s electrical equipment 1 1 8 Winterizing Your Jacuzzi Premium spa is designed to automatically protect itself against free...

Page 39: ...d Weather If you want to start up your spa after it has sat empty for a time in freezing temperatures be aware that the water remaining in certain sections of the piping may still be frozen This situa...

Page 40: ...sary to compensate for out of balance water some aid in cosmetic water treatment and others simply alter the feel or smell of the water Your Authorized Jacuzzi Premium dealer can advise you on the use...

Page 41: ...cover to speed cooling CAUTION Never leave spa uncovered when children are present If condition persists con tact your authorized Jacuzzi Premium dealer There are a number of unique functions designe...

Page 42: ...ds then turn off Reinstall filter cartridge and check spa See section 1 1 1 page 30 3 If problem persists contact your authorized dealer 13 6 Panel displays COL Cool Condition Temperature has dropped...

Page 43: ...lve the problem contact your authorized Jacuzzi Premium dealer 2 The main pump operates but no water flows to jets Pump may not be properly primed This can happen after the spa is drained and refilled...

Page 44: ...we are always striving to improve the quality and features of our products Your input as a Jacuzzi Premium spa owner is a cherished part of this process If you have any comments or suggestions or if y...

Page 45: ...power supply Use copper conductors ONLY Wire size must be appropriate per NEC and or local codes 4 If hot tub is to be operated on 30A service make sure the jumper provided at location JP1 1 2 on the...

Page 46: ...16 J17 J18 J19 J7 J8 J9 J10 Logic Jumper Settings Factory Defaults Shown JP1 1 2 ON 30A Logic JP1 1 2 OFF 50A Logic Factory Default Setting JP1 3 4 ON 2 Pump Operation JP1 3 4 OFF 1 Pump Operation JP1...

Page 47: ...J3 F1 20A 250V SC 20 Circ Pump Main Pump Spa Light Transformer 230 VAC J4 HI LO GRN Logic Jumper Settings All Export 50 Hz Models JP1 1 2 ON 20A Logic JP1 1 2 OFF 30A Logic Factory Jumper Setting Tem...

Page 48: ...J4 F1 JP1 4 2 3 1 6 5 8 7 7 6 2 4 HI HI LO C Control Panel CIRC PUMP SPA LIGHT J20 K1 K2 K3 K4 K5 K6 K7 K8 J21 J11 J12 J13 J14 J15 J16 J17 J18 J19 J7 J8 J9 J10 Logic Jumper Settings Factory Defaults S...

Page 49: ...Notes...
Page 50: ...Jacuzzi Premium 14525 Monte Vista Ave Chino CA 91710 Website http www jacuzzipremium com 6530 225 Rev D 2002 Jacuzzi Premium Printed in U S A...

Reviews: