background image

17 

Electrical hazards 


  Use  only  the  peripheral  elements  supplied  (power  pack,  charging 

base,  clipping  accessories,  etc.)  or  those  available  from  the 
importer or its after-sales service. 


  Regularly check the condition of the electrical lead connecting the 

power  pack  to  the  mains  supply.  If  the  lead  shows  any  signs  of 
damage, stop using the clippers immediately. Contact the dealer or 
his after-sales service to obtain a replacement lead. 

  The  electrical  lead  must  always  be  fully  unrolled  when  it  is 

connected to a power socket. Never pull on the lead to unplug it.  

  The charging base must be placed on a stable, clean surface. The 

charging base and the power pack must be placed well away from 
any source of heat (radiator, sunlight, etc.) and in a dry area away 
from any water or damp. 

  In the event of failure of the power pack or the charging base, they 

must be replaced by a model that is identical in all respects. 

  Make sure that the power supply voltage corresponds to the voltage 

marked on the power pack body and the charging base. 

  Never  try  to  open  the  batteries,  because  they  contain  chemicals 

that are hazardous for humans, animals and nature in general. In 
the event of any leakage from the batteries, avoid all contact with 
the  skin,  wash  any  affected  areas  with  running  water  for  about 
twenty minutes and see a doctor immediately. Use paper towels or 
a dry cloth to clean the clippers and contact the dealer to obtain 
replacement rechargeable batteries. 


  Never bring the clippers, the power pack, the charging base or the 

electrical lead into contact with water or excessive damp; if this 
occurs, contact the importer without trying to switch the clippers 
on; there is  a considerable risk of electrocution.  Never  use these 
clippers with wet hands. Always store the clippers in a dry place. 


Summary of Contents for HAIRCUT TH33

Page 1: ...UARIO GUIDA PER L UTENTE GEBRUIKERSHANDLEIDING FR Tondeuse de coupe professionnelle pour cheveux EN Professional hair clippers DE Profi Haarschneider f r Kopfhaare ES Cortadora profesional para cabell...

Page 2: ...lt et transmis toute personne susceptible d utiliser cet quipement notamment en cas de revente 1 2 A qui s adresse ce manuel Ce manuel s adresse toute personne d sirant utiliser la tondeuse dans un ca...

Page 3: ...limentation ou du socle de charge celui ci devra tre remplac par un mod le en tous points identique Veiller ce que la tension d alimentation soit la m me que celle indiqu e sur le corps du bloc d alim...

Page 4: ...de d faut 1 5 Garantie La tondeuse professionnelle est garantie un 1 an pi ce et main d uvre contre tout d faut ou vice de fabrication L accumulateur et la t te de coupe sont des pi ces courantes soum...

Page 5: ...mentation en vigueur sur la protection de l environnement Ainsi dans le but de pr server l environnement toute limination de cet quipement doit s effectuer en respectant les fili res appropri es La to...

Page 6: ...coupe 4 3 D Bouton Marche Arr t avec voyant incorpor premier appui la tondeuse est en marche voyant allum second appui la tondeuse est l arr t voyant teint 4 1 4 2 4 6 E Voyants d tat Voir d tail aux...

Page 7: ...7 Figure 1 les constituants de tondeuse et les accessoires Rep D signation Voir H Tondeuse en charge Voyant de niveau de recharge de la batterie Clignote 3...

Page 8: ...ondeuse en utilisation Voyant d autonomie Clignote lorsque l autonomie de la batterie est inf rieure 5 de l autonomie totale S teint lorsque la batterie est totalement d charg e 3 K Tondeuse en charge...

Page 9: ...1 Mettre la tondeuse l arr t par appui sur le bouton Marche Arr t Figure 1 D 2 Ins rer la fiche du bloc d alimentation Figure 2 B dans la prise Figure 2 A de la tondeuse 3 Brancher le bloc d alimenta...

Page 10: ...Brancher le bloc d alimentation Figure 1 L dans la prise secteur 4 Placer la tondeuse Figure 3 A sur son socle Figure 3 B 5 Durant la recharge le voyant rouge Figure 1 K est allum fixe Les voyants Fi...

Page 11: ...t sur le bouton Marche Arr t Figure 1 D le voyant t moin de marche int gr e au bouton s allume rouge Les voyants de niveau de charge de batterie restante sont allum s se r f rer en Figure 1 rep res G...

Page 12: ...minutes d utilisation il est imp ratif d huiler les lames de coupe Arr ter la tondeuse par appui sur le bouton Figure 1 D le voyant int gr rouge s teint Positionner le bouton de r glage en position 1...

Page 13: ...en appuyant avec le pouce l endroit indiqu par la fl che Figure 6 2 Nettoyer la t te de coupe avec la brosse de nettoyage fournie 3 Avec le pouce appuyer le support plastique Figure 8 B vers l arri r...

Page 14: ...gr e rechargeable type Lithium Polym re 3 7 V 1 350 mAh Temps de charge 120 minutes Autonomie 150 minutes environ Connecteur lectrique pour bloc d alimentation ou socle de charge Dimensions 45 x 162...

Page 15: ...n CE L importateur C A R SAS d clare que la tondeuse de coupe professionnelle pour cheveux et poils humains marque HAIRCUT mod le TH33 faisant l objet de la pr sente d claration est conforme aux exige...

Page 16: ...persons likely to use the equipment in particular in the event of resale 1 2 Who is concerned by this manual This manual is provided for all persons wishing to use the clippers in a professional conte...

Page 17: ...failure of the power pack or the charging base they must be replaced by a model that is identical in all respects Make sure that the power supply voltage corresponds to the voltage marked on the power...

Page 18: ...r covering all material or manufacturing defects The battery and the blades are ordinary parts that are subject to normal wear and tear and as such they are not covered by the manufacturer s guarantee...

Page 19: ...tection of the environment To ensure such environmental protection this equipment must be disposed of via the appropriate methods The clippers contain a battery that must be taken to an approved colle...

Page 20: ...4 3 D On Off button with built in indicator light press once to switch the clippers on indicator light on and press again to switch them off indicator light off 4 1 4 2 4 6 E Status indicator lights...

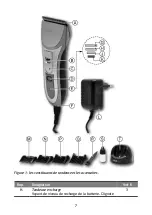
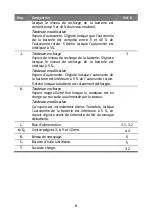
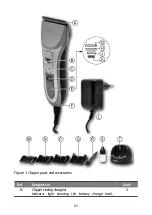
Page 21: ...21 Figure 1 Clipper parts and accessories Ref Designation See H Clippers being charged Indicator light showing the battery charge level 3...

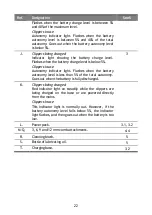
Page 22: ...n use Autonomy indicator light Flashes when the battery autonomy level is less than 5 of the total autonomy Goes out when the battery is fully discharged 3 K Clippers being charged Red indicator light...

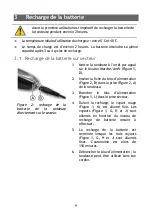
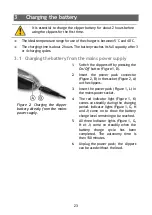
Page 23: ...power supply 1 Switch the clippers off by pressing the On Off button Figure 1 D 2 Insert the power pack connector Figure 2 B in the socket Figure 2 A on the clippers 3 Insert the power pack Figure 1 L...

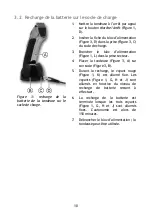
Page 24: ...wer pack Figure 1 L in the mains power socket 4 Put the clippers Figure 3 A on the base Figure 3 B 5 The red indicator light Figure 1 K comes on steadily during the charging period Indicator lights Fi...

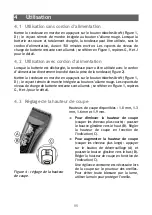
Page 25: ...ight built into the button comes on red The indicator lights showing the remaining battery charge level come on see Figure 1 refs G H and J for details 4 3 Adjusting the cutting height Figure 4 Adjust...

Page 26: ...f use it is essential to lubricate the cutter blades To switch the clippers off press the button Figure 1 D the built in red indicator light goes out Set the adjustment knob to the 1 9 mm position Fig...

Page 27: ...6 with your thumb 2 Use the cleaning brush supplied to clean the blades 3 Push the plastic holder Figure 8 B back with your thumb to separate the fixed cutters Figure 8 C and the mobile cutters Figur...

Page 28: ...Rechargeable Lithium Polymer type 3 7 V 1 350 mAh Charging time 120 minutes Autonomy About 150 minutes Electrical connector For power pack or charging base Dimensions 45 x 162 x 45 mm L x H x D Weight...

Page 29: ...The importer C A R SAS Simplified joint stock Company hereby declares that the professional hair clippers made by HAIRCUT model TH33 covered by this declaration comply with the requirements set out in...

Page 30: ...nnen Sie dieses Handbuch verwenden Der Aufbau dieses Handbuchs folgt den Phasen f r das Ablesen und die Bedienung dieses Produkts 1 4 Sicherheit Der Haarschneider ist f r die Benutzung in einem Friseu...

Page 31: ...den Sie sich sofort an einen Arzt Reinigen Sie den Haarschneider mit saugf higem K chenpapier oder mit einem trockenen Lappen und wenden Sie sich an den Wiederverk ufer um die Akkus auszutauschen Setz...

Page 32: ...der die Funktion des Ger tes nicht oder nur geringf gig beeintr chtigen sind ebenfalls von der Garantie ausgeschlossen Stempel Datum und Unterschrift des Wiederverk ufers sind f r eine Annahme des Ger...

Page 33: ...igneten Entsorgungswege erfolgen Da der Haarschneider einen Akku enth lt muss dieser bei einer zugelassenen Sammelstelle abgegeben werden um ihn zu entsorgen und wiederzuverwerten Die rtlichen Vorschr...

Page 34: ...ter mit integrierter Kontrollanzeige beim erstmaligen Dr cken wird der Haarschneider eingeschaltet Kontrollanzeige leuchtet beim zweiten Dr cken wird der Haarschneider ausgeschaltet Kontrollanzeige au...

Page 35: ...35 Abbildung 1 Ger teteile des Haarschneiders und Zubeh rteile Bst Bezeichnung Kap H Haarschneider im Lademodus Akku Aufladeanzeige Die Anzeige blinkt wenn der 3...

Page 36: ...nzeige Sie blinkt wenn die Akku Betriebszeit unter 5 der maximalen Betriebszeit liegt Sie erlischt wenn die Batterie vollst ndig leer ist 3 K Haarschneider im Lademodus Die rote Anzeige leuchtet im Da...

Page 37: ...ters aus Abbildung 1 D 2 Stecken Sie den Stecker des Netzteils Abbildung 2 B in die Steckdose Abbildung 2 A des Haarschneiders 3 Schlie en Sie das Netzteil Abbildung 1 L an die Netzsteckdose an 4 W hr...

Page 38: ...Netzsteckdose an 4 Stellen Sie den Haarschneider Abbildung 3 A in seine Ladestation Abbildung 3 B 5 W hrend des Aufladevorgangs leuchtet die rote Anzeige Abbildung 1 K im Dauermodus Die Anzeigen Abbi...

Page 39: ...us Schalters aus Abbildung 1 D die in den Schalter integrierte Betriebsanzeige leuchtet rot Die Anzeigen des verbleibenden Akku Ladezustands leuchten f r n here Informationen siehe Abbildung 1 Buchsta...

Page 40: ...brauch von 30 Minuten ist eine Schmierung der Schneidklingen unbedingt erforderlich Schalten Sie den Haarschneider durch Dr cken des Ein Aus Schalters aus Abbildung 1 D die integrierte rote Anzeige er...

Page 41: ...ung der Klingen 1 L sen Sie den Schneidkopf indem Sie mit dem Daumen auf die durch den Pfeil bezeichnete Stelle dr cken Abbildung 6 2 Reinigen Sie den Schneidkopf mit der mitgelieferten Reinigungsb rs...

Page 42: ...deraufladbar Typ Lithium Polymer Akku 3 7 V 1350 mAh Ladezeit 120 Minuten Akku Betriebszeit ca 150 Minuten Elektrostecker f r Netzteil oder Ladestation Abmessungen 45 x 162 x 45 mm L x H x T Gewicht 1...

Page 43: ...SAS erkl rt dass der Profi Haarschneider f r menschliche Kopf und K rperhaare Marke HAIRCUT Modell TH33 der Gegenstand dieser Erkl rung ist den Anforderungen der EMV Richtlinie 2004 108 EG und der Nie...

Page 44: ...alquier persona que pueda utilizar este equipo particularmente en caso de reventa 1 2 A qui n est destinado este manual Este manual est destinado a cualquier persona que desee utilizar la cortadora en...

Page 45: ...ue de alimentaci n o de la base de carga el conjunto deber remplazarse por un modelo id ntico Comprobar que la tensi n de alimentaci n es la misma que la indicada en el bloque de alimentaci n y en la...

Page 46: ...allo o defecto de fabricaci n El acumulador y el cabezal de corte son piezas corrientes sometidas a un desgaste normal y por tanto no est n cubiertas por la garant a del fabricante Si es necesario con...

Page 47: ...protecci n medioambiental la eliminaci n de este equipo debe efectuarse respetando los pasos apropiados La cortadora contiene una bater a que deber depositarse en un centro de recogida autorizado para...

Page 48: ...3 D Bot n Encendido Apagado con piloto incorporado primera pulsaci n la cortadora est encendida piloto encendido segunda pulsaci n la cortadora est apagada piloto apagado 4 1 4 2 4 6 E Pilotos de esta...

Page 49: ...49 Figura 1 componentes y accesorios de la cortadora Ref Designaci n Ver...

Page 50: ...rga de la bater a es inferior al 5 Cortadora en uso Piloto de autonom a Parpadea cuando la autonom a de la bater a es inferior al 5 de la autonom a total Se apaga cuando la bater a est totalmente desc...

Page 51: ...Apagar la cortadora pulsando el bot n Encendido Apagado Figura 1 D 2 Insertar la clavija del bloque de alimentaci n Figura 2 B en la toma Figura 2 A de la cortadora 3 Conectar el bloque de alimentaci...

Page 52: ...Conectar el bloque de alimentaci n Figura 1 L en la toma de red 4 Colocar la cortadora Figura 3 A en la base Figura 3 B 5 Durante la carga el piloto rojo Figura 1 K est encendido fijo Los pilotos Figu...

Page 53: ...agado Figura 1 D el piloto testigo de encendido integrado en el bot n se enciende rojo Los pilotos de nivel de carga de bater a restante se encienden Remitirse a la Figura 1 referencias G H y J para m...

Page 54: ...as 30 minutos de uso Apagar la cortadora pulsando el bot n Figura 1 D el piloto rojo integrado se apaga Colocar el bot n de ajuste en posici n 1 9 mm Figura 4 ref C Extraer el cabezal de corte presion...

Page 55: ...de corte presionando con el pulgar en el lugar indicado por la flecha Figura 6 2 Limpiar el cabezal de corte con el cepillo proporcionado 3 Con el pulgar presionar el soporte de pl stico Figura 8 B h...

Page 56: ...able tipo Litio Pol mero 3 7 V 1 350 mAh Tiempo de carga 120 minutos Autonom a 150 minutos aproximadamente Conector el ctrico para bloque de alimentaci n o base de carga Dimensiones 45 x 162 x 45 mm L...

Page 57: ...eclaraci n CE El importador C A R SAS declara que la cortadora profesional para cabello y pelo humanos marca HAIRCUT modelo TH33 objeto de la presente declaraci n cumple las exigencias relativas a la...

Page 58: ...acilmente consultato e trasmesso a chiunque potrebbe utilizzare questo apparecchio in particolare in caso di rivendita 1 2 Utenti Il presente manuale rivolto alle persone che desiderano utilizzare il...

Page 59: ...blemi l alimentatore o il caricabatterie dovranno essere sostituiti con un modello equivalente Accertarsi che la tensione di alimentazione sia uguale a quella indicata sul corpo dell alimentatore e de...

Page 60: ...iacapelli professionale ha una garanzia per la sostituzione dei pezzi e le riparazioni di un 1 anno contro i guasti o i difetti di fabbricazione L accumulatore e la testina di taglio sono parti sogget...

Page 61: ...igore sulla protezione dell ambiente Pertanto allo scopo di proteggere l ambiente lo smaltimento dell apparecchio deve avvenire rispettando le filiere appropriate La batteria contenuta nel tagliacapel...

Page 62: ...ensione spegnimento con spia incorporata Prima pressione accensione del tagliacapelli spia accesa seconda pressione spegnimento del tagliacapelli spia spenta 4 1 4 2 4 6 E Spie di stato Vedere i detta...

Page 63: ...63 Figura 1 parti e accessori del tagliacapelli Rif Designazione Vedere sez...

Page 64: ...l livello di carica della batteria inferiore al 5 Tagliacapelli in uso Spia di autonomia Lampeggia quando l autonomia della batteria inferiore al 5 dell autonomia massima Si spegne quando la batteria...

Page 65: ...amento diretto a una presa di rete 1 Spegnere il tagliacapelli premendo il tasto di accensione spegnimento Figura 1 D 2 Inserire la spina dell alimentatore Figura 2 B nella presa Figura 2 A del taglia...

Page 66: ...batterie 3 Collegare l alimentatore Figura 1 L alla presa di rete 4 Posizionare il tagliacapelli Figura 3 A sul caricabatterie Figura 3 B 5 Durante la ricarica la spia rossa Figura 1 K accesa fissa Le...

Page 67: ...nimento Figura 1 D la spia integrata si illumina in rosso Le spie di livello di carica della batteria residua sono accese Per dettagli fare riferimento alla Figura 1 riferimento G H e J 4 3 Regolazion...

Page 68: ...lame Spegnere il tagliacapelli premendo il tasto Figura 1 D la spia rossa integrata si spegne Impostare il tasto di selezione sulla posizione 1 9 mm Figura 4 rif C Rimuovere la testina di taglio preme...

Page 69: ...mendo con il pollice nel punto indicato dalla freccia Figura 6 2 Pulire la testina di taglio con l apposita spazzola in dotazione 3 Con il pollice premere indietro il supporto in plastica Figura 8 B p...

Page 70: ...ntegrata ricaricabile ai polimeri di litio 3 7 V 1 350 mAh Tempo di carica 120 minuti Autonomia circa 150 minuti Connettore elettrico per alimentatore o caricabatterie Dimensioni 45 x 162 x 45 mm L x...

Page 71: ...ne CE L importatore C A R SAS dichiara che il tagliacapelli professionale per capelli e peli umani marca HAIRCUT modello TH33 oggetto della presente dichiarazione conforme a quanto specificato dalla D...

Page 72: ...orden geraadpleegd en kan worden doorgegeven aan de persoon die het toestel gaat gebruiken bijvoorbeeld bij doorverkoop 1 2 Voor wie is deze handleiding bedoeld Deze handleiding is bedoeld voor alle p...

Page 73: ...Bij defect van het voedingsblok of de laadsokkel moet deze worden vervangen door een volledig identiek model Controleer of de voedingsspanning gelijk is aan deze vermeld op het voedingsblok en de laad...

Page 74: ...uik en het opladen een beetje warm dit is volledig normaal 1 5 Garantie De professionele tondeuse wordt verkocht met een 1 jaar garantie op onderdelen en arbeidsuren voor alle mogelijke fabrieksfouten...

Page 75: ...e wetgeving inzake milieubescherming Om het milieu te beschermen moet dit toestel dus volgens de voorgeschreven weg worden vernietigd De batterij die in de tondeuse zit moet voor vernietiging en recyc...

Page 76: ...t knop met ingebouwd lampje duwen om de tondeuse aan te zetten het lampje brandt opnieuw duwen om ze uit te zetten het lampje is gedoofd 4 1 4 2 4 6 E Lampjes voor toestandaanduiding Voor details zie...

Page 77: ...77 Afbeelding 1 de onderdelen en accessoires van de tondeuse Letter Benaming Zie H Tondeuse in laadtoestand Lampje voor aanduiding van het laadniveau van de 3...

Page 78: ...e batterij lager is dan 5 Tondeuse in gebruik Lampje voor aanduiding van de autonomie Knippert wanneer de autonomie van de batterij lager is dan 5 van de totale autonomie Gaat uit als de batterij voll...

Page 79: ...de tondeuse uit door te drukken op de Aan Uit knop Afbeelding 1 D 2 Steek de stekker van het voedingsblok Afbeelding 2 B in het contact Afbeelding 2 A van de tondeuse 3 Steek het voedingsblok Afbeeld...

Page 80: ...kel 3 Steek het voedingsblok Afbeelding 1 L in het stopcontact 4 Plaats de tondeuse Afbeelding 3 A op de sokkel Afbeelding 3 B 5 Tijdens het laden blijft het rode lampje Afbeelding 1 K branden De lamp...

Page 81: ...op de Aan Uit knop Afbeelding 1 D het in de knop ingebouwde lampje voor aanduiding van de AAN toestand wordt rood De lampjes voor aanduiding van het resterende laadniveau van de batterij branden voor...

Page 82: ...n Schakel de tondeuse uit door op de knop te drukken Afbeelding 1 D het ingebouwde rode lampje dooft Zet de instelknop in stand 1 9 mm Afbeelding 4 C Verwijder de scheerkop door met de duim te drukken...

Page 83: ...e duim te duwen op de plaats aangeduid met de pijl Afbeelding 6 2 Reinig de scheerkop met de bijgeleverde reinigingsborstel 3 Duw met de duim de plastic houder Afbeelding 8 B naar achteren om de vaste...

Page 84: ...batterij herlaadbare lithium polymeerbatterij 3 7 V 1350 mAh Oplaadtijd 120 minuten Autonomie ongeveer 150 minuten Elektrische stekker voor voedingsblok of laadsokkel Afmetingen 45 x 162 x 45 mm l x...

Page 85: ...ing van het merk HAIRCUT model TH33 die het voorwerp uitmaakt van deze verklaring in overeenkomst is met de bepalingen van de EMC richtlijn 2004 108 EG en de Laagspanningsrichtlijn 2006 95 EG Het toes...

Reviews: