background image

34

1

2

3

3

4

5

6

6

6

7

7

7

7

18

8

8

8

9

10

10

11

12

13

18/19

14

15/16

20

/

21

8

17

TRI-KING

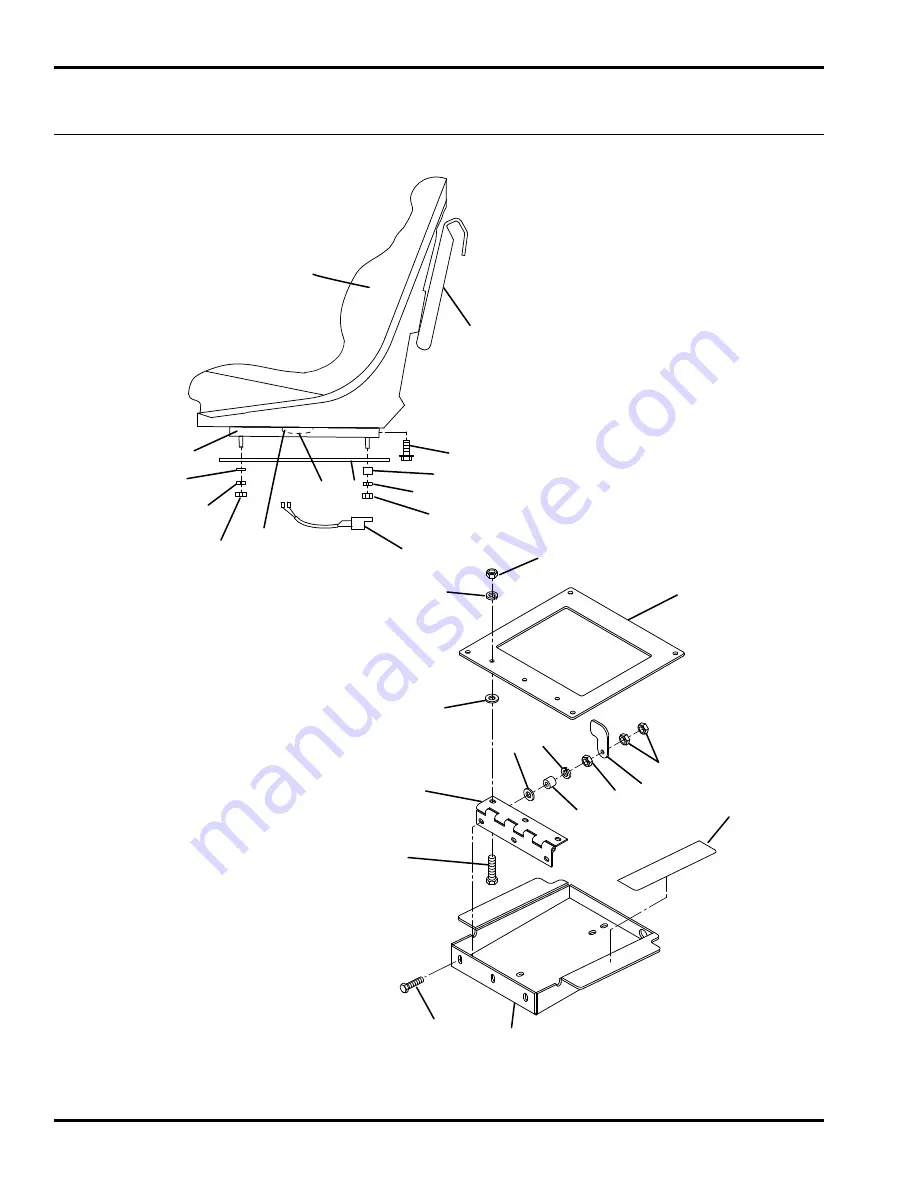
3.1 Seat and Base

Serial No. 67043-1601~4743

Summary of Contents for Tri King 67043

Page 1: ...o provádět jeho servis by si měli přečíst celou příručku WARNING If incorrectly used this machine can cause severe injury Those who use and maintain this machine should be trained in its proper use warned of its dangers and should read the entire manual before attempting to set up operate adjust or service the machine GB CZ Czech 19 17 18 13 6 5 9 15 16 7 8 10 4 3 11 1 INCLUDES ITEMS 3 16 Tri King...

Page 2: ...te of California to cause cancer and birth defects or other reproductive harm FOREWORD Suggested Stocking Guide To Keep your Equipment fully operational and productive Jacobsen suggests you maintain a stock of the more commonly used maintenance items We have included part numbers for additional support materials and training aids To order any of the following material 1 Write your full name and co...

Page 3: ... 15 Cutting Modes 13 3 16 Cutting Height Adjustment 13 3 17 Removing the Cutting Unit 14 3 18 Cutting Height Fixed Mode 14 3 19 Cutting Height Floating Mode 15 3 20 Torque Specification 16 3 21 Specific Torque 16 4 Maintenance 4 1 General 17 4 2 Engine 17 4 3 Engine Oil 18 4 4 Air Filter 18 4 5 Fuel 19 4 6 Fuel System 19 4 7 Battery 19 4 8 Jump Starting 20 4 9 Charging Battery 20 4 10 Hydraulic Ho...

Page 4: ...shields discharge deflectors or other protective devices securely fastened in place 12 Never disconnect or bypass any switch 13 Do not change the engine governor setting or overspeed the engine 14 Carbon monoxide in the exhaust fumes can be fatal when inhaled Never operate the engine without proper ventilation or in an enclosed area 15 Fuel is highly flammable handle with care 16 Keep the engine c...

Page 5: ...tenance should always be performed by a qualified technician If additional information or service is needed contact your Authorized Jacobsen Dealer who is kept informed of the latest methods to service this equipment and can provide prompt and efficient service Use of other than original or authorized Jacobsen parts and accessories will void the warranty WARNING The Interlock System on this mower ...

Page 6: ...AE 30W API Classification CD CE Air Filter Dry type with evacuator valve and service indicator Alternator 40 amp 2 3 CUTTING UNITS __________________________________________________________ Reel 3 Reels 26 in 660 mm wide or 3 Reels 30 in 762 mm wide Reel Diameter 7 in 178 mm Bearings Self adjusting tapered roller bearings Blade Options 7 blades Cutting Width 26 in Reels 72 in 1828 mm 30 in Reels 8...

Page 7: ...el 67115 7 Blade 26 in Center Reel 67116 7 Blade 30 in Left Hand Reel 67123 7 Blade 30 in Right Hand Reel 67124 7 Blade 30 in Center Reel 67125 Vertical Mower 26 in Left Hand 67139 Vertical Mower 26 in Right Hand 67140 Vertical Mower 26 in Center 67141 Rollers Grooved Front Roller Steel for 26 in Reel 67731 Grooved Front Roller Steel for 30 in Reel 67729 Solid Roller for 26 in Reel 132639 Solid Ro...

Page 8: ...or until proper belt tension is achieved Tighten hardware A Figure 3A 3 3 PUMP DRIVE BELT ________________________________________________________ Adjust reel pump belt C to deflect 1 4 in 6 mm with a force of 5 7 lb 2 3 kgf applied at midspan 1 Loosen hardware D and E 2 Move pump clutch assembly down to increase tension on belt C then tighten hardware D and E 3 Torque hardware D and E to 27 33 ft...

Page 9: ... so contacts are open with traction pedal in neutral and contacts close with minimal pedal travel in forward direction Figure 3C 3 5 PARKING BRAKE SWITCHES________________________________________________ Loosen screws K and adjust both switches so contacts just close as the brake lever is moved to the engaged position then tighten screws Figure 3D 3 6 LIFT LIMIT SWITCH ____________________________...

Page 10: ...Loosen all nuts N and adjust rear spring to position traction arm in neutral a Lock rear nuts and adjust front nuts N to maintain 3 8 in 9 mm of extension in spring O b Start the engine and check for creep then repeat the process if necessary Figure 3F 3 8 TRACTION PEDAL FORWARD STOP__________________________________________ Loosen nuts P move the traction pedal to its maximum forward position Adj...

Page 11: ...__________________________________________ 1 Rear lift arm position is properly adjusted when the rear mower bumpers are putting slight pressure against the underside of the foot rests 2 Disconnect lift chain T from crank and adjust ball joint U as required Figure 3I 3 12 DOWN PRESSURE_________________________________________________________ 1 Place mowers in the Fixed Mode Section 3 18 and lower ...

Page 12: ...ely and may result in serious damage to the reel and bedknife 6 Grass conditions will also affect the adjustment a Dry sparse conditions will require a wider gap to prevent heat buildup and damage to the reel and bedknife b High quality grass with a good moisture content requires a closer gap near zero Figure 3L 3 14 REEL TO BEDKNIFE ADJUSTMENT __________________________________________ 1 Read Sec...

Page 13: ...wer frames Install a front roller and store hardware H for future conversion to fixed mode 5 To convert the mower from Floating to Fixed Mode assemble hardware H as shown and remove or raise the front roller Figure 3O 3 16 CUTTING HEIGHT ADJUSTMENT_____________________________________________ 1 Raise and lock the lift arms in transport mode 2 For easier access to the height adjusters on the motor ...

Page 14: ...ned in Section 3 16 1 Reposition the rear roller adjuster a For cutting heights from 3 8 to 1 3 4 in 9 to 44 mm use holes M on the mower frame and two holes shown in black of the height adjuster F as shown b For cutting heights greater than 1 3 4 inches 44 mm disassemble adjuster F and turn the mounting bracket upside down then use holes N of the frame and the two holes shown in black of the adjus...

Page 15: ...e down then use holes N of the frame and the two holes shown in black of adjuster F 3 Loosen nut L and adjust screw K to obtain desired cutting height X then lock nut L against gauge P 4 Place one end of the gauge under the front roller at either end of the reel and slide the head of screw K over the bedknife a Adjust nut G to lower the rear roller to the gauge then tighten nut E against the adjus...

Page 16: ...50 5 7 1 2 20 ft lb Nm 64 86 7 85 115 90 122 120 162 12 24 in lb Nm 50 5 7 65 7 3 9 16 12 ft lb Nm 82 111 109 148 115 156 154 209 1 4 20 in lb Nm 75 8 4 100 11 3 107 12 1 143 16 1 9 16 18 ft lb Nm 92 124 122 165 129 174 172 233 1 4 28 in lb Nm 85 9 6 115 13 0 120 13 5 163 18 4 5 8 11 ft lb Nm 113 153 151 204 159 215 211 286 5 16 18 in lb Nm 157 17 7 210 23 7 220 24 8 305 34 4 5 8 18 ft lb Nm 128 1...

Page 17: ...tention to the engine manufacturer s directions will assure maximum service life of the engine To order replacement engine manuals contact the engine manufacturer The proper break in of a new engine can make a considerable difference to the performance and life of the engine During the break in period Jacobsen recommends the following 1 During the first 50 hours of operation a new engine should be...

Page 18: ...removal of the filter increases the risk of injecting dust and other impurities into the engine When service is required first clean the outside of the filter housing then remove the old element as gently as possible and discard 1 Carefully clean the inside of the filter housing without allowing dust into the air intake 2 Inspect the new element Do not use a damaged element and never use an incorr...

Page 19: ...attery Tighten cables securely to battery terminals and apply a light coat of silicone dielectric grease to terminals and cable ends to prevent corrosion Keep vent caps and terminal covers in place Check the electrolyte level every 100 hours Keep the cable ends battery and battery posts clean Verify battery polarity before connecting or disconnecting the battery cables 1 When installing the batter...

Page 20: ...d ties to a new location 4 Thoroughly inspect all tubes hoses and connections every 250 hours IMPORTANT The hydraulic system can be permanently damaged if the oil becomes contaminated Before disconnecting any hydraulic component clean the area around fittings and hose ends to keep impurities out of the system a Before disconnecting any hydraulic component tag or mark the location of each hose then...

Page 21: ... b Once the level has stabilized and the air is purged fill the tank to the full mark on dipstick 4 12 HYDRAULIC OIL FILTERS___________________________________________________ The hydraulic system is protected by two 10 micron filters To replace hydraulic oil filter 1 Remove the old filters 2 Fill new filter with oil then install new filter Hand tighten only 3 Operate engine at idle speed with hyd...

Page 22: ...__________________________________________ 1 Remove dirt grease and oil from stud thread Do not lubricate threads 2 Position wheel on hub and inspect to insure full contact between mounting surface of wheel and hub or brake drum 3 Finger tighten all hardware then torque hardware in criss cross order always tighten nuts in the top position 4 Check and retorque daily until torque is maintained 85 95...

Page 23: ...t ambient temperature Read and follow the instructions on the anti freeze container and engine manual Keep radiator air passages clean Use compressed air 30 psi maximum to clean the fins Check and tighten the fan belt Replace clamps and hoses every two years If you have to add coolant more than once a month or add more than one quart at a time have a authorized Jacobsen Dealer check the cooling sy...

Page 24: ...in reverse Adjust the reel speed to 100 150 RPM a Apply lapping compound with a long handle brush to high spots first then along entire length of the reel b Continue lapping and at the same time make a slight adjustment on the reel until there is a uniform clearance along the full length of the cutting edges c When the blades have been evenly honed turn adjusting nut A to neutral Carefully and tho...

Page 25: ...ilter Install drain plug and refill with fresh oil Let engine cool before starting 2 Clean exterior of engine Paint exposed metal or apply a light coat of rust preventative oil 3 Add a fuel conditioner or biocide to prevent gelling or bacterial growth in fuel See your local fuel supplier Cutting Units 1 Wash the cutting units thoroughly then repair and paint any damaged or exposed metal 2 Lubricat...

Page 26: ...fuel and bleed fuel lines 2 Interlocks not set before leaving operator s seat 2 Engage parking brake move traction lever to N and set reel control to OFF Engine overheating 1 Coolant level low 1 Inspect and add coolant 2 Air intake restricted 2 Clean cooling air intake 3 Water pump belt broken or loose 3 Tighten or replace belt 4 Engine overload 4 Reduce forward speed Battery not holding charge 1 ...

Page 27: ...ther friction points that are not shown on the lubrication chart apply several drops of SAE 30 oil every 40 hours or as required 5 Grease fittings A F every 50 hours and fittings G K every 100 hours 6 2 LUBRICATION CHART______________________________________________________ WARNING Before you clean adjust or repair this equipment disengage all drives lower implements to the ground engage parking b...

Page 28: ...5 gal 19 l pail or Part No 5003102 55 gal 208 l Drum IV Capacity 3qt 2 8 l 50 50 water ethylene glycol mix Recommended Service and Lubrication Intervals Every 8 10 Hours Every 50 Hours Every 100 Hours Every 250 Hours Every 400 Hours Every 500 Hours Every 1000 Hours Yearly See Section Lubricant Type Air Filter I AR R 4 4 Battery Charge I 4 7 Belts I A I A R 3 2 3 3 Brake I A A 3 10 Cooling System I...

Page 29: ......

Page 30: ...oduktivity doporuþuje Jacobsen mít stále na skladČ y nejpoužívanČjší položky potĜebné pro údržbu Pro další podpĤrné materiály a školící pomĤcky jsme zahrnuli þísla dílĤ Objednávání následujících materiálĤ 1 Napište na objednávku své plné jméno a kompletní adresu 2 VysvČtlete kam a jak doruþit zásilku q UPS q Normální pošta q PĜes noc q 2 den 3 Objednávejte podle požadovaného množství þísla dílu a ...

Page 31: ...Nastavení vĜetena ke spodnímu noži 12 3 15 Režimy sekání 13 3 16 Nastavení výšky sekání 13 3 17 Demontáž sekací jednotky 14 3 18 Výška sekání pevný režim 14 3 19 Výška sekání plovoucí režim 15 3 20 Specifikace kroutících momentĤ 16 3 21 Specifický krouticí moment 16 4 ÚDRŽBA 4 1 ObecnČ 17 4 2 Motor 17 4 3 Motorový olej 18 4 4 Vzduchový filtr 18 4 5 Palivo 19 4 6 Palivový systém 19 4 7 Baterie 19 4...

Page 32: ...nými zaĜízeními bezpeþnČ pĜipevnČnými na svém místČ 12 Nikdy neodpojujte ani nepĜemost ujte žádné vypínaþe 13 Nikdy nemČĖte nastavení omezovaþe motoru a motor nepĜetáþejte 14 Oxid uhelnatý obsažený ve výfukových plynech mĤže být pĜi vdechnutí smrtelnČ jedovatý Nikdy nenechávejte spuštČný motor pokud nemáte zajištČno dostateþné vČtrání nebo pokud jste v uzavĜené místnosti 15 Palivo je vysoce vznČtl...

Page 33: ...onnost SeĜizování a údržbu musí vždy provádČt kvalifikovaný technik V pĜípadČ potĜeby dodateþných informací kontaktujte autorizovaného prodejce spoleþnosti Jacobsen který je informován o nejnovČjších postupech údržby zaĜízení a je schopen poskytnout rychlý a úþinný servis PĜi použití neoriginálních dílĤ a pĜíslušenství které nejsou autorizovány spoleþností Jacobsen zaniká záruka VAROVÁNÍ Systém bl...

Page 34: ... SAE 20W SAE 30W API klasifikace CD CE Vzduchový filtr Suchý typ s odsávacím ventilem a servisním indikátorem Alternátor 40 A 2 3 SEKACÍ JEDNOTKY _______________________________________________________ VĜeteno 3 vĜetena o šíĜce 660 mm nebo 3 vĜetena o šíĜce 762 mm PrĤmČr bubnu 178 mm Ložiska Samostavná kuželíková valivá ložiska ýepele 7 þepelí ŠíĜka sekání 660 mm vĜetena 1828 mm 762 mm vĜetena 213...

Page 35: ...m prostĜední vĜeteno 67116 7 lopatek 762 mm levé boþní vĜeteno 67123 7 lopatek 762 mm pravé boþní vĜeteno 67124 7 lopatek 762 mm prostĜední vĜeteno 67125 Vertikální sekaþka 660 mm levá 67139 Vertikální sekaþka 660 mm pravá 67140 Vertikální sekaþka 660 mm prostĜední 67141 Válce Drážkovaný pĜední válec ocelový pro 660 mm vĜeteno 67731 Drážkovaný pĜední válec ocelový pro 762 mm vĜeteno 67729 Plný vál...

Page 36: ...lternátor dokud nebude dosaženo správného napČtí Ĝemene UtáhnČte šroub A Obr 3A 3 3 HNACÍ ěEMEN ýERPADLA _________________________________________________ Nastavte Ĝemen þerpadla vĜetena C tak aby se prohnul o 6 mm silou 2 3 kgf aplikovanou uprostĜed mezi Ĝemenicemi 1 Povolte upevĖovací prvky D a E 2 PosuĖte þerpadlo se spojkou dolĤ abyste zvýšili napČtí Ĝemenu C a pak utáhnČte šrouby D a E 3 Utáh...

Page 37: ...spínaþ 3WD H tak aby byly kontakty otevĜené když je pedál pojezdu v neutrálu a zavĜely se i pĜi minimálním pohybu pedálu ve smČru vpĜed Obr 3C 3 5 SPÍNAýE RUýNÍ BRZDY ____________________________________________________ Povolte šrouby K a seĜićte oba spínaþe tak aby se kontakty právČ zavĜely když se páka brzdy pohne do zatažené polohy potom utáhnČte šrouby Obr 3D 3 6 KONCOVÝ VYPÍNAý ZVEDÁNÍ ______...

Page 38: ...a seĜićte zadní pružinu tak abyste nastavili rameno pojezdu do neutrálu a ZajistČte zadní matice a nastavte pĜední matice N tak abyste zachovali protažení pružiny O 9 mm b Nastartujte motor zkontrolujte popojíždČní a v pĜípadČ potĜeby opakujte proceduru Obr 3F 3 8 ZASTAVENÍ S POUŽITÍM PEDÁLU POJEZDU VPěED ____________________________ Povolte matice P a sešlápnČte pedál pojezdu do maximální polohy ...

Page 39: ...VEDACÍ RAMENO __________________________________________________ 1 Poloha zadního zvedacího ramena je správnČ nastavena když nárazníky zadní sekaþky vyvíjejí lehký tlak na spodní stranu nožních opČr 2 Odpojte zvedací ĜetČz T od kliky a podle potĜeby nastavte kulový kloub U Obr 3I 3 12 PěÍTLAK _________________________________________________________________ 1 Nastavte sekaþky do pevného režimu Kap...

Page 40: ...jít k vážnému poškození vĜetena þi spodního nože 6 Na seĜízení mají vliv také vlastnosti trávy a Suchá a Ĝídká tráva vyžaduje širší mezeru aby nedocházelo k hromadČní tepla a poškození vĜetena a spodního nože b Vysoce kvalitní tráva s dobrým obsahem vlhkosti vyžaduje užší mezeru témČĜ nulovou Obr 3L Obr 3M 3 14 NASTAVENÍ VěETENA KE SPODNÍMU NOŽI ___________________________________ 1 Než zaþnete pr...

Page 41: ...ého režimu 5 Chcete li pĜenastavit sekaþku z plovoucího do pevného režimu namontujte upevĖovací prvky H jako na ilustraci a odmontujte pĜední válec nebo ho zvednČte Obr 3O 3 16 NASTAVENÍ VÝŠKY SEKÁNÍ _________________________________________________ 1 ZvednČte a zablokujte zvedací ramena v transportním režimu 2 Pro snazší pĜístup ke šroubĤm pro nastavení výšky na pĜedních vĜetenech u motoru firma ...

Page 42: ...ocedury popsané v Kapitola 3 16 1 Nastavte seĜizovací šroub zadního válce a Pro výšky sekání od 9 do 44 mm používejte otvory M na rámu sekaþky a dva otvory znázornČné þernČ na nastavovacím prvku výšky F jako na ilustraci b Pro výšky sekání vČtší než 44 mm odmontujte nastavovací prvek F a otoþte montážní konzolu vzhĤru nohama potom použijte otvory N v rámu a dva otvory znázornČné þernČ nastavovacíh...

Page 43: ... konzolu vzhĤru nohama potom použijte otvory N v rámu a dva otvory znázornČné þernČ nastavovacího prvku F 3 Povolte matici L a nastavte šroub K tak abyste získali požadovanou výšku sekání X potom utáhnČte matici L k mČrce P 4 UmístČte jeden konec mČrky pod pĜední válec na kterémkoli konci vĜetena a posuĖte hlavu šroubu K nad spodní nĤž a Nastavte matici G tak aby zadní válec klesl na mČrku a pak u...

Page 44: ... 10 32 in lb Nm 40 4 5 50 5 7 1 2 20 ft lbs Nm 64 86 7 85 115 90 122 120 162 12 24 in lb Nm 50 5 7 65 7 3 9 16 12 ft lbs Nm 82 111 109 148 115 156 154 209 1 4 20 in lb Nm 75 8 4 100 11 3 107 12 1 143 16 1 9 16 18 ft lbs Nm 92 124 122 165 129 174 172 233 1 4 28 in lb Nm 85 9 6 115 13 0 120 13 5 163 18 4 5 8 11 ft lbs Nm 113 153 151 204 159 215 211 286 5 16 18 in lb Nm 157 17 7 210 23 7 220 24 8 305...

Page 45: ...ete pokynĤm výrobce motoru vČnovat patĜiþnou pozornost zajistíte tak maximální životnost motoru PĜi objednávání náhradních dílĤ k motoru kontaktujte jeho výrobce Správné zajetí nového motoru mĤže výraznČ ovlivnit jeho výkon a životnost V období zábČhu doporuþuje Jacobsen toto 1 BČhem prvních 50 hodin provozu by mČl nový motor pĜed plným zatížením nejdĜíve dosáhnout teploty minimálnČ 60 C 2 BČhem p...

Page 46: ...o neodstraĖujte Zbyteþné odstraĖování filtru zvyšuje riziko že se do motoru dostanou neþistoty Pokud je nutná oprava nejdĜíve oþistČte okolí filtru poté starý filtr co nejopatrnČji vyjmČte a vyhoćte 1 OpatrnČ vyþistČte pouzdro krytu a zabraĖte tomu aby do pĜívodu vzduchu napadal nČjaký prach 2 Zkontrolujte nový filtr Nikdy nepoužívejte poškozený nebo nesprávný filtr 3 Nasaćte nový filtr a ujistČte...

Page 47: ...ely k pólĤm baterie a naneste na póly baterie a konce kabelĤ slabou vrstvu dielektrické silikonové pasty pro zabránČní koroze MČjte ventilaþní zátky a krytky pólu vždy na svém místČ Každých 100 hodin kontrolujte hladinu elektrolytu Udržujte konce kabelĤ baterii a sloupky baterie v þistotČ PĜed pĜipojováním a odpojováním bateriových kabelĤ pĜekontrolujte polaritu baterie 1 PĜi instalaci baterie vžd...

Page 48: ... hadice a spojení každých 250 hodin DģLEŽITÉ Hydraulický systém mĤže být trvale poškozen pokud dojde ke kontaminaci oleje PĜed odpojováním jakýchkoliv hydraulických komponentĤ oþistČte prostor okolo šroubení a koncĤ hadic aby se do systému nedostaly žádné neþistoty a PĜed odpojením jakékoliv hydraulické souþástky oznaþte umístČní každé hadice a oþistČte prostor okolo šroubení b PĜi odpojování komp...

Page 49: ...ilizovala hladina oleje b Jakmile se stabilizuje hladina a je vytlaþen vzduch naplĖte nádrž po rysku maxima na mČrce 4 12 FILTRY HYDRAULICKÉHO OLEJE ____________________________________________ Hydraulický systém je chránČn dvČma 10 mikronovými filtry VýmČna filtru hydraulického oleje 1 Vymontujte staré filtry 2 NaplĖte nový filtr olejem a poté ho nainstalujte RuþnČ ho dotáhnČte 3 Nechte motor po ...

Page 50: ...________________________________ 1 OdstraĖte neþistoty mazivo a olej ze závitu šroubĤ Závity nepromazávejte 2 UmístČte kolo na náboj a ujistČte se že je zajištČn plný kontakt mezi kolem a nábojem nebo brzdovým bubnem 3 RuþnČ dotáhnČte matice a poté je dotáhnČte kĜížem pomocí momentového klíþe vždy dotáhnČte matice v horní poloze 4 Kontrolujte a opravujte kroutící moment dennČ dokud nebude dosažen ...

Page 51: ...zi etylenglykolu pro nejnižší okolní teplotu PĜeþtČte si a dodržujte pokyny na nádobČ s nemrznoucí kapalinou a v pĜíruþce k motoru Vzduchové kanály chladiþe udržujte v þistotČ Pro þištČní žeber chladiþe použijte stlaþený vzduch max 210 kPa Zkontrolujte a napnČte Ĝemen vČtráku Každé dva roky vymČĖte hadice a svorky Pokud musíte doplĖovat chladicí kapalinu víckrát než jednou za mČsíc nebo najednou p...

Page 52: ...Nastavte rychlost vĜetena na 100 150 ot min a Naneste brusný prostĜedek kartáþem s dlouhou rukojetí nejprve na vysoká místa a pak po celé délce vĜetena b Pokraþujte v lapování a zároveĖ lehce nastavujte vĜeteno abyste dosáhli rovnomČrné vĤle po celé délce bĜitĤ c Až budou þepele rovnomČrnČ honované otoþte seĜizovací matici A na neutrál OpatrnČ a dĤkladnČ odstraĖte veškerý brusný prostĜedek z vĜete...

Page 53: ... zpČt vypouštČcí zátku a doplĖte þerstvý olej PĜed nastartováním nechte motor vychladnout 2 OþistČte povrch motoru Nalakujte obnažený kov nebo ho natĜete olejem zabraĖujícím rezavČní 3 PĜidejte do paliva palivový kondicionér nebo biocid pro zabránČní gelovatČní þi rĤstu bakterií Více informací získáte u svého dodavatele paliva Sekací jednotky 1 DĤkladnČ umyjte sekací jednotky a pak opravte a nalak...

Page 54: ...ení nastaveno pĜedtím než Ĝidiþ opustí sedadlo 2 ZatáhnČte ruþní brzdu nastavte páku pojezdu do polohy N a OFF vypnČte spínaþ vĜeten Motor se pĜehĜívá 1 Málo chladící smČsi diesel 1 Zkontrolujte a doplĖte chladicí kapalinu 2 Ucpaný pĜívod vzduchu 2 VyþistČte pĜívod chladícího vzduchu 3 PĜetržený nebo volný Ĝemen vodní pumpy diesel 3 DotáhnČte nebo vymČĖte Ĝemen 4 Motor je pĜetížen 4 Snižte rychlos...

Page 55: ...y v tabulce mazání kápnČte na tato místa nČkolik kapek oleje SAE 30 každých 40 hodin nebo dle potĜeby 5 Namažte spoje A F po každých 50 hodinách a spoje G K po každých 100 hodinách 6 2 TABULKA MAZÁNÍ_________________________________________________________ VAROVÁNÍ PĜed þištČním seĜizováním nebo opravami zaĜízení vypnČte všechny pohony spust te náĜadí na zem zatáhnČte ruþní brzdu vypnČte motor a v...

Page 56: ...dro obsahující 19 l nebo objednací þ 5003102 sud obsahující 208 l IV Kapacita 2 8 l 50 50 smČs vody a etylenglykolu Doporuþené servisní a mazací intervaly Každých 8 10 hodin Každých 50 hodin Každých 100 hodin Každých 250 hodin Každých 400 hodin Každých 500 hodin Každých 1000 hodin RoþnČ Viz kapitola Typ maziva Vzduchový filtr I AR R 4 4 Nabíjení baterie I 4 7 ěemeny I A I A R 3 2 3 3 Brzda I A A 3...

Page 57: ...ngine Exhaust 58 16 1 Radiator Installation 60 16 2 Radiator Installation 62 17 1 Air Filter and Circuit Breaker 64 18 1 Tanks 66 19 1 Hydro Pump and Charge Filter 68 20 1 Pump Suction and Return Hydraulics 70 21 1 Traction Hydraulics 72 21 2 Steering and Lift Hydraulics 74 22 1 Reel Hydraulics 76 23 1 Reel Lift 78 24 1 Rear Lift Arm 80 25 1 Reels 82 26 1 Roller Brackets and Skids 83 27 1 Reel Bea...

Page 58: ...s void if tractor is used for towing Do not use start assist fluids Use of such fluids in the air intake system may be potentially explosive or cause a runaway engine condition that would result in engine damage 1 Parking brake Off 2 Slowly depress hydro pedal Vehicle weight wet 1720 lbs 780 kg Vehicle horsepower 19 hp 14 2 kw at 3400 r p m 1 Parking brake Off 2 Reel switch On 3 Slowly depress hyd...

Page 59: ... Fluids 22 4124691 2 Decal Tri King 1900D 23 3004207 1 Decal Opening Hood 24 REF 1 Serial Plate On Left Front Wheel Motor Mount 25 4125772 1 Decal Patent 26 4117468 1 Decal Noise 105 dB 27 2811597 1 Decal Parking Brake Light 28 4124721 1 Decal GreensCare 29 4141266 1 Decal Oil 12 13 14 10 16 3003349 WARNING Read operators manual Do not allow untrained operators to use machine Use caution while ope...

Page 60: ... 2 3 4 5 6 7 8 26 8 7 19 20 19 20 23 29 30 25 27 7 18 11 10 22 28 14 12 13 9 12 8 8 24 15 21 16 17 37 40 18 39 38 35 15 24 34 32 33 41 23 31 38 40 37 36 37 36 37 TRI KING 2 1 Hood and Cowlings Serial No All ...

Page 61: ...0061 1 Right Footrest Pad 17 2810062 1 Left Footrest Pad 18 400188 7 Screw 5 16 18 x 1 Hex Head 19 403910 3 Screw 10 24 x 1 2 Truss Head 20 1001758 1 Rubber Latch 21 3003748 2 Edging 22 440134 2 Carriage Bolt 3 8 16 x 3 23 443106 3 Nut 5 16 18 Hex 24 443110 10 Nut 3 8 16 Hex 25 400126 1 Screw 1 4 20 Hex Head 26 452008 12 Flat Washer 3 8 27 3003968 1 Filter Cover 28 360343 1 Hose Clamp 29 2810029 1...

Page 62: ...34 1 2 3 3 4 5 6 6 6 7 7 7 7 18 8 8 8 9 10 10 11 12 13 18 19 14 15 16 20 21 8 17 TRI KING 3 1 Seat and Base Serial No 67043 1601 4743 ...

Page 63: ...washer 5 16 Hvy 8 443106 10 Nut 5 16 Hex 9 440088 1 Carriage Bolt 5 16 18 x 1 3 4 10 3004410 2 Spacer 11 3003402 1 Seat Latch 12 443806 2 Nut 5 16 18 Hex Jam 13 66172 1 Seat 14 163583 1 Seat Switch Wire Harness 15 434011 2 Screw 1 4 20 x 5 8 Soc Hd 16 446130 2 Lockwasher 1 4 17 554390 1 Switch Seat Reference SW6 18 3001328 6 Screw 5 16 18 x 5 8 Wsh Head 19 3003928 1 Literature Pouch 20 3006988 1 S...

Page 64: ...36 1 2 3 4 5 6 6 6 7 7 7 7 18 18 18 8 8 8 9 10 10 11 12 13 19 14 16 15 8 17 TRI KING 3 2 Seat and Base Serial No 67043 4744 and Up ...

Page 65: ... 10 Flat Washer 5 16 7 446136 10 Lockwasher 5 16 Hvy 8 443106 10 Nut 5 16 Hex 9 440088 1 Carriage Bolt 5 16 18 x 1 3 4 10 3004410 2 Spacer 11 3003402 1 Seat Latch 12 443806 2 Nut 5 16 18 Hex Jam 13 4139430 1 Seat 14 523357 1 Seat Adjuster 15 523356 1 Seat Adjuster with Handle 16 4139450 1 Switch Seat Reference SW6 17 5003769 1 Harness Seat 18 3001328 6 Screw 5 16 18 x 5 8 Wsh Head 19 3003928 1 Lit...

Page 66: ...38 1 2 4 5 8 9 10 4 12 12 13 14 15 16 17 18 19 20 21 17 18 19 26 27 28 22 25 24 23 Fuse Block Part of Wire Harness 3 7 6 11 TRI KING 4 1 Dash Installation Serial No All ...

Page 67: ... 4 Truss Head 10 446116 4 Lockwasher 10 11 403770 2 Screw 5 16 18 x 3 4 Hex Flange 12 3003540 7 1 Mounting Bracket 13 3002098 2 Latch 14 404016 4 Screw 1 4 20 x 5 8 Truss Head 15 3003468 2 Plastic Plate 16 2810209 1 Console Cover 17 452004 8 Flat Washer 1 4 18 446130 8 Lockwasher 1 4 Hvy 19 443102 8 Nut 1 4 20 Hex 20 3003541 2 Latch Bracket 21 441664 4 Screw 1 4 20 x 5 8 Round Head 22 2811364 1 St...

Page 68: ...40 30 3 1 29 31 32 6 5 4 X Y X Y 18 19 20 21 22 23 24 24 25 27 26 7 8 9 8 10 11 12 13 33 34 Z 28 Z 2 23 24 24 25 26 27 14 35 16 15 36 37 17 TRI KING 5 1 Instrument Panel Serial No All ...

Page 69: ...2811632 1 Harness Brake Light 18 162723 1 Hour Meter Reference U3 19 N S 1 Bracket 20 447006 1 Lockwasher 21 444310 1 Nut 10 24 Hex 22 162721 1 Volt Meter Reference U2 23 N S 1 Bracket 24 444306 4 Nut 8 32 Hex 25 447206 2 Lockwasher 8 26 447002 2 Lockwasher 6 27 444304 2 Nut 6 28 1004795 1 Wire Harness See Note 29 364774 1 Circuit Breaker Boot 30 338601 1 10 Amp Circuit Breaker Reference CB2 31 16...

Page 70: ...42 1 2 4 5 6 7 8 9 10 3 4 4 6 7 11 12 13 14 16 17 12 17 18 10 3 4 24 19 20 21 22 23 23 25 26 26 15 TRI KING 6 1 Hydro Control Linkage Serial No All ...

Page 71: ...4754 2 Locknut 5 16 24 Center 11 400192 1 Screw 5 16 18 x 1 1 2 Hex Head 12 443106 2 Nut 5 16 18 Hex 13 453017 1 Flat Washer 1 2 14 460028 1 Cotter Pin 1 8 x 1 15 444708 1 Locknut 1 4 20 Center 16 400264 1 Screw 3 8 16 x 1 1 4 Hex Head 17 443810 2 Nut 3 8 16 Hex Jam 18 471214 1 Grease Fitting 19 446142 4 Lockwasher 3 8 Hvy 20 3002673 7 2 Bracket 21 354989 2 Rubber Stop 22 400260 4 Screw 3 8 16 x 7...

Page 72: ...44 16 17 12 11 10 19 14 15 13 6 7 21 18 9 24 24 25 25 5 23 4 10 1 2 3 22 20 8 4 TRI KING 7 1 Front Motors and Brakes Serial No All ...

Page 73: ...60028 4 Cotter Pin 1 8 x 1 13 346771 2 Pin 5 16 14 1001634 1 L H Caliper See 35 1 for Service Parts 15 1001635 1 R H Caliper See 35 1 for Service Parts 16 453009 2 Flat Washer 5 16 17 460008 2 Cotter Pin 5 64 x 3 4 Plated 18 4182425 1 Wheel Motor Left Front 18 4189920 1 Wheel Motor Right Front 4178561 1 Rear Seal Kit 4178562 1 Shaft Seal Kit Includes Shaft Seal Seal Guards 5003384 1 Shaft and Bear...

Page 74: ...46 1 A 2 3 4 5 6 23 8 9 10 11 12 13 15 16 17 18 19 26 25 28 29 20 21 22 27 25 15 16 24 17 14 7 A B B 30 30 31 16 16 TRI KING 8 1 Parking Brake Neutral Start and 3WD Switches Serial No All ...

Page 75: ... Screw 5 16 18 x 2 3 4 Hex Head 13 3002788 1 Bracket Parking Brake Switch 14 3009193 AR Shim Proximity Switch 15 444718 2 Locknut 5 16 18 Center 16 453009 4 Flat Washer 5 16 17 2811659 1 Spacer Nylon 18 400118 1 Screw 1 4 20 x 1 3 4 Hex Head 19 444708 1 Locknut 1 4 20 Center 20 2811654 1 Arm Switch Actuating 21 352936 1 Bushing 22 REF 1 Parking Brake See 7 1 23 403860 4 Screw 8 32 x 5 8 Truss Head...

Page 76: ...19 21 22 31 14 15 18 18 18 28 20 17 24 23 24 24 16 18 28 23 24 21 1 12 29 9 9 8 8 6 6 11 13 12 7 To Motor To Control Panel 3 32 6 10 2 4 30 8 9 8 Engine Stop Lever 26 To Motor 9 5 36 37 33 35 34 TRI KING 9 1 Fuel Control Serial No All ...

Page 77: ...400200 1 Screw 5 16 18 x 2 1 2 Hex Head 16 444718 1 Locknut 5 16 18 Center 17 554748 1 Fuel Line Hose Cut to 13 18 366526 4 Hose Clamp 19 554748 1 Fuel Line Hose Cut to 37 20 554752 1 Fuel Line Hose Cut to 88 21 3003523 1 Negative Battery Cable 22 3003764 1 Convoluted Conduit 23 2810624 1 Positive Battery Cable 24 473142 15 Nylon Tie 25 447010 1 Washer 1 4 Star 26 362535 2 Screw 27 3004410 2 Space...

Page 78: ...Serial Numbers Notes 1 4130752 1 Frame 2 328133 4 Bushing 3 3002170 4 Bushing 4 365106 2 Bushing 5 471216 1 Grease Fitting 6 2811393 1 Column Assembly 7 400188 2 Screw 5 16 18 x 1 Hex Head 8 445781 2 Nut 5 16 18 Whizlock Flange 9 452006 2 Flat Washer 5 16 Serial Plate 2 2 2 5 4 3 1 7 8 6 9 9 9 8 7 ...

Page 79: ...tes 1 69157 1 ROPS Assembly 2 4187944 1 Base ROPS 3 5003595 1 Rear Backing Plate 4 5003596 1 Seat Belt Bracket 5 5000629 1 Seat Belt 60 6 400370 2 Screw 7 16 20 x 1 Hex Head 7 452010 2 Flat Washer 7 16 8 444730 2 Locknut 7 16 20 Uni Torque 9 400408 8 Screw 1 2 13 x 1 1 2 Hex Head 10 446154 12 Lockwasher 1 2 Heavy 11 443118 12 Nut 1 2 13 Hex 12 400420 4 Screw 1 2 13 x 3 1 2 Hex Head 13 5003598 1 De...

Page 80: ...52 1 13 3 8 2 2 3 8 6 9 7 22 21 12 11 10 9 5 14 15 19 20 18 4 23 17 16 TRI KING 12 1 Rear Steering Serial No All ...

Page 81: ... 10 452018 1 Flat Washer 3 4 11 445676 1 Nut 3 4 16 Slotted 12 460054 1 Cotter Pin 3 16 x 1 3 4 13 400408 1 Screw 1 2 13 x 1 1 2 Hex Head 14 4182425 1 Wheel Motor 4178561 1 Rear Seal Kit 4178562 1 Shaft Seal Kit Includes Shaft Seal Seal Guards 5003384 1 Shaft and Bearing 556450 4 Bolt 15 400414 4 Screw 1 2 13 x 2 1 4 Hex Head 16 3008482 2 Spacer 17 554780 1 Key 18 554779 1 Nut 19 220290 7 1 Rear W...

Page 82: ...54 5 6 3 1 2 4 7 8 15 9 10 11 12 17 18 16 14 13 9 19 20 21 22 23 TRI KING 13 1 Engine and Pump Serial No All ...

Page 83: ...6 Hvy 10 2810545 5 Screw SKT Button Cap 11 2809727 1 Clutch 12 4130754 7 1 Pump Mount Bracket 13 1000970 1 Hydraulic Pump Reel See 31 1 for Service Parts 14 400226 4 Screw 5 16 24 x 1 Hex Head 15 3001950 1 V Belt 16 364501 1 Temperature Sender Reference U5 17 446128 1 Lockwasher 1 4 18 361001 1 Nut M6 1 19 4141024 1 Fan Engine Cooling Serial No 4996 and Up 20 4125492 1 Spacer Fan Serial No 4996 an...

Page 84: ...13 20 20 13 19 12 19 19 12 13 2 13 11 20 13 13 2 1 21 21 1 19 13 18 19 Grounding Cable to Engine Block 15 15 17 17 9 9 16 15 Part of Frame Part of Frame 14 7 6 TRI KING 14 1 Diesel Engine Mounting Diesel Engine Serial No All ...

Page 85: ... 446142 4 Lockwasher 3 8 Hvy 9 452004 4 Flat Washer 1 4 10 443110 4 Nut 3 8 16 Hex 11 444718 2 Locknut 5 16 18 Center 12 361005 3 Bolt M8 1 25 x 25mm 13 446136 13 Lockwasher 5 16 Hvy 14 400108 2 Screw 1 4 20 x 3 4 Hex Head 15 446130 6 Lockwasher 1 4 Heavy 16 443102 2 Nut 1 4 20 Hex 17 400106 4 Screw 5 16 18 x 5 8 Hex Head 18 443106 1 Nut 5 16 Hex 19 452006 5 Flat Washer 5 16 20 457016 6 Washer 5 1...

Page 86: ...58 4 4 3 3 2 1 14 14 14 5 6 7 8 8 8 9 10 11 12 13 15 16 17 18 18 19 20 20 21 22 22 22 23 24 27 28 29 30 25 25 26 26 TRI KING 15 1 Diesel Engine Exhaust Serial No All ...

Page 87: ...Bolt Included with Engine 13 553934 1 Hook Engine Included with Engine 14 1002033 2 Exhaust Clamp 15 4121920 1 Muffler 16 553020 1 Gasket Exhaust Included with Engine 17 594331 4 Bolt Muffler Included with Engine 18 452006 6 Flat Washer 5 16 19 400264 1 Screw 3 8 16 x 1 1 4 Hex Head 20 452008 2 Flat Washer 3 8 21 446142 1 Lockwasher 3 8 Heavy 22 444762 3 Locknut 3 8 16 Center 23 4123003 1 Pipe Exh...

Page 88: ...60 8 8 7 6 5 4 3 2 1 9 10 11 12 13 14 15 16 17 17 17 4 5 19 18 21 21 6 5 6 4 20 5 5 TRI KING 16 1 Radiator Installation Serial No 1601 4995 ...

Page 89: ... 4 Hvy 6 452004 8 Flat Washer 1 4 7 1001964 7 7 Front Slide Shroud 8 3004187 AR Weather Strip 9 557578 1 Lower Hose 10 557563 1 Hose Clamp 11 554244 2 Bolt 12 553887 4 Cup Washer 13 553886 2 Cushion 14 452008 AR Flat Washer 3 8 15 553859 2 Snap Pin 16 554241 1 Upper Hose 17 554083 3 Hose Clamp 18 2810662 1 Radiator Support 19 3006127 1 Iso Mount Radiator 20 REF 1 Bracket Solenoid See 9 1 21 443102...

Page 90: ...62 1 2 3 4 4 4 4 5 5 5 6 6 6 7 8 9 10 10 11 13 13 14 14 15 18 19 6 5 6 15 16 17 17 17 17 20 20 20 12 12 TRI KING 16 2 Radiator Installation Diesel Engine Serial No 4996 and Up ...

Page 91: ...4708 1 Locknut 1 4 20 Hex Center 8 400108 1 Screw 1 4 20 x 3 4 Hex Head 9 4150418 1 Bracket Radiator Mount 10 4149217 AR Weather Strip 11 4140788 1 Bracket Upper Radiator Mount 12 553887 4 Washer Cup 13 443810 2 Nut 3 8 16 Hex Jam 14 460312 2 Hain Pin 15 4150598 2 Screw 3 8 16 x 2 Hex Head Hole in end for hairpin 16 553886 2 Cushion Radiator 17 452008 6 Flat Washer 3 8 4141392 1 Radiator Hose Kit ...

Page 92: ...64 13 8 9 4 17 3 4 A 14 15 1 2 5 6 7 11 22 21 20 19 18 16 10 12 A TRI KING 17 1 Air Filter and Circuit Breaker Serial No All ...

Page 93: ...sher 5 16 Hvy 7 452006 2 Flat Washer 5 16 8 3000359 1 Circuit Breaker 50 Amp Reference CB1 9 364774 1 Protector Boot 10 3004256 1 Bracket 11 364703 1 Over Flow Hose 30 Long 12 1001752 1 Air Cleaner Indicator Adapter 13 REF 1 Bracket Circuit Breaker See 14 1 14 3004253 1 Male Elbow 15 5002126 1 Tube 16 3004333 1 Bulkhead Fitting 17 473142 1 Nylon Tie 18 400260 2 Screw 3 8 16 x 7 8 Hex Head 19 55758...

Page 94: ...66 1 2 3 7 8 9 8 10 11 12 13 14 15 16 16 17 18 19 20 21 6 22 5 4 17 1 5 7 11 TRI KING 18 1 Tanks Serial No All ...

Page 95: ... 1 Gasket 7 344132 4 Flat Washer 8 443118 4 Nut 1 2 13 Hex 9 1001134 1 Fuel Tank 10 4106900 1 Fuel Cap 11 361117 2 Fuel Tank Bushing 12 346361 2 Battery Hold Down 13 325822 1 Fuel Line 14 x 1 4 I D 14 1001311 1 Fuel Shut Off Valve 15 1000973 1 Battery Bracket 16 400424 4 Screw 1 2 13 x 4 1 2 Hex Head 17 446130 3 Lockwasher 1 4 Hvy 18 443102 3 Nut 1 4 20 Hex 19 3003473 1 Hose Clamp 20 3003665 1 Stu...

Page 96: ...68 1 2 3 4 4 5 6 7 8 9 10 5 11 12 13 14 15 19 20 17 18 18 21 22 22 23 24 25 26 27 16 TRI KING 19 1 Hydro Pump and Charge Filter Serial No All ...

Page 97: ...1 Key 3 16 x 5 8 Morton Serial No 1601 4250 12 463113 1 Key 3 16 x 3 4 Morton Serial No 4251 and Up 13 1001630 1 Universal Joint Serial No 1601 4250 13 4129589 1 Universal Joint Serial No 4251 and Up 554663 1 Cross and Bearing Kit 14 4129588 1 Fan 15 412020 2 Screw 5 16 18 x 1 Set 16 400272 2 Screw 3 8 16 x 2 1 4 Hex Head 17 400274 1 Screw 3 8 16 x 2 1 2 Hex Head 18 446142 4 Lockwasher 3 8 Hvy 19 ...

Page 98: ...26 27 28 29 10 12 11 14 16 32 33 19 19 8 18 16 33 34 31 20 20 25 21 22 23 21 1 35 34 14 14 17 6 7 3 9 24 5 4 19 2 30 36 36 38 38 38 37 38 Rear View of Hydraulic Pump TRI KING 20 1 Pump Suction and Return Hydraulics Serial No All ...

Page 99: ...58 4 Hose Clamp 15 3003115 1 Tube Suction 16 354080 3 Hose Clamp 17 3003114 1 Formed Hose 18 3003219 1 Hose Suction 19 473142 4 Nylon Tie 20 443810 2 Nut 3 8 16 Hex Jam 21 452008 2 Flat Washer 3 8 22 3003223 1 Drain Shield 23 444762 1 Locknut 3 8 16 Center 24 3004410 1 Spacer 25 361723 1 Rubber Stop 26 339900 1 O Ring 27 1001148 1 Filter 28 549597 1 Filter Element 29 3003256 1 Adapter Beaded Tube ...

Page 100: ...2 F F E E C D C D 11 11 14 15 15 11 17 17 16 16 11 11 4 3 9 9 7 8 9 9 7 18 8 7 5 7 18 6 10 2 12 19 19 19 19 19 11 13 1 19 19 19 Rear View of Hydraulic Pump TRI KING 21 1 Traction Hydraulics Serial No All ...

Page 101: ...03242 7 1 Bracket 6 441668 2 Carriage Bolt 1 4 20 x 1 1 4 7 452004 6 Flat Washer 1 4 8 444708 4 Locknut 1 4 20 Center 9 3003110 2 Clamp 10 3004410 1 Spacer 11 339989 11 Adapter Straight 12 340121 1 Fitting Tee 13 340265 1 Adapter Tee 14 4111942 1 3WD Valve See 34 1 for Service Parts 15 1001496 2 Rear Motor Hose 16 1001495 2 Traction Hose 17 473142 4 Nylon Tie 18 400116 2 Screw 1 4 20 x 1 1 2 Hex H...

Page 102: ...alve Asm Bottom View Aux In Out LT RT A A B B C C D D E E 1 2 3 3 4 5 5 6 7 8 9 10 11 12 13 13 13 14 14 15 15 15 15 16 17 18 19 20 20 20 21 22 23 24 24 24 25 TRI KING 21 2 Steering and Lift Hydraulics Serial No All ...

Page 103: ...1002941 1 Right Steering Hose 9 354080 2 Hose Clamp 10 446136 1 Lockwasher 5 16 Hvy 11 443106 1 Nut 5 16 18 Hex 12 473142 4 Nylon Tie 13 339974 3 Adapter Straight 14 340057 2 Adapter 90 15 340061 4 Adapter 90 16 1002940 1 Lift Cylinder Hose 17 1001500 1 Lift Cylinder Hose 18 1001502 1 Lift Valve Hose 19 1001501 1 Lift Valve Hose 20 339979 3 Adapter Straight 21 340088 1 Adapter 90 22 1001356 1 Lift...

Page 104: ...76 16 16 3 16 16 2 12 13 14 15 1 1 1 1 6 7 15 9 10 8 11 2 16 16 4 3 13 14 15 5 18 17 11 11 8 10 6 9 8 5 TRI KING 22 1 Reel Hydraulics Serial No All ...

Page 105: ...Hose 6 1001490 1 Right Reel Motor Return Hose 7 1001489 1 Left Reel Motor Return Hose 8 1001493 1 Center Reel Motor Pressure Hose 9 1001494 1 Right Reel Motor Pressure Hose 10 1001492 1 Left Reel Motor Pressure Hose 11 2810171 3 Snap Ring 12 340062 1 Adapter 90 13 339980 2 Adapter Straight 14 340070 2 Adapter 90 15 1002603 3 Reel Motor See 32 1 for Service Parts 16 3003473 3 Clamp 17 339979 3 Adap...

Page 106: ...78 16 15 32 35 34 26 1 37 9 33 35 36 36 28 29 27 1 32 13 10 15 30 32 31 3 4 5 6 7 8 11 12 17 18 19 20 21 22 23 24 25 26 19 19 2 38 TRI KING 23 1 Reel Lift Serial No All ...

Page 107: ...Nut 1 4 20 Hex 16 446130 2 Lockwasher 1 4 Hvy 17 471214 2 Grease Fitting 18 400192 1 Screw 5 16 18 x 1 1 2 Hex Head 19 443106 4 Nut 5 16 18 Hex 20 400190 1 Screw 5 16 18 x 1 1 4 Hex Head 21 1002606 7 1 Lift Pedal 22 3003474 1 Pedal Grip 23 453017 1 Flat Washer 1 2 24 460028 1 Cotter Pin 1 8 x 1 25 400118 2 Screw 1 4 20 x 1 3 4 Hex Head 26 444708 4 Locknut 1 4 20 Center 27 3003035 1 Pin 28 461418 1...

Page 108: ...80 1 2 3 4 5 6 7 8 9 10 11 12 13 14 15 18 17 16 19 20 21 22 23 24 25 26 27 28 29 30 31 32 35 34 33 18 18 TRI KING 24 1 Rear Lift Arm Serial No All ...

Page 109: ...ot Pin 15 460096 1 Cotter Pin 5 16 x 1 3 4 16 400188 1 Screw 5 16 18 x 1 Hex Head 17 446136 1 Lockwasher 5 16 Hvy 18 452006 3 Flat Washer 5 16 19 443106 1 Nut 5 16 18 Hex 20 443110 2 Nut 3 8 16 Hex 21 1001258 7 1 Crank Bottom 22 463040 1 Key 1 4 x 1 1 4 Woodruff 23 1001259 7 1 Lift Top Crank 24 415519 1 Screw 5 16 18 x 3 8 Set 25 444780 1 Locknut 1 2 20 26 5000183 1 Limit Switch Reference SW4 27 5...

Page 110: ...r Size In Inches No of Blades Bedknife Bedknife Backing Rear Roller Location Reel Part No Mower Frame Complete Tube Shaft Left Center Right 67114 26 7 554284 5000616 132639 5002831 3003415 5002087 1001643 67115 5002088 1001643 67116 5002087 1001643 67123 30 7 503550 5000617 132640 5002832 3003414 5002089 1001642 67124 5002090 1001642 67125 5002089 1001642 ...

Page 111: ...er 9 400264 8 Screw 3 8 16 x 1 1 4 Hex Head 10 446142 8 Lockwasher 3 8 Hvy 11 446174 4 Lockwasher 3 4 Light 12 443110 8 Nut 3 8 16 Hex 13 434002 4 Screw 3 4 16 x 1 1 4 Socket Head 14 471214 2 Grease Fitting 15 3007673 2 Housing 16 132680 2 Rear Roller Adjuster 17 3000313 4 Adjusting Nut 18 3008359 1 L H Front Roller Bracket 19 3008360 1 R H Front Roller Bracket 20 207473 1 R H Skid 21 207474 1 L H...

Page 112: ...84 4 3 2 38 33 34 24 30 31 8 7 9 5 29 22 23 26 19 35 20 32 18 25 21 28 12 13 11 10 2 3 4 6 5 1 14 15 16 17 27 13 36 37 TRI KING 27 1 Reel Bearing Housing Serial No All ...

Page 113: ... 338585 1 Cover 16 446116 4 Lockwasher 10 17 434038 4 Screw 10 24 x 1 2 18 3003611 2 Adjusting Nut 19 365995 2 Washer 20 3004189 2 Adjusting Screw 21 3003517 2 Shoulder Bolt 22 3004370 2 Locknut 3 4 16 Thin Security 23 434031 2 Screw 1 4 20 x 3 4 Socket Head 24 364151 2 Wave Washer 25 472519 2 Plug 26 445718 2 Nut 5 8 18 Hex Stover Lock 27 400258 4 Screw 3 8 16 x 3 4 Hex Head 28 364282 1 Support P...

Page 114: ...86 12 11 10 28 13 24 10 8 8 7 6 4 12 11 10 9 19 18 18 17 20 21 6 5 15 16 27 26 26 22 23 20 25 13 11 3 2 29 11 32 11 12 14 1 1 30 31 33 33 33 33 TRI KING 28 1 Shields and Center Pivot Arm Serial No All ...

Page 115: ...Only 16 3002814 1 Reel Bumper Bracket 67116 67125 Only 17 361723 2 Rubber Bumper 67116 67125 Only 18 443810 4 Nut 3 8 16 Jam 67116 67125 Only 19 400190 4 Screw 5 16 18 x 1 1 4 Hex Head 67116 67125 Only 20 446136 AR Lockwasher 5 16 Hvy 21 443106 4 Nut 5 16 18 Hex 67116 67125 Only 22 122875 6 1 Rear Shield 67114 67115 Only 22 122769 6 1 Rear Shield 67123 67124 Only 23 1003056 6 1 Rear Shield 67116 O...

Page 116: ...23 26 27 17 30 19 18 20 19 18 24 20 10 13 14 25 9 7 8 6 2 15 3 15 10 19 18 20 17 30 11 12 23 22 21 22 16 9 7 6 8 1 4 15 3 3 26 Reels 30 Reels 28 28 29 29 7 16 7 TRI KING 29 1 Side Pivot and Lift Arms Serial No All ...

Page 117: ...4 13 2811278 1 R H Lift Arm Includes 15 25 28 67124 14 2811279 1 L H Lift Arm Includes 15 25 28 67123 15 3007694 2 Bushing 16 400262 AR Screw 3 8 16 x 1 Hex Head 17 441904 2 Screw 1 2 13 x 10 Full Thread Hex 18 364157 AR Spring 19 3007908 AR Plug 20 364160 AR Shackle 21 3004065 2 Lift Chain 22 1001854 4 Shackle 23 471214 2 Grease Fitting 24 3005219 2 Bracket 67123 67124 67125 Only 25 3003041 2 Sha...

Page 118: ...Down Pressure Kit 1 400268 2 Screw 3 8 16 x 1 3 4 2 366974 2 Rod End 3 364328 2 Spacer 4 443812 2 Nut 3 8 24 5 347935 2 Washer Special 6 460312 2 Hairpin 7 453017 2 Washer 8 366978 2 Eye Bolt 9 443810 2 Nut 3 8 16 Jam 10 400272 4 Screw 3 8 16 x 2 1 4 11 366976 2 Spring 12 366975 2 Tube Down Pressure 13 3005136 2 Block 14 453011 2 Washer 3 8 15 443110 2 Nut 3 8 16 16 446142 2 Lockwasher 3 8 ...

Page 119: ...A 2 N S 4 Snap Ring Included in A 3 N S 1 Oil Seal Included in A 4 5001435 1 Driveshaft 5 N S 3 Seal Plate Included in A 6 590286 6 Alignment Pin 7 5001437 1 Drive Key 8 N S 3 Wear Plate Included in A 9 N S 3 Diamond O Ring Included in A A 5001436 1 Repair Kit Includes 1 3 5 8 9 TRI KING 31 1 Reel Pump Part No 1000970 Serial No All ...

Page 120: ...92 16 17 14 15 31 30 29 28 27 26 12 8 11 25 24 9 32 10 5 6 13 7 18 20 19 21 22 23 TRI KING 32 1 Reel Motor Part No 1002603 Serial No All ...

Page 121: ... 00075 Gold Gasket Included in A 11 5001446 4 Sleeve Bearing 12 5001447 1 Idler Shaft 13 5001448 1 Stator 14 555828 4 Screw 1 4 20 15 5001449 2 Alignment Pin 16 5001450 1 Shipping Plug 17 5001451 1 Shipping Plug 18 555830 1 Snap Ring Included in A 19 N S 1 Adjustment Screw Included in C 20 N S 1 Cap Included in B and C 21 N S 1 Copper Gasket Included in A B and C 22 N S 1 Spring Included in C 23 N...

Page 122: ...94 8 9 6 13 7 14 13 4 1 16 3 11 2 15 5 12 9 6 13 7 14 13 4 10 10 1 16 3 11 5 12 Part Number 4129590 Part Number 4120764 TRI KING 33 1 Traction Pump Part No 4120764 and 4129590 Serial No All ...

Page 123: ...1 Square Cut Seal Also included in B 6 N S 1 Square Cut Seal Also included in B 7 N S 1 Pump Plate 8 546416 1 Grass Shield Part Number 4120764 Only 9 N S 2 Snap Ring 10 4120216 1 Carrier B 2500620 1 Oil Seal Kit Included in B 11 N S 1 Square Cut Seal Included in B 12 N S 1 Square Cut Seal Included in B 13 N S 1 Square Cut Seal Included in B 14 N S 2 Oil Seal Includes 11 14 15 361631 1 Fitting 90 B...

Page 124: ...4111942 Serial No All Item Part No Qty Description Serial Numbers Notes 1 4113025 2 Check Valve 2 4113026 1 Spool Valve 3 4113027 1 Solenoid Coil Reference K6 4 5003578 2 Seal Kit Check Valve 5 5003579 1 Seal Kit Spool Valve 6 5002157 2 Port Plug 7 5001065 2 Port Plug 8 4113028 1 Nut Coil ...

Page 125: ...l Numbers Notes 1 N S 1 Cam R H 1 N S 1 Cam L H 2 557823 1 Pivot Pin 3 503660 1 Carrier Side Pad 4 557824 1 Pad Support 5 557825 1 Lever Retainer Spring 6 557826 1 Pad Support 7 503660 1 Cam Side Pad TRI KING 35 1 Brake Calipers Part No 1001634 L H Part No 1001635 R H Serial No All ...

Page 126: ...Y BK BK BK BK RD WH RD YE RD BU GY GY BK BK RD YE GY BK GY RD RD OR RD OR RD OR RD BU RD OR RD OR OR GN OR GN OR YE BK WH BK WH BK WH OR YE OR YE OR GN OR GY OR GY RD OR RD OR RD RD RD RD H RD OR RD RD CB1 1 2 1 2 3 4 5 6 G Ig B 87A 87 30 86 85 87A 87 30 86 85 G B G I G I S SW1 SW2 SW3 SW4 SW5 SW6 SW7 SW8 SW9 SW10 SW11 K5 K6 K7 K8 L1 L2 L3 D1 D2 D3 F1 F2 F3 F4 U1 R1 U2 U3 U4 U5 BK BK WH OR YE OR Y...

Page 127: ...9 1 9 1 3001307 Neutral Relay L1 Not Shown NS Optional Light Included in Product 69149 L2 Not Shown NS Optional Light Included in Product 69149 L3 See 5 1 164194 Oil Pressure Warning Light L4 See 5 1 366751 Parking Brake Light M1 Not Shown NS Starter Motor Included in Engine R1 Not Shown NS Glow Plugs Included in Engine SW1 See 5 1 363961 Glow Plug Switch SW2 See 5 1 3001780 Reel Control 3WD Switc...

Page 128: ...mp Engine Direct Drive 3400 RPM Reel Motors Right Center Left Electric Clutch Filter Tank 5 5 Gals in System Steering Cylinder Steering Valve Filter Lift Cylinder Lift Valve 3WD Valve A T B P PB T P L R 1 2 A1 A B1 B A B TRI KING 37 1 Hydraulic Schematic Serial No All ...

Page 129: ...598 Six 12 Ounce Orange Aerosol 2500789 Twelve 1 Quart Can Orange 546409 Two 1 Gallon Can Orange Lapping Compound 5002488 One 10 Pound Pail of 80 Grit 5002490 One 25 Pound Pail of 80 Grit 5002489 One 10 Pound Pail of 120 Grit 5002491 One 25 Pound Pail of 120 Grit Specialty Compound 365422 5 3 Ounce Tube of Electrical Insulating Gel 5001581 14 Ounce Can of Lubriplate Multi Lube A Biodegradable Hydr...

Page 130: ... O Ring Face Seal Size X X X W X Y W W X Y O Ring Face Seal Size O Ring Face Seal Size O Ring Boss Dash Size X Y W W X Y W X Y W W X Y O Ring Face Seal Size O Ring Face Seal Size O Ring Boss Dash Size W X Y O Ring Face Seal Size O Ring Face Seal Size W X Y O Ring Face Seal Size O Ring Not Needed O Ring Not Needed O Ring Face Seal Size W X Y O Ring Face Seal Size O Ring Face Seal Size O Ring Face S...

Page 131: ...39909 339898 340068 8 12 90 Adapter 339910 339900 340070 10 10 90 Adapter 339911 339899 340088 4 6 90 Adapter 339908 339897 340120 4 4 4 Swivel Run Tee 339908 339908 340121 6 6 6 Swivel Run Tee 339909 339909 340265 10 10 10 Straight Thread Run Tee 339911 339899 339911 340376 8 8 90 Swivel Adapter 339910 SAE Boss O Rings ORS Face Seal O Rings Dash Size Thread Size O Ring Dash Size Thread Size O Rin...

Page 132: ...11280 89 2811281 89 2811364 39 2811365 39 2811387 43 2811390 47 2811393 50 2811437 41 2811495 33 2811547 39 2811597 31 2811632 41 2811637 7 55 2811654 47 2811659 47 2812032 31 2812215 47 3000313 83 3000359 65 3000576 33 3000718 87 3000983 85 3001078 81 3001152 85 3001328 35 37 3001780 41 3001905 7 81 3001950 55 3002053 31 3002056 47 3002098 39 3002170 50 3002234 7 79 3002372 43 3002379 87 3002397 ...

Page 133: ...4774 41 65 364777 87 364781 89 365106 50 365956 31 365995 85 366526 49 366653 83 366751 41 366790 53 366827 87 366974 90 366975 90 366976 90 366978 90 367029 83 367159 31 367160 31 367458 71 395388 45 4106900 67 4111408 31 4111942 73 4112141 95 4113025 96 4113026 96 4113027 96 4113028 96 4113754 89 4113755 89 4113756 87 4113757 89 4113758 89 4113759 87 4117468 31 4121007 7 59 4121856 7 57 4121872 ...

Page 134: ...37 45 546416 95 549597 69 71 550376 59 550383 59 550398 59 550409 59 550489 49 550553 49 553020 59 553859 61 553886 61 63 553887 61 63 553926 65 553934 59 554083 61 554241 61 554244 61 554284 82 554330 79 554331 75 554390 35 554663 69 554723 83 554748 49 554752 49 554779 45 53 554780 45 53 554782 45 554896 61 555822 93 555828 93 555830 93 555833 93 555836 93 556450 45 53 557563 61 557578 61 557580...

Page 135: ......

Page 136: ... 14001 registration at all our manufacturing locations A worldwide dealer network and factory trained technicians backed by Jacobsen Parts Xpress provide reliable high quality product support Vybavení od firmy Jacobsen je vyrobeno podle striktních standardů zaručených registrací ISO 9001 a ISO 14001 ve všech našich výrobních závodech Celosvětová síť prodejců a vyškolených techniků podporovaných or...

Reviews: