background image

ADJUSTMENTS    5

GB-17

5.11 BEDKNIFE-TO-REEL _______________________________________________________  

(Pre-adjustment Check)

1.

Check the reel bearings for end play or radial play.
There should be no end play or radial play. See Section
5.14.

2.

Inspect the reel blades and bedknife to insure good
sharp edges without bends or nicks.

a.

The leading edge of the reel blades (A) must be

sharp, free of burrs and show no signs of rounding
off.

b.

The bedknife and bedknife backing must be

securely tightened. The bedknife must be straight
and sharp.

c.

A flat surface of at least 1/16 in. (1.5 mm) minimum

must be maintained on the front face of the bed-
knife. Use a standard flat file to dress the bedknife.

3.

If wear or damage is beyond the point where the reel
or bedknife can be corrected by the lapping process,
they must be reground.

4.

Proper reel-to-bedknife adjustment is critical. A gap of
0.001 to 0.003” (0.025 to 0.076 mm) must be
maintained across the entire length of the reel and
bedknife.

5.

The reel must be parallel to the bedknife. An
improperly adjusted reel will lose its sharp edges
prematurely and may result in serious damage to the
reel and bedknife.

6.

Grass conditions will also affect the adjustment.

a.

Dry, sparse conditions will require a wider gap to

prevent heat buildup and damage to the reel and
bedknife.

b.

High quality grass with a good moisture content

requires a closer gap (near zero).

Figure 5J

Figure 5K

5.12 BEDKNIFE ADJUSTMENT ___________________________________________________

1.

Read Section 5.11 before making the adjustment.

2.

Start adjustment at the leading end of the reel,
followed by the trailing end. The leading end of the
reel blades is that end which passes over the
bedknife first during normal reel rotation.

3.

Use adjusters (B  and C), to adjust gap. Loosen
bottom adjuster (C) and turn top adjuster (B) down
(Clockwise) to close gap.

a.

Slide a feeler gauge or shim stock 0.001” -
0.003” (0.025 - 0.075 mm) between the reel
blade and the bedknife. Do not turn the reel.

b.

Adjust the trailing end of the reel to the same
gap in a similar manner then recheck the
adjustment at the leading end.

c.

When the reel is properly adjusted to the
bedknife, the reel will spin freely and you should
be able to cut a piece of newspaper, along the

full length of the reel, when the paper is held at
90° to the bedknife.

Figure 5L

Note: Avoid excessive tightening or serious damage may
result to bedknife and reel blades. Reels must turn freely.


CAUTION

 To prevent personal injury and damage to the cutting 

edges, wear gloves and handle the reel and bedknife 

with extreme care.

!

1/16 in.
(1.5 mm)

A

LF025

GKV-1

B

C

Summary of Contents for Super LF 1880

Page 1: ...Maintenance Manual Use the pre delivery checklist provided on the inside back cover of this manual You may wish to provide a copy to the customer upon delivery of the unit Prodejce HOHP WpWR S tUX N...

Page 2: ...7 5 13 Cutting Height 18 5 14 Reel Bearing 18 5 15 Flash Attach 19 5 16 Down Pressure 19 5 17 Torque Specification 20 5 18 Specific Torque 20 6 TROUBLESHOOTING 6 1 General Troubleshooting 21 7 LUBRICA...

Page 3: ...standers and damage to property 8 Never operate equipment that is not in perfect working order or is without decals guards shields discharge deflectors or other protective devices securely fastened in...

Page 4: ...technician If additional information or service is needed contact your Authorized Textron Golf Turf Specialty Products Dealer who is kept informed of the latest methods to service this equipment and...

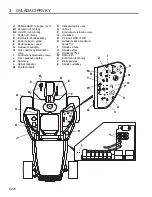
Page 5: ...iarize yourself with the icons shown above and what they represent Learn the location and purpose of all the controls and gauges before operating this tractor Coolant Temperature D Read Manual Engine...

Page 6: ...Seat Adjustment H Hydraulic Oil Cap I Hydraulic Oil Light J Fuel Cap K Fuel Level Gauge L Backlap Switch M Hour Meter N Water Temperature Gauge O Volt Meter P Engine Oil Light Q Horn R 2WD 4WD Switch...

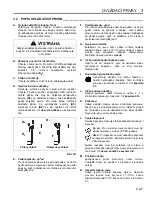
Page 7: ...on gauge using clean hydraulic fluid while machine is cool Do not overfill I Hydraulic Oil Light Alerts the operator of a low fluid level in hydraulic tank This light operates in combination with the...

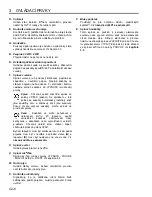
Page 8: ...rs removing grass build up in mowers or dislodging objects binding mowers To reverse blade rotation press switch to the REVERSE position When backlapping the parking brake must be set traction pedal i...

Page 9: ...back to a service area NEVER operate engine with oil light on severe damage to the engine can occur 2 Engine Coolant Temperature Alarm sounds Engine coolant temperature high Stop tractor immediately...

Page 10: ...all missing or hard to read decals 3 All fluids must be at the full level mark with engine cold Check a Radiator coolant level b Engine oil level c Hydraulic fluid level 4 Make sure air filter connect...

Page 11: ..._______________________ After the initial inspection and installation of reels and accessories test the tractor and implements for proper operation 1 Test the Interlock system Section 4 5 2 Start trac...

Page 12: ...marks across the chart Shut engine off between each test Test 1 Represents normal starting procedure The operator is seated parking brake is engaged the traction pedal is in neutral and the reel swit...

Page 13: ...________________________________________ Check throttle adjustment if engine runs below recommended RPM with throttle lever in its high speed position For all other engine adjustments refer to the Eng...

Page 14: ...is located on the same bracket as the neutral switch 1 Loosen switch mounting hardware 2 Adjust switch I as required to position the sensing area under the return arm as shown with pump in neutral Fig...

Page 15: ...nal adjustment 2 Fully loosen adjusting nut O 3 Disconnect brake return spring at caliper 4 By hand pull cable behind adjusting nut P away from pedal until brake pads just contact brake disk Thread ad...

Page 16: ...d the lift arms If reels continue to run when lifted or do not run when lowered inspect switch Adjust or replace switch as needed To adjust switch 1 Park tractor on a flat level surface 2 Remove reel...

Page 17: ...nt a Dry sparse conditions will require a wider gap to prevent heat buildup and damage to the reel and bedknife b High quality grass with a good moisture content requires a closer gap near zero Figure...

Page 18: ...near one end of roller 5 Slide the head of gauge screw F over the bedknife H and adjust the knob I to close the gap between the screwhead and bedknife Then tighten locknut G 6 Repeat Steps 4 and 5 on...

Page 19: ...om the cutting unit To prevent contamination and damage to internal components cover or cap off bearing housing cavity 4 Remove cap M on lift arm Unfasten retaining clip L from pin K and remove pin 5...

Page 20: ...Nm 95 10 7 125 14 1 1 4 28 in lbs Nm 95 10 7 150 17 0 5 16 18 in lbs Nm 200 22 6 270 30 5 5 16 24 in lbs Nm 240 27 1 300 33 9 3 8 16 ft lbs Nm 30 40 7 40 54 2 3 8 24 ft lbs Nm 35 47 5 45 61 0 7 16 14...

Page 21: ...manual Engine stops 1 Fuel tank empty 1 Fill with fresh fuel and bleed fuel lines 2 Interlocks not set before leaving operator s seat 2 Engage parking brake set reel switch to OFF and traction pedal...

Page 22: ...ubrication chart apply several drops of SAE 30 oil every 40 hours or as required 5 Grease fittings A I every 50 hours fittings J M every 100 hours and N every 250 hours 7 2 LUBRICATION CHART _________...

Page 23: ...ires Hydraulic System _______________ Check Hydraulic oil level For pinched or rubbing hoses For twisted or crimped hoses For oil leaks Tow Valve is closed Miscellaneous__________________ Check for lo...

Page 24: ......

Page 25: ......

Page 26: ...GQtKR QR H 17 5 13 V ka sek n 18 5 14 R LVNR Y HWHQD 18 5 15 8SHYQ Qt 19 5 16 3 tWODN 19 5 17 6SHFLILNDFH NURXWtFtFK PRPHQW 20 5 18 Specifick kroutic moment 20 6 2 675 29 1 9 6 1 9 HREHFQp RGVWUD RYiQ...

Page 27: ...D NRG QD PDMHWNX D P H MLP DEUiQLW 8 1LNG QHSRX tYHMWH D t HQt NWHUp E OR XSUDYHQR QHVSO XMH VSHFLILNDFH Y UREFH QHER QHQt RSDW HQR WtWN NU W NU W Y KR X L MLQ PL RFKUDQQ PL D t HQtPL EH SH Q S LSHYQ...

Page 28: ...iG W NYDOLILNRYDQ WHFKQLN XGHWH OL SRW HERYDW GDO t LQIRUPDFH QHER VHUYLV NRQWDNWXMWH VYpKR DXWRUL RYDQpKR SURGHMFH VSROH QRVWL 7H WURQ ROI 7XUI 6SHFLDOW 3URGXFWV NWHU MH LQIRUPRYiQ R QHMQRY M tFK SRV...

Page 29: ...WH Y H XYHGHQ PL LNRQDPL D V WtP FR S HGVWDYXMt 3 HG DSR HWtP SUiFH V WUDNWRUHP VL DSDPDWXMWH XPtVW Qt D HO Y HFK RYOiGDFtFK SUYN D XND DWHO Teplota chladic kapaliny D 3 H W WH VL S tUX NX Plyn motoru...

Page 30: ...QiGU H K GUDXOLFNpKR oleje I Kontrolka hydraulick ho oleje J 9t NR SDOLYRYp QiGU H K 3DOLYRP U L 6StQD ODSRYiQt M 3R LWDGOR KRGLQ N Ukazatel teploty vody O Voltmetr P Kontrolka motorov ho oleje Q RXND...

Page 31: ...YRX ER Qt Si NX P HWH QDVWDYLW VHGDGOR QDKRUX QHER GRO KFHWH OL QDVWDYLW QDSQXWt SUX LQ SRG VHGDGOHP RWi HMWH QDVWDYRYDFtP NQRIOtNHP QD S HGQt VWUDQ VHGDGOD H 9t NR QiGU H K GUDXOLFNpKR ROHMH 1DSO WH...

Page 32: ...N YUDW WH VStQD GR SURVW HGQt SRORK Vzad 6HND ND VH P H SRK ERYDW Y REUiFHQpP VP UX S L ODSRYiQt SRX LWt YHUWLNiOQtFK VHND HN RGVWUD RYiQt WUiY DFK FHQp Y VHND NiFK QHER Y SUR W RYiQt XYt O FK S HGP...

Page 33: ...o servisu NIKDY QHQHFKWH E HW PRWRU V UR VYtFHQRX NRQWURONRX ROHMH SURWR H E VH PRKO Yi Q SR NRGLW 2 Teplota chladic kapaliny motoru Zn alarm Vysok teplota chladic kapaliny motoru 2NDP LW DVWDYWH WUDN...

Page 34: ...KRYDW QD QD NX PD LPiOQt KODGLQ Kontrola a ODGLQD FKODGLFt NDSDOLQ Y FKODGL L b Hladina motorov ho oleje c Hladina hydraulick kapaliny 4 3 HVY G WH VH H MVRX S tSRMN Y GXFKRYpKR ILOWUX XWD HQp D NU W...

Page 35: ...3R SUYQt SURKOtGFH D PRQWi L Y HWHQ D S tVOX HQVWYt NRQWUROXMWH VSUiYQp IXQJRYiQt WUDNWRUX D S tSRMQ FK D t HQt 1 Otestujte blokovac syst m Kapitola 4 5 2 1DVWDUWXMWH WUDNWRU D NRQWUROXMWH MHVWOL VStQ...

Page 36: ...k za krtnut Y WDEXOFH 0H L RE PD WHVW Y SQ WH PRWRU Test 1 3 HGVWDYXMH QRUPiOQt VWDUWRYDFt SURFHGXUX LGL VHGt QD VHGDGOH UX Qt EU GD MH DWD HQi SHGiO SRMH GX MH Y QHXWUiOX D VStQD Y HWHQD MH 9 3187 Mo...

Page 37: ...______________________________________ NRQWUROXMWH VH t HQt UX QtKR SO QX SRNXG PRWRU E t Y QL tFK QH GRSRUX HQ FK RWi NiFK V Si NRX UX QtKR plynu v poloze nejvy rychlosti 3RN Q SUR Y HFKQD RVWDWQt VH...

Page 38: ...MDNR VStQD neutr lu 1 8YROQ WH PRQWi Qt SUYN VStQD H 2 1DVWDYWH VStQD I SRGOH SRW HE GR SRORK Y oblasti sn m n pod vratn m ramenem jak je Qi RUQ QR V HUSDGOHP Y QHXWUiOX Obr 5C 5 5 RYCHLOST J ZDY ___...

Page 39: ...t HQt 2 SOQ SRYROWH VH L RYDFt PDWLFL O 3 2GSRMWH YUDWQRX SUX LQX EU G QD W PHQX 4 5XNRX RGWiKQ WH ODQNR D VH L RYDFt PDWLFt P SU RG SHGiOX D VH EU GRYp GHVWL N W VQ GRWNQRX EU GRYpKR NRWRX H URXEXMW...

Page 40: ...G VH Y HWHQD SR YHGQXWt GiO SRK EXMt QHER VH SR VSX W Qt QHUR E KQRX NRQWUROXMWH VStQD 6H L WH QHER Y P WH VStQD SRGOH SRW HE 6H t HQt VStQD H 1 Zaparkujte traktor na ploch m rovn m povrchu 2 2GVWUD W...

Page 41: ...HUX DE QHGRFKi HOR N KURPDG Qt WHSOD D SR NR HQt Y HWHQD D VSRGQtKR QR H b Vysoce kvalitn tr va s dobr m obsahem vlhkosti Y DGXMH X t PH HUX WpP QXORYRX Obr 5J Obr 5K 5 12 1 67 9 1 632 1 2 12 _______...

Page 42: ...MHGQRKR NRQFH YiOFH 5 1DVX WH KODYX URXEX P UN F QD VSRGQt Q H a QDVWDYHQtP NROH ND I DY HWH PH HUX PH L KODYRX URXEX D VSRGQtP QR HP 3RWRP XWiKQ WH SRMLVWQRX matici G 6 2SDNXMWH NURN D QD SURW M tP...

Page 43: ...HNDFt MHGQRWNX E QHGR OR NH QH L W Qt QHER SR NR HQt YQLW QtFK VRX iVWt DNU MWH GXWLQX OR LVNRYpKR SRX GUD 4 2GVWUD WH NU W M QD YHGDFtP UDPHQX 8YROQ WH S LGU RYDFt VSRQX L z kol ku K a vyndejte kol k...

Page 44: ...in lbs Nm 95 10 7 150 17 0 5 16 18 in lbs Nm 200 22 6 270 30 5 5 16 24 in lbs Nm 240 27 1 300 33 9 3 8 16 ft lbs Nm 30 40 7 40 54 2 3 8 24 ft lbs Nm 35 47 5 45 61 0 7 16 14 ft lbs Nm 50 67 8 65 88 1 7...

Page 45: ...3Ui GQi SDOLYRYi QiGU 1 RSO WH HUVWYp SDOLYR D RGY GX Q WH SDOLYRYp YHGHQt 2 ORNRYiQt QHQt QDVWDYHQR S HGWtP QH LGL RSXVWt VHGDGOR 2 DWiKQ WH UX Qt EU GX Y SQ WH VStQD EXEQ D nastavte ped l pojezdu na...

Page 46: ...WDEXOFH PD iQt NiSQ WH QD WDWR PtVWD Q NROLN NDSHN ROHMH 6 ND G FK KRGLQ QHER GOH SRW HE 5 1DPD WH VSRMN A I ND G FK KRGLQ VSRMN J M ND G FK KRGLQ D N ND G FK KRGLQ 7 2 TABULKA MAZ N _________________...

Page 47: ...ulick syst m _____________ Kontrola Hladina hydraulick ho oleje 6N tSQXWp QHER SURG HQp KDGLFH 3 HNURXFHQp QHER RK EDQp KDGLFH Unik n oleje 7D Q YHQWLO MH DY HQ 5 Qp_________________________ RQWUROD X...

Page 48: ......

Page 49: ......

Page 50: ...p com Equipment from Jacobsen is built to exacting standards ensured by ISO 9001 and ISO 14001 registration at all of our manufacturing locations A worldwide dealer network and factory trained technic...

Reviews: