background image

4

Option

Description

Zone number
Range

Range

Range

01 to 08

60 to 85F

55 to 80F

Default

Default

Default

01

76F

68F

Program damper module to Zone address
Default 01

Maximum allowable heating setpoint

Minimum allowable cooling setpoint

01

03

08

09

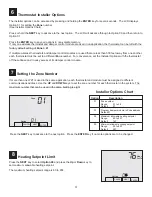
Thermostat Installer Options

If more than one WZ1 is used in the same application, each thermostat and module must be assigned a different
communications address. Use the

and

keys to set the zone number for each thermostat in the system.

.

UP

DOWN

The

maximum number that can be used in the same building is eight

Press the

key to advance to the next option. Press the

key if no more options are to be changed.

NEXT

ENTER

Option

Zone

CANCEL

NEXT

ENTER

Setting the Zone Number

The installer options can be accessed by pressing and holding the

key for seven seconds. The LCD displays

Option 01 for setting the

number.

(See Installer Options Chart)

Press or hold the

key to advance to the next option. The LCD will advance through to Option 09 and then return to

Option 01.

Press the

key to save all options in non-volatile memory.

If multiple wireless thermostats and damper control modules are used that are less than 500 feet away from one another,
each thermostat must be set to a different

number. For convenience, set the Installer Options with the thermostat

off the subbase and in easy access of its damper control module.

ENTER

Zone

NEXT

ENTER

Zone

If only one wireless thermostat and damper control module are used in an application, the thermostat can be left with the
factory default setting of

Zone = 01

Installer Options Chart

6

7

8

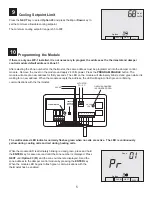
Heating Setpoint Limit

Press the

key to select

and press the

or

key to

set maximum allowable heating setpoint.

NEXT

Option 08

Up

Down

The maximum heating setpoint range is 60 to 85F.

Option

CANCEL

NEXT

ENTER

Set To

Heat

Summary of Contents for WZ1

Page 1: ...ensor determines there is warm air in the duct the damper will power open otherwise the damper will remain closed The relay control module has LED indication to confirm mode of operation and damper po...

Page 2: ...rmostat should be located in the area being controlled by the zone damper and away from the HVAC unit thermostat Do not install the thermostat in an area where drafts are present near the floor behind...

Page 3: ...thermostat should be installed approximately 5 feet above the floor Level the subbase for appearance and use the wall anchors and screws provided Installing the Subbase 4 Slide the battery cover off...

Page 4: ...n seconds The LCD displays Option 01 for setting the number See Installer Options Chart Press or hold the key to advance to the next option The LCD will advance through to Option 09 and then return to...

Page 5: ...r normally flashes green when no calls are active The LED is continuously yellow during cooling calls and red during heating calls 9 Cooling Setpoint Limit Press the key to select and press the or key...

Page 6: ...EM key selects Auto and Off Fan key Not used Temperature Setting Space temperature Menu key used to set time of day and day of week Cancel key used to cancel changes Next key used when setting time of...

Page 7: ...the and keys to set the hour Make sure that the AM or PM is correct MENU Up Down Press the key to set the minute Use the and keys to set the minute Press the key to set the current day of the week Us...

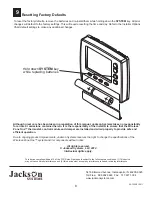
Page 8: ...f the Wireless Zone One system and its components without notice All rights reserved Jackson Systems LLC 2010 Intellectual rights apply To reset the factory defaults remove the batteries and re instal...

Reviews: