background image

PREPARATION:

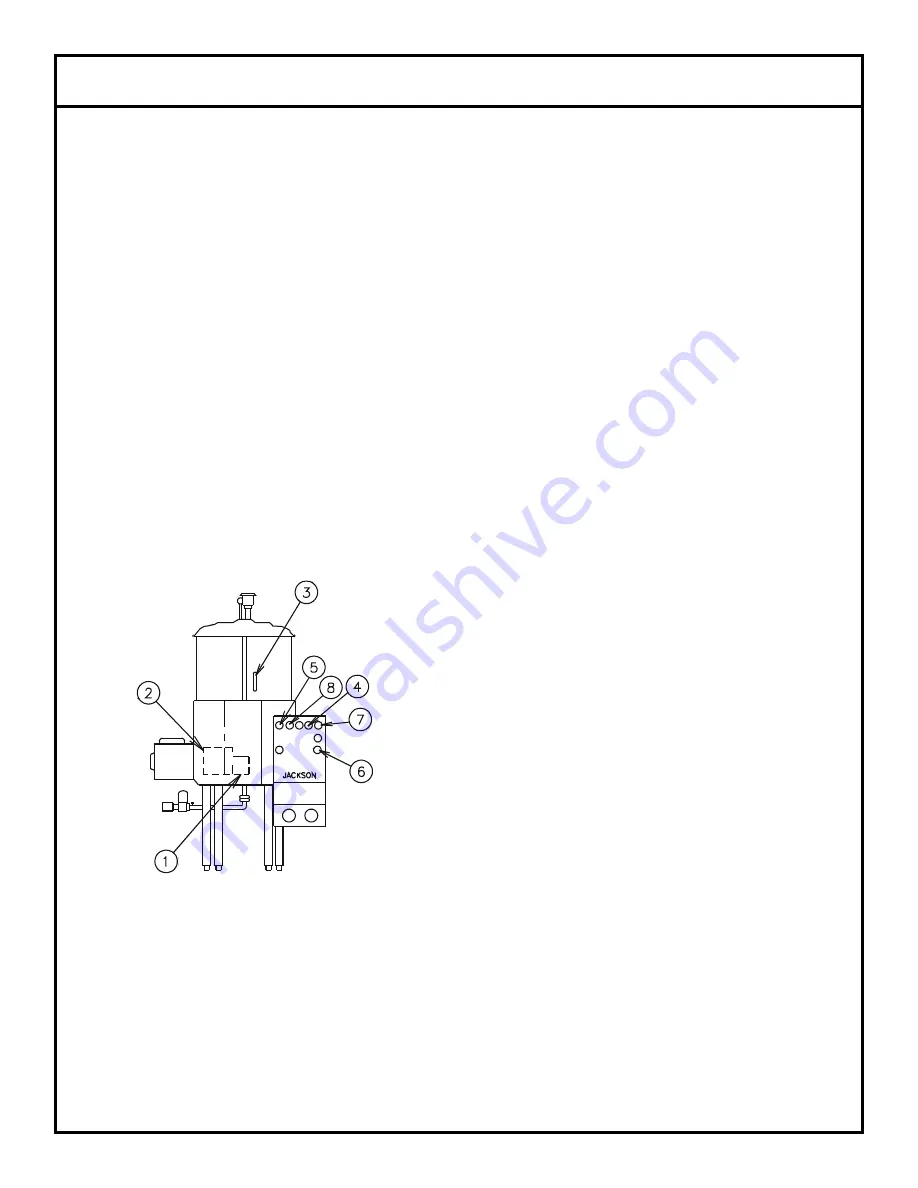
1. Ensure that the pump intake strainer (1) and basket overflow
strainer (2) are inserted and tight.

2. Ensure that the wash and rinse arms are installed and secure.

3. Remove all solid wastes in order to avoid obstructing filters,
drain and wash and rinse arms.

4. Ware that is encrusted with soil should be presoaked prior to
being placed in the machine.

5. When placing dishes into the racks, do not allow them to lean
on each other.

6. Place the glasses upside down in the open rack. With the model
10 series, a four compartment silverware rack is supplied. Place
silver in compartment rack loosely not allowing it to mix with other
silverware of the same nature. Place the compartment rack in the
open rack and wash with the cups and glasses.

DAILY MACHINE PREPARATION:

Refer to the section entitled

“PREPARATION” at the top of this page and follow the instructions
there. Afterwards, check that all of the chemical levels are correct
and/or that there is plenty of detergent available for the expected
workload.

WARM-UP CYCLE: 

At the beginning of each work day, a warm up

cycle will need to be performed. Close the hood (3). Turn on the
master switch (4). Raise the fill switch (5) until the machine is filled
to the top of the basket overflow strainer (2.) Once the proper
water level has been reached, turn on the heater switch (6).
Observe the temperature gauges, the rinse temperature should
rise to a specified level of 180°F within five minutes if the incom-
ing water to the booster tank is 140°F. The wash heater will take
longer to reach 150°F as the element is designed for maintaining
temperature, not heating. Once the proper temperature has been
reached, with the hood closed, turn on the manual wash switch.
You should hear the water being pumped as it strikes the top of
the hood. Turn off the manual wash switch. The dishmachine is
now ready to proceed with washing of the dishes.

WARE PREPARATION:

Proper preparation of ware will help

ensure good results and less re-washes. If not done properly,
ware may not come out clean and the efficiency of the dishma-
chine will be reduced. It is important to remember that a dishma-
chine is not a garbage disposal and that throwing unscraped dish-
es into the machine will defeat the purpose altogether of washing
the ware. Scraps should be removed from ware prior to being
loaded into a rack. Pre-rinsing and pre-soaking are good ideas,
especially for silverware and casserole dishes. Place cups and
glasses upside down in racks so that they do not hold water dur-
ing the cycle. The dishmachine is meant not only to clean, but to
sanitize as well, to destroy all of the bacteria that could be harm-
ful to human beings. In order to do this, ware must be properly
prepared prior to being placed in the machine.

WASHING A RACK OF WARE:

To wash a rack, open the hood

completely (being careful for hot water that may drip from the top
of the hood), manually load detergent into the wash chamber, or if
automatic detergent dispenser is used, follow the manufacturers
instructions. Slide the rack of dishes into the dishmachine. Close
the hood. Start the automatic wash and rinse cycle of the dishma-
chine by flipping the start switch (7) either up or down (NOTE: The
start switch, is a three position switch. Up = Start, Center = Off,
Down = Start) the indicating light (8) will come on at the start of the
cycle. When the light goes off, the cycle is complete. Open the
hood, remove the rack of clean dishes to air dry.  Repeat the cycle
by adding another rack of soiled dishes, adding the detergent,
close hood and flip start switch (8) in opposite direction.

SHUT DOWN AND CLEANING: 

At the end of meal time, shut off

the dishmachine by placing the start switch in center position and
turn heat switch off. Drain the dishmachine by removing the over-
flow strainer. Remove the pump intake strainer after water has
drained. Clean both strainers. Clean the inside of the unit. Clean
wash head, upper and lower rinse arms and replace the clean
strainers. Replace all removed parts. The machine is now ready
for refilling and operation. 

OPERATION INSTRUCTIONS

4

Summary of Contents for 10A

Page 1: ...COVERED IN THIS MANUAL 10A 10AB 10APRB 10AB APRB 4SH 10A AB APRB 5HH S E R V I C E M A N U A L www jacksonmsc com 10 SERIES ROUND DISHMACHINES ELECTRICALLY HEATED June 3 2002 P N 7610 002 41 09 Revis...

Page 2: ...gs 27 Tub Assembly 29 Bottom View Assembly 31 Wash Tank Cross View Tub to Booster Connection 33 10AB APRB Rinse Booster Associated Parts 34 Pump Motor Assembly 35 Thermostat Housing Assembly 36 Incomi...

Page 3: ...PUMP MOTOR HP APRB ONLY 1 2 MODEL VOLTS HERTZ PHASE AMPS 10A 208 60 1 8 23 10A 220 60 1 8 23 10AB 208 60 1 38 8 10AB 208 60 3 25 6 10AB 220 60 1 37 2 10AB 220 60 3 24 6 10APRB 208 60 1 43 4 10APRB 208...

Page 4: ...e bottom of the rinse booster tank The bottom union of the piping connects to an adapter pipe which in turn connects to the solenoid valve The arrows on the solenoid valve indicate the direction of wa...

Page 5: ...n operation ELECTRICAL POWER CONNECTION Electrical and grounding connections must comply with the applicable portions of the National Electrical Code ANSI NFPA 70 latest edition and or other electrica...

Page 6: ...ll help ensure good results and less re washes If not done properly ware may not come out clean and the efficiency of the dishma chine will be reduced It is important to remember that a dishma chine i...

Page 7: ...ne the interior All lime should be removed and parts should be shiny If not allow to wash for a longer period e After the interior is clean empty the wash water be removing overflow strainer f Replace...

Page 8: ...bbing with fine sandpa per or emery cloth 14 Rinse the ball bearings and manifolds thoroughly 15 To reassemble first fill the lower race way to capacity with the 1 4 ball bearings then remove one This...

Page 9: ...ement 2 Remove the two screws which hold the timer to the control panel 3 One screw holds the microswitches cams and actuating arms in the frame This screw is seen on the side opposite the motor Remov...

Page 10: ...he rinse heads It may be used as an emergency back up in case of timer failure tor rinsing dishes The required rinse time is indicated on the front control panel Heat Switch This switch applies power...

Page 11: ...RED PAINT When adjusting screw 2 power should be disconnected during adjustment Set screw 1 so that it can be turned equal distances in either direction then if screw 1 stopped while turning in CW di...

Page 12: ...ose With heat switch on a Check power supply at Position 1 on terminal board X Voltage should be 208 230 VAC If not check customer s breaker if defec tive replace b Check position 2 voltage should be...

Page 13: ...to proceed c Observe water level control letter D Turn hat switch on and off several timers Relay and contact points inside clear case on heat water level control should move back and forth AA If wate...

Page 14: ...eat switch on yet no water in wash tub PROCEED WITH CHECKOUT 1 Remove power to machine by turning circuit breaker to its OFF position 2 Remove the 4 screws holding the control panel on the control box...

Page 15: ...er to machine by turning circuit breaker to its off position 2 Remove 4 screws holding control panel on control box Remove panel and attach to one side of control box with 2 screws 3 Locate water leve...

Page 16: ...8 The ceramic Is embedded in the impeller and normally does not need replacement but it should be checked for cracks or a worn out surface If the ceramic does need replacement proceed as follows a Wit...

Page 17: ...seconds Any more than 5 seconds longer indicates the water supply and pressure and insufficient 2 Rinse head assemblies limed up or clogged with other deposits Clean rinse head tubes by removing end p...

Page 18: ...ruction page concerning water level control wash heat circuit 4 Wash heater faulty See instruction page concerning wash tank heater system 5 Thermostat faulty See instruction page concerning wash tank...

Page 19: ...the connection 3 Timer rinse or wash microswitch faulty See instructions page concerning timer and motor Problem Wash does not work when manual wash switch operated but does work during the automatic...

Page 20: ...rinse pump motor 10APRB only F Booster tank 10AB and 10APRB only All dimensions in inches All vertical dimensions are 1 2 from the floor due to the adjustable bullet feet 9 14 7 8 TO THE WALL 13 5 1...

Page 21: ...r 10APRB only F Booster tank 10AB and 10APRB only All dimensions in inches All vertical dimensions are 1 2 from the floor due to the adjustable bullet feet 9 14 7 8 TO THE WALL 13 5 1 4 1 13 16 16 1 2...

Page 22: ...pump motor 10APRB only F Booster tank 10AB and 10APRB only All dimensions in inches All vertical dimensions are 1 2 from the floor due to the adjustable bullet feet 20 9 14 7 8 TO THE WALL 13 5 1 4 1...

Page 23: ...tor 10APRB only F Booster tank 10AB and 10APRB only All dimensions in inches All vertical dimensions are 1 2 from the floor due to the adjustable bullet feet 20 9 14 7 8 TO THE WALL 13 5 1 4 1 13 16 1...

Page 24: ...2 turnback at 45 degree B 3 High 1 1 2 diameter rolled edge C Scrap block D Scrap basket with slide bars E 20 x 20 x 5 deep pre rinse sink F Heavy duty pre rinse G 20 Slanted wall mounted overshelf 4...

Page 25: ...e Control Box Assembly Refer to Control Box Assembly Page 6 1 Vacuum Breaker Assembly Refer to Vacuum Breaker Assy Page 7 1 Motor and Pump Assembly 5700 002 60 91 8 1 Incoming Plumbing Assembly 5700 0...

Page 26: ...01 03 6 1 Outlet Connector 5700 002 60 92 7 1 Complete Control Box Assembly Refer to Control Box Assembly Page 8 1 Vacuum Breaker Assembly Refer to Vacuum Breaker Assy Page 9 1 Rinse Tank Assembly 570...

Page 27: ...5 16 17 29 24 25 9 10 11 26 27 28 32 4 1 12 13 6 15 21 22 23 21 22 23 14 APRB only The complete Control Box attaches to the Control Box Support Bracket with 2 of each item Locknut 1 4 20 S S Hex w Nyl...

Page 28: ...9905 105 33 62 16 1 Decal Schematic 10APRB 3 phase 9905 105 34 50 17 1 Panel Control Box Front and Bottom 5700 000 24 30 18 1 Circuit Breaker 15 Amp 5925 105 10 01 19 1 Plate Circuit Breaker 5927 113...

Page 29: ...44 96 20 Gauge 6145 104 05 97 20 Gauge with Black Stripes 6145 011 59 57 20 Gauge with Yellow Stripes 6145 104 11 97 GREY WIRE 18 Gauge 6145 104 36 00 18 Gauge with Black Stripes 6145 011 81 71 18 Gau...

Page 30: ...89 89 Fitting 1 2 45 Degree 5975 011 45 23 Fitting 1 2 45 Degree Zinc Plated 5975 111 89 86 Fitting 1 2 90 Degree 5975 011 45 14 Fitting 1 2 90 Degree Zinc Plated 5975 111 89 88 Fitting 3 4 Straight 5...

Page 31: ...TUB ASSEMBLY 29 1 30 15 16 17 16 18 21 22 23 24 22 25 22 26 27 28 20 19 29 4 5 8 9 10 11 3 2 12 13 14 6 7 Lundy Probe Assembly...

Page 32: ...lon Washer 5311 369 08 00 17 1 Rinse Arm Hex Bushing 5700 000 28 65 18 1 Rinse Arm Snap Ring 5340 112 02 11 19 1 Rinse Feed Pipe Weldment 5700 002 60 96 20 1 Set Screw 10 24 x 1 2 5305 473 02 00 21 1...

Page 33: ...BOTTOM VIEW ASSEMBLY 31 9 7 8 Refer to Thermostat Housing Assembly Page Refer to Pump Motor Assembly Page 14 8 15 16 17 1 2 3 4 5 6 10 11 12 13 Wash tank section...

Page 34: ...ent 5700 000 59 70 6 4 Bolt 5 16 18 x 1 S S Hex 5305 275 06 00 7 4 Washer 5 16 S S Flat 5311 175 01 00 8 3 Locknut 1 4 20 S S Hex w Nylon Insert 5310 374 01 00 9 1 Bulk Head Plug 4730 609 05 00 10 1 E...

Page 35: ...rt 5700 000 27 55 7 1 Rivet 3 16 x 5 8 S S CTR Flat Head 5320 107 07 00 8 1 Gasket Hood Support Bracket 5330 200 01 06 9 1 Elbow 3 4 90 Deg CU to MNPT Brass 4730 406 42 01 10 1 Tube 3 4 x 7 1 2 Copper...

Page 36: ...Rinse Heater Cover Mfg No 5700 000 26 40 Decal Warning Disconnect Power Mfg No 9905 100 75 93 Attaches with 2 Screw 8 18 x 1 2 Tek Hex Mfg No 5305 272 01 00 Heater Bus Bar 3 Phase Mfg No 5700 000 32...

Page 37: ...1 65 00 2 1 Flange Motor Mounting Epoxied and Painted 5700 002 60 97 3 1 Seal Crane 5330 300 09 27 4 1 Seal Ceramic 5330 300 02 27 5 1 Impeller 5700 000 19 11 6 1 Gasket Pump 5330 200 34 00 7 4 Screw...

Page 38: ...Overload Thermal 5945 301 49 00 7 6 Screw 6 32 x 1 4 S S Round Head 2 Not used on 10A 5305 151 02 00 8 4 Lockwasher 6 External Tooth 2 Not used on 10A 5311 271 02 00 9 2 Nut 6 32 S S Hex 5310 271 01...

Page 39: ...e Brass 4730 207 15 00 8 1 Coupling 1 2 x 3 4 Brass 4730 204 07 00 9 1 Adapter 1 2 Copper x MSPS 4730 401 03 01 10 1 Tube 1 2 x 1 1 2 Copper 5700 001 04 68 11 1 Tee 1 2 C x 1 2 C x 1 2 C Copper 4730 4...

Page 40: ...be taken apart by unscrewing the bonnet and the enclosing tube assembly from the valve body assembly After unscrewing carefully lift off the bonnet and enclosing tube assembly Don t drop the plunger...

Page 41: ...HOOD AND ASSOCIATED ASSEMBLIES 39 2 1 3 14 15 16 17 18 19 5 4 11 12 13 9 10 20 7 8 6 5 4...

Page 42: ...8 30 10 2 Screw 10 24 x 3 8 Flat Head 5305 773 02 00 11 1 Lockwasher Spinner 5311 279 02 00 12 1 Locknut Spinner 5310 379 01 00 13 1 Rinse Head Assembly 5700 000 28 68 14 1 Gasket 2 O D x 1 1 2 I D x...

Page 43: ...IES 10A 41 Outlet Connector Mfg No 5700 002 61 19 Complete Vacuum Breaker Assembly Mfg No 5700 002 61 18 Plated Outlet Assembly Mfg No 5700 002 61 21 Outlet Connector Mfg No 5700 002 61 19 Plated Inle...

Page 44: ...002 61 11 Plated Inlet Assembly 5HH Mfg No 5700 002 61 12 Vacuum Breaker Mfg No 4820 300 07 00 Inlet Connector Mfg No 5700 002 60 93 Outlet Connector Mfg No 5700 002 60 92 Complete Vacuum Breaker Asse...

Page 45: ...o 4820 300 07 00 Inlet Connector Mfg No 5700 002 60 93 Outlet Connector Mfg No 5700 002 60 92 Complete Vacuum Breaker Assembly 4SH Mfg No 5700 002 60 74 Starting with Machine Serial No 45973 Vacuum Br...

Page 46: ...5311 279 02 00 Hood Spanner Lockwasher All 1 5120 100 01 01 Hood Spanner Nut Wrench Tool All 1 6401 005 10 00 Hood Handle w gaskets and screws All 1 6401 006 84 00 Hood Support Pipe Assembly Standard...

Page 47: ...Switch Manual Wash DPDT slip disconnect AF 24 451 1 5930 301 22 18 Switch Master DPST all slip disconnect used on wash heat and conveyor on 39 s AF 24 451 1 5930 301 22 18 Switch Heat DPST all slip di...

Page 48: ...STOMER SERVICE L1 L3 L2 TERMINAL BOARD 1 CUSTOMER SERVICE 6900 WATTS 15 AMP RATING CIRCUIT BREAKER RINSE HEATERS WASH MOTOR HP 5 3 AMPS 630 WATTS HP 5 3 AMPS WASH HEATER RINSE MOTOR 09905 105 34 50 B...

Page 49: ...10A 208 230 VOLT 60 HERTZ 1PHASE WIRING DIAGRAM 47...

Page 50: ...10AB 208 230 VOLT 60 HERTZ 1PHASE WIRING DIAGRAM 48 9905 000 54 97...

Page 51: ...10AB 208 230 VOLT 60 HERTZ 3PHASE WIRING DIAGRAM 49 9905 002 55 90a...

Page 52: ...10APRB 208 230 VOLT 60 HERTZ 1PHASE WIRING DIAGRAM 50 9905 002 55 91a...

Page 53: ...10APRB 208 230 VOLT 60 HERTZ 3PHASE WIRING DIAGRAM 51 9905 002 55 92a...

Reviews: