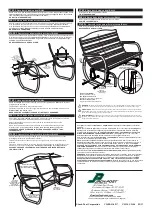
STEP 3
Open inner hardware bag IB-4050.
Attach the
shaped
top seat slat to the top of the 3 seat supports and a
wide
slat to the front
using the hardware shown
.
Tap bolt heads into holes in slats until fully seated.
Fasten the top 9 slats on all 3 seat supports with acorn nuts and the bottom 6 with hex nuts.
Alternate wide and narrow slats.
MAKE SURE THE ASSEMBLY IS SQUARE. TIGHTEN ALL HARDWARE.
STEP 4
Open inner hardware bag IB-4060.
Attach seat to base using hardware shown.
TIGHTEN HARDWARE.
PASO 4
Abra la bolsa interna de ferretería IB-4060.
Una el asiento a la base usando la ferretería que se muestra.
APRIETE LA FERRETERÍA.
ÉTAPE 4
Ouvrez le sac de quincaillerie intérieure IB-4060.
Fixez le siège à la base avec la quincaillerie indiquée.
RESSERREZ LA QUINCAILLERIE.
STEP 2
Open inner hardware bag IB-4040.
Attach 2 arm rests with hardware shown. Attach seat brace to arms using hardware shown. Attach
end seat supports
to arms with hardware shown.
The end seat supports have 3 holes on the
side. The center seat support does not have side holes.
DO NOT TIGHTEN HARDWARE.
PASO 3
Abra la bolsa interna de ferretería IB-4050.
Una el listón superior
modelado
del asiento a la parte superior de los 3 apoyos del asiento
y un listón
ancho
al frente usando la ferretería que se muestra.
Golpee las cabezas de los pernos en los orificios de los listones hasta que estén
totalmente asentadas
Ajuste los 9 listones superiores en los 3 apoyos del asiento con tuercas ciegas y los
6 inferiores con tuercas hexagonales.
Alterne entre listones anchos y angostos.
ASEGÚRESE DE QUE EL ENSAMBLE ESTÉ EN ESCUADRA. APRIETE TODA
LA FERRETERÍA.
PASO 2
Abra la bolsa interna de ferretería IB-4040.
Una los 2 apoyos de los posabrazos con la ferretería que se muestra. Una el tirante del asiento
a los posabrazos con la ferretería que se muestra. Una
los apoyos laterales del asiento
a los posabrazos con la ferretería que se muestra.
Los apoyos laterales del asiento tienen
3 orificios al costado. El apoyo central del asiento no tiene orificios laterales.
NO APRIETE LA FERRETERÍA.
ÉTAPE 2
Ouvrez le sac de quincaillerie intérieure IB-4040.
Fixez les 2 accoudoirs avec la quincaillerie indiquée. Fixez le renfort du siège aux accoudoirs avec
la quincaillerie indiquée. Fixez les
supports d'extrémité
du siège aux bras avec la quincaillerie
indiquée.
Les supports d'extrémité du siège ont 3 trous sur le côté. Le support du siège
central n'a pas de trous latéraux.
NE RESSERREZ PAS LA QUINCAILLERIE.
ÉTAPE 3
Ouvrez le sac de quincaillerie intérieure IB-4050.
Fixez la latte supérieure du siège
formée
sur le dessus des 3 supports du siège et une
latte
large
à l'avant avec la quincaillerie indiquée.
Taraudez les têtes des écrous dans les trous des lattes jusqu’à ce qu’elles soient bien
installées.
Fixez les 9 lattes supérieures sur les trois supports du siège avec les écrous borgnes et les
6 du bas avec les écrous hexagonaux.
Alternez les lattes larges et les lattes étroites.
ASSUREZ-VOUS QUE L'ASSEMBLAGE SOIT D'ÉQUERRE. RESSERREZ TOUTE
LA QUINCAILLERIE.
©
2007 Jack-Post Corporation
ZA-1140-4
CG-10, CG44 12/07
CORPORATION
800 East Third Street
Buchanan, Michigan 49107-1803
Customer Service 1-800-800-4950
Mon. thru Fri. 8:00am – 4:30pm EST
E-mail [email protected]
Toda comunicación es solamente en inglés.
Toute communication sera seulement en anglais.
Your glider is complete. TIGHTEN ALL HARDWARE. Periodically check the tightness of all bolts
and nuts.
NOTE: Your assembled glider has several free moving parts. As a result, improper handling when
moving could result in hand or finger injury should they become pinched between a bearing
assembly and the glider frame. TO PREVENT POSSIBLE INJURY, SECURE BOTH SIDES OF THE
GLIDER BEFORE MOVING YOUR ASSEMBLED GLIDER. (Using light rope or cord, secure the
bottom portion of the bearing to the arm and base to prevent glider movement.)
Su mecedora está completa. APRIETE TODA LA FERRETERÍA. Revise periódicamente los pernos
y tuercas para comprobar que estén ajustados.
NOTA: Su mecedora armada tiene varias piezas de movimiento libre. Como consecuencia, la
manipulación inadecuada cuando se lo mueve puede provocar lesiones en las manos o dedos si
se los llegara a pellizcar entre un ensamble del rodamiento y el marco de la mecedora. PARA
EVITAR POSIBLES LESIONES, ASEGURE AMBOS LADOS DE LA MECEDORA ANTES DE MOVER
SU MECEDORA ARMADA. (Con una cuerda o cordón liviano, asegure la porción inferior del
rodamiento al posabrazo y a la base para evitar el movimiento de la mecedora.)
Votre fauteuil est terminé. RESSERREZ TOUTE LA QUINCAILLERIE. Vérifiez régulièrement si tous
les boulons et écrous sont bien resserrés.
REMARQUE : Votre fauteuil coulissant assemblé a plusieurs pièces mobiles. Donc, toute mauvaise
manipulation en déplaçant le fauteuil pourrait mener à une blessure de la main ou du doigt qui
pourrait se pincer entre un assemblage de roulement et le cadre du fauteuil coulissant. POUR
ÉVITER TOUTE BLESSURE POSSIBLE, FIXEZ LES DEUX CÔTÉS DU FAUTEUIL COULISSANT
AVANT DE DÉPLACER VOTRE FAUTEUIL ASSEMBLÉ. (Utilisez une petite corde ou une ficelle, fixez
la partie inférieure du roulement au bras et à la base pour éviter tout déplacement du fauteuil
coulissant.)
44mm
65mm
SEAT BRACE
TIRANTE DEL ASIENTO
CALE DE SIÈGE
52mm
65mm
LOCKNUT
CONTRATUERCA
CONTRE-ÉCROU
HEX NUT
TUERCA HEXAGONAL
ÉCROU HEXAGONAL
39mm
WIDE SLAT
LISTÓN ANCHO
LATTE LARGE
TOP 9 WITH
ACORN NUTS
9 SUPERIORES CON
TUERCAS CIEGAS
9 DU HAUT À
ÉCROUS BORGNES
39mm
62mm
BEARING
RODAMIENTO
ROULEMENT
PLASTIC
SPACER
SEPARADOR
PLÁSTICO
ENTRETOISE DE
PLASTIQUE
BASE
BASE
BASE
ARM
POSABRAZO
BRAS
62mm
PLASTIC SPACER
ESPACIADOR DE
PLÁSTICO
ENTRETOISE DE
PLASTIQUE
LEG
PATA
PIED
FRONT BASE BRACE
TIRANTE DELANTERO DE LA BASE
RENFORT DE LA BASE AVANT
LOCKNUTS
CONTRATUERCAS
CONTRE-ÉCROUS
CENTER SEAT SUPPORT
APOYO CENTRAL DEL ASIENTO
SUPPORT DE SIÈGE CENTRAL
BOTTOM 6 WITH HEX NUT
6 INFERIORES CON TUERCAS
HEXAGONALES
6 DU BAS À ÉCROU HEX.
SQUARE
PLASTIC SPACER
ESPACIADOR CUADRADO
DE PLÁSTICO
ENTRETOISE CARRÉE
DE PLASTIQUE
WARNING:
Assemble the seat to the base with the rear base brace behind the seat as shown. If the rear
base brace is under the front of the seat, the product can tip over backwards and cause serious injury.
ADVERTENCIA:
Arme el asiento a la base dejando el tirante trasero de la base en la parte posterior del
asiento como se muestra. Si el tirante trasero de la base queda debajo del frente del asiento, la mecedora
puede caerse hacia atrás y provocar lesiones graves.
AVERTISSEMENT :
Assemblez le siège à la base avec le renfort arrière de la base derrière le siège tel
qu'illustré. Si le renfort arrière de la base est sous l'avant du siège, le fauteuil pourrait basculer vers l'arrière
et causer de graves blessures.
Do not overtighten!
Bearing should move freely.
¡No apriete en exceso!
El rodamiento debe moverse libremente.
Ne resserrez pas trop !
Le palier devrait se déplacer librement.
©Jack-Post Corporation YQ-ZA-1140-5 CG-10, CG-44 10/10
03/11
7


