background image

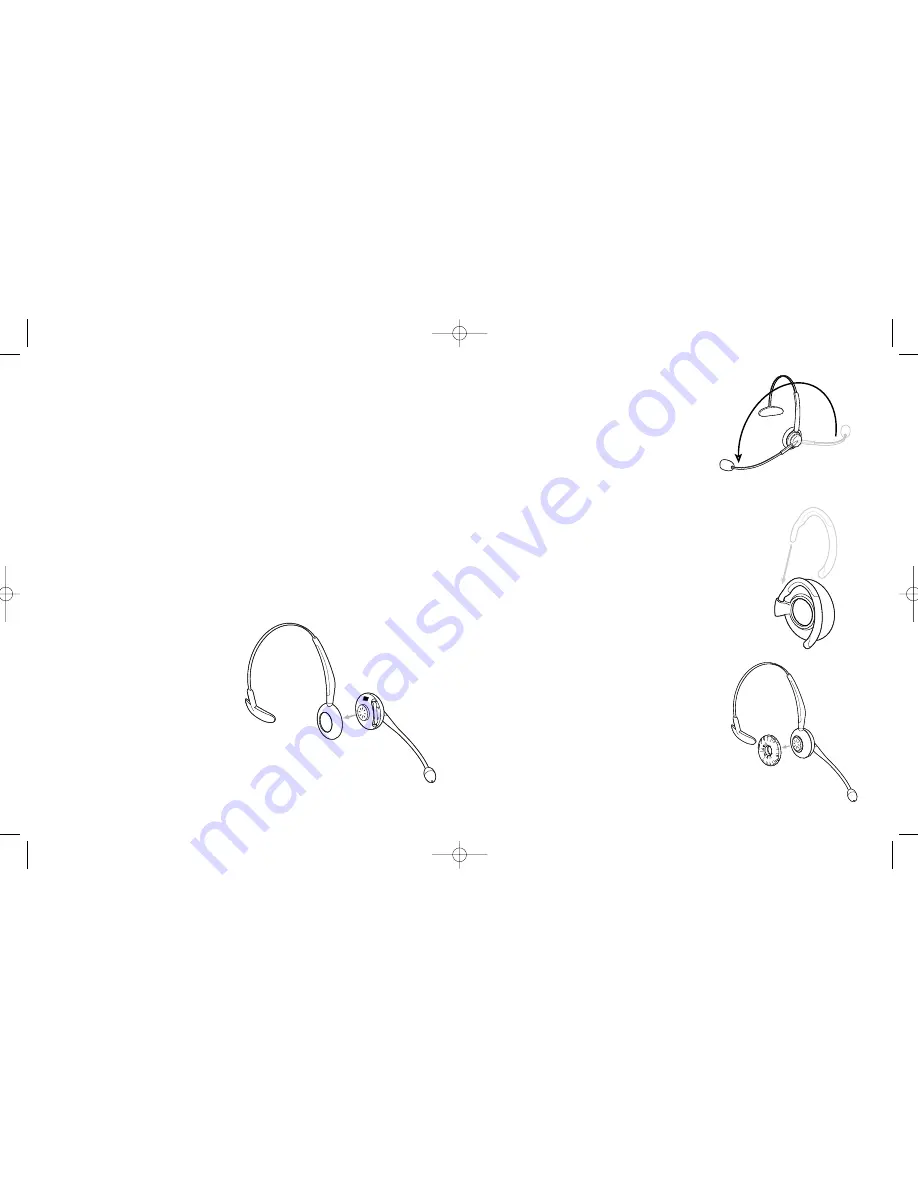
Your headband allows you to wear your headset on your

right or left ear. Rotate the 

Boom Arm

(x) 180 degrees for

left ear or right ear wearing. The 

Stay-Put

TM

click-stop

headband lengthens and shortens to the desired length for

a custom fit over your head. Pull to lengthen. 

Push to shorten.

Note: 

The Boom Arm cannot be rotated a full 360

degrees.Do not force it if you cannot rotate it any further.

To Attach the Earhook for Over-the-Ear Wearing:

1) Gently 

press 

the 

Earhook Ring

into the 

Headset 

Receiver

. The square knob on the 

Earhook Ring

will match the square hole in the 

Headset Receiver

.

2) Attach 

the 

Earhook

to the 

Earhook Ring

.

After attaching the 

Earhook

, you may now 

adjust the headset to be worn on your right 

or left ear, depending on personal preference. 

Changing the Headset's Wearing Style:

1)

Remove the 

Ear Cushion

from the 

Headset 

Receiver (headband version only).

1 1

1 0

3)  During the telephone call, place an additional headset into the 

Master's Base Unit

4)

Listen for a beep in the master headset. You will have 15 seconds after the beep to 

accept the additional headset for conference. Accept the additional headset by simultane-

ously pressing the 

+/- Buttons

briefly. The additional headset can exit the conference call 

by pressing the 

Multifunction Button

for 2 seconds. 

5)

The conference mode is terminated when:

the 

Master

headset is placed in the 

Base Unit

or; the 

Master

headset's 

Multifunction 

Button

is pressed for 2 seconds (this will end the call)   

Note:  Repeat steps 3-5 to add more headsets to the conference mode. Up to 4 headsets 

may participate in the conference mode.

Comfort Adjustments

The GN 9120 has 2 different wearing styles:

Headband or Over-the-Ear.

To attach the headband:

1) Align 

the 

Headset Receiver

with the 

Headband Ring.

2)

Gently press the 

Headband Ring

to 

the 

Headset Receiver

until it clicks. 

The square knob on the 

Headband 

Ring

will match the square hole in 

the 

Headset Receiver

.

3)

Press the 

Ear Cushion

onto the 

Headset Receiver

until it clicks.

Align Heaband Ring with
Headset Receiver

GN9120 BETA User Guide  11/20/02  5:12 PM  Page 10

Summary of Contents for GN 9120

Page 1: ...GN 9120 User Guide GN Netcom GN9120 BETA User Guide 11 20 02 5 12 PM Page 1 ...

Page 2: ...r d Link Indicator e Telephone Termination Switch 2 Headset a Multifunction Button b Volume Up c Volume Down 3 Headband 4 Earhook 5 Earplate 6 Ear cushion 7 Base Stand 8 Connection Cord 9 Cord Manager 10 Power Cord 3 1a 1 1d 1b 2 3 1e 5 2b 4 8 9 6 7 10 2c 2a 1c GN9120 BETA User Guide 11 20 02 5 12 PM Page 2 ...

Page 3: ...0 seconds REMEMBER CHARGE THE BATTERY FOR 1 5 HOURS PRIOR TO INITIAL USE 5 4 Your headset will have one of the following Boom styles a Headset with NC noise canceling microphone b Headset with SoundTubeTM c Headset with MidiBoomTM These instructions apply to all 3 Headsets Installation 1 Disconnect the handset cord from the telephone s handset port and connect it to the port marked handset on the ...

Page 4: ...h G until the dial tone is clearly heard 7 6 Adjusting Transmit and Receive Volume 1 Put on the headset 2 Lift the handset 3 Call someone and ask them to help you evaluate the headset s transmit volume 4 Make sure that the boom arm microphone is positioned closely to your mouth 5 Press the buttons on the headset simultaneously until you hear a beep Adjust the Transmit Volume by pressing the or But...

Page 5: ...r Base Unit is the Master headset 1 Lift your Master headset out of the Base Unit 2 Initiate or answer a call Adjusting Receive Tone Control Select the tone Normal Bass Lift or Treble Lift according to personal preference 1 Press the Multifunction Button for 6 seconds A beep will indicate when 6 seconds has passed 2 Press the volume or button to toggle between the 3 sound modes When the desired so...

Page 6: ...dset into the Master s Base Unit 4 Listen for a beep in the master headset You will have 15 seconds after the beep to accept the additional headset for conference Accept the additional headset by simultane ously pressing the Buttons briefly The additional headset can exit the conference call by pressing the Multifunction Button for 2 seconds 5 The conference mode is terminated when the Master head...

Page 7: ...aning use only water and a small amount of dishwashing liquid if needed For the Earplate remove the Earplate from the Headset Receiver For the Headset s Ear Cushion gently peel it off the Earplate 2 While carefully handling the headset gently press the Headset Receiver s speaker with your thumb and pull the Headband Earhook Ring away Frequently Asked Questions Why can t I hear a dial tone Check th...

Page 8: ...L FCC and CS standards Safety Instructions Never try to dismantle the product yourself None of the internal components can be repaired by users Do not expose the headset to rain or other liquids The headset is equipped with a rechargeable NiMH battery nickel metal hydride For battery replacement please contact your distributor or reseller FCC Notice to Users Upon request only you must notify your ...

Page 9: ...a telephone interface The ter mination of an interface may consist of any combination of devices subject only to the requirement that the sum of the ringer equivalence Numbers of all the devices does not exceed 5 17 ing two conditions 1 This device may not cause harmful interference 2 This device must accept any interference received including interference that may cause undesired operation Note T...

Page 10: ...attempt any service adjustments or repairs on this unit whether in or out of warranty FCC Part 68 216 man dates that Repair of registered terminal equipment and registered protective circuitry shall be accomplished only by the manufacturer or assembler thereof or by their authorized agent Contact GN Netcom Inc at 800 826 4656 for authorized service locations 19 To Obtain Service For customer servi...

Page 11: ...20 GN9120 BETA User Guide 11 20 02 5 12 PM Page 20 ...

Reviews: