JABLOTRON
ALARMS
a.s.
Pod
Skalkou
4567/33
46601
Jablonec
n.
Nisou
Czech
Republic
www
.jablotron.com
||
|
TM-201A multi-functional electronic thermometer,
- 1 -
MNU51203
TM-201A multi-functional electronic thermometer
The TM-201A multi-functional electronic thermometer can be used in all
installations where one or two temperature values need to be measured with
a subsequent relay closing or opening action. The thermometer is equipped
with warning (optical and acoustic) indication. It can be typically used
as a protective thermometer, bistable thermostat or difference thermostat.
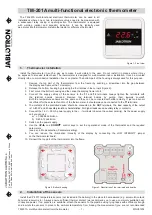
Figure 1: Front view
1. Thermometer
installation
Install the thermometer in such a way as to make it well visible to the user. Do not install it in places where it may
be exposed to intensive radiant heat. The thermometer is designed for wall-mounted indoor installation. It can be mounted
directly into a common device installation box or on plaster. The bottom part of the housing is always used for this purpose.
1. Remove the top part of the thermometer from the frame (by pushing a screwdriver into the gap between
the display and frame at the T2 indicator).
2. Release the bottom housing by pressing the four latches in the corners (figure 2).
3. First, mount the bottom housing and then snap the display frame into it.
4. Connect the supply cables of the sensors to the
T1
and
T2
terminals. Always tighten the terminals with
the terminal boards removed. Remove the terminal boards by pulling them towards yourself.
Both the temperature sensors are the same and they can be connected with either polarity. If just one sensor
is sufficient for the selected function of the thermometer, it should always be connected to the
T1
terminals.
5. The contacts of the controlled device should be connected to the
OUT
terminals. The load capacity of the output
is 1 A/250 V and it has safety isolation characteristics. For higher loads use an auxiliary relay or contactor.
6. Connect the 12 V / 50 mA power supply to the + - terminals (observe the correct polarity). As the power supply
unit you can use:
a) LT-089.06
Jablotron.
b) DE06-12
Jablotron.
7. Switch on the power supply.
8. Use
the
UP
Ÿ
and
DOWN
ź
control keys to set the operational mode of the thermostat and the required
parameters
(see par. 4, Mode selection, Parameter setting).
9. You can reduce the illumination intensity of the display by connecting the LOW INTENSITY jumper
on the thermometer board.
10. Reinsert the top part of the thermometer into the frame.
Figure 2: Bottom housing
Figure 3: Description of the terminals and boards
2.
Installation of the sensors
Install the CP-201T temperature sensors (not included in the delivery) in the place to be measured (e.g. accumulation tank,
hot water reservoir etc.). Always ensure sufficient thermal contact (we recommend you to use a commonly available heat-
conductive paste). If no pockets are available, attach the sensors to the pipeline using tying tapes with sufficient strength
and insulate the sensors to prevent the ambient temperature from biasing the measurement (you are not recommended


