J-Tech Digital JTECH-EX230 User Manual Download Page 5


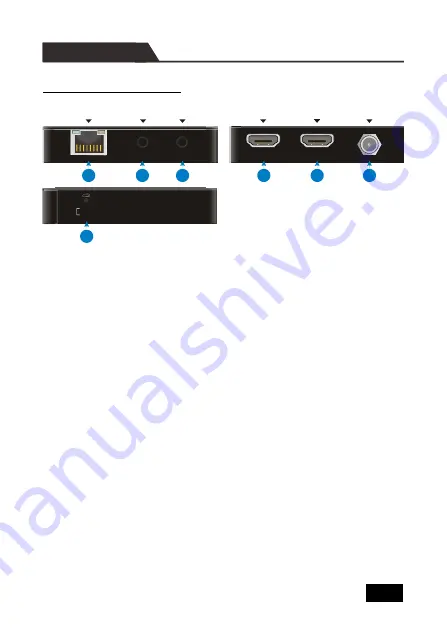
Transmitter Panel Description 


CATx OUT: 

RJ45 port to connect the CATx IN port of receiver by CATx cable. It 

supports 12V PoC to power the receiver. The orange LED illuminates when 

there is a valid HDMI signal input. The green LED illuminates when power is 

applied.


IR IN: 

3.5mm mini jack to connect IR receiver for IR pass-through.


IR OUT: 

3.5mm mini jack to connect IR emitter for IR pass-through. 


DISPLAY: 

Type-A female HDMI port to connect HDMI display device. 


SOURCE: 

Type-A female HDMI port to connect HDMI source device. 


DC 12V: 

DC connector for the power adapter connection. 


EDID Management: 

Press the button with paper clip or other sharp tool to set 

EDID bypass mode, or press and hold it for 3 seconds to copy the EDID from 

the display device.


Note: 

Press and hold the button while powering off, and then release it after 5 

seconds of power on to restore the default setting: The source device learns 

EDID from the TV which has the lowest resolution. 


EDID BYPASS

EDID COPY Tx/3s

IR OUT

IR IN


CATx OUT

DISPLAY

SOURCE

DC 12V

1

2

3

4

5

6

7

PANEL DESCRIPTION 


Summary of Contents for JTECH-EX230

Page 1: ...Operating Instructions Website www jtechdigital com Toll Free 1 888 610 2818 Email support jtechdigital com USER MANUAL HDMI 18G Extender 230Ft DownScale Model JTECH EX230 JTD ID 536 ...

Page 2: ...ge to the unit Follow all instructions and warnings marked on this unit Do not attempt to service this unit yourself except where explained in this manual Provide proper ventilation air circulation and do not use near water Keep objects that might damage the device away and assure that the placement of this unit is on a stable surface Use only the power adapter power cords and connection cables de...

Page 3: ...INTRODUCTION 1 PACKAGE LIST 1 FEATURES 1 PANEL DESCRIPTION 2 PANEL DESCRIPTION 3 SYSTEM CONNECTION 3 SPECIFICATION 4 TABLE OF CONTENTS ...

Page 4: ... 1080p display 1x Transmitter Tx 1x Receiver Rx 1x IR Receiver 1x IR Emitter 1x Power Adapter 5V DC 1A 2x Velcro Tape 1x User Manual Supports HDMI 2 0 up to 4K 60Hz 4 4 4 HDR 18G HDCP 2 2 Extends 4K or 1080p HDMI signal up to 230 feet 70m over a single CAT5e 6 cable HDMI loop out on transmitter Bi directional IR pass through Supports video resolution down scaling the 4K input can be automatically ...

Page 5: ... to connect HDMI display device SOURCE Type A female HDMI port to connect HDMI source device DC 12V DC connector for the power adapter connection EDID Management Press the button with paper clip or other sharp tool to set EDID bypass mode or press and hold it for 3 seconds to copy the EDID from the display device Note Press and hold the button while powering off and then release it after 5 seconds...

Page 6: ...lluminates when there is a valid HDMI signal input The green LED illuminates when power is applied IR IN 3 5mm mini jack to connect IR receiver for IR pass through IR OUT 3 5mm mini jack to connect IR emitter for IR pass through The following diagram illustrates the typical input and output connection of the splitter IR Emitter Blu Ray Remote IR Receiver Bedroom TV 4K Blu Ray Tx Rx Living Room TV ...

Page 7: ...l Connector 2 3 5mm mini jacks General Video Resolution Up to 4K 60Hz 4 4 4 HDR Transmission Distance 4K 1080p 70 meters 230ft HDMI Version Up to HDMI 2 0 HDCP Version Up to HDCP 2 2 The HDCP of output follows the HDCP version of display device EDID Pass through Supported Power Supply Input 100VAC 240VAC 50 60Hz Output 12VDC 1A Power Consumption 4W Max Operation Temperature 5 55 Storage Temperatur...

Page 8: ...e subject to change without prior notification Only use the provided power supply when operating this unit J Tech Digital is not responsible for any damage due to customer neglect All trademarks are the sole property of their respective companies Copyright J Tech Digital Inc All rights reserved ...

Reviews: