background image

4  | 

P a g e


Dear Customer 

Thank you for purchasing the JTECH-ENCH54. For optimum performance and safety, please read 

these instructions carefully before connecting, operating or adjusting this product. Please keep 

this manual for future reference.   


FEATURES 


Supports H.264 & H.265 Encoding 


Supports UDP, HTTP, RTSP, RTMP, ONVIF Protocols 


CBR/VBR Rate: 32 Kbps 

 32 Mbps 


1000M Network Interface uses Full Duplex Mode 


Supports up to 4K 30Hz HD Video Input 


Supports Image Parameter Settings 


Supports Remote Management in WAN (webGUI) 


Supports Customized Resolution Settings 


PACKAGE CONTENTS 

1)


J-Tech Digital JTECH-ENCH54 H.264/H.265 Encoder 

2)


Power Adapter 12VDC 1A 

3)


User Manual 


Summary of Contents for JTD-671

Page 1: ...1 P a g e JTD 671 JTECH ENCH54 4 Input H 264 H 265 Encoder...

Page 2: ...TATIC IP ADDRESS 12 DETERMINING THE IP SCHEME OF YOUR NETWORK WINDOWS 12 LOCATING AN UNUSED IP ADDRESS ON YOUR NETWORK 13 ASSIGNING THE JTECH ENCH54 A STATIC IP ADDRESS IN THE WEB GUI 15 NAVIGATING TH...

Page 3: ...3 P a g e SYSTEM 30 Network 30 Advanced 31 Change Password 32 Serial to TCP 33 Upgrade and Backup 33 Reset 33 Reboot 33 Schedule Restart 33...

Page 4: ...e reference FEATURES Supports H 264 H 265 Encoding Supports UDP HTTP RTSP RTMP ONVIF Protocols CBR VBR Rate 32 Kbps 32 Mbps 1000M Network Interface uses Full Duplex Mode Supports up to 4K 30Hz HD Vide...

Page 5: ...tatus LED 3 LAN Status LED Back Panel 1 Reset Button Factory Default Settings Press hold the reset button for 10 seconds until the Power and LAN Status LEDs turn off 2 Analog Audio Input Ports 1 2 3 H...

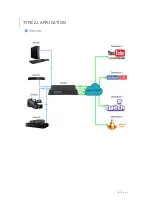
Page 6: ...6 P a g e TYPICAL APPLICATION...

Page 7: ...R PC S IP ADDRESS You will start by changing the IP address of your computer to match the default IP address scheme of the encoder 192 168 1 168 so that the two can communicate This means we will need...

Page 8: ...8 P a g e This will bring up a new window Right Click on Ethernet and select Properties This will bring up a new window Highlight Internet Protocol Version 4 TCP IPv4 and select the Properties button...

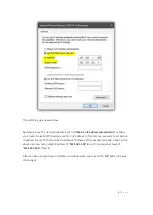
Page 9: ...our PC an IP address In this instance we want to set a static IP address for our PC that matches the default IP scheme of the encoder 192 168 1 168 In the above instance I set a static IP address of 1...

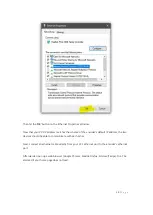
Page 10: ...he encoder s default IP address the two devices should be able to communicate with each other Next connect an ethernet cable directly from your PC s ethernet port to the encoder s ethernet port Afterw...

Page 11: ...default IP address of the encoder 192 168 1 168 and hit enter When you are prompted to enter login information please enter the following credentials Username admin Password admin From here you should...

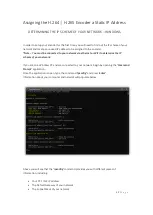
Page 12: ...r network via ethernet or WiFi to determine the IP scheme of your network If you are on a Windows PC and are connected to your network begin by opening the Command Prompt application Once the applicat...

Page 13: ...DHCP dynamic host configuration protocol This function allows the router to assign an IP address to the devices on the LAN We do not want to utilize DHCP with your encoder because the IP address assig...

Page 14: ...o the device host itself and sends an echo message back to say that it cannot be found Most likely there is not a device on your LAN that is using the 192 168 1 200 IP address If your results show the...

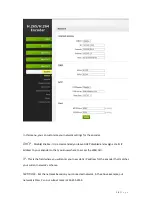
Page 15: ...address ASSIGNING THE JTECH ENCH54 A STATIC IP ADDRESS IN THE WEB GUI In order for the JTECH ENCH54 to operate correctly the device needs to live on your existing network and have access to the intern...

Page 16: ...ign a static IP address to your encoder so that you know where to access the WEB GUI IP This is the field where you will enter your new static IP address for the encoder that matches your current netw...

Page 17: ...After your device has rebooted and your changes have saved directly connect your JTECH ENCH54 encoder to your network switch or router via ethernet cable Reconnect your computer to your network switc...

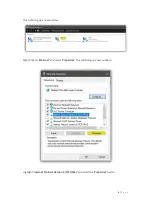
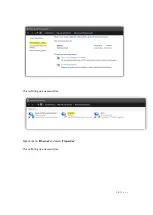
Page 18: ...18 P a g e This will bring up a new window Right Click on Ethernet and select Properties This will bring up a new window...

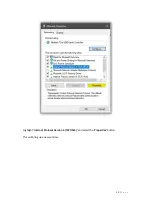
Page 19: ...19 P a g e Highlight Internet Protocol Version 4 TCP IPv4 and select the Properties button This will bring up a new window...

Page 20: ...s scheme and provide you access to the internet After these changes have been made you can confirm two things 1 Open a web browser to confirm you have regained internet access 2 Open a web browser typ...

Page 21: ...powered on Device Time Time that the encoder references CPU Usage Current percentage of CPU processing power being used CPU Junction Temperature Current temperature of CPU Memory Usage Current memory...

Page 22: ...T 1 INPUT STATUS MAIN STREAM URLS Input Status Input Size HDMI Input Resolution Refresh Rate Collected Video Frames Captured Video Frames Lost Video Frames Lost Video Frames Audio Sample Rate HDMI Inp...

Page 23: ...ort Stream URL HLS URL HTTP Live Stream URL FLV URL HTTP Flash Video Stream URL RTSP URL Real Time Streaming Protocol URL RTMP URL Real Time Messaging Protocol URL RTMP PUSH URL Real Time Messaging Pr...

Page 24: ...64 H 265 MJPG Select your compression type FPS Frames Per Second Set your stream FPS 5 60 fps Bitrate kbit Stream s Bitrate Setting 32 32000 kbps Bitrate Control VBR Variable Bit Rate CBR Constant Bit...

Page 25: ...e Disable set the Multicast IP to be used Multicast Port Assign the multicast port to be used 1 65535 SRT URL Enable Disable Secure Reliable Transport URL SRT PUSH URL Enable Disable Secure Reliable T...

Page 26: ...axis 0 1920 o Y Location on y axis 0 1080 o Text Customized text you d like shown on the OSD o Font Size Size of font on OSD 8 72 o Background Color Transparent White Black o Color Color of text bmp S...

Page 27: ...lack o Color Color of text time OSD Shows Date Time o X Location of image on x axis 0 1920 o Y Location of image on y axis 0 1080 o Font Size Size of font on OSD 8 72 o Background Color Transparent Wh...

Page 28: ...e over X and Y axis Video Clipping Enable Disable Clipping Functions Video Clipping Left Shifts image horizontally from left side 0 1920 0 left Video Clipping Right Shifts image vertically from bottom...

Page 29: ...g Audio from analog audio input port only available for Input Port 1 2 Mix Audio from both HDMI input port and analog audio input port Sample Rate 44100 Hz 48000 Hz Encoder Audio Encoding Type AAC AAC...

Page 30: ...sable G711A audio codec System NETWORK Internet Access DHCP Enable Disable IP Field for assigning static IP address NetMask Field for assigning custom netmask Gateway Field for assigning custom gatewa...

Page 31: ...me When the input signal is interlaced the format stream is divided into even and odd fields Both Even and odd fields are treated in turn Bottom Only Only one of odd or even fields is dealt with Field...

Page 32: ...t Enable The setting for H264 slice Slice Size The size for H264 slice Min_QP Usually the lower the QP equates to better image quality higher bit rate The higher the QP the image quality will decrease...

Page 33: ...ew firmware up rar or configuration box ini files Backup Firmware and Configuration In this section the user can backup and save their current firmware version and or configuration RESET Clicking the...

Page 34: ...34 P a g e...

Reviews: