


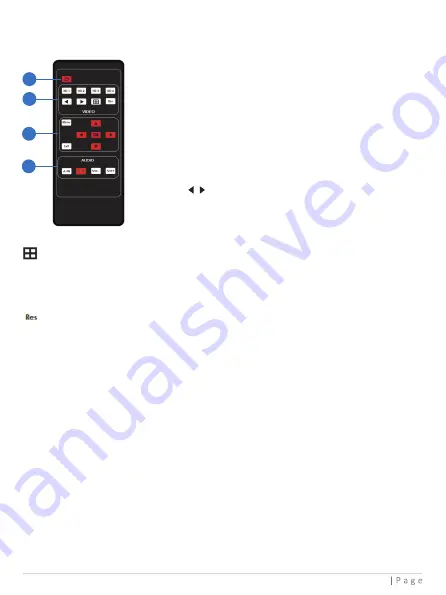
6. IR Remote
1
2
3
4
①
Power on or Standby: Press this button to
power on the switcher or set it to standby mode.
②
HD 1/2/3/4: Press these buttons to select input
source in single screen display mode, and the
corresponding input LED on the front panel will
light in green, and the corresponding input source
will be displayed on the OSD of the window.
: Press these buttons to circularly select the
last or next input source in single screen
display mode.
③
MENU, EXIT, LEFT, RIGHT, UP, DOWN, OK: OSD Menu navigation buttons.
④
A-IN: Press this button to pop up the audio channel selection OSD, then press
the UP / DOWN button to select the audio output channel (The output audio
follows the video source by default). Finally, pess the A-IN button to switch to
the selected audio channel, and the corresponding audio channel name is also
displayed on the OSD at the bottom center of the window.
Mute: Press this button to mute / unmute the audio.
VOL-, VOL+: Press these buttons to increase / decrease the audio output volume.
Note:
The optical fiber digital audio can only be mute / unmute by the Mute
button, and the volume cannot be increased or decreased by the VOL-/VOL+
button.
: Multiview display mode switching button.
▪ Short press this button to circularly select: SINGLE - PIP - PBP (1) - PBP (2) -
Triple (1) - Triple (2) - Quad (1) - Quad (2).
▪ Long press this button, the input source of the window will be displayed on OSD.
: Output resolution switching button.
▪ Short press the RES button to circularly switch the output resolution of the HDMI
OUTPUT port (Please refer to the output resolution list of “8. Video & Audio”).
▪ Long press the RES button for 3 seconds to switch the output resolution to
720P60.
8


