

1
2
3
9
8
7
6
5
4
1
2
3
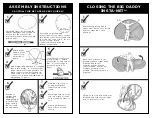
Assemble frame by inserting the
smaller fiberglass end of the pole
section into the center of the
larger metal sleeve. Frame should
form an oval.
Lay frame on ground and
rotate connectors on frame so they
face inside of net. Twist frame rod
to rotate the connectors, do not
loosen screws. Black
connectors should be at the
bottom of the frame.
Attach white
strap to white
connector on
each side of
frame.
Find weight bag attached to strapping
that forms a large ‘X’. Place weight
bag at bottom of frame between the
black connectors and attach short
ends of blue ‘X’ cross straps to the
connectors. Attach Velcro® strap on
weight bag to frame.
Locate green connectors
at top of frame. Attach
green clips at long end of
blue ‘X’ cross straps to
green connectors on
frame.
Stand net
upright and
anchor by
adding weight
to the weight
bag or using
the enclosed
ground stakes.
Find red clip at top of
netting attached to
topmost part of the
frame.
Working down from the
red clip, attach all clips
to the frame on sides of
net.
Attach guidelines to
each side of net and
secure.
Remove weight or ground
stakes from base of net. Grab
frame at 10 and 2 o’clock
positions.
Push the net down to the
ground with your right hand
while pulling the net
towards your body with
your left hand. Let the net
collapse naturally to the
ground. This will result in a
‘figure 8’.
Lift up on the left loop with your
left hand and fold over the right
loop to form two circles.
ASSEMBLY INSTRUCTIONS
CLOSING THE BIG DADDY
INSTA-NET
TM
CAUTION: THIS NET OPENS VERY QUICKLY.
Black
White
Green
Black
Green
White
10
2
BOTTOM
CONNECTOR