iXsystems TrueNAS Mini E Basic Setup Manual Download Page 9

Support: 855-473-7449 or 408-943-4100                                     Email: [email protected]

Page 7

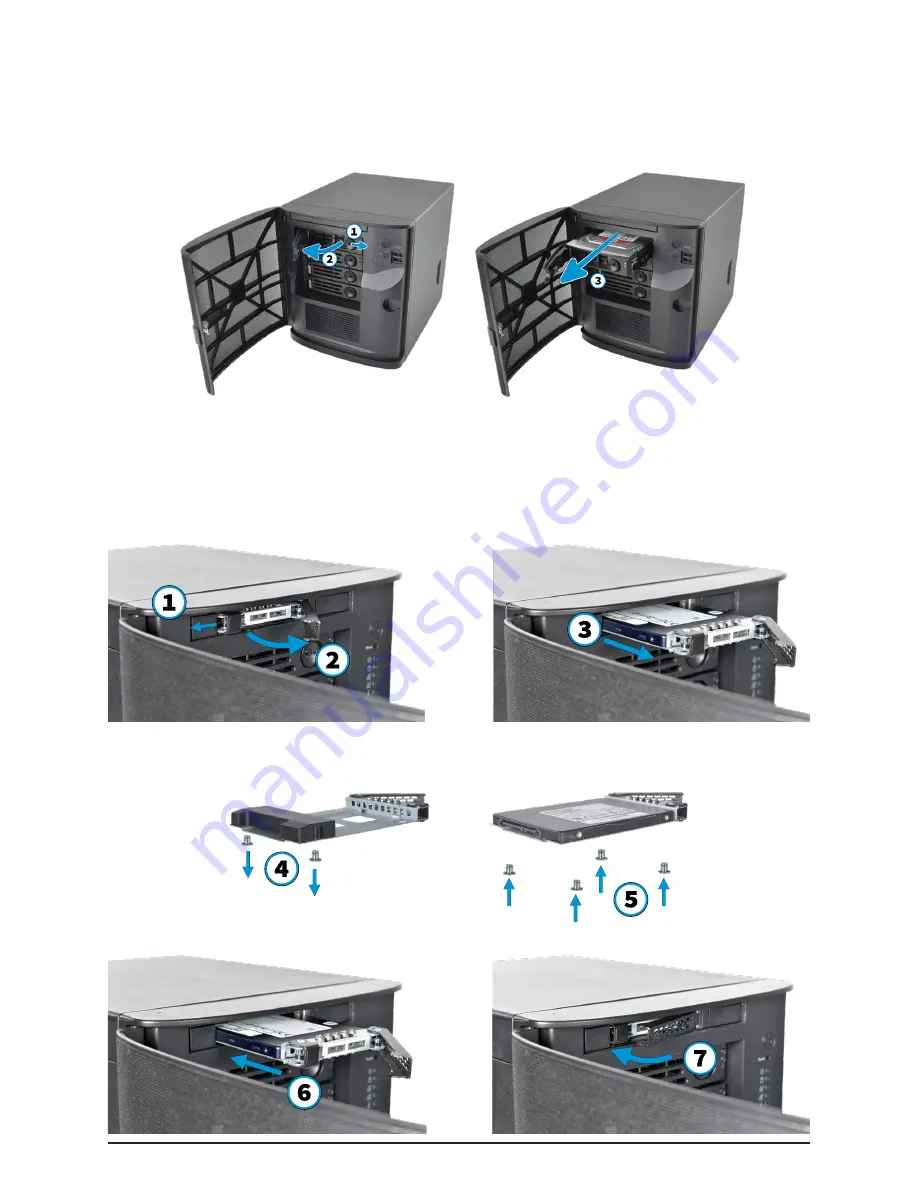
4 Mini 2.5” Drive Bays

4.1 Mini XL+ 2.5” Bay Installation

The Mini XL+ has a single additional 2.5” bay for an SSD.

To remove the tray, release the latch by sliding the button to the left (

1

). Gently swing the latch to 

the right (

2

), then slide the tray out (

3

).

To add an SSD, unscrew the two attachment screws from the SSD tray underside and remove the 

SSD tray filler (

4

). Attach the SSD to the tray with four screws from the bag labeled 2.5” through the 

bottom of the tray (

5

).

Gently insert the tray into the bay until it stops (

6

) and the latch is nearly shut. Swing the latch closed 

until it locks (

7

).

3  Removing Drive Trays

If a drive tray must be removed, release the latch by pushing the large circular button to the right (

1

). 

Swing the latch to the left to eject the tray, then pull outwards on the latch to begin sliding the tray 

out (

2

). Grip the top and bottom of the tray and gently remove it (

3

).

Summary of Contents for TrueNAS Mini E

Page 1: ...TrueNAS Mini 3 0 Family Basic Setup Guide Version 1 1...

Page 2: ...8 943 4100 Please locate and record the hardware serial numbers on the back of each chassis for quick reference Contents Introduction 1 1 Become Familiar with the TrueNAS Mini Family 2 1 1 The TrueNAS...

Page 3: ...ay TrueNAS Mini products share similar chassis and front panels but have different system compo nents that can change what type of connections are available and where they are located Each Mini produc...

Page 4: ...cators 8 Two USB 2 0 ports 1 Become Familiar with the TrueNAS Mini Family 1 1 The TrueNAS Mini E and E 1 Back Panel Power Connector 2 Serial Port 3 VGA connector 4 Four GbE network ports 5 IPMI remote...

Page 5: ...ty Indicator 9 Unit Identification Indicators 1 2 The TrueNAS Mini X 1 Back Panel Power Connector 2 Serial Port 3 VGA connector 4 Four GbE network ports 5 IPMI remote management network port 6 Port co...

Page 6: ...ving or cutting the Tamper Resistant sticker to remove the case 1 Five 3 5 drive trays 2 Two 2 5 drive trays and screws 3 Two Ethernet cables 4 One bag of 3 5 HDD screws 5 One power cord 6 One set of...

Page 7: ...ntification Indicators 9 One USB 3 0 port 10 One USB 2 0 port 1 4 The TrueNAS Mini XL 1 Back Panel Power Connector 2 IPMI remote management network port 3 Two USB 2 0 ports 4 Two 10 GbE network ports...

Page 8: ...ar screws holding the filler 1 Gently spread both sides of the tray away from the filler 2 until the pins release 3 then remove the filler Starting with the top bay gently insert a tray into a drive b...

Page 9: ...he SSD tray underside and remove the SSD tray filler 4 Attach the SSD to the tray with four screws from the bag labeled 2 5 through the bottom of the tray 5 Gently insert the tray into the bay until i...

Page 10: ...ch to the right 2 then slide the tray out 3 Remove the filler tray from the drive tray by removing the screws 4 place the drive in the tray and secure the drive to the tray with the provided screws 5...

Page 11: ...power on the system Pressing and holding the power button while the system is running will perform a hard power off The reset button will reboot the system 5 2 Console Setup on the TrueNAS Mini A VGA...

Page 12: ...ng truenas local or the IP address of the TrueNAS Mini system into the browser address bar and pressing Enter Log in with Username root Password abcd1234 After logging in you can change the root accou...

Page 13: ...The TrueNAS forums provide an opportunity to interact with other TrueNAS users and to discuss their configurations The forums are available at https ixsystems com community forums 7 1 Contacting iXsy...

Page 14: ...Support 855 473 7449 or 408 943 4100 Email support ixsystems com Page 12...

Page 15: ...Support 855 473 7449 or 408 943 4100 Email support ixsystems com Page 13...

Page 16: ......

Reviews: