IVIEW CyPad 1000 TPC User Manual Download Page 12


Copy files to memory cards. 

1. Use a USB cable to connect MID with computer. 

2. After setting the 

store setting

, then connect with computer successfully. 

3. Open 

M y Computer

 of your computer, then see "portable disk" content. 

4. Find intended copy files to duplicate to the "portable disk". 

5. After  the  completion  of  the  copy,  click  on  "safe  deletion  hardware"  Icon  of  your 

computer task bar to unload. 


Content of MID Storage Device 

1.

iView-1000TPC has 8G NAND FLASH storage space for keeping files. 

2.

TF movable storage card. 

3.

The abovementioned two storage devices can be accessed using USB to connect to 

your computer. 


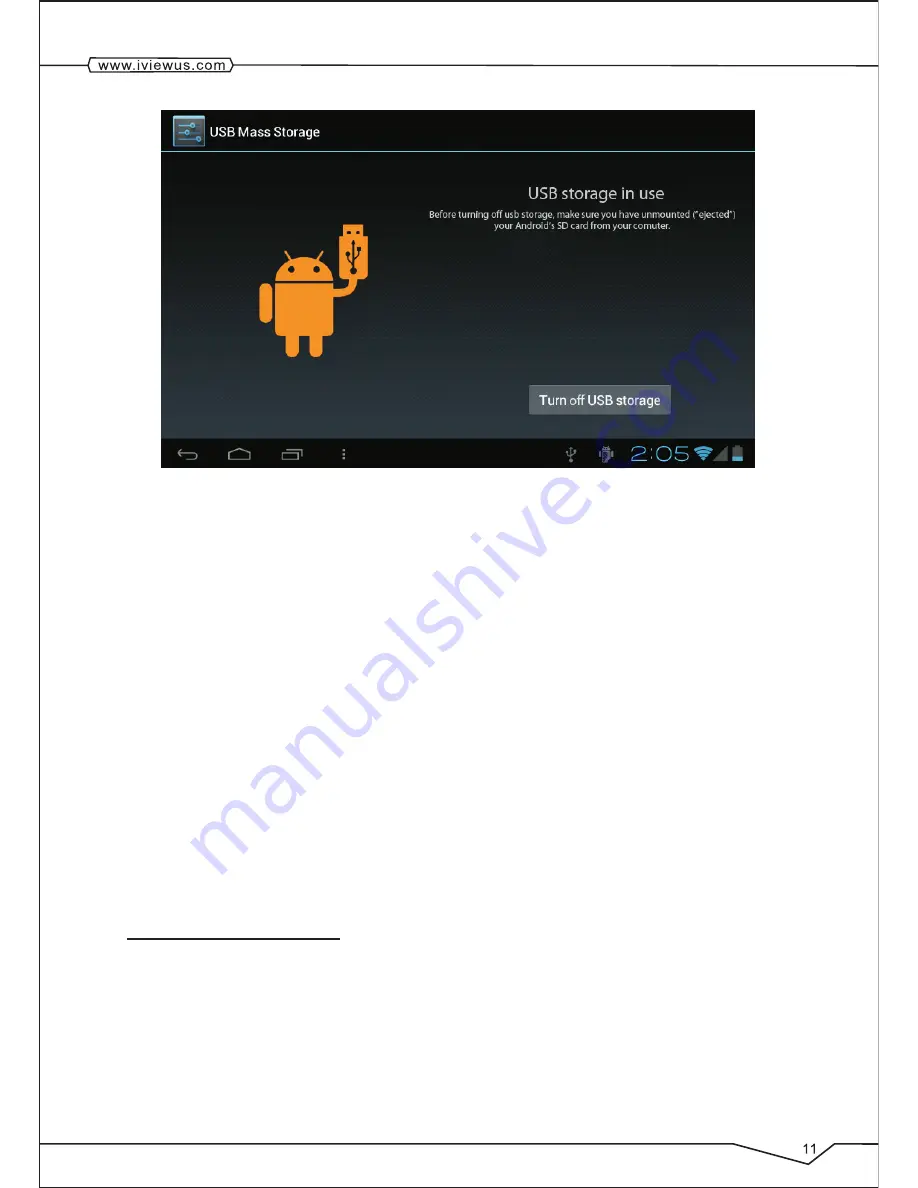
Note: When you connect the USB cable to MID, if you enable 

USB storage device,

 you 

will not be able to access to Internal Memory; if you  want to access to Internal Memory,   

disconnect the USB device. 

2.7 Storage Card 

Copy files to storage card 

You can transfer files between MID and computer such as music and pictures, etc. If you 

want to see the file, provided that you click file browser, then you can browse the contents 

of the SD card. 


Delete the file on the MID memory card. 

1.  Find the file you want to delete. 

2.  Hold click the file which you need to delete, then the file menu will pop up. 

Summary of Contents for CyPad 1000 TPC

Page 1: ......

Page 2: ...2 4 Page Interface 8 2 5 Access To The Application 9 2 6 USB Connection 10 2 7 Storage Card 11 2 8 Input Text 12 2 9 Use Skills 13 3 Establish WIFI Connections 14 4 Communication 14 4 1 Email 14 4 2 B...

Page 3: ...ation Security 25 8 3 Storage 26 8 4 Date Time 26 8 5 Language Keyboard 27 8 6 About Device 27 9 The Apkinstaller and Control of Program 28 9 1 Apkinstaller 28 9 2 Managing and Unloading 28 Specificat...

Page 4: ......

Page 5: ...1 1 MID Overall Drawing 1...

Page 6: ...or previous operation interface Home key l Press this button to return the function interface from arbitrary interface l Long press this button to open recently application window 1 2 MID Accessories...

Page 7: ...tters to be handled Download is completed Alarm opening General notice such as synchronization error Music playing More Data synchronization Charging Insufficient SD card space Battery changing sign W...

Page 8: ...matically closed to save the battery 2 In the screen opening condition press the power button the screen will immediately shut down Tip if you need to find out how to configure screen closing time ple...

Page 9: ...es you can only turn to MID then the screen will switch from lateral to straight direction 2 4 Page Interface The main menu screen will show all application You can use the application shortcut and cu...

Page 10: ...ew folder of homepage interface to open it 4 Click and hold the folder list of headlines to rename it 5 Open the folder click the application of marking holding the application to drag folders then ma...

Page 11: ...MID with computer Notice bar will appear notice cue 2 Drag down the Icon at the bottom right side 3 In the notification panel click on the USB connected then click Turn on USB storage 4 Then the USB...

Page 12: ...e storage card 3 The abovementioned two storage devices can be accessed using USB to connect to your computer Note When you connect the USB cable to MID if you enable USB storage device you will not b...

Page 13: ...creen keyboard will appear Keyboard have optional input way as below 1 Android keyboard 2 The third party input method The user can install independently Select the input method which you want to use...

Page 14: ...play all previous viewed records such as music picture and downloads etc Quick close the program Press the ESC button back to superior interface or press HOME button back to the homepage interface Res...

Page 15: ...s the MID will automatically scan available Wi Fi wireless networks 6 Choose the Wi Fi network which you want to connect If it has requires password it will display an password input window Then input...

Page 16: ...button 3 Enter your email account address and password 4 Click the next step button and select your mailbox type POP3 or IMAP 5 Then click next step button to check whether email server is available 6...

Page 17: ...hope to send an email in one account click that account title in advance before you click main menu key and write email 4 2 Bluetooth Function 1 At the homepage interface press Menu key to display th...

Page 18: ...atically record and save in the system 8 You can use the navigator to search for the routes to your destination 9 Use the navigator processing can zoom or narrow the view of distances 5 Multimedia 5 1...

Page 19: ...6 Input name of playlist 7 Click to save Delete the playlist 1 Click the music 2 Click the songs 3 Hold the song which you want to delete in playlists 4 Music setting menu will pop up then click delet...

Page 20: ...her functions 4 Click on Video Record button again to end video recording and you can see previewed videos 5 4 Gallery Using the Gallery application program you can automatically search all photos and...

Page 21: ...y adjust the direction of rotation Edit and set images Press menu button to display select item in full screen mode you can choose select item to edit and setting up the picture according to your need...

Page 22: ...ble video files Click to select one of them to be able to play the video file In the video preview interface press Menu button to be able to appear the function window editing video files as shown in...

Page 23: ...Visit Web pages 1 Touch Browser 2 Press the Menu key 3 Touch Address bar 4 Type the Web address touch Go Need network connection...

Page 24: ...tton pop up alarm setting menu 7 2 Calculator 1 Click the calculator 2 Enter into the basic calculator panel 3 First Click the Shortcut key then click clear history 7 3 File Manager Browse the file Sl...

Page 25: ...py or Move to then click Paste Delete the file 1 Use fingers to hold the file you want to delete in the file browser 2 Click delete 3 Click delete to delete files or click cancel to return 8 Basic Set...

Page 26: ...just Sleep timeout 1 On the homepage interface press the menu button to display setting menu 2 Click Settings 3 Click Display 4 Scroll down the screen then click Sleep timeout 5 Open the Screen Standb...

Page 27: ...e Safely remove SD card Secure removal of the SD card can effectively protect the SD card and increase the service life of the SD card 1 On the homepage interface press the menu button to display the...

Page 28: ...d format will also be applied to the time format of the clock 9 Click to select date format and then choose to display the date format on the MID 8 5 Language Keyboard 1 On the homepage interface pres...

Page 29: ...to install 3 The Install option will pop up then click install 4 Follow the installation guide to complete and then operate Note Search files with the apk suffix for these third party programs which...

Page 30: ...roid 4 0 RAM 1GB DDR3 Memory 8GB Support up to 32GB Wireless Connection WIFI 802 11b g Support 3G Module USB Dongle Support Flash 10 3 Support Camera 0 3MP Build in Bluetooth Build in GPS Support G SE...

Page 31: ...6...

Page 32: ......

Reviews: