


1.1.
Mark the edge of
our door at the
desired height of
your lever.
(Figure 1)
1.2.
We recommend
around 900mm –
100mm from
fl oor level, or at the
centre of a lock rail
on a panel door.
1. Marking
the Door
Preferred product height
Figure 1.
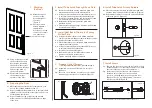
2. Preparing the Door
2.1 Affi
x supplied tube latch privacy template to your
door in the location marked in step 1.1
2.2 As per template drill an 18mm hole to accommodate
spindle, ensure to drill from either side of the door to
avoid splitting the timber.
2.3 As per template, using your preferred method
drill mortice hole of H25 x W23 x D77mm on edge
of the door.
Figure 2.
1.3.
Using a spirit level, mark
the door at the desired
lever height, continuing
the line from the front of
the door, around the edge
and onto the back of
the door. (Figure 2)
1.4.
We recommend extending
the line 100mm onto
each face of the door.
3.1.
Insert the tube latch privacy with face plate and
mark around the edges with a stanley knife.
3.2 Using your preferred method create a 4mm recess
to accommodate the privacy latch and faceplate.
3.3 Insert the tube latch privacy and face plate unit and
pre-drill 2mm pilot holes at 6 and 12 o’clock.
3.4 Install tube latch privacy and face plate with
provided screws.
3.5 Please note to change tongue direction pull out and
rotate 1800 and release.
3. Install Tube Latch Privacy & Face Plate
4.1.
Using preferred method create a W22 x H32mm
cavity to a minimum depth of 12mm on the door edge.
4.2 Remove dust and insert dust box.
4.3 Place striker plate over cavity and mark around the
edges with a stanley knife.
4.4 Using your preferred method create a 4mm recess
to accommodate the striker plate.
4.5 Insert dust box and striker plate.
4.6 Drill two 2mm holes for striker plate screws at
6 and 12 o’clock and install screws.
4.7 Tighten manually with a screwdriver.
4. Install Dust Box & Tube Latch Privacy
Striker Plate
Figure 3.
(6)
5.1.
If required, shorten cut-off screws to suit door
thickness.
5.2.
Ensure to cut so that the screw does not protrude
from the opposite rose once installed. (Figure 3)
5. Prepare Cut-off Screws
—
if using face fi x timber screws, proceed to step 6
6. Install Tube Latch Privacy Spindle
6.1.
Place the tube latch privacy spindle (provided with
the tube latch) through the latch follower. (Figure 4)
6.2
Roll rubber stopper over opposite end until it locates
within the groove. (Figure 5)
7.
Figure 4.
Figure 5.
7.1.
Remove the outer roses from the door lever set and
install the halves on either side of the door, ensuring
the levers function in the correct direction.†
7.2
Insert two of the cut-off screws through non-
threaded holes of the inner rose at 12 and
6 o’clock, screwing them into the opposite rose.
Repeat at 3 or 9 o’clock, depending on location
of privacy pin,
OR
(Figure 6)
7. Install Levers
1.
7.
6. (or 5.)
Figure 6.
† For Helsinki lever unscrew end cap to remove and fi t rose.