background image

53

English

General TV Operation

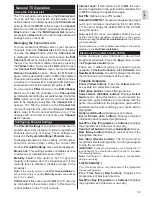
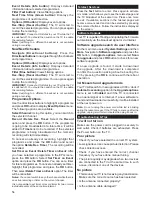
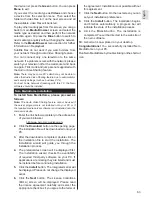
Using the Channel List

The TV sorts all stored stations in the 

Channel List

You can edit this channel list, set favourites or set 

active stations to be listed by using the 

Channel List


options. Press the 

OK

/

TV

 button to open the 

Channel 

List

. You can filter the listed channels by pressing the 

Blue

 button or open the 

Edit Channel List

 menu by 

pressing the 

Green

 button in order to make advanced 

changes in the current list.

Managing the Favourite Lists

You can create four different lists of your favourite 

channels. Enter the 

Channel List

 in the main menu 

or press the 

Green

 button while the 

Channel List


is displayed on the screen in order to open the 

Edit 

Channel List

 menu. Select the desired channel on 

the list. You can make multiple choices by pressing 

the 

Yellow

 button. Then press the 

OK

 button to open 

the 

Channel Edit Options

 menu and select 

Add/

Remove Favourites

 option. Press the 

OK

 button 

again. Set the desired list option to 

On

. The selected 

channel/s will be added to the list. In order to remove  

a channel or channels from a favourite list follow the 

same steps and set the desired list option to 

Off

.

You can use the 

Filter

 function in the 

Edit Channel 

List

 menu to filter the channels in the 

Channel list 

permanently according to your preferences. Using this 

Filter

 option, you can set one of your four favourite 

lists to be displayed everytime the 

Channel list

 is 

opened. The  filtering  function  in  the 

Channel list


menu will only filter the currently displayed 

Channel 

list

 in order to find a channel and tune in to it. This 

changes will not remain the next time the 

Channel 

list

 is opened.

Configuring Parental Settings

The 

Parental Settings

 menu options can be used to 

prohibit users from viewing of certain programmes, 

channels and using of menus. These settings are 

located in the 

System>Settings>Parental

 menu.

To display parental lock menu options, a PIN number 

should be entered. After coding the correct PIN 

number, 

Parental Settings

 menu will be displayed.

Menu Lock:

 This setting enables or disables access 

to all menus or installation menus of the TV. 

Maturity Lock:

 If this option is set, TV gets the 

maturity information from the broadcast and if this 

maturity level is disabled, disables access to the 

broadcast.

Note:

 If the country option in the 

First Time Installation

 is 

set as France, Italy or Austria, 

Maturity Lock

’s value will be 

set to 18 as default.

Child Lock:

 If this option is set to 

ON

, the TV can only 

be controlled by the remote control. In this case the 

control buttons on the TV will not work.

Internet Lock:

 If this option is set to 

ON

, the open 

browser application in the portal will be disabled. Set 

to 

OFF

 to release the application again.

Set PIN:

 Defines a new PIN number. 

Default CICAM PIN:

 This option will appear as greyed 

out if no CI module is inserted into the CI slot of the 

TV. You can change the default PIN of the CI CAM 

using this option. 

Note: 

Default PIN can be set to 

0000

 or 

1234

. If you have 

defined  the  PIN(is  requested  depending  on  the  country 

selection) during the 

First


Time


Installation

 use the PIN that 

you have defined.

Some options may not be available depending on the country 

selection in the 

First Time Installation

.

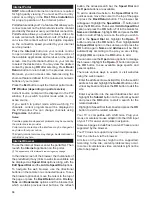
Electronic Programme Guide (EPG)

Some channels send information about their 

broadcast schedules. Press the 

Epg

 button to view 

the 

Programme Guide

 menu.

There are 3 different types of schedule layouts 

available, 

Timeline Schedule

List Schedule

 and 

Now/Next Schedule

. To switch between them follow 

the instructions on the bottom of the screen.

Timeline Schedule

Zoom (Yellow button):

 Press the 

Yellow

 button to 

see events in a wider time interval.

Filter (Blue button): 

Views filtering options.

Select Genre (Subtitles button): 

Displays 

Select 

Genre

 menu. Using this feature, you can search the 

programme guide database in accordance with the 

genre. Info available in the programme guide will be 

searched and results matching your criteria will be 

highlighted.

Options (OK button):

 Displays event options.

Event Details (Info button):

 Displays detailed 

information about selected programmes.

Next/Prev Day (Pro/- buttons): 

Displays 

the programmes of previous or next day.

Search (Text button):

 Displays 

Guide Search

 menu.

Now (Swap button):

 Displays current event of the 

highlighted channel.

Rec./Stop (Record button): 

The TV will start to 

record the selected programme. You can press again 

to stop the recording.

IMPORTANT:

 Connect a USB disk to your TV while the TV 

is switched off. You should then switch on the TV to enable 

the recording feature.

Note:

 Switching to a different broadcast is not available 

during a recording.

List Schedule(*)

(*) 

In this layout option, only 

the events of the highlighted 

channel will be listed.

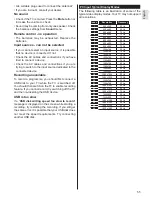
Prev. Time Slice (Red button):

 Displays the 

programmes of previous time slice.

Next/Prev Day (Pro/- buttons): 

Displays 

the programmes of previous or next day.

Summary of Contents for LED 43U-7785(N)

Page 1: ...LED TV Deutsch English LED 43U 7785 N ...

Page 2: ...dung und Wartung gewährleistet wird Bewahren Sie diese Bedienungsanleitung so auf dass Sie sie immer griffbereit haben Unsere Hotline für technische Fragen 07082 9254 20 Mo Do 8 00 16 30 Uhr Fr 8 00 15 00 Uhr Bitte machen Sie von dieser Hotline Gebrauch da technische Probleme meist hier schon behoben werden können ohne dass Sie Ihr Gerät einsenden müssen Internet www itt deutschland de E Mail serv...

Page 3: ...lowMe TV sofern verfügbar 13 CEC und CEC RC Passthrough 13 E Handbuch 14 TV Menüinhalte 15 Allgemeine Bedienung 20 Verwendung der Senderliste 20 Einstellung der Kindersicherungseinstellungen 20 Elektronischer Programmführer EPG 20 Teletext Dienste 21 Softwareaktualisierung 21 Fehlerbehebung Tipps 22 Typische Anzeigemodi PC Eingang 23 AV und HDMI Signalkompatibilität 23 Im USB Modus Unterstützte Vi...

Page 4: ...ker trennen Sie das TV Gerät nicht durch Ziehen des Netzkabels vom Netz Berühren Sie niemals das Netzkabel den Stecker mit nassen Händen da dies einen Kurzschluss oder elektrischen Schlag verursachen kann Machen Sie niemals Knoten in das Netzkabel und binden Sie es nie mit anderen Kabeln zusammen Wenn es beschä digt ist muss das Kabel ersetzt werden DieseArbeit darf ausschließlich durch eine quali...

Page 5: ...s che Hilfe auf i CLASS 1 LASER PRODUCT WARNUNG Stellen Sie das TV Gerät niemals auf eine instabile oder geneigte Unterlage Andernfalls könnte das TV Gerät umfallen und dabei ernste Verletzungen mit möglicher Todesfolge verursachen Viele Verletzungen insbesondere bei Kindern können vermieden werden wenn die folgenden einfachen Vorsichtsmaßnahmen beachtet werden Verwenden Sie nur vom Hersteller des...

Page 6: ...d drücken Sie OK um den Bildschirm umgehend auszuschalten Wenn Sie keine Taste drücken wird der Bildschirm nach 15 Sekunden ausgeschaltet Drücken Sie eine beliebige Taste auf der Fernbe dienung oder auf dem TV Gerät um den Bildschirm wieder einzuschalten Hinweis Die BildschirmAus Option is nicht verfügbar wenn der Modus auf Spielen gestellt ist Schalten Sie das Gerät aus oder ziehen Sie den Netzst...

Page 7: ...ken Sie die Return Back Taste bzw die Menü Taste um einen Menü Bildschirm zu verlassen Eingangsauswahl Sobald Sie ein externes System an Ihr Gerät angeschlossen haben können Sie zwischen den verschiedenen Eingangsquellen schalten Drücken Sie auf Ihrer Fernbedienung hintereinander die Source Taste um die verschiedenen Signalquellen auszuwählen Programme wechseln und Lautstärke ändern Mit den Lautst...

Page 8: ...Einrichtungen oder Systeme umsehen Hinweis Das unten abgebildete Pb Symbol für Akkus zeigt an dass dieser Akku Blei enthält Produkte Batterie Technische Daten TV Übertragung PAL BG I DK LL SECAM BG DK Empfangskanäle VHF BAND I III UHF BAND U HYPERBAND Digitaler Empfang Vollintegriertes Digital Kabel Satelliten TV DVB T C S DVB T2 DVB S2 kompatibel Anzahl der voreingestellten Kanäle 10 000 Kanalanz...

Page 9: ...ler Rücklauf Bewegt Einzelbilder rückwärts in Medien wie Filme 13 Pause Hält die Mediawiedergabe an startet Timeshift Aufnahme 14 Aufnahme Nimmt Programme auf 15 Wiedergabe Beginnt das Abspielen von ausgewählten Media 16 Stop Stoppt die gespielte Medien 17 Schneller Vorwärts Bewegt Einzelbilder vorwärts in Medien wie Filme 18 Untertitel Schaltet Untertitel ein und aus sofern verfügbar 19 Bildschir...

Page 10: ...8 Komfort Fernbedienung Zapper 1 Standby Ein 2 Lautstärke 3 Quellenauswahl 4 Info 5 Stummschaltung 6 Programm weiter zurück 7 Bildgröße 8 Mono Stereo Dual I II Audio Untertitelsprache ...

Page 11: ...montieren alle Kabel an die Rückseite des TV Gerätes anzuschließen Sie dürfen nur dann das CI Modul einsetzen oder herausnehmen wenn das TV Gerät ABGESCHALTET ist Für die genaue Einstellung verweisen wir auf das Handbuch zum Modul Die USB 2 0 Eingänge an der Rückseite sowie seitlich am TV Gerät unterstützen bis Geräte bis zu 500mA Ein Anschluss von Geräten deren Wert mehr als 500mA beträgt kann zu...

Page 12: ...igitalen Satelliten sendern sobald die Ersteinstellungen vorgenommen worden sind Vor dem Ausführen der Satellitensuche müssen einige Einstellungen vorgenommen werden Das Menü Antennen Typ wird zuerst eingeblendet Sie können als Antennentyp Direkt Einzelkabel Satellit oder DiSEqC mit den Tasten oder auswählen Direct Wenn Sie einen einzelnen Receiver und einen direkten Satellitenschüssel haben wähle...

Page 13: ...Zoll HDD mit externer Stromversorgung externe Festplatten oder einen USB Speicherstick an das TV Gerät anschließen WICHTIG Sichern Sie die Dateien Ihres Speicher gerätes bevor Sie es mit dem Gerät verbinden Der Hersteller übernimmt keinerlei Haftung für beschädig te Dateien oder Datenverluste Unter Umständen sind bestimmteArten von USB Geräten z B MP3 Player oder USB Festplattenlaufwerke Speichers...

Page 14: ...ehalten und gleichzeitig auf dem angeschlossenen USB Laufwerk gespeichert Drücken Sie die Wiedergabe Taste um das an gehaltene Programm vom Zeitpunkt der Pause an anzusehen Drücken Sie die Stopp Taste um die Timeshift Aufnahme zu beenden und zur Live Sen dung zu wechseln Timeshift kann nicht im Radio Modus verwendet werden Sie können die Timeshift Rücklauf Funktion nicht benutzen bevor Sie mit der...

Page 15: ...er Funktion lassen sich CEC fähige Geräte die über einen HDMI Anschluss angeschlossen sind über die Fernbedienung des Fernseher steuern D i e C E C O p t i o n i m M e n ü System Einstellungen Mehr muss vorher aktiviert werden Drücken Sie die Taste Quelle und wählen Sie den HDMI Eingang des angeschlossenen CEC Geräts im Menü Quellenliste Wenn eine neue CEC Quelle angeschlossen wurde wird es im Men...

Page 16: ...ormationsbroschüre und drücken Sie Ok Durch die Verwendung der Richtungstasten wählen Sie die gewünschte Kategorie Jede Kategorie enthält unterschiedliche Themen Wählen Sie das Thema und drücken Sie OK um die Anweisungen zu lesen Um das E Handbuch zu schließen drücken Sie die Exit bzw die Menu Taste Hinweis Der Inhalt des E Handbuchs kann je nach Modell variieren ...

Page 17: ...des durch das Drücken der Links bzw Rechts Taste Bildzoom Stellt das gewünschte Bildgrößenformat ein Filmmodus Filme werden mit einer unterschiedlichen Anzahl von Bildern je Sekunde bis zu normalen Fernsehprogrammen aufgezeichnet Schalten Sie diese Funktion ein wenn Sie sich schnell bewegende Szenen eines Films klarer sehen möchten Oberflächenfarbe Die Balance kann zwischen 5 und 5 eingestellt wer...

Page 18: ...tion stellt den Ton so ein dass zwischen den Programmen ein konstanter Ausgangspegel erhalten bleibt Kopfhörer Lineout Wenn Sie einen externen Verstärker an Ihren Fernseher anschließen durch Benutzen des Kopfhöreranschlusses können Sie diese Option als Lineout festlegen Wenn Sie einen Kopfhörer an den Fernseher angeschlossen haben legen Sie diese Option als Kopfhörer fest Bevor Sie einen Kopfhörer...

Page 19: ... Optionen Regulär Verbessert und Deaktiviert verfügbar Die Optionen Regulär und Verbessert haben Auswirkungen auf die Farbeinstellungen der ausgewählten HDMI Quelle Um 4K Bilder von HDMI Quelle anzeigen zu können müssen die entsprechenden Einstellungen für Quellen auf Verbessert gestellt wenn die angeschlossene HDMI 2 0 kompatibel ist Wählen Sie Regulär wenn die angeschlossene HDMI 1 4 kompatibel ...

Page 20: ...ind einige Elemente im TV Menü möglicherweise nicht verfügbar Audio Video Sharing Die Audio Video Sharing Funktion gestattet Ihnen das Teilen von auf Ihrem Smartphone oder Tablet PC gespeicherten Dateien Sofern Sie ein kompatibles Smartphone bzw einen Tablet PC besitzen und die geeignete Software installiert ist können Sie dort gespeicherte Bilder auf dem TV Gerät teilen anzeigen Für weitere Infor...

Page 21: ... an Sie können Satelliten Hinzufügen löschen oder Satelliteneinstellungen auf der Liste Bearbeiten Antenneninstallation Sie können die Satellitenantenneneinstellungen ändern und oder eine neue Satellitensuche starten SatcoDX Sie können mit Hilfe der entsprechenden Optionen SatcoDX Daten hoch bzw herunterladen Installationseinstellungen Zeigt das Menü Installationseinstellungen an Standby Suche opt...

Page 22: ...ine PIN eingegeben werden Nach der Eingabe der richtigen PIN werden die Einstellungen Kindersicherung angezeigt Menüsperre Diese Einstellung aktiviert bzw deaktiviert den Zugang zu allen Menüs bzw Installationsmenüs des TV Geräts Altersfreigabe Ist diese Option eingestellt bezieht das Fernsehgerät vom Sender Altersinformationen Ist die entsprechendeAltersstufe im Gerät deaktiviert wird der Zugriff...

Page 23: ...r umschalten Programmoptionen Benutzen Sie die Navigationstasten um ein Programm zu markieren und drücken Sie die OK Taste um das Menü Ereignis Optionen anzuzeigen Folgende Optionen stehen zur Auswahl Kanal auswählen Mit dieser Option können Sie zum gewählten Kanal umschalten Aufnahme einstellen Löschen Timer Wählen Sie die Option Aufnahme und drücken Sie die Taste OK Wenn das Programm zu einem sp...

Page 24: ...quelle ausgewählt ist Ist die Antenne richtig angeschlossen Ist das Antennenkabel beschädigt Wurden geeignete Stecker verwendet um die Antenne anzuschließen Wenn Sie nicht sicher sind fragen Sie Ihren Händler Kein Ton Sehen Sie nach ob das Fernsehgerät stumm geschaltet ist Drücken Sie die Stumm Taste oder erhöhen Sie zur Prüfung die Lautstärke Es könnte sein dass der Ton nur aus einem Lautsprecher...

Page 25: ...z 28 1680x1050 59Hz 29 1680x1050 60Hz 30 1920x1080 60Hz AV und HDMI Signalkompatibilität Quelle Unterstützte Signale Verfügbar EXT SCART PAL O SECAM O NTSC4 43 O NTSC3 58 RGB 50 60 O RÜCKLAUF AV PAL O SECAM O NTSC4 43 O NTSC3 58 O YPbPr 480i 480p 60Hz O 576i 576p 50Hz O 720p 50Hz 60Hz O 1080i 50Hz 60Hz O HDMI 480i 60Hz O 480p 60Hz O 576i 576p 50Hz O 720p 50Hz 60Hz O 1080i 50Hz 60Hz O 1080p 24Hz 25...

Page 26: ...I avi MKV mkv H 264 3840x2160 30fps 1080P 60fps 135Mbps FLV flv MP4 mp4 mov 3GPP 3gpp 3gp MPEG Transportstream ts trp tp ASF asf AVI avi MKV mkv Motion JPEG 720P 30fps 10Mbps AVI avi 3GPP 3gpp 3gp MP4 mp4 mov MKV mkv ASF asf VP8 1080P 30fps 20Mbps MKV mkv WebM webm HEVC 4K2K 60fps 160Mbps MP4 mp4 mov MKV mkv MPEG Transportstream ts trp tp VP9 4K2K 30fps 100Mbps MKV mkv WebM webm Im USB Modus Unter...

Page 27: ...Hz 44 1KHz 48KHz 32Kbps 640Kbps AC3 ac3 AVI avi Matroska mkv mka 3GPP 3gpp 3gp MP4 mp4 mov m4a MPEG Transportstream ts trp tp MPEG Programmstream DAT VOB MPG MPEG EAC3 32KHz 44 1KHz 48KHz 32Kbps 6 Mbps EAC3 ec3 3GPP 3gpp 3gp MP4 mp4 mov m4a MPEG Transportstream ts trp tp MPEG program stream DAT VOB MPG MPEG AAC HEAAC 8KHz 48KHz AAC aac AVI avi Matroska mkv mka 3GPP 3gpp 3gp MP4 mp4 mov m4a MPEG Tr...

Page 28: ...I nicht im Lieferumfang enthalten an die Anschlüsse Ihres TV Gerätes anschließen können Sie die folgenden Auflösungsrichtwerte verwenden 56Hz 60Hz 66Hz 70Hz 72Hz 75Hz 640x480 þ þ 800x600 þ þ þ 1024x768 þ þ þ 1280x768 þ þ 1280x960 þ 1360x768 þ 1366x768 þ 1280x1024 þ þ þ 1400x1050 þ 1600x900 þ ...

Page 29: ... ein Ethernet Kabel um Ihren Fernseher direkt mit der Netzwerk Steckdose zu verbinden LAN Eingang an der Rückseite des TV Geräts Netzwerk Wandsteckdose Konfiguration der Einstellungen für draht gebundene Geräte Netzwerktyp Als Netzwerktyp können Sie Drahtgebundenes Gerät Drahtloses Gerät oder aber Deaktiviert auswählen entsprechend der aktiven Verbindung zum TV Gerät Wählen Sie die Option Drahtgeb...

Page 30: ...rät als Netzwerktyp um den Verbindungsvorgang zu starten Das TV Gerät sucht nun automatisch nach Drahtlos netzwerken Eine Liste der verfügbaren Netzwerke wird angezeigt Bitte wählen Sie aus der Liste das gewünschtes Netzwerk Hinweis Wenn das Modem den N Modus unterstützt sollten Sie die N Modus Einstellungen bevorzugen Falls das gewählte Netzwerk passwortgeschützt geben Sie dieses bitte über die v...

Page 31: ...st überprüfen Sie das Mo dem Router Liegt kein Problem mit dem Router vor überprüfen Sie die Internetverbindung des Modems Verbindung ist langsam Sehen Sie im Handbuch Ihres WLAN Modems nach um Informationen über die Reichweite die Verbin dungsgeschwindigkeit die Signalqualität und weitere Einstellungen zu erhalten Sie benötigen einen Hoch geschwindigkeitsanschluss für das Modem Unterbrechung währ...

Page 32: ... des Medien browser zurückgehen den gewünschten Medientyp wählen und die Netzwerk Auswahl wiederholen Oder Sie drücken die Blaue Taste um zum nächsten Me dientyp zu wechseln ohne das Netzwerk zu ändern Weitere Informationen zur Wiedergabe von Dateien finden Sie im Menüabschnitt Mediabrowser Wenn Sie Videos aus Ihrem Netzwerk mit Hilfe der Audio Video Sharing Funktion abspielen können Untertitel ni...

Page 33: ...Clips oder Web Inhalte mit definierten Tastenkürzel aufzurufen Ob Sie diesen Inhalt ohne Unterbrechung anzeigen können ist abhängig von der Verbindungsgeschwindigkeit Ihres Internet Service Providers Drücken Sie die Internet Taste auf der Fernbedienung um die Internetportalseite aufzurufen Die Icons der verfügbaren Anwendungen und Dienste werden auf der Portal Seite angezeigt Wählen Sie mit Hilfe ...

Page 34: ...en Sie die OK Taste Markieren Sie dann die Zum Schnellzugriff hinzufügen Option im Untermenü und drücken Sie erneutOK Taste Name und Adresse werden entsprechend der Seite auf der Sie sich befinden ergänzt Markieren Sie die OK Taste und drücken Sie zum Hinzufügen die OK Taste erneut Sie können auf die Opera Browsermenüoptionen zur Steuerung im Browser verwenden Markieren Sie die Opera Schaltfläche ...

Page 35: ... kann folgendes passieren Die Anwendung kann weiter laufen Die Anwendung kann beendet werden Die Anwendung kann beendet werden und eine andere Autostart Rote Punkt Anwendung kann gestartet werden HbbTV macht es möglich dass die Anwendungen über Breitband oder Broadcast wieder gefunden werden können Der Sender kann entweder beide Möglichkeiten aktivieren oder eine von ihnen Hat die Plattform keine ...

Page 36: ...eladene Kanalliste navigieren und auf die Miniaturansichten klicken um die Informationsseiten anzuzeigen AUFNAHMEN Sie können Ihre aktiven Aufnahmen sofern vorhanden und Erinnerungen über diesen Tab ansehen Um ein Element zu löschen drücken Sie die Löschtaste die sich in jeder Reihe findet EPG Sie können die Sendezeiten ausgewählter Kanallisten über diesen Tab sehen Sie können auch durch die Kanäl...

Page 37: ...nen Hinweis Nicht alle Bilddateiformate werden unterstützt Die Funktion ist nicht verfügbar wenn die Audio Video Sha ring Funktion nicht unterstützt wird Portal Launcher Um auf das Widget Portal Launcher zuzugrei fen tippen Sie auf den Aufwärtspfeil in der unteren linke Seite des Bildschirms Sie können auf die Portal Seite zugreifen indem Sie auf den Portal Launcher tippen Hinweis Eine Internet Ve...

Page 38: ...99 5 EC R TTE EN 55013 2001 A1 2003 A2 2006 EN 55020 2007 EN 61000 3 2 2006 A1 2009 A2 2009 EN 61000 3 3 2008 EN 60065 2002 A1 2006 A11 2008 A2 2010 A12 2011 EN 55022 2006 A1 2007 Class B EN 55024 1998 A1 2001 A2 2003 Eine Kopie der vollständigen Konformitätserklärung kann unter der folgenden Adresse bezogen werden Karcher AG Gewerbestr 19 75217 Birkenfeld Oder im Internet unter folgendem Link htt...

Page 39: ...FollowMe TV if available 47 CEC and CEC RC Passthrough 47 E Manual if available 48 TV Menu Contents 49 General TV Operation 53 Using the Channel List 53 Configuring Parental Settings 53 Electronic Programme Guide EPG 53 Teletext Services 54 Software Upgrade 54 Troubleshooting Tips 54 PC Input Typical Display Modes 55 AV and HDMI Signal Compatibility 56 Supported Video File Formats for USB Mode 57 ...

Page 40: ... the TV to dripping or splashing of liquids and do not place objects filled with liquids such as vases cups etc on or over the TV e g on shelves above the unit Do not expose the TV to direct sunlight or do not place open flames such as lit candles on the top of or near the TV Do not place any heat sources such as electric heaters radiators etc near the TV set Do not place the TV on the floor and i...

Page 41: ...ain from your local dealer if not supplied with your TV Do not install the TV on a ceiling or on an inclined wall Use the specified wall mounting screws and other accessories Tighten the wall mounting screws firmly to prevent the TV from fall Do not over tighten the screws WARNING Apparatus connected to the protective earthing of the building installation through the MAINS connection or through ot...

Page 42: ...y Notifications If the TV does not receive any input signal e g from an aerial or HDMI source for 5 minutes it will go into standby When you next switch on the following message will be displayed TV switched to stand by mode automatically because there was no signal for a long time Press OK to continue If the TV is on and it isn t being operated for a while it will go into standby When you next sw...

Page 43: ...ratories Dolby and the double D symbol are trademarks of Dolby Laboratories YouTube and the YouTube logo are trademarks of Google Inc Information for Users on Disposal of Old Equipment and Batteries European Union only Equipment bearing these symbols should not be disposed as general household waste You should look for appropriate recycling facilities and systems for the disposal of these products...

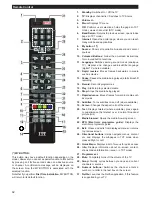
Page 44: ... available press again to superimpose the teletext over a normal broadcast picture mix 21 Media browser Opens the media browsing screen 22 EPG Electronic programme guide Displays the electronic programme guide 23 Exit Closes and exits from displayed menus or returns to previous screen 24 Directional buttons Helps navigate menus content etc and displays the subpages in TXT mode when pressed Right o...

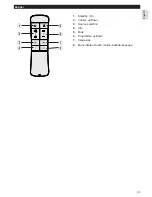
Page 45: ...43 English Zapper 1 Standby On 2 Volume up down 3 Source selection 4 Info 5 Mute 6 Programme up down 7 Image size 8 Mono Stereo Dual II Audio Subtitle language ...

Page 46: ...ty in the market if not supplied we recommend that you plug all your cables into the back of the TV before mounting on the wall Insert or remove the CI module only when the TV is SWITCHED OFF You should refer to the module instruction manual for details of the settings The USB 2 0 inputs on the back side and on the left side of the TV support devices up to 500mA Connecting devices that have curren...

Page 47: ... a single receiver and a direct satellite dish select this antenna type Press OK to continue Select an available satellite on the next screen and press OK to scan for services Single Satellite Cable If you have multiple receivers and a single satellite cable system select this antenna type Press OK to continue Configure settings by following instructions on the next screen Press OK to scan for ser...

Page 48: ...sk Note When viewing image files the Media Browser menu can only display 1000 image files stored on the connected USB device Recording a Programme IMPORTANT When using a new USB hard disk drive it is recommended that you first format the disk using your TV s Format Disk option in the Media Browser Settings Recording Settings menu To record a programme you should first connect a USB disk to your TV...

Page 49: ...r a format but you will lose ALL your data If USB disk writing speed too slow to record message is displayed on the screen while starting a recording try restarting the recording If you still get the same error it is possible that your USB disk does not meet the speed requirements Try connecting another USB disk Media Browser Menu You can play photo music and movie files stored on a USB disk by co...

Page 50: ...t System Audio Control Allows an Audio Amplifier Receiver to be used with the TV The volume can be controlled using the remote control of the TV To activate this feature set the Speakers option in the System Settings More menu as Amplifier The TV speakers will be muted and the sound of the watched source will be provided from the connected sound system Note The audio device should support System A...

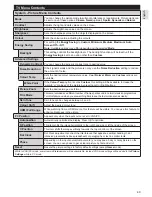
Page 51: ...ness of the picture by pressing Left or Right buttons Picture Zoom Sets the desired image size format Film Mode Films are recorded at a different number of frames per second to normal television programmes Turn this feature on when you are watching films to see the fast motion scenes clearly Skin Tone Skin tone can be changed between 5 and 5 Colour Shift Adjust the desired colour tone HDMI Full Ra...

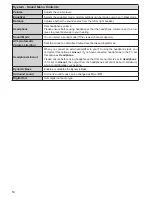
Page 52: ... AVL Automatic Volume Limiting Sets the sound to obtain fixed output level between programmes Headphone Lineout When you connect an external amplifier to your TV using the headphone jack you can select this option as Lineout If you have connected headphones to the TV set this option as Headphone Please ensure before using headphones that this menu item is set to Headphone If it is set to Lineout t...

Page 53: ...sibility Displays accessibility options of the TV Hard of Hearing Enables any special feature sent from the broadcaster Audio Description A narration track will be played for the blind or visually impaired audience Press OK to see all available Audio Description menu options This feature is available only if the broadcaster supports it Note Audio description sound feature is not available in recor...

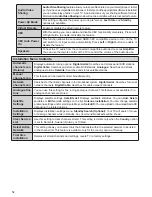
Page 54: ...Analogue Searches and stores analogue stations Satellite Searches and stores satellite stations Manual channel scan This feature can be used for direct broadcast entry Network channel scan Searches for the linked channels in the broadcast system Digital Aerial Searches for aerial network channels Digital Cable Searches for cable network channels Analogue fine tune You can use this setting for fine...

Page 55: ...tion is set as France Italy or Austria Maturity Lock s value will be set to 18 as default Child Lock If this option is set to ON the TV can only be controlled by the remote control In this case the control buttons on the TV will not work Internet Lock If this option is set to ON the open browser application in the portal will be disabled Set to OFF to release the application again Set PIN Defines ...

Page 56: ...The timer will be cancelled Notes You cannot switch to any other channel while there is an active recording or timer on the current channel It is not possible to set timer or record timer for two or more individual events at the same time interval Teletext Services Press the Text button to enter Press again to activate mix mode which allows you to see the teletext page and the TV broadcast at the ...

Page 57: ...you cannot record try switching off the TV and then re inserting the USB device USB is too slow If a USB disk writing speed too slow to record message is displayed on the screen while starting a recording try restarting the recording If you still get the same error it is possible that your USB disk does not meet the speed requirements Try connecting another USB disk PC Input Typical Display Modes ...

Page 58: ... 60Hz O 576i 576p 50Hz O 720p 50Hz 60Hz O 1080i 50Hz 60Hz O 1080p 24Hz 25Hz 30Hz 50Hz 60Hz O 3840x2160p 24Hz 25Hz 30Hz 50Hz 60Hz O 4096x2160p 24Hz 25Hz 30Hz 50Hz 60Hz O X Not Available O Available In some cases a signal on the TV may not be displayed properly The problem may be an inconsistency with standards from the source equipment DVD Set top box etc If you do experience such a problem please ...

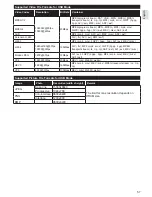
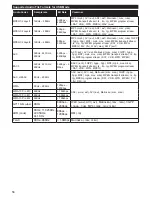
Page 59: ...P 3gpp 3gp AVI avi MKV mkv H 264 3840x2160 30fps 1080P 60fps 135Mbps FLV flv MP4 mp4 mov 3GPP 3gpp 3gp MPEG transport stream ts trp tp ASF asf AVI avi MKV mkv Motion JPEG 720P 30fps 10Mbps AVI avi 3GPP 3gpp 3gp MP4 mp4 mov MKV mkv ASF asf VP8 1080P 30fps 20Mbps MKV mkv WebM webm HEVC 4K2K 60fps 160Mbps MP4 mp4 mov MKV mkv MPEG transport stream ts trp tp VP9 4K2K 30fps 100Mbps MKV mkv WebM webm Sup...

Page 60: ...44 1KHz 48KHz 32Kbps 640Kbps AC3 ac3 AVI avi Matroska mkv mka 3GPP 3gpp 3gp MP4 mp4 mov m4a MPEG transport stream ts trp tp MPEG program stream DAT VOB MPG MPEG EAC3 32KHz 44 1KHz 48KHz 32Kbps 6 Mbps EAC3 ec3 3GPP 3gpp 3gp MP4 mp4 mov m4a MPEG transport stream ts trp tp MPEG program stream DAT VOB MPG MPEG AAC HEAAC 8KHz 48KHz AAC aac AVI avi Matroska mkv mka 3GPP 3gpp 3gp MP4 mp4 mov m4a MPEG tra...

Page 61: ...nnectors by using DVI converter cable DVI to HDMI cable not supplied you can refer to the following resolution information 56Hz 60Hz 66Hz 70Hz 72Hz 75Hz 640x480 þ þ 800x600 þ þ þ 1024x768 þ þ þ 1280x768 þ þ 1280x960 þ 1360x768 þ 1366x768 þ 1280x1024 þ þ þ 1400x1050 þ 1600x900 þ ...

Page 62: ...tlet LAN input on the rear side of the TV network wall socket Configuring Wired Device Settings Network Type The Network Type can be selected as Wired Device Wireless Device or Disabled in accordance with the active connection to the TV set Select this as Wired Device if you are connecting via an ethernet Internet Speed Test Highlight Internet Speed Test and press the OK but ton TV will check the ...

Page 63: ...e this keyboard via the directional buttons and the OK button on the remote control Wait until the IP address is shown on the screen This means that the connection is now established To disconnect from a wireless network highlight Network Type and press Left or Right buttons to set as Disabled Highlight Internet Speed Test and press the OK button to check your internet connection speed Highlight A...

Page 64: ...ason your TV cannot connect to the internet Contact your internet service provider and request information on how to connect a different device such as your TV to the internet It is also possible that the connection may not be available due to a firewall problem If you think this causes your problem contact your internet service provider A firewall might be the reason of a connectivity and discove...

Page 65: ... PC or if the required media server software is not installed onto the companion device 1 Enter the link below completely in the adress bar of your web browser http www nero com mediahome tv 2 Click the Download button on the opening page The installation file will be downloaded onto your PC 3 After the download is completed double click on the installation file to start the installation The insta...

Page 66: ... the Edit Speed Dial and the Add to Speed Dial options To navigate the web browser use the directional buttons on the remote or a connected mouse To see the browser options bar move the cursor to the top of the page or press the Back Return button History Tabs and Bookmarks options and the browser bar which contains previous next buttons the refresh button the adress search bar the Speed Dial and ...

Page 67: ...tion is active either in red button icon mode or full UI mode the following scenarios can occur The application can continue running The application can be terminated The application can be terminated and another autostart red button application can be launched HbbTV allows the applications to be retrieved both from broadband or broadcast The broadcaster may enable both ways or one of them If the ...

Page 68: ...te icon found on each row EPG You can view the broadcast schedules of selected channel lists through this tab You can also navigate through channels by pressing on the selected channel on the EPG grid Please note that updating refreshing the EPG information may take a while depending on your network and web service quality Note Internet connection is required for WEB based EPG informations PORTAL ...

Page 69: ... the portal page by tapping on the Portal Launcher widget Note Internet connection is required This function will not work if a portal page is not in use Smart Remote Feature You can use your mobile device as a remote control for your TV once it has connected to the TV To use smart remote s full features tap on the Up arrow on the bottom left side of the screen Voice Recognation You can tap on the...

Page 70: ...f and is used under license granted by ITT Manufacturing Enterprises LLC All trademarks referred to in this booklet are property of their respective owners Technical specifications and design may change without notice Karcher AG ...

Page 71: ......

Page 72: ...www itt deutschland de ...

Reviews: