background image

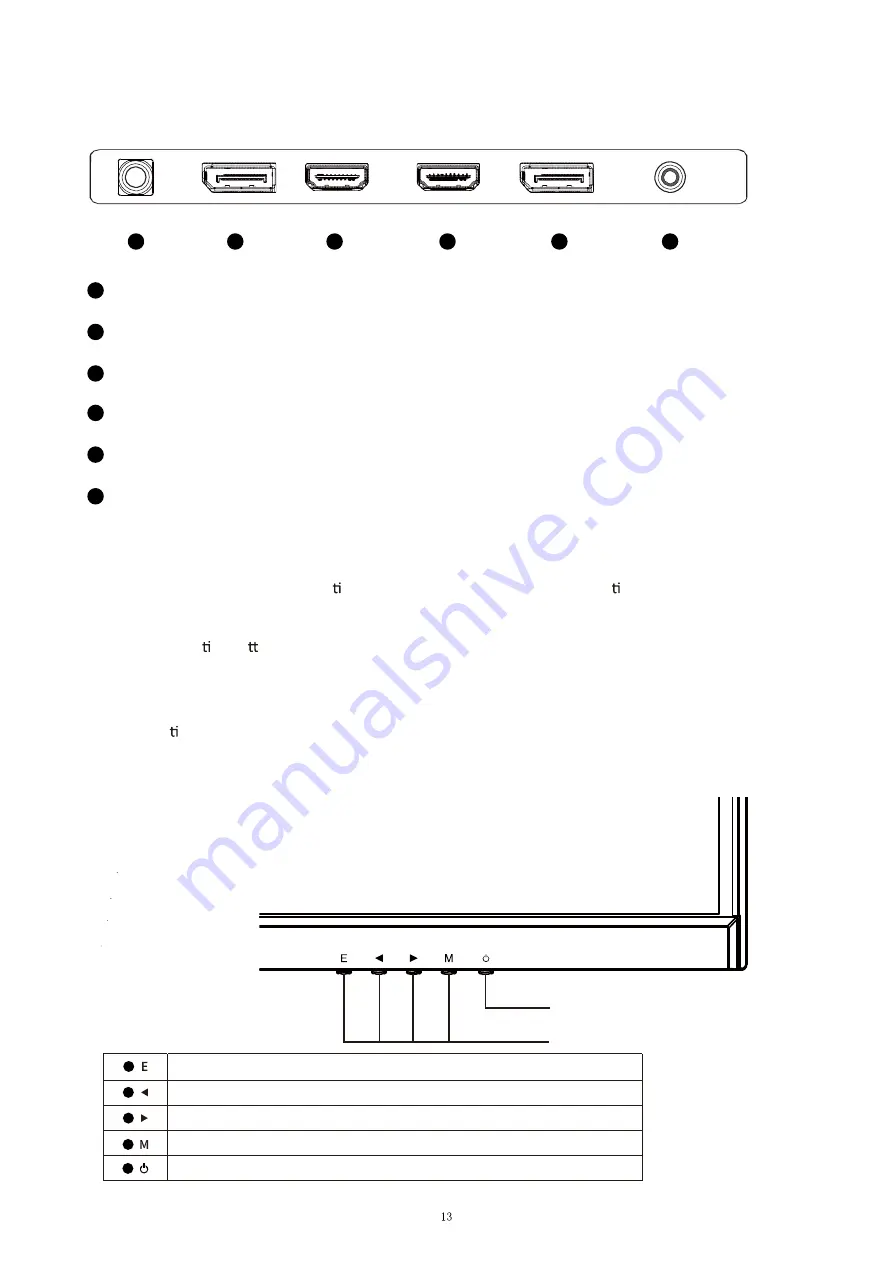
CONNECTIONS AVAILABLE ON THE MONITOR


WALL MOUNTING


The monitor is provided with moun ng holes for a VESA approved wall moun ng bracket (not 
supplied)


The VESA moun ng pa ern is: 100x100mm and the size of the screws is 4 x M6 x 10 (not supplied) Do not 
use screws longer than speci

ed or damage will occur to the internal components.


NOTE: 

As the monitor is considered heavy, please consult with a professional wall mount installer to perform 

the installa on.


GETTING STARTED


MONITOR CONTROLS


Power Button

OSD Control Buttons

Select  signal source or Exit OSD

Open the Main OSD Menu Select Submenu

Turn the monitor on or off

Go Up on the Main OSD Menu increase the value of a selected item

Go Down on the Main OSD Menu and decrease the value of a selected item

1

2

3

4

5

1

2

3

4

5

6

Power

DP2 

(DisplayPort1.2, 280Hz, FreeSync & G-Sync)

DP1 

(DisplayPort1.2, 280Hz, FreeSync & G-Sync)

HDMI1 

(HDMI2.0, 240Hz, FreeSync)

HDMI2 

(HDMI2.0, 240Hz, FreeSync)

AUDIO OUT

DC 12V

1

2

3

4

5

6


H

DP 1

DMI 1 

HDMI 2 

DP 2 

AUDIO OUT


Summary of Contents for ITMF24I281FHD

Page 1: ...Manuale Utente Manuale d istruzioni Si prega di leggere questo manuale accuratamente e tenerlo a portata di mano per riferimenti futuri...

Page 2: ...uando si u lizza un carrello o un supporto prestare a enzione quando lo si sposta per evitare lesioni o danni da ribaltamento Scollegare l apparecchio durante i temporali o quando non viene u lizzato...

Page 3: ...zzi e gli ogge riempi di liquidi come vasi non devono essere posiziona sull apparecchio AVVERTENZA la presa a muro viene u lizzata come disposi vo di disconnessione e deve rimanere facilmente accessib...

Page 4: ...MATERIALE INCLUSO...

Page 5: ...latore professionale per il montaggio a parete per eseguire l installazione INIZIARE PULSANTI MONITOR Power Button OSD Control Buttons Select signal source or Exit OSD Open the Main OSD Menu Select Su...

Page 6: ...ltro premere il pulsante Sorgente per accedere al menu Sorgente Usa il Pulsan e per scegliere la sorgente di ingresso tra Selezione HDMI1 HDMI2 e DP1 DP2 OPZIONI DEL MENU possibile accedere al menu pr...

Page 7: ...o luce blu Proporzioni DCR avanzato Tempo di risposta Adap ve Sync MPRT Game O 1920X1080 280Hz Menu regolazione colore Regolazione audio Sorgente di ingresso Altre impostazioni La modalit di gioco div...

Page 8: ...audio Modalit di visualizzazione Regolazione manuale dell immagine Contrasto Luminosit Temperatura di colore Gamma di colori HDR Game O 1920X280 144Hz Menu regolazione colore Regolazione audio Sorgen...

Page 9: ...Regolazione audio Sorgente di ingresso Altre impostazioni Selezione della lingua Cambia la lingua di visualizzazione del menu OSD Avviso di risoluzione A va o disa va la funzione Avviso di risoluzione...

Page 10: ...sso segnale Audio Altoparlan Cavi Cavo di alimentazione Cavo DP Funzioni aggiun ve Low Blue Light Flicker Free Consumo energe co Tipo di alimentazione Italian Per maggiori informazioni visitate il nos...

Page 11: ...urer or sold with the apparatus When a cart or stand is used use cau on when moving it to avoid any injuries or damage from it pping over Unplug the apparatus during lightning storms or when unused fo...

Page 12: ...tap or shake the screen this may damage internal components WARNING To reduce the risk of re or electric shock do not expose this apparatusto rain or moisture The apparatusshall not be exposedto dripp...

Page 13: ...WHAT S INCLUDED...

Page 14: ...rofessional wall mount installer to perform the installa on GETTING STARTED MONITOR CONTROLS Power Button OSD Control Buttons Select signal source or Exit OSD Open the Main OSD Menu Select Submenu Tur...

Page 15: ...ted 3 To change between inputs press the Source bu on to enter the source menu Use the and bu ons to choose the input source between Auto Select MENU OPTIONS The menu for the monitor can be accessed b...

Page 16: ...p Menu View Mode Manual lmage Adjust Sharpness Blue Light Filter Advanced DCR Response Time MPRT Game O 1920X1080 144Hz Color Adjust Audio Adjust Input Select Setup Menu Sharpness Change the sharpness...

Page 17: ...or Adjust Audio Adjust Input Select Setup Menu View Mode Manual lmage Adjust Volume Mute Game O 1920X1080 144Hz Color Adjust Audio Adjust Input Select Setup Menu Contrast Brightness Adjust the display...

Page 18: ...P1 HDMI1 HDMI2 DP2 Language Select Change the OSD Menu display language Resolu on No ce Turn the Resolu on No ce feature On or O Informa on Resolu on 1920x1080 Horizontal frequency 137 36Khz Ver cal f...

Page 19: ...ightness 400cd m Panel Type Fast IPS Resolu on 1920x1080 Refresh Rate 280Hz Response Time 1ms Viewing Angle 178 178 CR 10 Contrast Ra o 1000 1 VESA Moun ng 75x75mm Colours 16 7M 8bit AMD FreeSync Yes...

Reviews: