


ACTIVE-BOX
www.itec-audio.com
3
ACTIVE-BOX
1. HOW TO STAND THE ITEC ACTIVE-BOX
Loosen the lower adjusting screw of the aluminium light-weight tripod and open the legs of the tripod (as
amply as space allows). Once you have found a solid stand, tighten lower adjusting screw.
The height of the tripod can be changed by reducing the radial range; bear in mind, however, that what you
gain in height you lose in stability!
Attention:
make sure the ACTIVE-BOX does not collapse, particularly when it is windy!
2. HOW TO START
- General:
Turn on the ACTIVE-BOX by turning the ON/OFF switch (1) to the right (position ON); the ON/OFF indicator light
(2) will show.
- Battery mode:
In case the power supply is not plugged in, the ACTIVE-BOX will be supplied by an integrated rechargeable
battery. The average operating time with a fully charged battery will be 6 to 10 hours. The ON/OFF indicator
light will be green if the battery has suffi cient power; it will be red if the battery is low. You can still operate the
ACTIVE-BOX, yet the device will switch off automatically when the power becomes too low (built-in discharge
protection).
- Mains supply:
In case the ACTIVE-BOX is connected (socket 10) to the mains supply (220V), the red mains indicator light (3)
will show in addition to the ON/OFF indicator light (2). As soon as you switch off the ACTIVE-BOX the battery
will start recharging immediately with the mains indicator light (3) staying On and the ON/OFF indicator light
(2) disappearing (see 13. recharging the ACTIVE-BOX).
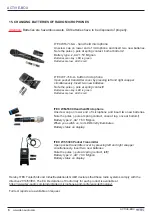
3. USING A CABLE MICROPHONE
Plug in the cable microphone in the microphone socket (4) and adjust its volume at the volume control for the
cable microphone (6). See 14. general advice ....
Technical information:
The multi-jack microphone socket (3) lets you plug in microphones with XLR or 1/4” jack. Use either dynamic
microphones or electret condenser microphones.
Connecting balanced microphones: by means of a XLR plug or a stereo ¼” jack.
Connecting balanced microphones with phantom supply: by means of a XLR plug.
Connecting unbalanced microphones: by means of a mono ¼” jack.
In case you have a long microphone cable, an interference free operation can only be guaranteed when you
use both balanced microphones and balanced microphone cables.
no phantom voltage
signal
1
2
3
1 earth (US = ground)
2
3 signal
-
signal
earth (US = ground)
earth (US = ground)
¼” stereo jack, balanced
phantom voltage 12V
XLR plug, balanced
no phantom voltage
¼” stereo jack, unbalanced
signal
4. PLAYBACK
The cinch sockets (5A) will accept any tape recorder, CD player, radio, etc. The volume can be adjusted at
the corresponding control (7). Should your ACTIVEBOX have a built-in tape recorder or CD player, please do
not forget to consult the instructions enclosed.


