911 28th Street N.E.
Calgary, AB, Canada T2A 7X1
866.415.ISYS
Fax:403.204.1971
www.isys-group.com
Tutorial
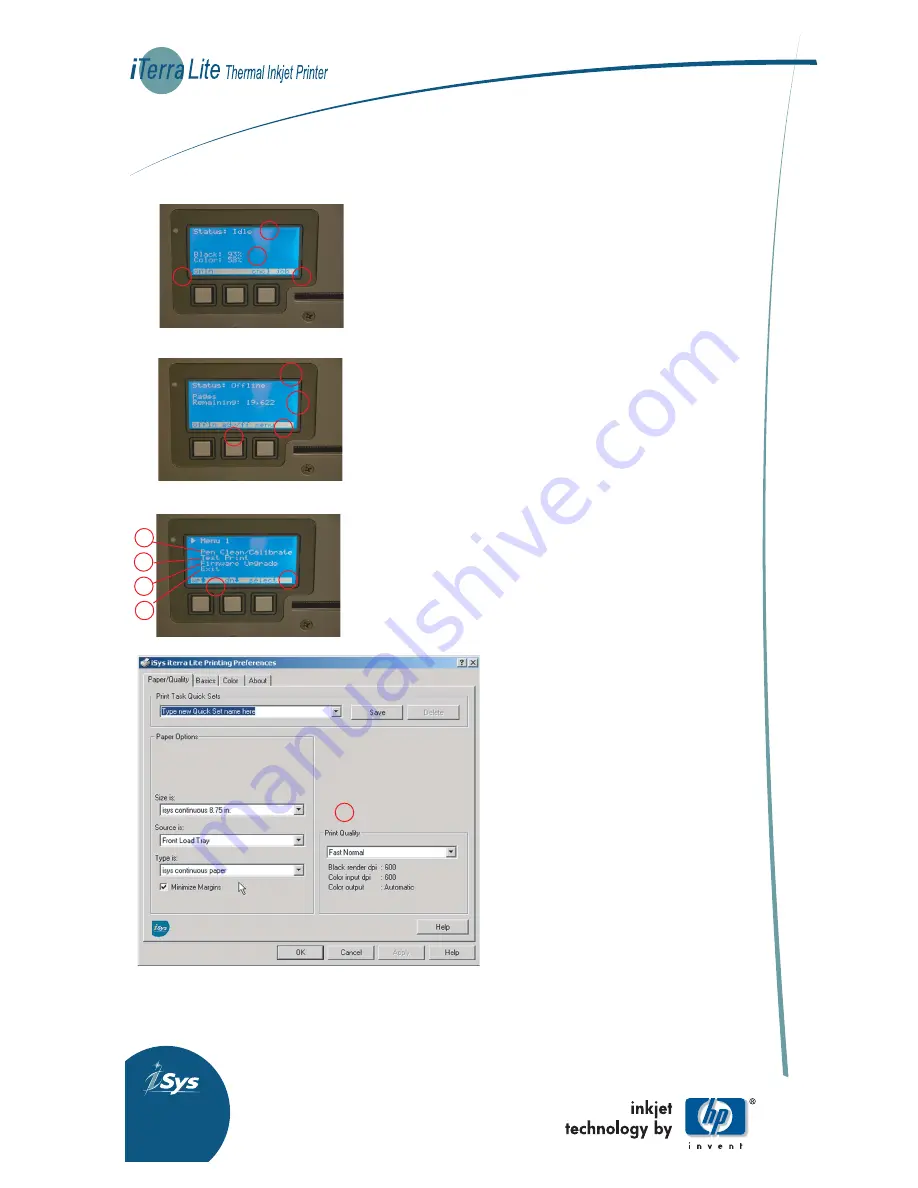
Power On (Step 2 Quick Start) Printer will be “Busy” while printer starts-up.
LCD will display:
(1) Status “Idle”. In this mode you are able to print.
(2) Black and Colour ink status.
(3) Online/Offline button
(4) cncl Job (Cancel Job)
Press the “onln” (3) button to switch the printer to “offln”
1.
1.
2.
2.
3.
LCD will display:
(1) Status “Offline”
(2) “Pages Remaining ” - this is the *QAN License
For the beta program QAN has been preloaded for 20,000 sheets (8.5x11)
The printer will stop printing at zero sheets. Printer will need to be
returned to iSys to reload QAN License. (Contact your Sales Rep)
(3) click on the “Menu” button for printer options
(4) adv/ff button; use to move paper through the printer
*iSys, as part of the media imaging qualification program, has
established the Quality Assurance Number (QAN) License program.
The QAN License program allows you to optimize the performance
of your iTerra Lite.
1.
1.
2.
2.
3.
Menu Window:
(1) Pen Clean/Calibrate. Use when inserting new Pen Inks.
(2) Test Print
(3) Firmware - Use when new firmware is released.
(4) Exit
Use the “up” or “down” (5) buttons to scroll through
the menu. Click “Select” (6) button for your selection.
Exit the Menu Window
4.
4.
1.
1.
2.
2.
3.
4.
5.
6.
Install Driver:
Installation:
Place installation cd in cdrom drive. Within windows
operating system select 'Start=>Settings=>Printers'.
Within Printers window, perform add printer function.
Select 'local printer' then go to next screen, select 'lpt1:'
as print port and go to next. Select 'have disk', browse
the CD until your in the 'iTerra Lite Drivers' directory,
the .inf file should be highlighted and select open. Press
OK on next screen and Printer driver will begin install.
Printer model type should display iSys iTerra Lite, press
next. Move through the next series of screens accepting
the default values. Do not attempt to print the test page
at this point.
Set-up (1)
Default printing preferences are set to perform
continuous paper printing. Do not attempt to use 'Best'
or 'Maximum dpi' print quality settings in continuous
mode as there will be page gaps on your print output.
Before a test page print can be performed, the user must
go into printer properties window and then select OK.
Test print page can now be performed successfully.
1.
1.
The Imaging Systems Group Inc.
Page Two
LCD display
LCD display
LCD display


