background image

Read 

This First!

1

READ AND FOLLOW ALL 

INSTRUCTIONS .

WARNING:

To reduce the risk of injury, do not permit children to 

use this product unless they are closely supervised at 

all times.

DANGER -- Risk of accidental drowning:

Do not allow children to be in or around a spa unless a 

responsible adult supervises them.  Keep the spa cover 

on  and  locked  when  not  in  use.  See  instructions  en-

closed with your cover for locking procedures.

DANGER -- Risk of injury:

The suction fittings in this spa are sized to match the 

specific  water  flow  created  by  the  pump.  Should  the 

need arise to replace the suction fittings, or the pump, 

be sure the flow rates are compatible.
Never operate the spa if the suction fitting or filter bas

-

kets  are  broken  or  missing.  Never  replace  a  suction 

fitting  with  one  that  is  rated  less  than  the  flow  rate 

marked on the original suction fitting.

DANGER -- Risk of electric shock:

Install the spa at least 5 feet (1.5 meters) from all met-

al surfaces. As an alternative, a spa may be installed 

within 5 feet of metal surfaces if each metal surface is 

permanently bonded by a minimum #8 AWG solid cop-

per conductor to the outside of the spa’s control box.

DANGER -- Risk of electric shock:

Do not permit any external electrical appliances, such 

as lights, telephones, radios, televisions, and etc., with-

in five feet (1.5 meters) of the spa. Never attempt to 

operate any electrical device from inside the spa.

WARNING -- To reduce the risk of injury:

The spa water should never exceed 104˚F (40˚C). Wa

-

ter  temperatures  between  100˚F  (38˚C)  and  104˚F 

(40˚C) are considered safe for a healthy adult. Lower 

water temperatures are recommended for young chil-

dren and when spa use exceeds 10 minutes.
High water temperatures have a high potential for caus-

ing  fetal  damage  during  pregnancy.  Women  who  are 

pregnant,  or  who  think  they  are  pregnant,  should  al-

ways check with their physician prior to spa usage.

Summary of Contents for PORTABLE SPA 2009

Page 1: ...LTR20091084 Rev A 9 1 09 Preliminary...

Page 2: ...allation 6 GFCI Wiring Diagram 8 Filling and Powering Up Your Portable Spa 10 Operating Your Spa Electronic Control Operation 13 Diagnostic Messages 16 Jets 20 Clear Water Plan The Key to Clear Water...

Page 3: ...suction fitting DANGER Risk of electric shock Install the spa at least 5 feet 1 5 meters from all met al surfaces As an alternative a spa may be installed within 5 feet of metal surfaces if each metal...

Page 4: ...ove the normal body temperature of 98 6 F or 2 C to 4 C above 37 C While hyperthermia has many health benefits it is important not to allow your body s core temperature to rise above 103 F 39 5 C Symp...

Page 5: ...void unconsciousness and possible drowning WARNING Do not use a spa or hot tub immediately following strenuous exercise WARNING Prolonged immersion in a spa or hot tub may be injurious to your health...

Page 6: ...py you will probably want to create a specific mood around it Plan for Your Environment If you live in a region where it snows in the winter or rains frequently place the spa near a house entry By doi...

Page 7: ...floor ing that will not be damaged or stained If you are installing your spa on an elevated wood deck or other structure consult a structural engineer or a contractor to ensure the structure will sup...

Page 8: ...he GFCI trips while the spa is in use press the RE SET button If the GFCI does not reset unplug the spa and call your local dealer for service DO NOT USE THE SPA 240 Volt Electrical Installa tion All...

Page 9: ...A normal 50 amp GFCI with four 8 AWG Copper wires run over 85 feet would require you to go to four 6 AWG copper wires Read and follow the heater manufacturer s safety and installation instructions pr...

Page 10: ...2009 iSpa Owner s Manual LTR20091084 Rev A Preparing for Your New Portable Spa 8 GFCI Wiring Diagram...

Page 11: ...Preparing for Your New Portable Spa 9...

Page 12: ...ter makes it impossible to maintain the proper water chemistry and may cause the water to foam which will ulti mately harm the finish of the spa and void your war ranty VERY IMPORTANT Never run the sp...

Page 13: ...emperature reaches the default temperature of 100 F If no water is flowing when the pump is running 8 there could be an air pocket at the suction side of the pump Shut off power to the spa and loosen...

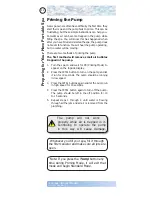
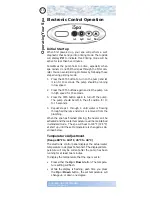
Page 14: ...he spa on and wait for PR Priming Mode to 1 appear on the topside display Press the JETS1 button to turn on the pump and let 2 it run for 10 seconds The pump should be running in low speed Press the J...

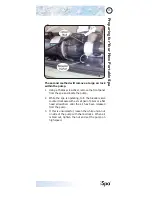
Page 15: ...the spa and locate the pump While the spa is operating turn the bleeder valve 2 counter clockwise with a small pair of pliers or a flat head screwdriver until the air has been released from the pump...

Page 16: ...ump 3 The pump should be left in the off position for 10 to 15 seconds Repeat steps 1 through 4 until water is flowing 4 through all the jets and all air is removed from the plumbing When the spa has...

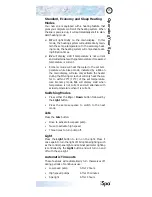
Page 17: ...ter during the filtering cycles but will only heat the wa ter to within 20 F 10 C of the set temperature Like Economy mode SL will display solid when temperature is not current and will alternate with...

Page 18: ...e main display Diagnostic Messages Message Meaning Action Required No message on display 1 Spa temperature is unknown 1 After pump has been run ture will be displayed 2 Spa is in Economy or Sleep mode...

Page 19: ...et call your dealer or service organization ater detected in heater Spa hird occurrence of dr mes Follow directions for dr message and press any button to reset spa Spa will not automatically reset wh...

Page 20: ...tdown One sensor has detected 118 F 48 C at the heater DO NOT ENTER THE WATER Remove the spa cover and a 42 C Press any button o spa If spa will not reset aft off power for approximately power back on...

Page 21: ...move the spa cover and allow spa to cool below 107 F 42 C Press any button on the topside display to reset spa If spa will not reset after spa has cooled turn off power for approximately 30 seconds an...

Page 22: ...an adjustable jet to the left coun ter clockwise will decrease the amount of water flow through the jet Rotating the face of an adjustable jet to the right clockwise will increase the amount of water...

Page 23: ...Operating Your Spa 21...

Page 24: ...issed dunt utpatisi Ut vel ut wis atis nonullut augiam augait lore dolore erci te ea consequat Met prate er sit dolor iriureetuer si Feummy nullamcore magna ad dio er sequamconum nis eu feugiamet vent...

Page 25: ...in utat num voloreril in ut pratie dionull umsandio consed dolumsandit at Rat consequi tinim ilisi bla feuis euguerc ilisi Em verit iliqui endiam nulluptat lamcore minibh elestio num sandip eraesectem...

Page 26: ...Alkalinity Up If the TA is too high the pH level will tend to be too high and may be difficult to bring down High TA can be corrected by adding pH Alkalinity Down When the TA is balanced it normally...

Page 27: ...eed to decide which chemi cal sanitizer you wish to use Consult your dealer for the right decision with regards to your lifestyle and spa usage We recommend either bromine or chlorine as your sanitize...

Page 28: ...rine dissipation rate will be faster at higher water temperatures and slower at lower temperatures When you add chlorine open all of the jets and run the spa at high speed with the cover open for at l...

Page 29: ...ather loads If water has a strong odor Spa must be running with all of the jets on high for 30 minutes with the cover open If necessary repeat oxi dizer shock in 30 minute intervals Using Bromine as a...

Page 30: ...orage may result in serious injury sickness fire explosion and even death Do not store your chemicals inside the equipment area of your spa Cleaning the Filter The filter is the part of your spa that...

Page 31: ...ilter for a minimum of 24 hours 3 Spray the filter with a water hose Spray each pleat 4 carefully Reinstall the filter Do not overtighten 5 Cleaning the Filter Basket You will need to clean the filter...

Page 32: ...n ger filtration time will be needed All versions of the Clear Water Plan are designed for spas with average bather load 3 to 4 people 15 min utes of usage three times a week at 100 degrees If your ba...

Page 33: ...per water level with normal 3 tap water Do not use soft water Use test strip and balance the spa water 4 Adjust total alkalinity acceptable range is 80 120ppm Adjust pH if necessary between 7 2 to 7 8...

Page 34: ...sty Odor Bacteria or algae growth Shock spa with sanitizer persistent drain clean a Organic buildup scum ring around spa Buildup of oils and dirt Wipe off scum with clea the spa use a spa surfa remove...

Page 35: ...ldup of oils and dirt Wipe off scum with clean rag if severe drain the spa use a spa surface and tile cleaner to remove the scum and refill the spa igh pH ow sanitizer level Shock spa with sanitizer a...

Page 36: ...test kit Adjust chemical levels as necessary Once a month Deep clean your spa s filter Follow filter cleaning instruc tion at beginning of Clear Water Plan Every two to four months Drain and clean you...

Page 37: ...aker 1 Remove the filter 2 Remove the access panel 3 Locate hose ending with the 3 4 inch hose bib fix 4 ture Hook up the female end of a garden hose to the 5 drain fitting Place the other end of the...

Page 38: ...ntial of freezing in your spas equipment and plumbing Even if the directions below are followed perfectly there is no guarantee that your spa will not suffer freeze damage Freeze damage is not covered...

Page 39: ...the Shell Spa All Purpose Cleaner Using a Spa All Purpose Cleaner is an essential part of maintaining your spa s finish Through normal use the spa s finish can accumulate dirt oil and calcium caus in...

Page 40: ...m the chemicals and minerals associated with normal spa use The most effective solution to minimize cleaning time is prevention When the following steps are followed the spa s finish will actually sta...

Page 41: ...idue behind that is normally associated with common automotive vinyl protectants It should be used sparingly and incorrect usage may cause water clarity issues Periodic Maintenance Remove spa cover fr...

Page 42: ...cro Flow Directional 6 spoke face PLU21703664 PSD 4 Polystorm Direc tional 6 spoke face PLU21703661 Drain Main Drain Super Hi Flo Suction 2 Silver PLU21400132 Filter Filter Cartridge 50 Sq Ft Anti Bac...

Page 43: ...rough the spa shell due to defects in materials and or workmanship for a period of one year Interior Surface LMS warrants against cracks blisters peeling discolor ation and delamination of interior su...

Page 44: ...imitations and Exclusions The limited warranty applies only to spas normally used for personal family or household purposes This warranty specifically excludes factory installed plumbing Replaceable s...

Page 45: ...For relocating your spa without voiding your warranty contact Customer Service for relocation procedures Equipment adjustments such as pressure switch ad justments are specifically excluded from this...

Page 46: ...2009 iSpa Owner s Manual LTR20091084 Rev A Appendix 44...

Page 47: ...Appendix 45...

Page 48: ...______________________ Spa Serial Number __________________________ Date Purchased _ ___________________________ Date Installed ______________________________ Dealer s Phone Number ___________________...

Reviews: