background image

4.4.4.2 To add a fixed host

19

4.4.4.2

To add a fixed host

1.

In the 

DHCP Server Settings

 page, click 

Add Fixed Host

. The following page is displayed:

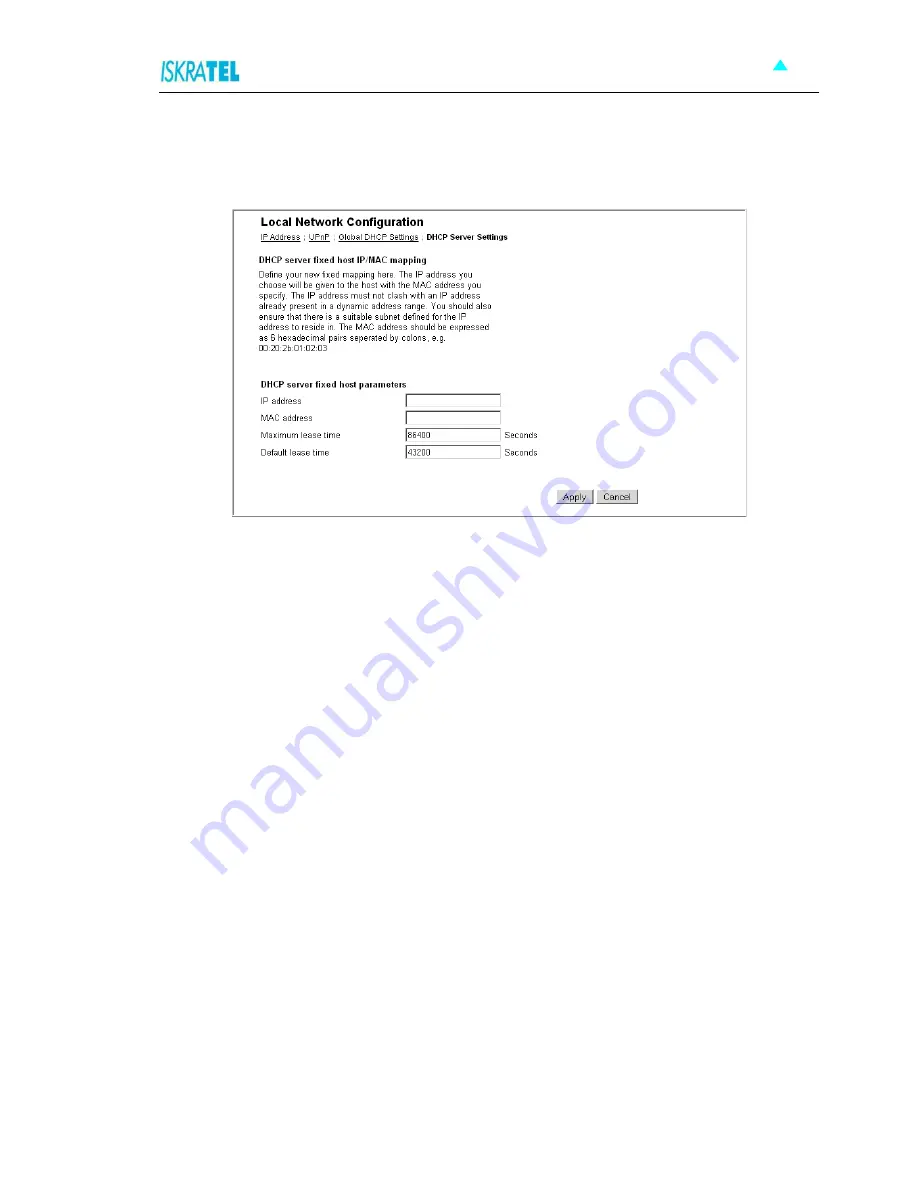
Figure 4-11: Add Fixed Host page

2.

Type in:

Š

IP address that will be given to the host with the specified MAC address,

Š

MAC address,

Š

maximum lease time (default is 86400 seconds). 

3.

Click 

Apply

.

Summary of Contents for SI3000

Page 1: ...SI3000 Broadband CPE i Sinope568 Wireless Home Gateway User Guide...

Page 2: ...ofar as they are specifically and expressly agreed upon in a written contract Technical modifications possible User Guide ii The Table of Contents contains 6 pages The document contains 40 pages Docum...

Page 3: ...heat sources The housing and electronic components may be damaged by direct sunlight or heat sources Avoid using the device in dusty or damp places and places where there is a risk of explosion Do no...

Page 4: ...User Guide iv...

Page 5: ...10 4 Managing Sinope568 Router 10 4 1 Overview 11 4 2 Save Configuration 11 4 3 Internet 12 4 3 1 To establish internet connection 12 4 4 Local Network Configuration 13 4 4 1 IP Address 14 4 4 2 UPnP...

Page 6: ...st 34 4 7 4 Port Forwarding 35 4 7 4 1 To add a port forwarding rule 35 4 8 DNS settings 36 4 8 1 LAN Host 36 4 8 2 Dynamic DNS 37 4 9 Port Configuration 38 4 9 1 To change the port function 38 4 10 A...

Page 7: ...llowing better network security and management WEB management and Telnet management over CLI Command Line Interface over Ethernet interface and remotely over ADSL interface support for centralized man...

Page 8: ...out sacrificing unauthorized access to its private network Typically the DMZ contains devices accessible to Internet traffic such as HTTP FTP DNS and SMTP servers You can configure the Firewall to all...

Page 9: ...l ALM led will start flashing fast about 30 seconds Sinope568 will use factory default settings only for the time it is running If you want to preserve factory default settings save the configuration...

Page 10: ...e shows the front panel of your Sinope568 home gateway Figure 3 2 The front panel of the Sinope568 home gateway There are five LEDs on the front panel of the modem that indicate the status of your Sin...

Page 11: ...P connection on 70 IP session is established no WAN traffic flickering IP session is established WAN traffic activity blinking slow IP connection failed Data off No devices connected to the home gatew...

Page 12: ...setup 3 4 1 LAN and TCP IP setup This section of the manual provides important information to keep in mind when setting up the first connection between your computer and Sinope568 home gateway The fa...

Page 13: ...he subnet values of your system and the modem are the same e g 192 168 1 0 IP address 192 168 1 1 for modem and IP address 192 168 1 2 for computer Example is shown on the picture bellow Figure 3 4 Us...

Page 14: ...r on your system to obtain an IP automatically This can be done in your operational system by managing the Local Area Connection Properties The TCP IP protocol must be installed on your system and set...

Page 15: ...browser 1 To access Web management connection enter the URL in your web browser http ipaddress for example http 192 168 1 1 ipaddress is the Local IP address of the Sinope568 home gateway e g 192 168...

Page 16: ...e right frame right frame display area Displays a configuration page for the selected element 4 Managing Sinope568 Router This section describes the web management interface configuration options and...

Page 17: ...hardware version information is set by Iskratel so the make and model of your device can be quickly identified in the unlikely even that you need assistance Figure 4 1 Device Overview 4 2 Save Configu...

Page 18: ...d username and password Using PPPoE Point to Point Protocol over Ethernet allows Internet access only after you have entered a valid username and password Using DHCP Dynamic Host Control Protocol auto...

Page 19: ...tion These pages allow you to configure the following settings IP Address UPnP Global DHPC Settings DHPC Server Configuration To access these settings 1 Select Configuration Local Network The Local Ne...

Page 20: ...ving it the range of addresses to use for other PCs that are connected to Sinope568 Sinope568 s default IP address and subnet mask are suitable for most networks 1 In the Local Network Configuration p...

Page 21: ...ss public spaces or attached to the Internet Universal Plug and Play is a distributed open networking architecture that leverages TCP IP and the Web technologies to enable seamless proximity networkin...

Page 22: ...igure your PCs connected to Sinope568 to be able to connect to the Internet You must enable DHCP Client Automatically configure IP address on your computer 1 In the Local Network Configuration page cl...

Page 23: ...ion page allows you to create DHCP server subnets and DHCP server fixed host IP MAC mappings In the Local Network Configuration page click the DHCP Server Settings tab The page displays any configured...

Page 24: ...gure 4 10 Add DHCP server subnet 2 Type in value and netmask of the subnet and set the maximum and default lease times DHCP address range or use a default range set your Synope568 to give out its own...

Page 25: ...e DHCP Server Settings page click Add Fixed Host The following page is displayed Figure 4 11 Add Fixed Host page 2 Type in IP address that will be given to the host with the specified MAC address MAC...

Page 26: ...ges let you enable and disable this feature and set various security settings for your wireless network These pages allow you To Set Wireless Global Settings To configure a wireless connection To acce...

Page 27: ...ot transmit on illegal frequencies you must set where you are in the world In the Country Setting area select your country from a drop down list 3 In the Profiles area select the type of wireless netw...

Page 28: ...igure 4 14 Wireless Port settings The preconfigured wireless network settings wireless and wireless1 You must first enable 2 Enable the connection wireless Click the Edit link The following page opens...

Page 29: ...character hex key Wi Fi Protected Access WPA on the wireless network A reliable security method You must provide a password of 8 to 63 characters long Wi Fi Protected Access2 WPA2 on the wireless netw...

Page 30: ...opens Figure 4 20 Address Authentication 5 In this page select one of the following options Allow any wireless PCs to connect with this option you allow any PC to connect to your wireless network Allo...

Page 31: ...to set a passphrase Your wireless network can be accessed only by providing this passphrase 1 Select Wi Fi Protected Access WPA on the wireless network or Wi Fi Protected Access2 WPA2 on the wireless...

Page 32: ...de a passphrase to access your wireless network The passphrase must consist of at least 8 and not more than 63 characters Figure 4 24 Address Authentication 5 After you have provided the passphrase th...

Page 33: ...wo options in the previous step you will be prompted to add the MAC addresses of PCs to the list 8 Before you confirm changes that you have made the following page is displayed Figure 4 26 Wireless Ne...

Page 34: ...es of incoming packet the packet is tracked to ensure that only those types of incoming packets are allowed through the Firewall Other types of traffic are blocked Each time outbound packets are sent...

Page 35: ...policies between security interfaces You can use the default pre configured Firewall policies add new policies and delete policies Port Filters A Port Filter is a rule that determines how the Firewall...

Page 36: ...rmitted traffic is transported from the inside interface to the outside interface both inbound and outbound rules apply 4 7 1 1 IP Filter page 1 Select the IP Filter tab The following page opens Figur...

Page 37: ...he IP Filter Settings click the Add button to add or the Edit icon to edit the rule The following page opens Figure 4 31 Add IP Filtering Rule 2 Type in Filter Rule Name 3 Select policy ext int ext dm...

Page 38: ...tion IP Range Start End Source Port Range Start End Destination Port Range Start End Status Enable Enable Port Filter Rule Disable Disable Port Filter Rule 7 IP Validator Rule IP address SINGLE IP Val...

Page 39: ...n Choose Allow to allow access only to URLs that you specify Choose Deny to deny access to URLs that you specify 3 Click Apply to confirm Rule Action 4 Set the rule Fill in the following fields Filter...

Page 40: ...ewall settings 1 Select the DMZ Host tab The following page opens Figure 4 33 DMZ Host 2 Click Edit The following page opens Figure 4 34 DMZ Host Configuration 3 To set up a DMZ host Select Forwarded...

Page 41: ...pens Figure 4 35 Port Forwarding 2 The page displays any previously created rules You can edit or delete these rules or add new rules 4 7 4 1 To add a port forwarding rule 1 In the Port Forwarding pag...

Page 42: ...the Internet for example Also more than one protocol could be set for one application External Port Port Start Port End Type External Port Start End of your application range 1 65535 Start and End va...

Page 43: ...ure you must subscribe to a dynamic DNS service Currently supported are dydns org or tzo com 1 Select Configuration DNS The following page opens Figure 4 39 Dynamic DNS 2 To enable Dynamic DNS feature...

Page 44: ...on settings click the Port Configuration option The following page opens Figure 4 40 Port Configuration 4 9 1 To change the port function Depending on device type connected to the port you can change...

Page 45: ...Password 1 To change the administration password select System Admin Password The following page opens Figure 4 43 Administration Password 2 Type in the new password twice in the New password field an...

Page 46: ...Select System Remote Access The following page opens Figure 4 44 Remote Access 2 Select the Web Browser option 3 In the fields Start IP Address and End IP Address type the host IP address or address r...

Reviews: