Irritrol KwikDial User Manual Download Page 8

A rain sensor can be connected directly to the KwikDial
to automatically interrupt watering when it begins to rain.
When the rain sensor absorbs rain water, it automatically
signals the KwikDial to suspend all watering operations.
The display will alternately show “SEN” (sensor) and the
time of day until the rain sensor drys out and resets the
controller for automatic operation.

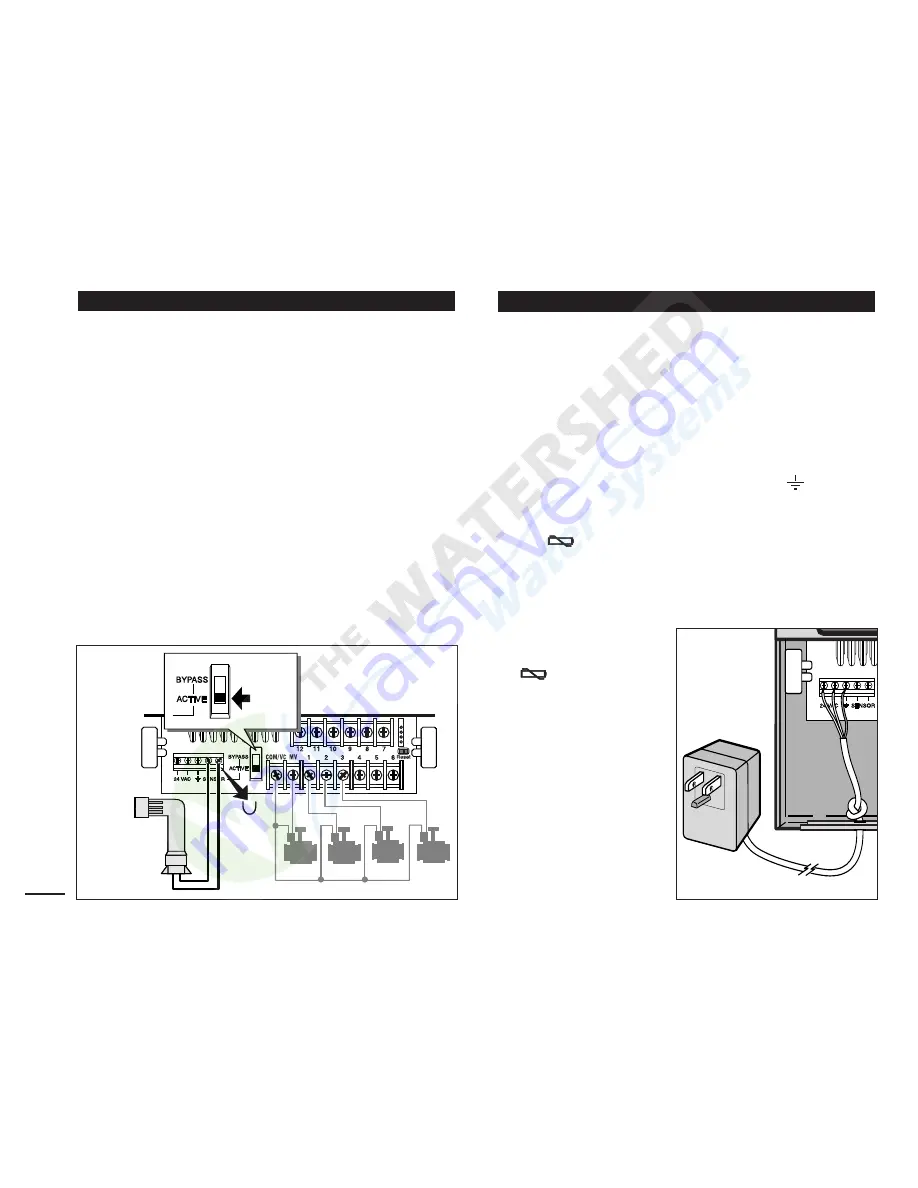
1. Route the wire cable from the rain switch sensor into

the controller along with the valve wires.

2. Remove the jumper wire from the sensor terminals.

3. Referring to the instructions provided with the rain

sensor, connect two wires from the rain sensor
designated for “Normally Closed” applications to the
sensor terminals. See Figure 4.

4. Place the sensor switch to the ACTIVE position. To

turn off the sensor circuit, place the switch in the
BYPASS position. See Figure 4.

Indoor Models

1. Route 6" (15 cm) of the transformer wire cable into

the controller through the small opening provided in
the base of the cabinet. 

2. Tie a knot in the cable just inside the cabinet to prevent

the cable wires from pulling out. See Figure 5.

3. Connect the transformer cable red and black wires to

the terminals labeled “24 VAC”. Connect the green or
green/yellow wire to the ground terminal

.

See Figure 5.

4. Plug the transformer into the wall plug socket. 

The

symbol will be displayed for 30 seconds while

the program memory back-up power is being charged.
During this time, the controller can not be operated.
This will only occur when the controller is initially
powered up or after a power interruption.

When the controller is
ready to operate, the

symbol will

disappear and 4:00 PM
will be displayed. See
“Setting the Date/Time”
on page 8 to set the
current time and date. 
To quickly check the
sprinkler system
operation, refer to the
“Test Mode” procedure
provided on page 15.

Connecting the Power Source

Rain Sensor Installation (optional)

6

Figure 4

Figure 5

Rain Sensor

Jumper
Wire

Sensor
Switch

Summary of Contents for KwikDial

Page 1: ...ring Schedule by 7 Day Calendar Day Interval or Odd Even Days Three Start Times Per Program Multi language Display Option 24 hour Memory Back up Without Battery Automatic Valve Testing Mode Rain Delay...

Page 2: ...50 60 Hz 20 VA Indoor Models Export Plug in Transformer TUV Approved Input 230 V a c 50 Hz 0 1 Amps Output 24 V a c 50 Hz 20 VA Outdoor Models Export Built in Transformer TUV Approved SAA Approved Inp...

Page 3: ...Day Interval Schedule 12 Setting Program Start Time 12 Setting Station Run Time Duration 13 Controller Operations 13 15 Automatic Operation 13 Manual Operations 13 True Manual Operation 14 Timed Manua...

Page 4: ...unctions 7 Button Press to select program A B or C 8 Button Press to advance to next portion of program information or next station when operating 9 Station Terminals Connection terminals for valve co...

Page 5: ...3 3 1 2 3 4 5A 5B 5C 6 7 8 9 19 18 10 15 14 13 12 11 16 17 20 Note Power connection access cover removed for illustration International Models See Troubleshooting...

Page 6: ...the sides and pulling it directly outward from the cabinet 4 Hang the cabinet on the screw using the keyhole slot on the back panel B Make sure the cabinet slides down securely on the screw 5 Install...

Page 7: ...station terminals Connect the master valve wire if applicable to the terminal labeled MV Note Connecting a master valve or pump start relay is optional and may not be required for your sprinkler syst...

Page 8: ...cm of the transformer wire cable into the controller through the small opening provided in the base of the cabinet 2 Tie a knot in the cable just inside the cabinet to prevent the cable wires from pu...

Page 9: ...be displayed for 30 seconds while the program memory back up power is being charged During this time the controller can not be operated This will only occur when the controller is initially powered up...

Page 10: ...Interval schedule indicate the desired Interval number 1 31 For Odd or Even day watering schedule simply mark the appropriate box Station Run Time Duration Indicate the amount of run time 1 minute to...

Page 11: ...Odd Even Odd Even Station Location Run Time Run Time Run Time Program A Program B Program C Example Parkway Lawn 10 min Off Off Front Lawn 10 min Off Off Front Shrubs Off 5 min Off Back Lawn 25 min Of...

Page 12: ...10 Program Start Times Watering Day Schedule Day Interval Calendar Days Odd Odd Even Even 1 2 3 Odd Even Odd Even Station Location Run Time Run Time Run Time Program A Program B Program C...

Page 13: ...the no watering symbol is displayed for the selected program 4 Repeat steps 1 and 3 for each day of the week 5 Repeat steps 1 4 for each program as needed 6 Turn the control dial to the Auto position...

Page 14: ...Turn the control dial to Auto position when finished Note To prevent watering on specific days of the week regardless of schedule type i e never water on Saturday turn the control dial to that day an...

Page 15: ...l dial to Auto position when finished The KwikDial controller has five modes of operation Automatic Manual Station s Manual Programs Test and Off In the Automatic mode the controller tracks the time a...

Page 16: ...2 4 to select additional stations These stations will not start immediately but will operate in sequence 6 After all desired stations for timed manual operation have been selected turn control dial to...

Page 17: ...in sequence starts By leaving the dial in the Auto position the controller completes the test of each station then returns to the Automatic mode To manually advance to the next station in sequence pre...

Page 18: ...ol dial to the Auto position when finished Note During operation the display will show the adjusted run time for each station as it starts running As a reminder of Water Budget setting other than 100...

Page 19: ...in conjunction with the KwikStart remote system The expansion port provided for the remote receiver connection must be switched On to enable KwikStart remote control operation 1 Turn control dial to...

Page 20: ...ease adjustment factor as necessary See pages 8 and 16 Troubleshooting 2005 Irritrol Form Number 373 0239 Rev C For Technical Assistance USA 951 785 3623 800 634 8873 Europe 39 0765 40191 Australia 13...

Reviews: